场景介绍
软件安全是一件很负责的问题,由于微服务系统中每个服务都要处理安全问题,所以在微服务场景下会更加复杂,一般我们会四种面向微服务系统的身份验证方案。
在传统的单体架构中,单个服务保存所有的用户数据,可以校验用户,并在认证成功后创建HTTP会话。在微服务架构中,用户是在和服务集合交互,每一个用户都有可能需要知道请求的用户是谁。一种简单的方案是在微服务中,采用与单体系统中相同的模式,但问题是如何让所有的服务访问用户的数据
解决这个问题大致2个思路:(1)使用共享数据库时,更新数据库表会成为一个难题,因为所有的服务必须同时升级以便能够对接修改后的表解构;(2)将相同的数据分发给所有的服务时,当某个用户已经被认证,如何让每个服务都知晓这个状态是个问题。
方案1:单点登录(SSO)方案, 采用单点登录方案,意味着每个面向用户的服务都必须与认证服务交互,这会产生大量非常琐碎的网络流量,同时这个防范实现起来也相当的复杂。在其他方面,选择SSO方案安全性会很好,用户登录状态是不透明的,可防止攻击者从状态中推断任何有用的信息。
方案2:分布式会话方案,原理主要是将关于用户信息存储在共享内存中,并通常由用户会话作为key来实现简单的分布式哈希映射。当用户访问微服务时,用户数据可以从共享存储中获取。该方案的另外一个优点就是用户登录状态不是透明的。当使用分布式数据库时,它也是一个高度可用且可可扩展的解决方案。这种方案的优点是在于共享存储需要一定保护机制,因此需要通过安全链接来访问,这时解决方案的实现就通常具有相当高的负责性了。
方案3:token客户端令牌方案,此令牌在客户端生成,由身份验证服务进行签名,并且必须包含足够的信息,以便可以在所有微服务中建立用户身份。令牌会附加到每一个请求上,为微服务提供身份验证。这种解决方案安全性相对较好,但身份验证注销是一个大大的问题,缓解这种情况的方法可以使用短期令牌access_token 和频繁检查认证服务器等。对于客户端令牌的编码方案,可以使用 JSON Web Tokens( JWT), 它足够简单且支持程度也比较好。
方案4:客户端令牌与API网关结合,这个方案意味着所有的请求都通过网关,从而有效地隐藏了微服务。在请求时,网关将原始用户令牌转换为内部会话(session)ID令牌。在这种情况下,注销就不在是个大大的问题, 因为网关在注销时可以撤销用户的令牌。这种方案虽然支持程度比较好,但是实现起来还是可能相当的复杂。
个人推荐方案:客户端令牌(JWT) + API网关结合的方案,因为这个方案通常使用起来比较容易,且性能也不错。SSO方案虽然能满足需求,但尽量避免使用,若分布式会话方案所需要的相关技术已经应用在你的场景中,那么这个方案也是比较有趣的。在考虑方案的时候,应该考虑注销的重要性。
api网关,参考这篇,
http://geek.csdn.net/news/detail/104715
http://www.dockerinfo.net/773.html
JWT介绍
这篇文章将会知指导你如何用spring boot实现JWT的授权。
文章将会涉及到下面2个方面:
1. Ajax 授权
2. JWT token 授权
前提
请在你细读本篇文章的时候,先看看Github 上的简单项目:https://github.com/svlada/springboot-security-jwt 。
这个项目是使用H2 内存数据库来存储简单的用户信息。为了让事情变的更加简单,我已经配置了spring boot在自动加载Application自动启动的时候,已经创建了数据设备和配置了spring boot的相关配置(/ jwt-demo / src / main /resources/ data.sql)。
先预览一下下面的项目结构:
+—main
| +—java
| | —com
| | —svlada
| | +—common
| | +—entity
| | +—profile
| | | —endpoint
| | +—security
| | | +—auth
| | | | +—ajax
| | | | —jwt
| | | | +—extractor
| | | | —verifier
| | | +—config
| | | +—endpoint
| | | +—exceptions
| | | —model
| | | —token
| | —user
| | +—repository
| | —service
| —resources
| +—static
| —templates
Ajax 授权
当我们在谈论Ajax授权的时候,我们通常会联想到的是用户是通过JSON 的方式提供凭证,并以XMLHttpRequest 的方式发送的场景。
在本教程的第一部分,Ajax实现身份验证是遵循Spring Security 框架的标准模式。
下面列表的东西,将是要我们去实现的:
1. AjaxLoginProcessingFilter
2. AjaxAuthenticationProvider
3. AjaxAwareAuthenticationSuccessHandler
4. AjaxAwareAuthenticationFailureHandler
5. RestAuthenticationEntryPoint
6. WebSecurityConfig
在我们实现这些细节的时候,让我们细看一下,下面的 request/response 的授权流程。
Ajax 授权请求的例子
身份验证API允许用户传入凭据,来获得身份验证令牌token。
在我们的例子中,客户端启动验证过程通过调用身份验证API(/API/auth/login)。
我们可以写这样的Http 请求:
POST /api/auth/login HTTP/1.1
Host: localhost:9966
X-Requested-With: XMLHttpRequest
Content-Type: application/json
Cache-Control: no-cache

{
    "username": "svlada@gmail.com",
    "password": "test1234"
}
终端可以用CURL:
curl -X POST -H "X-Requested-With: XMLHttpRequest" -H "Content-Type: application/json" -H "Cache-Control: no-cache" -d '{
    "username": "svlada@gmail.com",
    "password": "test1234"
}' "http://localhost:9966/api/auth/login"
Ajax 授权相应的例子
如果客户端请求的凭证被通过,授权API将会返回Http响应包括下面的一些细节:
1. Http 状态 "200 OK"
2. 带有 JWT的access_toke 和 refresh_token 都会在 response body中被包含了。
JWT Refresh token
用来获取新的 access_token, 刷新token 可以用这样的API来处理:/api/auth/token.(刷新可以用来防止access_token 的过期)
获取的HTTP 响应格式:
{
  "token": "eyJhbGciOiJIUzUxMiJ9.eyJzdWIiOiJzdmxhZGFAZ21haWwuY29tIiwic2NvcGVzIjpbIlJPTEVfQURNSU4iLCJST0xFX1BSRU1JVU1fTUVNQkVSIl0sImlzcyI6Imh0dHA6Ly9zdmxhZGEuY29tIiwiaWF0IjoxNDcyMDMzMzA4LCJleHAiOjE0NzIwMzQyMDh9.41rxtplFRw55ffqcw1Fhy2pnxggssdWUU8CDOherC0Kw4sgt3-rw_mPSWSgQgsR0NLndFcMPh7LSQt5mkYqROQ",

  "refreshToken": "eyJhbGciOiJIUzUxMiJ9.eyJzdWIiOiJzdmxhZGFAZ21haWwuY29tIiwic2NvcGVzIjpbIlJPTEVfUkVGUkVTSF9UT0tFTiJdLCJpc3MiOiJodHRwOi8vc3ZsYWRhLmNvbSIsImp0aSI6IjkwYWZlNzhjLTFkMmUtNDg2OS1hNzdlLTFkNzU0YjYwZTBjZSIsImlhdCI6MTQ3MjAzMzMwOCwiZXhwIjoxNDcyMDM2OTA4fQ.SEEG60YRznBB2O7Gn_5X6YbRmyB3ml4hnpSOxqkwQUFtqA6MZo7_n2Am2QhTJBJA1Ygv74F2IxiLv0urxGLQjg"
}
JWT Access Token
JWT访问令牌可用于身份验证和授权:
1. 身份验证是由验证JWT访问令牌签名。如果签名是有效的,访问API请求的资源是理所当然。
2. 授权是通过查找特权JWT scope属性的值来判断。(译者:scope,一般会是版本号或平台,安卓,ios,wap等或不同的系统的id, 具体看自家的场景和需求).
解码JWT token有三个部分:Header(请求头), Claims(要求) and Signature(签名)
Header
{
    "alg": "HS512"
}
Claims(要求):
{
  "sub": "svlada@gmail.com",
  "scopes": [
    "ROLE_ADMIN",
    "ROLE_PREMIUM_MEMBER"
  ],
  "iss": "http://svlada.com",
  "iat": 1472033308,
  "exp": 1472034208
}
签名base64 encoded)
41rxtplFRw55ffqcw1Fhy2pnxggssdWUU8CDOherC0Kw4sgt3-rw_mPSWSgQgsR0NLndFcMPh7LSQt5mkYqROQ
JWT Refresh Token
Refresh token 是长寿令牌用于请求新的访问令牌。Refresh token过期时间是超过access_token的过期时间。
在本次教程中,我们将使用 jti 声称来维持黑名单,或撤销令牌列表。JWT ID(jti) 声称被 RFC7519 定义了,目的是为了唯一地标识单个刷新令牌。
解码刷新令牌有三个部分: Header(请求头), Claims(要求), Signature(签名) 如下所示:
Header:
{
  "alg": "HS512"
}
Claims:
{
  "sub": "svlada@gmail.com",
  "scopes": [
    "ROLE_REFRESH_TOKEN"
  ],
  "iss": "http://svlada.com",
  "jti": "90afe78c-1d2e-4869-a77e-1d754b60e0ce",
  "iat": 1472033308,
  "exp": 1472036908
}
Signature (base64 encoded)
SEEG60YRznBB2O7Gn_5X6YbRmyB3ml4hnpSOxqkwQUFtqA6MZo7_n2Am2QhTJBJA1Ygv74F2IxiLv0urxGLQjg
AjaxLoginProcessingFilter( Ajax 登录处理过滤器)
首先,需要继承AbstractAuthenticationProcessingFilter, 目的是为了提供一般常用的Ajax 身份验证请求。反序列化JSON和基本验证的主要任务都是在的。AjaxLoginProcessingFilter#attemptAuthentication这个方法里完成的。在成功验证JSON的主要检验逻辑是委托给AjaxAuthenticationProvider类实现。
在一个成功校验中, AjaxLoginProcessingFilter#successfulAuthentication 方法会被调用。
在一个失败的检验中,AjaxLoginProcessingFilter#unsuccessfulAuthentication 方法被调用。
public class AjaxLoginProcessingFilter extends AbstractAuthenticationProcessingFilter {
    private static Logger logger = LoggerFactory.getLogger(AjaxLoginProcessingFilter.class);

    private final AuthenticationSuccessHandler successHandler;
    private final AuthenticationFailureHandler failureHandler;

    private final ObjectMapper objectMapper;

    public AjaxLoginProcessingFilter(String defaultProcessUrl, AuthenticationSuccessHandler successHandler,
            AuthenticationFailureHandler failureHandler, ObjectMapper mapper) {
        super(defaultProcessUrl);
        this.successHandler = successHandler;
        this.failureHandler = failureHandler;
        this.objectMapper = mapper;
    }

    @Override
    public Authentication attemptAuthentication(HttpServletRequest request, HttpServletResponse response)
            throws AuthenticationException, IOException, ServletException {
        if (!HttpMethod.POST.name().equals(request.getMethod()) || !WebUtil.isAjax(request)) {
            if(logger.isDebugEnabled()) {
                logger.debug("Authentication method not supported. Request method: " + request.getMethod());
            }
            throw new AuthMethodNotSupportedException("Authentication method not supported");
        }

        LoginRequest loginRequest = objectMapper.readValue(request.getReader(), LoginRequest.class);

        if (StringUtils.isBlank(loginRequest.getUsername()) || StringUtils.isBlank(loginRequest.getPassword())) {
            throw new AuthenticationServiceException("Username or Password not provided");
        }

        UsernamePasswordAuthenticationToken token = new UsernamePasswordAuthenticationToken(loginRequest.getUsername(), loginRequest.getPassword());

        return this.getAuthenticationManager().authenticate(token);
    }

    @Override
    protected void successfulAuthentication(HttpServletRequest request, HttpServletResponse response, FilterChain chain,
            Authentication authResult) throws IOException, ServletException {
        successHandler.onAuthenticationSuccess(request, response, authResult);
    }

    @Override
    protected void unsuccessfulAuthentication(HttpServletRequest request, HttpServletResponse response,
            AuthenticationException failed) throws IOException, ServletException {
        SecurityContextHolder.clearContext();
        failureHandler.onAuthenticationFailure(request, response, failed);
    }
}
- 1
- 2
- 3
- 4
- 5
- 6
- 7
- 8
- 9
- 10
- 11
- 12
- 13
- 14
- 15
- 16
- 17
- 18
- 19
- 20
- 21
- 22
- 23
- 24
- 25
- 26
- 27
- 28
- 29
- 30
- 31
- 32
- 33
- 34
- 35
- 36
- 37
- 38
- 39
- 40
- 41
- 42
- 43
- 44
- 45
- 46
- 47
- 48
- 49
- 50
AjaxAuthenticationProvider
AjaxAuthenticationProvider类的责任是:
1. 对用户凭证与 数据库、LDAP或其他系统用户数据,进行验证。
2. 如果用户名和密码不匹配数据库中的记录,身份验证异常将会被抛出。
3. 创建用户上下文,你需要一些你需要的用户数据来填充(例如 用户名 和用户密码)
4. 在成功验证委托创建JWT令牌的是在* AjaxAwareAuthenticationSuccessHandler* 中实现。
@Component
public class AjaxAuthenticationProvider implements AuthenticationProvider {
    private final BCryptPasswordEncoder encoder;
    private final DatabaseUserService userService;

    @Autowired
    public AjaxAuthenticationProvider(final DatabaseUserService userService, final BCryptPasswordEncoder encoder) {
        this.userService = userService;
        this.encoder = encoder;
    }

    @Override
    public Authentication authenticate(Authentication authentication) throws AuthenticationException {
        Assert.notNull(authentication, "No authentication data provided");

        String username = (String) authentication.getPrincipal();
        String password = (String) authentication.getCredentials();

        User user = userService.getByUsername(username).orElseThrow(() -> new UsernameNotFoundException("User not found: " + username));

        if (!encoder.matches(password, user.getPassword())) {
            throw new BadCredentialsException("Authentication Failed. Username or Password not valid.");
        }

        if (user.getRoles() == null) throw new InsufficientAuthenticationException("User has no roles assigned");

        List<GrantedAuthority> authorities = user.getRoles().stream()
                .map(authority -> new SimpleGrantedAuthority(authority.getRole().authority()))
                .collect(Collectors.toList());

        UserContext userContext = UserContext.create(user.getUsername(), authorities);

        return new UsernamePasswordAuthenticationToken(userContext, null, userContext.getAuthorities());
    }

    @Override
    public boolean supports(Class<?> authentication) {
        return (UsernamePasswordAuthenticationToken.class.isAssignableFrom(authentication));
    }
}
- 1
- 2
- 3
- 4
- 5
- 6
- 7
- 8
- 9
- 10
- 11
- 12
- 13
- 14
- 15
- 16
- 17
- 18
- 19
- 20
- 21
- 22
- 23
- 24
- 25
- 26
- 27
- 28
- 29
- 30
- 31
- 32
- 33
- 34
- 35
- 36
- 37
- 38
- 39
- 40
AjaxAwareAuthenticationSuccessHandler
我们将实现AuthenticationSuccessHandler接口时,称为客户端已成功进行身份验证。
AjaxAwareAuthenticationSuccessHandler AuthenticationSuccessHandler接口的类是我们的自定义实现。这个类的责任是添加JSON载荷包含JWT访问和刷新令牌到HTTP响应的body。
@Component
public class AjaxAwareAuthenticationSuccessHandler implements AuthenticationSuccessHandler {
    private final ObjectMapper mapper;
    private final JwtTokenFactory tokenFactory;

    @Autowired
    public AjaxAwareAuthenticationSuccessHandler(final ObjectMapper mapper, final JwtTokenFactory tokenFactory) {
        this.mapper = mapper;
        this.tokenFactory = tokenFactory;
    }

    @Override
    public void onAuthenticationSuccess(HttpServletRequest request, HttpServletResponse response,
            Authentication authentication) throws IOException, ServletException {
        UserContext userContext = (UserContext) authentication.getPrincipal();

        JwtToken accessToken = tokenFactory.createAccessJwtToken(userContext);
        JwtToken refreshToken = tokenFactory.createRefreshToken(userContext);

        Map<String, String> tokenMap = new HashMap<String, String>();
        tokenMap.put("token", accessToken.getToken());
        tokenMap.put("refreshToken", refreshToken.getToken());

        response.setStatus(HttpStatus.OK.value());
        response.setContentType(MediaType.APPLICATION_JSON_VALUE);
        mapper.writeValue(response.getWriter(), tokenMap);

        clearAuthenticationAttributes(request);
    }

    /**
     * Removes temporary authentication-related data which may have been stored
     * in the session during the authentication process..
     *
     */
    protected final void clearAuthenticationAttributes(HttpServletRequest request) {
        HttpSession session = request.getSession(false);

        if (session == null) {
            return;
        }

        session.removeAttribute(WebAttributes.AUTHENTICATION_EXCEPTION);
    }
}
- 1
- 2
- 3
- 4
- 5
- 6
- 7
- 8
- 9
- 10
- 11
- 12
- 13
- 14
- 15
- 16
- 17
- 18
- 19
- 20
- 21
- 22
- 23
- 24
- 25
- 26
- 27
- 28
- 29
- 30
- 31
- 32
- 33
- 34
- 35
- 36
- 37
- 38
- 39
- 40
- 41
- 42
- 43
- 44
- 45
让我们关注一下如何创建JWT访问令牌。在本教程中,我们使用Java JWT, Stormpath这个人创建的库。
<dependency>
    <groupId>io.jsonwebtoken</groupId>
    <artifactId>jjwt</artifactId>
    <version>${jjwt.version}</version>
</dependency>
我们已经创建了工厂类(JwtTokenFactory)分离令牌创建逻辑。
方法JwtTokenFactory # createAccessJwtToken创建签署了JWT访问令牌。
方法JwtTokenFactory # createRefreshToken创建签署了JWT刷新令牌。
@Component
public class JwtTokenFactory {
private final JwtSettings settings
@Autowired
public JwtTokenFactory(JwtSettings settings) {
this.settings = settings
}
public AccessJwtToken createAccessJwtToken(UserContext userContext) {
if (StringUtils.isBlank(userContext.getUsername()))
throw new IllegalArgumentException("Cannot create JWT Token without username")
if (userContext.getAuthorities() == null || userContext.getAuthorities().isEmpty())
throw new IllegalArgumentException("User doesn't have any privileges")
Claims claims = Jwts.claims().setSubject(userContext.getUsername())
claims.put("scopes", userContext.getAuthorities().stream().map(s -> s.toString()).collect(Collectors.toList()))
DateTime currentTime = new DateTime()
String token = Jwts.builder()
.setClaims(claims)
.setIssuer(settings.getTokenIssuer())
.setIssuedAt(currentTime.toDate())
.setExpiration(currentTime.plusMinutes(settings.getTokenExpirationTime()).toDate())
.signWith(SignatureAlgorithm.HS512, settings.getTokenSigningKey())
.compact()
return new AccessJwtToken(token, claims)
}
public JwtToken createRefreshToken(UserContext userContext) {
if (StringUtils.isBlank(userContext.getUsername())) {
throw new IllegalArgumentException("Cannot create JWT Token without username")
}
DateTime currentTime = new DateTime()
Claims claims = Jwts.claims().setSubject(userContext.getUsername())
claims.put("scopes", Arrays.asList(Scopes.REFRESH_TOKEN.authority()))
String token = Jwts.builder()
.setClaims(claims)
.setIssuer(settings.getTokenIssuer())
.setId(UUID.randomUUID().toString())
.setIssuedAt(currentTime.toDate())
.setExpiration(currentTime.plusMinutes(settings.getRefreshTokenExpTime()).toDate())
.signWith(SignatureAlgorithm.HS512, settings.getTokenSigningKey())
.compact()
return new AccessJwtToken(token, claims)
}
}
- 1
- 2
- 3
- 4
- 5
- 6
- 7
- 8
- 9
- 10
- 11
- 12
- 13
- 14
- 15
- 16
- 17
- 18
- 19
- 20
- 21
- 22
- 23
- 24
- 25
- 26
- 27
- 28
- 29
- 30
- 31
- 32
- 33
- 34
- 35
- 36
- 37
- 38
- 39
- 40
- 41
- 42
- 43
- 44
- 45
- 46
- 47
- 48
- 49
- 50
- 51
- 52
- 53
- 54
- 55
- 56
- 57
- 58
- 59
- 60
- 61
AjaxAwareAuthenticationFailureHandler
AjaxAwareAuthenticationFailureHandle 是AjaxLoginProcessingFilter调用身份验证失败时,被调用的函数。
你可以设计基于异常类型特定的错误消息身份验证过程中发生的异常。
@Component
public class AjaxAwareAuthenticationFailureHandler implements AuthenticationFailureHandler {
    private final ObjectMapper mapper;

    @Autowired
    public AjaxAwareAuthenticationFailureHandler(ObjectMapper mapper) {
        this.mapper = mapper;
    }

    @Override
    public void onAuthenticationFailure(HttpServletRequest request, HttpServletResponse response,
            AuthenticationException e) throws IOException, ServletException {

        response.setStatus(HttpStatus.UNAUTHORIZED.value());
        response.setContentType(MediaType.APPLICATION_JSON_VALUE);

        if (e instanceof BadCredentialsException) {
            mapper.writeValue(response.getWriter(), ErrorResponse.of("Invalid username or password", ErrorCode.AUTHENTICATION, HttpStatus.UNAUTHORIZED));
        } else if (e instanceof JwtExpiredTokenException) {
            mapper.writeValue(response.getWriter(), ErrorResponse.of("Token has expired", ErrorCode.JWT_TOKEN_EXPIRED, HttpStatus.UNAUTHORIZED));
        } else if (e instanceof AuthMethodNotSupportedException) {
            mapper.writeValue(response.getWriter(), ErrorResponse.of(e.getMessage(), ErrorCode.AUTHENTICATION, HttpStatus.UNAUTHORIZED));
        }

        mapper.writeValue(response.getWriter(), ErrorResponse.of("Authentication failed", ErrorCode.AUTHENTICATION, HttpStatus.UNAUTHORIZED));
    }
}
- 1
- 2
- 3
- 4
- 5
- 6
- 7
- 8
- 9
- 10
- 11
- 12
- 13
- 14
- 15
- 16
- 17
- 18
- 19
- 20
- 21
- 22
- 23
- 24
- 25
- 26
- 27
JWT Authentication
基于身份验证模式的token(身份令牌),已经成为近年来非常流行的验证模式,他相比较于session/cookie, token能提供更加重要的好处。
1. CORS。
2. 不需要CSRF的保护。
3. 更好的和移动端进行集成。
4. 减少了授权服务器的负载。
5. 不再需要分布式会话的存储。
有一些交互操作会用这种方式需要权衡的地方:
1. 更容易受到XSS攻击
2. 访问令牌可以包含过时的授权声明(e。g当一些用户权限撤销)
3. 在claims 的数在曾长的时候,Access token 也能在一定程度上增长。
4. 文件下载API难以实现的。
5. 无状态和撤销是互斥的。
在本文中,我们将探讨如何JWT的可以用于基于令牌的身份验证。
JWT 的授权流程是非常的简单的:
1. 用户可以向授权服务器提供凭证来获取刷新和访问令牌(refresh_token 和 access_token).
2. 用户发送每一个请求去访问受保护的资源的时候都需要access token 做为参数。
3. 问令牌是签名,并包含用户身份(例如,用户id)和授权声明。
这是非常重要的,注意到授权声明将包含Access token. 为什么他是如此之重要?很好,让我们来先说说授权声明吧(例如:在数据库中用户权限)被改变了,在Access token 还有效的这个时间周期里,这些更改不会生效,直到新的访问令牌。在更多的情况下,这并不是一个很大的问题,因为Access token 拥有很短的生命周期。 否则就是不透明的标记模式。
在我们探索实现细节之前,让我们先看看一个被保护的资源的API的简单请求。
Signed request to protected API resource
当发送 access token时,下面的一些样式将会被使用,Bearer。 在我们的例子中,header 的名字(),我们将会使用 X-Authorization.
Raw HTTP request:
GET /api/me HTTP/1.1
Host: localhost:9966
X-Authorization: Bearer eyJhbGciOiJIUzUxMiJ9.eyJzdWIiOiJzdmxhZGFAZ21haWwuY29tIiwic2NvcGVzIjpbIlJPTEVfQURNSU4iLCJST0xFX1BSRU1JVU1fTUVNQkVSIl0sImlzcyI6Imh0dHA6Ly9zdmxhZGEuY29tIiwiaWF0IjoxNDcyMzkwMDY1LCJleHAiOjE0NzIzOTA5NjV9.Y9BR7q3f1npsSEYubz-u8tQ8dDOdBcVPFN7AIfWwO37KyhRugVzEbWVPO1obQlHNJWA0Nx1KrEqHqMEjuNWo5w
Cache-Control: no-cache
CURL:
curl -X GET -H "X-Authorization: Bearer eyJhbGciOiJIUzUxMiJ9.eyJzdWIiOiJzdmxhZGFAZ21haWwuY29tIiwic2NvcGVzIjpbIlJPTEVfQURNSU4iLCJST0xFX1BSRU1JVU1fTUVNQkVSIl0sImlzcyI6Imh0dHA6Ly9zdmxhZGEuY29tIiwiaWF0IjoxNDcyMzkwMDY1LCJleHAiOjE0NzIzOTA5NjV9.Y9BR7q3f1npsSEYubz-u8tQ8dDOdBcVPFN7AIfWwO37KyhRugVzEbWVPO1obQlHNJWA0Nx1KrEqHqMEjuNWo5w" -H "Cache-Control: no-cache" "http://localhost:9966/api/me"
让我们来看一下下面的细节,下面的一些组件,我们需要实现JWT 的身份验证:
1. JwtTokenAuthenticationProcessingFilter
2. JwtAuthenticationProvider
3. SkipPathRequestMatcher
4. JwtHeaderTokenExtractor
5. BloomFilterTokenVerifier
6. WebSecurityConfig
JwtTokenAuthenticationProcessingFilter
JwtTokenAuthenticationProcessingFilter 过滤器 被应用到了每一个API(/api/**) 异常的刷新令牌端点(/api/auth/token)以及 login 点(/api/auth/login)。
这个过滤器拥有一下的一些职责:
1. 检查访问令牌在X-Authorization头。如果发现访问令牌的头,委托认证JwtAuthenticationProvider否则抛出身份验证异常
2. 调用成功或失败策略基于由JwtAuthenticationProvider执行身份验证过程的结果
确保chain.doFilter(request, response) 被调用,成功的验证了身份。你想在下一个处理器中,优先处理这些请求, 因为最后一个过滤器 FilterSecurityInterceptor#doFilter
会响应的实际调用方法是在Controller 中的处理访问API 资源的方法。
public class JwtTokenAuthenticationProcessingFilter extends AbstractAuthenticationProcessingFilter {
    private final AuthenticationFailureHandler failureHandler;
    private final TokenExtractor tokenExtractor;

    @Autowired
    public JwtTokenAuthenticationProcessingFilter(AuthenticationFailureHandler failureHandler,
            TokenExtractor tokenExtractor, RequestMatcher matcher) {
        super(matcher);
        this.failureHandler = failureHandler;
        this.tokenExtractor = tokenExtractor;
    }

    @Override
    public Authentication attemptAuthentication(HttpServletRequest request, HttpServletResponse response)
            throws AuthenticationException, IOException, ServletException {
        String tokenPayload = request.getHeader(WebSecurityConfig.JWT_TOKEN_HEADER_PARAM);
        RawAccessJwtToken token = new RawAccessJwtToken(tokenExtractor.extract(tokenPayload));
        return getAuthenticationManager().authenticate(new JwtAuthenticationToken(token));
    }

    @Override
    protected void successfulAuthentication(HttpServletRequest request, HttpServletResponse response, FilterChain chain,
            Authentication authResult) throws IOException, ServletException {
        SecurityContext context = SecurityContextHolder.createEmptyContext();
        context.setAuthentication(authResult);
        SecurityContextHolder.setContext(context);
        chain.doFilter(request, response);
    }

    @Override
    protected void unsuccessfulAuthentication(HttpServletRequest request, HttpServletResponse response,
            AuthenticationException failed) throws IOException, ServletException {
        SecurityContextHolder.clearContext();
        failureHandler.onAuthenticationFailure(request, response, failed);
    }
}
- 1
- 2
- 3
- 4
- 5
- 6
- 7
- 8
- 9
- 10
- 11
- 12
- 13
- 14
- 15
- 16
- 17
- 18
- 19
- 20
- 21
- 22
- 23
- 24
- 25
- 26
- 27
- 28
- 29
- 30
- 31
- 32
- 33
- 34
- 35
- 36
JwtHeaderTokenExtractor 是一个非常简单的类,通常用来扩展来处理身份检验的处理。
你可以扩展TokenExtractor 接口 和 提供你常用的一些实现。例如从URL中提取标记。
@Component
public class JwtHeaderTokenExtractor implements TokenExtractor {
    public static String HEADER_PREFIX = "Bearer ";

    @Override
    public String extract(String header) {
        if (StringUtils.isBlank(header)) {
            throw new AuthenticationServiceException("Authorization header cannot be blank!");
        }

        if (header.length() < HEADER_PREFIX.length()) {
            throw new AuthenticationServiceException("Invalid authorization header size.");
        }
        return header.substring(HEADER_PREFIX.length(), header.length());
    }
}
JwtAuthenticationProvider
JwtAuthenticationProvider 拥有一下的一些职责:
1. 验证 access token 的签名
2. 从访问令牌中提取身份和授权声明和使用它们来创建UserContext
3. 如果访问令牌是畸形的,过期的或者只是如果令牌不签署与适当的签名密钥身份验证就会抛出异常
@Component
public class JwtAuthenticationProvider implements AuthenticationProvider {
    private final JwtSettings jwtSettings;

    @Autowired
    public JwtAuthenticationProvider(JwtSettings jwtSettings) {
        this.jwtSettings = jwtSettings;
    }

    @Override
    public Authentication authenticate(Authentication authentication) throws AuthenticationException {
        RawAccessJwtToken rawAccessToken = (RawAccessJwtToken) authentication.getCredentials();

        Jws<Claims> jwsClaims = rawAccessToken.parseClaims(jwtSettings.getTokenSigningKey());
        String subject = jwsClaims.getBody().getSubject();
        List<String> scopes = jwsClaims.getBody().get("scopes", List.class);
        List<GrantedAuthority> authorities = scopes.stream()
                .map(authority -> new SimpleGrantedAuthority(authority))
                .collect(Collectors.toList());

        UserContext context = UserContext.create(subject, authorities);

        return new JwtAuthenticationToken(context, context.getAuthorities());
    }

    @Override
    public boolean supports(Class<?> authentication) {
        return (JwtAuthenticationToken.class.isAssignableFrom(authentication));
    }
}
- 1
- 2
- 3
- 4
- 5
- 6
- 7
- 8
- 9
- 10
- 11
- 12
- 13
- 14
- 15
- 16
- 17
- 18
- 19
- 20
- 21
- 22
- 23
- 24
- 25
- 26
- 27
- 28
- 29
- 30
SkipPathRequestMatcher
JwtTokenAuthenticationProcessingFilter 过滤器被配置为跳过这个点:/api/auth/login 和 /api/auth/token . 这三个通过 SkipPathRequestMatcher 实现 RequestMatcher 接口来实现。
public class SkipPathRequestMatcher implements RequestMatcher {
    private OrRequestMatcher matchers;
    private RequestMatcher processingMatcher;

    public SkipPathRequestMatcher(List<String> pathsToSkip, String processingPath) {
        Assert.notNull(pathsToSkip);
        List<RequestMatcher> m = pathsToSkip.stream().map(path -> new AntPathRequestMatcher(path)).collect(Collectors.toList());
        matchers = new OrRequestMatcher(m);
        processingMatcher = new AntPathRequestMatcher(processingPath);
    }

    @Override
    public boolean matches(HttpServletRequest request) {
        if (matchers.matches(request)) {
            return false;
        }
        return processingMatcher.matches(request) ? true : false;
    }
}
- 1
- 2
- 3
- 4
- 5
- 6
- 7
- 8
- 9
- 10
- 11
- 12
- 13
- 14
- 15
- 16
- 17
- 18
- 19
WebSecurityConfig
WebSecurityConfig 类 继承 WebSecurityConfigurerAdapter 去提供常用的security configuration .
下面的Beans 类被配置和实例化了:
1. AjaxLoginProcessingFilter
2. JwtTokenAuthenticationProcessingFilter
3. AuthenticationManager
4. BCryptPasswordEncoder
同时,在 WebSecurityConfig#configure(HttpSecurity http) 方法中,我们将配置样式去定义 被保护/非被保护的API节点。请注意,我们已经不能用CSRF保护了,因为我们并没有使用Cookies.
@Configuration
@EnableWebSecurity
public class WebSecurityConfig extends WebSecurityConfigurerAdapter {
public static final String JWT_TOKEN_HEADER_PARAM = "X-Authorization";
public static final String FORM_BASED_LOGIN_ENTRY_POINT = "/api/auth/login";
public static final String TOKEN_BASED_AUTH_ENTRY_POINT = "/api/**";
public static final String TOKEN_REFRESH_ENTRY_POINT = "/api/auth/token";
@Autowired private RestAuthenticationEntryPoint authenticationEntryPoint;
@Autowired private AuthenticationSuccessHandler successHandler;
@Autowired private AuthenticationFailureHandler failureHandler;
@Autowired private AjaxAuthenticationProvider ajaxAuthenticationProvider;
@Autowired private JwtAuthenticationProvider jwtAuthenticationProvider;
@Autowired private TokenExtractor tokenExtractor;
@Autowired private AuthenticationManager authenticationManager;
@Autowired private ObjectMapper objectMapper;
@Bean
protected AjaxLoginProcessingFilter buildAjaxLoginProcessingFilter() throws Exception {
AjaxLoginProcessingFilter filter = new AjaxLoginProcessingFilter(FORM_BASED_LOGIN_ENTRY_POINT, successHandler, failureHandler, objectMapper);
filter.setAuthenticationManager(this.authenticationManager);
return filter;
}
@Bean
protected JwtTokenAuthenticationProcessingFilter buildJwtTokenAuthenticationProcessingFilter() throws Exception {
List<String> pathsToSkip = Arrays.asList(TOKEN_REFRESH_ENTRY_POINT, FORM_BASED_LOGIN_ENTRY_POINT);
SkipPathRequestMatcher matcher = new SkipPathRequestMatcher(pathsToSkip, TOKEN_BASED_AUTH_ENTRY_POINT);
JwtTokenAuthenticationProcessingFilter filter
= new JwtTokenAuthenticationProcessingFilter(failureHandler, tokenExtractor, matcher);
filter.setAuthenticationManager(this.authenticationManager);
return filter;
}
@Bean
@Override
public AuthenticationManager authenticationManagerBean() throws Exception {
return super.authenticationManagerBean();
}
protected void configure(AuthenticationManagerBuilder auth) {
auth.authenticationProvider(ajaxAuthenticationProvider);
auth.authenticationProvider(jwtAuthenticationProvider);
}
@Bean
protected BCryptPasswordEncoder passwordEncoder() {
return new BCryptPasswordEncoder();
}
@Override
protected void configure(HttpSecurity http) throws Exception {
http
.csrf().disable()
.exceptionHandling()
.authenticationEntryPoint(this.authenticationEntryPoint)
.and()
.sessionManagement()
.sessionCreationPolicy(SessionCreationPolicy.STATELESS)
.and()
.authorizeRequests()
.antMatchers(FORM_BASED_LOGIN_ENTRY_POINT).permitAll()
.antMatchers(TOKEN_REFRESH_ENTRY_POINT).permitAll()
.antMatchers("/console").permitAll()
.and()
.authorizeRequests()
.antMatchers(TOKEN_BASED_AUTH_ENTRY_POINT).authenticated()
.and()
.addFilterBefore(buildAjaxLoginProcessingFilter(), UsernamePasswordAuthenticationFilter.class)
.addFilterBefore(buildJwtTokenAuthenticationProcessingFilter(), UsernamePasswordAuthenticationFilter.class);
}
}
- 1
- 2
- 3
- 4
- 5
- 6
- 7
- 8
- 9
- 10
- 11
- 12
- 13
- 14
- 15
- 16
- 17
- 18
- 19
- 20
- 21
- 22
- 23
- 24
- 25
- 26
- 27
- 28
- 29
- 30
- 31
- 32
- 33
- 34
- 35
- 36
- 37
- 38
- 39
- 40
- 41
- 42
- 43
- 44
- 45
- 46
- 47
- 48
- 49
- 50
- 51
- 52
- 53
- 54
- 55
- 56
- 57
- 58
- 59
- 60
- 61
- 62
- 63
- 64
- 65
- 66
- 67
- 68
- 69
- 70
- 71
- 72
- 73
- 74
- 75
- 76
- 77
BloomFilterTokenVerifier
这是虚拟类。你应该实现自己的TokenVerifier检查撤销令牌。
@Component
public class BloomFilterTokenVerifier implements TokenVerifier {
    @Override
    public boolean verify(String jti) {
        return true;
    }
}
结论
我在网络上听到有人窃窃私语,失去JWT令牌就像失去你的房子的钥匙。所以要小心。
补充
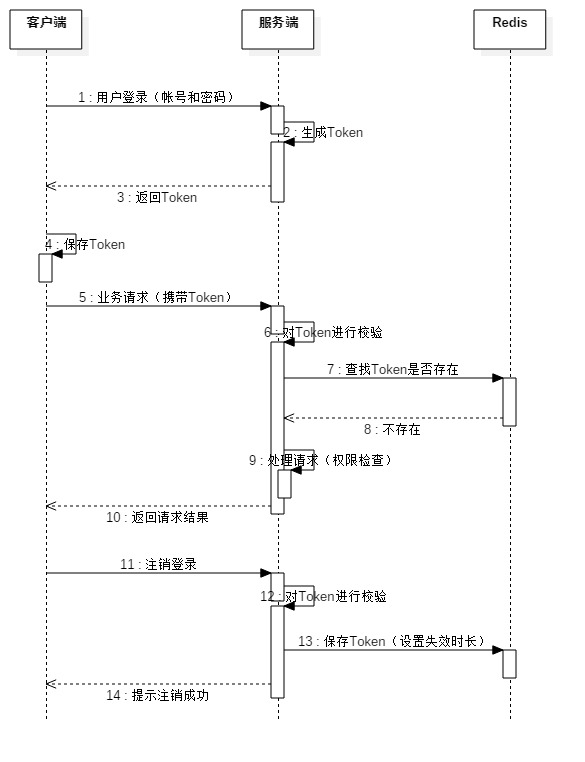
在上述讲到的JWT使用的方案中,j w t无法做到注销操作。为此我们未来填补JWT在这方面的缺陷,我们引入了redis。当用户注销时,可以把还在时效内的token放到redis中,并设置redis该token正确的失效时间。当用户token访问时,先查询redis,看是否存在注销的token,有就重新登陆。
一、JWT认证方式的实现方式 :
1.客户端不需要持有密钥,由服务端通过密钥生成Token。
2.客户端登录时通过账号和密码到服务端进行认证,认证通过后,服务端通过持有的密钥生成Token,Token中一般包含失效时长和用户唯一标识,如用户ID,服务端返回Token给客户端。
3.客户端保存服务端返回的Token。
4.客户端进行业务请求时在Head的Authorization字段里面放置Token,如:
Authorization: Bearer Token
5.服务端对请求的Token进行校验,并通过Redis查找Token是否存在,主要是为了解决用户注销,但Token还在时效内的问题,如果Token在Redis中存在,则说明用户已注销;如果Token不存在,则校验通过。
6.服务端可以通过从Token取得的用户唯一标识进行相关权限的校验,并把此用户标识赋予到请求参数中,业务可通过此用户标识进行业务处理。
7.用户注销时,服务端需要把还在时效内的Token保存到Redis中,并设置正确的失效时长。
二、在实际环境中如何使用JWT
1.Web应用程序
在令牌过期前刷新令牌。如设置令牌的过期时间为一个星期,每次用户打开Web应用程序,服务端每隔一小时生成一个新令牌。如果用户一个多星期没有打开应用,他们将不得不再次登录。
2.移动应用程序
大多数移动应用程序用户只进行一次登录,定期刷新令牌可以使用户长期不用登录。
但如果用户的手机丢失,则可提供一种方式由用户决定撤销哪个设备的令牌。当然,这就需要服务端记录设备的名称,例如“maryo的iPad”。然后用户可以去申请并撤销获得“maryo的iPad”。当用户修改密码时需要服务端把原Token保存到Redis上,使其失效。
为了防止Token被窃取,最好把JWT和HTTPS结合起来使用。
三、如何实现安全认证与权限的结合
服务端生成的Token中需要包含用户唯一标识,这样用户进行业务请求时,服务端通过附带的Token获取用户唯一标识,通过此标识进行权限检查。
四、更换Token
为了解决高并发访问时更换Token, 有可能造成用旧的Token的访问失败。 在缓存中不保存Token,而是保存一个计数,每次更换Token时,计数加1,这个计数的值会跟用户ID一起加密后保存在新生成的Token中,返回给用户,用户每次访问时携带这个Token。验证用户Token时,用Token中的计数与缓存中保存的计数比较,如果差值范围在1~2之间就认为Token有效,这样即使在并发访问时,更换Token,计数值虽然不等,但在规定的差值范围内,也被认为有效,这样就解决了上面的Token失效问题。
参考
I don’t see the point in Revoking or Blacklisting JWT
Spring Security Architecture - Dave Syer
Invalidating JWT
Secure and stateless JWT implementation
Learn JWT
Opaque access tokens and cloud foundry
The unspoken vulnerability of JWTS
How To Control User Identity Within Micro-services
Why Does OAuth v2 Have Both Access and Refresh Tokens?RFC-6749
Are breaches of JWT-based servers more damaging?
https://github.com/svlada/springboot-security-jwt/tree/master/src
https://stormpath.com/blog/token-auth-for-java
https://stormpath.com/blog/fun-with-java-spring-boot-token-management
https://github.com/nielsutrecht/jwt-angular-spring
http://www.svlada.com/jwt-token-authentication-with-spring-boot/
https://github.com/svlada/springboot-security-jwt/tree/master/src
https://spring.io/guides/tutorials/spring-boot-oauth2/
https://stormpath.com/blog/fun-with-java-spring-boot-token-management
来自 http://lib.csdn.net/article/microservice/57555?knId=1904