欢迎各位兄弟 发布技术文章

这里的技术是共享的

You are here

JSON Web Token Tutorial: An Example in Laravel and AngularJS

With the rising popularity of single page applications, mobile applications, and RESTful API services, the way web developers write back-end code has changed significantly. With technologies like AngularJS and BackboneJS, we are no longer spending much time building markup, instead we are building APIs that our front-end applications consume. Our back-end is more about business logic and data, while presentation logic is moved exclusively to the front-end or mobile applications. These changes have led to new ways of implementing authentication in modern applications.

Authentication is one of the most important parts of any web application. For decades, cookies and server-based authentication were the easiest solution. However, handling authentication in modern Mobile and Single Page Applications can be tricky, and demand a better approach. The best known solutions to authentication problems for APIs are the OAuth 2.0 and the JSON Web Token (JWT).

What is a JSON Web Token?

A JSON Web Token, or JWT, is used to send information that can be verified and trusted by means of a digital signature. It comprises a compact and URL-safe JSON object, which is cryptographically signed to verify its authenticity, and which can also be encrypted if the payload contains sensitive information.

Because of it’s compact structure, JWT is usually used in HTTP Authorization headers or URL query parameters.

Structure of a JSON Web Token

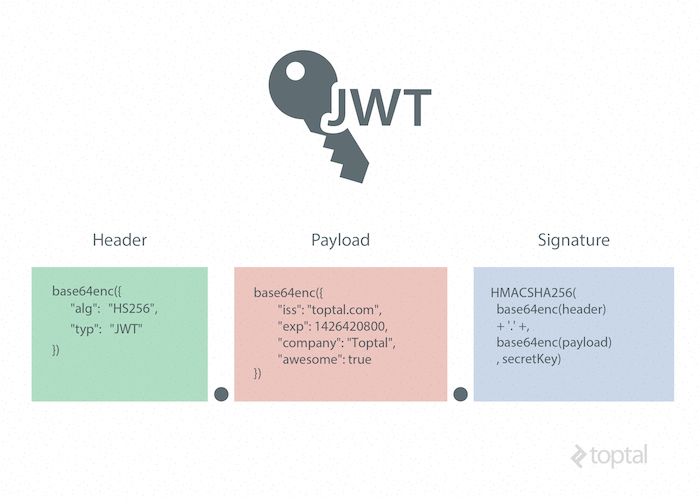
A JWT is represented as a sequence of base64url encoded values that are separated by period characters.

JSON web token example in laravel and angularjs

JSON Web Token example:

eyJhbGciOiJIUzI1NiIsInR5cCI6IkpXVCJ9.
eyJpc3MiOiJ0b3B0YWwuY29tIiwiZXhwIjoxNDI2NDIwODAwLCJodHRwOi8vdG9wdGFsLmNvbS9qd3RfY2xhaW1zL2lzX2FkbWluIjp0cnVlLCJjb21wYW55IjoiVG9wdGFsIiwiYXdlc29tZSI6dHJ1ZX0.
yRQYnWzskCZUxPwaQupWkiUzKELZ49eM7oWxAQK_ZXw

The header contains the metadata for the token and it minimally contains the type of signature and the encryption algorithm. (You can use a JSON formatter tool to prettify the JSON object.)

Example Header

{
  “alg”: “HS256”,
  “typ”: “JWT”
}

This JWT Header declares that the encoded object is a JSON Web Token, and that it is signed using the HMAC SHA-256 algorithm.

Once this is base64 encoded, we have the first part of our JWT.

eyJhbGciOiJIUzI1NiIsInR5cCI6IkpXVCJ9

Payload (Claims)

In the context of JWT, a claim can be defined as a statement about an entity (typically, the user), as well as additional meta data about the token itself. The claim contains the information we want to transmit, and that the server can use to properly handle authentication. There are multiple claims we can provide; these include registered claim names, public claim names and private claim names.

Registered Claims

These are the claims that are registered in the IANA JSON Web Token Claims registry. These claims are not intended to be mandatory but rather to provide a starting point for a set of useful, interoperable claims.

These include:

  • iss: The issuer of the token

  • sub: The subject of the token

  • aud: The audience of the token

  • exp: Token expiration time defined in Unix time

  • nbf: “Not before” time that identifies the time before which the JWT must not be accepted for processing

  • iat: “Issued at” time, in Unix time, at which the token was issued

  • jti: JWT ID claim provides a unique identifier for the JWT

Public Claims

Public claims need to have collision-resistant names. By making the name a URI or URN naming collisions are avoided for JWTs where the sender and receiver are not part of a closed network.

An example of a public claim name could be: https://www.toptal.com/jwt_claims/is_admin, and the best practice is to place a file at that location describing the claim so that it can be dereferenced for documentation.

Private Claims

Private claim-names may be used in places where JWTs are only exchanged in a closed environment between known systems, such as inside an enterprise. These are claims that we can define ourselves, like user IDs, user roles, or any other information.

Using claim-names that might have conflicting semantic meanings outside of a closed or private system are subject to collision, so use them with caution.

It is important to note that we want to keep a web token as small as possible, so use only necessary data inside public and private claims.

Example Payload

{
  “iss”: “toptal.com”,
  “exp”: 1426420800,
  “https://www.toptal.com/jwt_claims/is_admin”: true,
  “company”: “Toptal”,
  “awesome”: true
}

This example payload has two registered claims, one public claim and two private claims. Once it is base64 encoded, we have the second part of our JWT.

eyJpc3MiOiJ0b3B0YWwuY29tIiwiZXhwIjoxNDI2NDIwODAwLCJodHRwOi8vdG9wdGFsLmNvbS9qd3RfY2xhaW1zL2lzX2FkbWluIjp0cnVlLCJjb21wYW55IjoiVG9wdGFsIiwiYXdlc29tZSI6dHJ1ZX0

Signature

The JWT standard follows the JSON Web Signature (JWS) specification to generate the final signed token. It is generated by combining the encoded JWT Header and the encoded JWT Payload, and signing it using a strong encryption algorithm, such as HMAC SHA-256. The signature’s secret key is held by the server so it will be able to verify existing tokens and sign new ones.

$encodedContent = base64UrlEncode(header) + “.” + base64UrlEncode(payload);
$signature = hashHmacSHA256($encodedContent);

This gives us the final part of our JWT.

yRQYnWzskCZUxPwaQupWkiUzKELZ49eM7oWxAQK_ZXw

Security and Encryption with JWT

It is critical to use TLS/SSL in conjunction with JWT, to prevent man-in-the-middle attacks. In most cases, this will be sufficient to encrypt the JWT payload if it contains sensitive information. However, if we want to add an additional layer of protection, we can encrypt the JWT payload itself using the JSON Web Encryption (JWE) specification.

Of course, if we want to avoid the additional overhead of using JWE, another option is to simply keep sensitive information in our database, and use our token for additional API calls to the server whenever we need to access sensitive data.

Why the need for Web Tokens?

Before we can see all the benefits of using token authentication, we have to look at the way authentication has been done in the past.

Server-Based Authentication

Server-Based Authentication

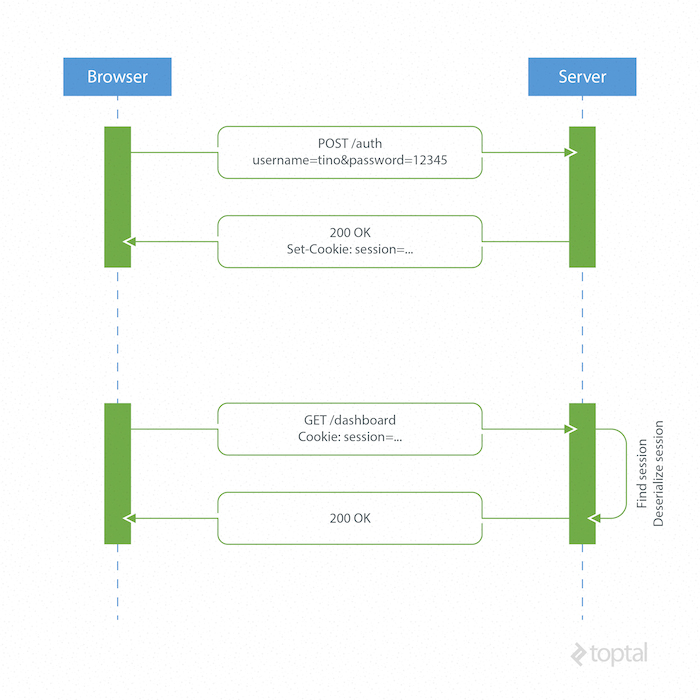
Because the HTTP protocol is stateless, there needs to be a mechanism for storing user information and a way to authenticate the user on every subsequent request after login. Most websites use cookies for storing user’s session ID.

How it Works

The browser makes a POST request to the server that contains the user’s identification and password. The server responds with a cookie, which is set on the user’s browser, and includes a session ID to identify the user.

On every subsequent request, the server needs to find that session and deserialize it, because user data is stored on the server.

Like what you're reading?
Get the latest updates first.
No spam. Just great engineering posts.

Drawbacks of Server-Based Authentication

  • Hard to scale: The server needs to create a session for a user and persist it somewhere on the server. This can be done in memory or in a database. If we have a distributed system, we have to make sure that we use a separate session storage that is not coupled to the application server.

  • Cross-origin request sharing (CORS): When using AJAX calls to fetch a resource from another domain (cross-origin) we could run into problems with forbidden requests because, by default, HTTP requests don’t include cookies on cross-origin requests.

  • Coupling with the web framework: When using server-based authentication we are tied to our framework’s authentication scheme. It is really hard, or even impossible, to share session data between different web frameworks written in different programming languages.

Token-Based Authentication

Token-Based Authentication

Token based authentication is stateless, so there is no need to store user information in the session. This gives us the ability to scale our application without worrying where the user has logged in. We can easily use the same token for fetching a secure resource from a domain other than the one we are logged in to.

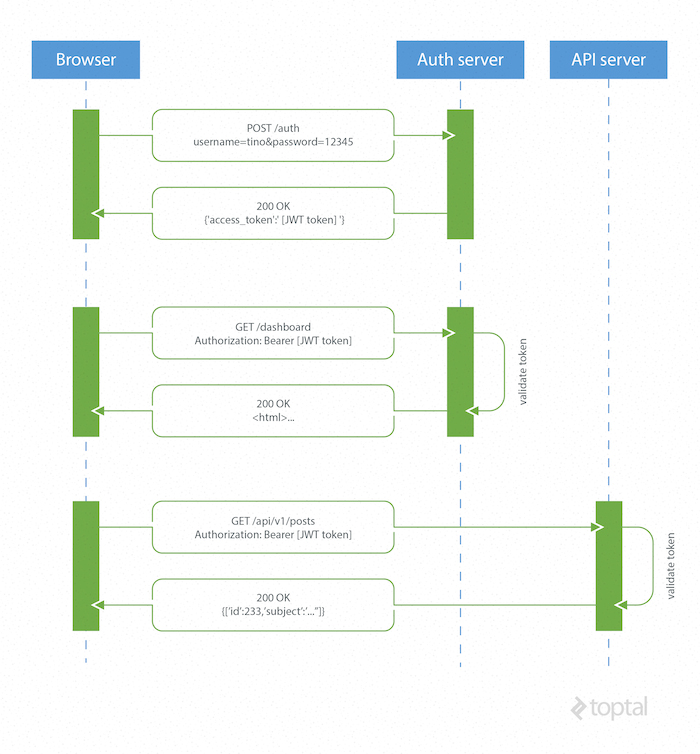
How JSON Web Tokens Work

A browser or mobile client makes a request to the authentication server containing user login information. The authentication server generates a new JWT access token and returns it to the client. On every request to a restricted resource, the client sends the access token in the query string or Authorization header. The server then validates the token and, if it’s valid, returns the secure resource to the client.

The authentication server can sign the token using any secure signature method. For example, a symmetric key algorithm such as HMAC SHA-256 can be used if there is a secure channel to share the secret key among all parties. Alternatively, an asymmetric, public-key system, such as RSA, can be used as well, eliminating the need for further key-sharing.

Advantages of Token-Based Authentication

Stateless, easier to scale: The token contains all the information to identify the user, eliminating the need for the session state. If we use a load balancer, we can pass the user to any server, instead of being bound to the same server we logged in on.

Reusability: We can have many separate servers, running on multiple platforms and domains, reusing the same token for authenticating the user. It is easy to build an application that shares permissions with another application.

Security: Since we are not using cookies, we don’t have to protect against cross-site request forgery (CSRF) attacks. We should still encrypt our tokens using JWE if we have to put any sensitive information in them, and transmit our tokens over HTTPS to prevent man-in-the-middle attacks.

Performance: There is no server side lookup to find and deserialize the session on each request. The only thing we have to do is calculate the HMAC SHA-256 to validate the token and parse its content.

A JSON Web Token Example using Laravel 5 and AngularJS

In this tutorial I am going to demonstrate how to implement the basic authentication using JSON Web Tokens in two popular web technologies: Laravel 5 for the backend code and AngularJS for the frontend Single Page Application (SPA) example. (You can find the entire demo here, and the source code in this GitHub repositoryso that you can follow along with the tutorial.)

This JSON web token example will not use any kind of encryption to ensure the confidentiality of the information transmitted in the claims. In practice this is often okay, because TLS/SSL encrypts the request. However, if the token is going to contain sensitive information, such as the user’s social security number, it should also be encrypted using JWE.

Laravel Backend Example

We will use Laravel to handle user registration, persisting user data to a database and providing some restricted data that needs authentication for the Angular app to consume. We will create an example API subdomain to simulate Cross-origin resource sharing (CORS) as well.

Installation and Project Bootstrapping

In order to use Laravel, we have to install the Composer package manager on our machine. When developing in Laravel I recommend using the Laravel Homestead pre-packaged “box” of Vagrant. It provides us with a complete development environment regardless of our operating system.

The easiest way to bootstrap our Laravel application is to use a Composer package Laravel Installer.

composer global require "laravel/installer=~1.1"

Now we are all ready to create a new Laravel project by running laravel new jwt.

For any questions about this process please refer to the official Laravel documentation.

After we have created the basic Laravel 5 application, we need to set up our Homestead.yaml, which will configure folder mappings and domains configuration for our local environment.

Example of a Homestead.yaml file:

---
ip: "192.168.10.10"
memory: 2048
cpus: 1

authorize: /Users/ttkalec/.ssh/public.psk

keys:
    - /Users/ttkalec/.ssh/private.ppk
folders:
    - map: /coding/jwt
      to: /home/vagrant/coding/jwt
sites:
    - map: jwt.dev
      to: /home/vagrant/coding/jwt/public
    - map: api.jwt.dev
      to: /home/vagrant/coding/jwt/public
variables:
    - key: APP_ENV
      value: local

After we’ve booted up our Vagrant box with the vagrant up command and logged into it using vagrant ssh, we navigate to the previously defined project directory. In the example above this would be /home/vagrant/coding/jwt. We can now run php artisan migrate command in order to create the necessary user tables in our database.

Installing Composer Dependencies

Fortunately, there is a community of developers working on Laravel and maintaining many great packages that we can reuse and extend our application with. In this example we will use tymon/jwt-auth, by Sean Tymon, for handling tokens on the server side, and barryvdh/laravel-cors, by Barry vd. Heuvel, for handling CORS.

jwt-auth

Require the tymon/jwt-auth package in our composer.json and update our dependencies.

composer require tymon/jwt-auth 0.5.*

Add the JWTAuthServiceProvider to our app/config/app.php providers array.

'Tymon\JWTAuth\Providers\JWTAuthServiceProvider'

Next, in app/config/app.php file, under the aliases array, we add the JWTAuth facade.

'JWTAuth' => 'Tymon\JWTAuth\Facades\JWTAuth'

Finally, we will want to publish the package config using the following command: php artisan config:publish tymon/jwt-auth

JSON Web tokens are encrypted using a secret key. We can generate that key using the php artisan jwt:generate command. It will be placed inside our config/jwt.php file. In the production environment, however, we never want to have our passwords or API keys inside configuration files. Instead, we should place them inside server environment variables and reference them in the configuration file with the env function. For example:

'secret' => env('JWT_SECRET')

We can find out more about this package and all of it’s config settings on Github.

laravel-cors

Require the barryvdh/laravel-cors package in our composer.json and update our dependencies.

composer require barryvdh/laravel-cors 0.4.x@dev

Add the CorsServiceProvider to our app/config/app.php providers array.

'Barryvdh\Cors\CorsServiceProvider'

Then add the middleware to our app/Http/Kernel.php.

'Barryvdh\Cors\Middleware\HandleCors'

Publish the configuration to a local config/cors.php file by using the php artisan vendor:publish command.

Example of a cors.php file configuration:

return [
   'defaults' => [
       'supportsCredentials' => false,
       'allowedOrigins' => [],
       'allowedHeaders' => [],
       'allowedMethods' => [],
       'exposedHeaders' => [],
       'maxAge' => 0,
       'hosts' => [],
   ],

   'paths' => [
       'v1/*' => [
           'allowedOrigins' => ['*'],
           'allowedHeaders' => ['*'],
           'allowedMethods' => ['*'],
           'maxAge' => 3600,
       ],
   ],
];

Routing and Handling HTTP Requests

For the sake of brevity, I will put all my code inside the routes.php file that is responsible for Laravel routing and delegating requests to controllers. We would usually create dedicated controllers for handling all our HTTP requests and keep our code modular and clean.

We will load our AngularJS SPA view using

Route::get('/', function () {
   return view('spa');
});

User Registration

When we make a POST request to /signup with a username and password, we will try to create a new user and save it to the database. After the user has been created, a JWT is created and returned via JSON response.

Route::post('/signup', function () {
   $credentials = Input::only('email', 'password');

   try {
       $user = User::create($credentials);
   } catch (Exception $e) {
       return Response::json(['error' => 'User already exists.'], HttpResponse::HTTP_CONFLICT);
   }

   $token = JWTAuth::fromUser($user);

   return Response::json(compact('token'));
});

User Sign In

When we make a POST request to /signin with a username and password, we verify that the user exists and returns a JWT via the JSON response.

Route::post('/signin', function () {
   $credentials = Input::only('email', 'password');

   if ( ! $token = JWTAuth::attempt($credentials)) {
       return Response::json(false, HttpResponse::HTTP_UNAUTHORIZED);
   }

   return Response::json(compact('token'));
});

Fetching a Restricted Resource on the Same Domain

Once the user is signed in, we can fetch the restricted resource. I’ve created a route /restricted that simulates a resource that needs an authenticated user. In order to do this, the request Authorization header or query string needs to provide the JWT for the backend to verify.

Route::get('/restricted', [
   'before' => 'jwt-auth',
   function () {
       $token = JWTAuth::getToken();
       $user = JWTAuth::toUser($token);

       return Response::json([
           'data' => [
               'email' => $user->email,
               'registered_at' => $user->created_at->toDateTimeString()
           ]
       ]);
   }
]);

In this example, I’m using jwt-auth middleware provided in the jwt-auth package using 'before' => 'jwt-auth'. This middleware is used to filter the request and validate the JWT token. If the token is invalid, not present, or expired, the middleware will throw an exception that we can catch.

In Laravel 5, we can catch exceptions using the app/Exceptions/Handler.php file. Using the render function we can create HTTP responses based on the thrown exception.

public function render($request, Exception $e)
{
  if ($e instanceof \Tymon\JWTAuth\Exceptions\TokenInvalidException)
  {
     return response(['Token is invalid'], 401);
  }
  if ($e instanceof \Tymon\JWTAuth\Exceptions\TokenExpiredException)
  {
     return response(['Token has expired'], 401);
  }

  return parent::render($request, $e);
}

If the user is authenticated and the token is valid, we can safely return the restricted data to the frontend via JSON.

Fetching Restricted Resources from the API Subdomain

In the next JSON web token example, we’ll take a different approach for token validation. Instead of using jwt-auth middleware, we will handle exceptions manually. When we make a POST request to an API server api.jwt.dev/v1/restricted, we are making a cross-origin request, and have to enable CORS on the backend. Fortunately, we have already configured CORS in the config/cors.php file.

Route::group(['domain' => 'api.jwt.dev', 'prefix' => 'v1'], function () {
   Route::get('/restricted', function () {
       try {
           JWTAuth::parseToken()->toUser();
       } catch (Exception $e) {
           return Response::json(['error' => $e->getMessage()], HttpResponse::HTTP_UNAUTHORIZED);
       }

       return ['data' => 'This has come from a dedicated API subdomain with restricted access.'];
   });
});

AngularJS Frontend Example

We are using AngularJS as a front-end, relying on the API calls to the Laravel back-end authentication server for user authentication and sample data, plus the API server for cross-origin example data. Once we go to the homepage of our project, the backend will serve the resources/views/spa.blade.php view that will bootstrap the Angular application.

Here is the folder structure of the Angular app:

public/
  |-- css/
      `-- bootstrap.superhero.min.css
  |-- lib/
      |-- loading-bar.css
      |-- loading-bar.js
      `-- ngStorage.js
  |-- partials/
      |-- home.html
      |-- restricted.html
      |-- signin.html
      `-- signup.html
  `-- scripts/
      |-- app.js
      |-- controllers.js
      `-- services.js

Bootstrapping the Angular Application

spa.blade.php contains the bare essentials needed to run the application. We’ll use Twitter Bootstrap for styling, along with a custom theme from Bootswatch. To have some visual feedback when making an AJAX call, we’ll use the angular-loading-bar script, which intercepts XHR requests and creates a loading bar. In the header section, we have the following stylesheets:

<link rel="stylesheet" href="//maxcdn.bootstrapcdn.com/bootstrap/3.2.0/css/bootstrap.min.css">
<link rel="stylesheet" href="/css/bootstrap.superhero.min.css">
<link rel="stylesheet" href="/lib/loading-bar.css">

The footer of our markup contains references to libraries, as well as our custom scripts for Angular modules, controllers and services.

<script src="http://cdnjs.cloudflare.com/ajax/libs/jquery/2.1.1/jquery.min.js"></script>
<script src="http://maxcdn.bootstrapcdn.com/bootstrap/3.3.2/js/bootstrap.min.js"></script>
<script src="http://cdnjs.cloudflare.com/ajax/libs/angular.js/1.3.14/angular.min.js"></script>
<script src="http://cdnjs.cloudflare.com/ajax/libs/angular.js/1.3.14/angular-route.min.js"></script>
<script src="/lib/ngStorage.js"></script>
<script src="/lib/loading-bar.js"></script>
<script src="/scripts/app.js"></script>
<script src="/scripts/controllers.js"></script>
<script src="/scripts/services.js"></script>
</body>

We are using ngStorage library for AngularJS, to save tokens into the browser’s local storage, so that we can send it on each request via the Authorization header.

In the production environment, of course, we would minify and combine all our script files and stylesheets in order to improve performance.

I’ve created a navigation bar using Bootstrap that will change the visibility of appropriate links, depending on the sign-in status of the user. The sign-in status is determined by the presence of a token variable in the controller’s scope.

<div class="navbar-header">
   <button type="button" class="navbar-toggle collapsed" data-toggle="collapse" data-target=".navbar-collapse">
       <span class="sr-only">Toggle navigation</span>
       <span class="icon-bar"></span>
       <span class="icon-bar"></span>
       <span class="icon-bar"></span>
   </button>
   <a class="navbar-brand" href="#">JWT Angular example</a>
</div>
<div class="navbar-collapse collapse">
   <ul class="nav navbar-nav navbar-right">
       <li data-ng-show="token"><a ng-href="#/restricted">Restricted area</a></li>
       <li data-ng-hide="token"><a ng-href="#/signin">Sign in</a></li>
       <li data-ng-hide="token"><a ng-href="#/signup">Sign up</a></li>
       <li data-ng-show="token"><a ng-click="logout()">Logout</a></li>
   </ul>
</div>

Routing

We have a file named app.js which is responsible for configuring all our front end routes.

angular.module('app', [
   'ngStorage',
   'ngRoute',
   'angular-loading-bar'
])
   .constant('urls', {
       BASE: 'http://jwt.dev:8000',
       BASE_API: 'http://api.jwt.dev:8000/v1'
   })
   .config(['$routeProvider', '$httpProvider', function ($routeProvider, $httpProvider) {
       $routeProvider.
           when('/', {
               templateUrl: 'partials/home.html',
               controller: 'HomeController'
           }).
           when('/signin', {
               templateUrl: 'partials/signin.html',
               controller: 'HomeController'
           }).
           when('/signup', {
               templateUrl: 'partials/signup.html',
               controller: 'HomeController'
           }).
           when('/restricted', {
               templateUrl: 'partials/restricted.html',
               controller: 'RestrictedController'
           }).
           otherwise({
               redirectTo: '/'
           });

Here we can see that we have defined four routes that are handled by either HomeController or RestrictedController. Every route corresponds to a partial HTML view. We have also defined two constants that contain URLs for our HTTP requests to the backend.

Request Interceptor

The $http service of AngularJS allows us to communicate with the backend and make HTTP requests. In our case we want to intercept every HTTP request and inject it with an Authorization header containing our JWT if the user is authenticated. We can also use an interceptor to create a global HTTP error handler. Here is an example of our interceptor that injects a token if it’s available in browser’s local storage.

$httpProvider.interceptors.push(['$q', '$location', '$localStorage', function ($q, $location, $localStorage) {
   return {
       'request': function (config) {
           config.headers = config.headers || {};
           if ($localStorage.token) {
               config.headers.Authorization = 'Bearer ' + $localStorage.token;
           }
           return config;
       },
       'responseError': function (response) {
           if (response.status === 401 || response.status === 403) {
               $location.path('/signin');
           }
           return $q.reject(response);
       }
   };
}]);

Controllers

In the controllers.js file, we have defined two controllers for our application: HomeController and RestrictedControllerHomeController handles sign-in, sign-up and logout functionality. It passes the username and password data from the sign-in and sign-up forms to the Auth service, which sends HTTP requests to the backend. It then saves the token to local storage, or shows an error message, depending on the response from the backend.

angular.module('app')
   .controller('HomeController', ['$rootScope', '$scope', '$location', '$localStorage', 'Auth',
       function ($rootScope, $scope, $location, $localStorage, Auth) {
           function successAuth(res) {
               $localStorage.token = res.token;
               window.location = "/";
           }

           $scope.signin = function () {
               var formData = {
                   email: $scope.email,
                   password: $scope.password
               };

               Auth.signin(formData, successAuth, function () {
                   $rootScope.error = 'Invalid credentials.';
               })
           };

           $scope.signup = function () {
               var formData = {
                   email: $scope.email,
                   password: $scope.password
               };

               Auth.signup(formData, successAuth, function () {
                   $rootScope.error = 'Failed to signup';
               })
           };

           $scope.logout = function () {
               Auth.logout(function () {
                   window.location = "/"
               });
           };
           $scope.token = $localStorage.token;
           $scope.tokenClaims = Auth.getTokenClaims();
       }])

RestrictedController behaves the same way, only it fetches the data by using the getRestrictedData and getApiData functions on the Data service.

   .controller('RestrictedController', ['$rootScope', '$scope', 'Data', function ($rootScope, $scope, Data) {
       Data.getRestrictedData(function (res) {
           $scope.data = res.data;
       }, function () {
           $rootScope.error = 'Failed to fetch restricted content.';
       });
       Data.getApiData(function (res) {
           $scope.api = res.data;
       }, function () {
           $rootScope.error = 'Failed to fetch restricted API content.';
       });
   }]);

The backend is responsible for serving the restricted data only if the user is authenticated. This means that in order to respond with the restricted data, the request for that data needs to contain a valid JWT inside its Authorization header or query string. If that is not the case, the server will respond with a 401 Unauthorized error status code.

Auth Service

The Auth service is responsible for making the sign in and sign up HTTP requests to the backend. If the request is successful, the response contains the signed token, which is then base64 decoded, and the enclosed token claims information is saved into a tokenClaims variable. This is passed to the controller via the getTokenClaims function.

angular.module('app')
   .factory('Auth', ['$http', '$localStorage', 'urls', function ($http, $localStorage, urls) {
       function urlBase64Decode(str) {
           var output = str.replace('-', '+').replace('_', '/');
           switch (output.length % 4) {
               case 0:
                   break;
               case 2:
                   output += '==';
                   break;
               case 3:
                   output += '=';
                   break;
               default:
                   throw 'Illegal base64url string!';
           }
           return window.atob(output);
       }

       function getClaimsFromToken() {
           var token = $localStorage.token;
           var user = {};
           if (typeof token !== 'undefined') {
               var encoded = token.split('.')[1];
               user = JSON.parse(urlBase64Decode(encoded));
           }
           return user;
       }

       var tokenClaims = getClaimsFromToken();

       return {
           signup: function (data, success, error) {
               $http.post(urls.BASE + '/signup', data).success(success).error(error)
           },
           signin: function (data, success, error) {
               $http.post(urls.BASE + '/signin', data).success(success).error(error)
           },
           logout: function (success) {
               tokenClaims = {};
               delete $localStorage.token;
               success();
           },
           getTokenClaims: function () {
               return tokenClaims;
           }
       };
   }
   ]);

Data Service

This is a simple service that makes requests to the authentication server as well as the API server for some dummy restricted data. It makes the request, and delegates success and error callbacks to the controller.

angular.module('app')
   .factory('Data', ['$http', 'urls', function ($http, urls) {

       return {
           getRestrictedData: function (success, error) {
               $http.get(urls.BASE + '/restricted').success(success).error(error)
           },
           getApiData: function (success, error) {
               $http.get(urls.BASE_API + '/restricted').success(success).error(error)
           }
       };
   }
   ]);

Conclusion

Token-based authentication enables us to construct decoupled systems that are not tied to a particular authentication scheme. The token might be generated anywhere and consumed on any system that uses the same secret key for signing the token. They are mobile ready, and do not require us to use cookies.

JSON Web Tokens work across all popular programming languages and are quickly gaining in popularity. They are backed by companies like Google, Microsoft and Zendesk. Their standard specification by Internet Engineering Task Force (IETF) is still in the draft version and may change slightly in the future.

There is still a lot to cover about JWTs, such with how to handle the security details, and refreshing tokens when they expire, but the examples above should demonstrate the basic usage and, more importantly, advantages of using JSON Web Tokens.

About the author

Tino Tkalec, Croatia
MEMBER SINCE OCTOBER 3, 2014
Tino is a software engineer with over 10 years of experience in creating native Windows and Web Applications. He has a strong experience with the LAMP stack and the ability to refactor spaghetti code into reusable and testable code. [click to continue...]
Hiring? Meet the Top 10 Freelance Web Developers for Hire in January 2018

Comments

Agustín Santiago Castaño
Very interesting and current stuff!
Alex Xela
Thank you for intertesting article, but for me pros and cons of each approach looks quite weak. For example, using JWT your server has an overhead exposed by token validation on each request (i.e. the same as in cookie-based). CORS issue wasn't described at all. Last point - remove coupling with framework looks true. But!.. At this time we coupled with library which handles JWT (its standard is still discussing). Finally it is interesting new approach, but actually it does not provide any strong reasons to use it instead of cookie-based one.
Ahmed Abdel Razzak
My only concern, is how to log out the user... You might delete the token from the local storage. but as long as it's not expired, it can be reused again. A simple solution is keep a reference on which token is expired by user ( manually logout) and delete that token... And keep a reference on the token id in the jwt instead of the user id. I know it's feels like smelly code... But really couldn't find any other solution... Any ideas ?
Vitaly Dyatlov
The same applies to cookies. You can delete cookie but it's still possible to use it for authentication. Unless you notify server about your changes - you're at risk.
Tino Tkalec
There is no way to easily invalidate the token without involving a database. You might want to look at the refresh tokens to help you with this. https://auth0.com/docs/refresh-token If you just delete the token on the client, it does nothing for the server side security. I think the best way is to keep token expiry times short and rotate them often. This also has it's drawbacks. Token security and best practices are a broad subject, worthy of another blog post.
Vitaly Dyatlov
it's really easier for mobile apps. You can't use cookies in restful apps
Tino Tkalec
JWTs are not appropriate for everything but they give us more flexibility that using cookie-based auth, especially for the mobile apps. I didn't want to go in depth into CORS, because it's a beast on it's own. Token validation has less overhead than finding the session in the database and deserializing it. You aren't coupled to the library which handles JWT, because every library will yield the same looking JWT as an output. JWT's standard is still not finalized, but there certainly won't be any major changes there, and the libraries will adapt accordingly.
Alex Xela
It is not the same. Cookie stores session is synchronized on client and on server side. So server could invalidates client's session (by timeout or by request). That is strong pros of "stateful" app. I put "stateful" in quotes because it differs with commonly use of term "stateful". For example application with DB backend could be stateless but keep user sessions.
Ryan J. Peterson
Just as a note, the Provider route is now: 'Tymon\JWTAuth\Providers\JWTAut'
Tino Tkalec
Thank you Ryan. I will update it
John L Magee
This is a nice article about Authentication. In places it seems to use the terms Authentication and Authorization interchangeably. Some clarification and perhaps a follow-up article would be very helpful
eduardonunesp
You can check in database if the user is logged (boolean), also check if the token already expired or marked as invalid, the JWT claims may help you to achieve that. As stated before there is no easy way to logout JWT tokens, without involve some backend database.
eduardonunesp
My two cents : http://jwt.io/
Tino Tkalec
Hey John, tnx for the comment. This article is focused on authentication which refers (in short) to determining that somebody is who he claims to be. Authorization refers to user's permissions, or what the user is allowed to do. One place in the article where I mention authorization often is the "Authorization header" which is defined by HTTP protocol. There were a couple more places where I mistakenly used the term authorization instead of authentication, but that is fixed now.
Ahmed Abdel Razzak
Just to make sure that everybody have an idea on how I solved the issue (for reference and suggestions) 1 - I've added a authentication token model to the database which has only 2 field (id, token) 2 - I've added the id of the token to the payload 1- when a user logout (DELETE /sign_out) It deletes the token from the server 2- I have an hourly worker that cleans up the expired tokens this way every hour the old expired tokens are cleared... 3- If a user tries to login with a token, just check if the id in the payload (or the token itself ) exists or not... If it doesn't then he must have been logged out before... --- PS This solution should work with only the id field, and in fact it's more secure (incase of a breach), but I needed to save the token and many other "session" info for other purposes ) If you think that this might have a problems... please share with me what you think :D
Ahmed Abdel Razzak
+1 for the refresh token
Rohan Deshpande
Amazing tutorial! I'm having some issues though, basically I can't perform Ajax requests to my api subdomain as I keep getting csrf token mismatch errors. Anyone else experiencing this? I have the csrf-token meta tag in my <head> and have also done the $.ajaxSetup() thing (was working fine before I went api based) so I'm not too sure what's going on. Any ideas?
Sean Tymon
Just FYI, my jwt-auth package has token invalidation & refreshing built-in. It uses Laravel's cache driver by default, but any key value store will suffice. See here for reference (not completed docs fully yet) - https://github.com/tymondesigns/jwt-auth/blob/master/src/JWTAuth.php#L126-L144
Bradley Suira
Hi, to publish JWTAuth is: php artisan vendor:publish --provider="Tymon\JWTAuth\Providers\JWTAuthServiceProvider" --tag="config"
Alberto Cole
Would not be insecure to store sensitive information on the localstorage? An XSS attack using blind storage enumeration could find the token, and in modern web applications, the potential XSS harm is not only present in our code, it's present on all the 3rd party libs we use. There's actually an alternative: Send JWT over Cookies, and Cookies set as HttpOnly so no JS code can access it, the tradeoff here is dealing with CORS/XSRF, there's a good read about this if you are interested https://stormpath.com/blog/where-to-store-your-jwts-cookies-vs-html5-web-storage/
Rohan Deshpande
Just a note, when I tried to run `php artisan config:publish tymon/jwt-auth` it said the command did not exist, I tried vendor:publish and it gave an exception saying "Too many arguments" not sure about why this happened, but I just got the config file sample from the repo and then generated my key.
Rohan Deshpande
I'm also wondering about the middleware because when I check the files, inside of JWTAuthServiceProvider.php in the registerJWTAuthMiddleware() method, it seems to be referenced as tymon.jwt.auth. I'm not too sure, because I thought middlewares had to be registered in app/Http/Kernel.php but maybe there is some different way to do it and I'm missing something
Badru
Thanks for sharing.
♫☆ Alex Goretoy ☭ ☁
Nice Article. I was using this jwt library in a laravel project two months ago. I didn't know about the laravel-cors one. Thanks. PS: This command is for Laravel 4.x, not 5.x php artisan config:publish tymon/jwt-auth in version 5, use vendor:publish, as you mention later in the article
Jonathan Gravois
Great Article! Very timely since there isn't really another Laravel 5/AngularJS JWT tutorial on the web yet. I have a slightly different use case than your sample. I want (need) to decouple the applications so the Laravel 5 API is a totally separate application from the AngularJS client application. The reason I need this is because I will actually end up with a "Staff" client app (Angular), a "Client" client app (Angular), a "Client" mobile app (Ionic) that will all consume the Laravel API. I read your article and then I went back through it and followed along and was able to reproduce your example. Can you point me in the right direction as to the changes I will need to make to now adapt your example into my use case. I think I will need to make the /login route part of the API and create the login page on the client where a successful login will receive and locally store the JWT but I am not sure how to accomplish this.
Guest
Excellent article. Laravel 5 changed its publish method. Now it's vendor:publish instead of config:publish, so the correct way is: php artisan vendor:publish tymon/jwt-auth Again, congratulations for your excellent article :)
Paulo Coghi
Excellent article. Laravel 5 changed its publish method. Now it's vendor:publish instead of config:publish, so the correct way is: php artisan vendor:publish (yes, without the "tymon/jwt-auth" part) Again, congratulations for your excellent article :)
Karlo Smid
Hi Tino! I think that this statement is not true: """ Security: Since we are not using cookies, we don’t have to protect against cross-site request forgery (CSRF) attacks """ Could you please elaborate more on that? Since there is no way to invalidate JWT token, generated JWT token will be valid up to the moment when keys are recreated. Because of that fact, every POST/PUT method must be protected with CSRF secret.
Sean Tymon
You should find some more info in this SO post - http://stackoverflow.com/questions/21357182/csrf-token-necessary-when-using-stateless-sessionless-au... JWT's have an expiry so they are only valid for as long as you set them to be. You might be interested to know that I implemented a way to "blacklist" tokens using the package mentioned here. It simply adds the token "jti" to redis, where it remains until the token expires, at which point it is automatically purged.
Miguel
I tried the example but I'm getting the error "No 'Access-Control-Allow-Origin' header is present on the requested resource. Origin 'http://localhost:8383' is therefore not allowed access. The response had HTTP status code 403" You now what? because my app is not at the same server. You CORS config works because it is in the same server.
Neerav
Thank you very much Tino for the wonderful, tutorial with detailed explanation of concepts. I am just beginning to explore the possibility of using angularjs with laravel 5. While going through many articles regarding using angular for beginners, I came across a strong opinion that says "DO NOT USE JQUERY IN ANGULAR PROJECT" and "THINK IN ANGULAR", meaning try avoiding jquery as long as you can while developing with angularjs which will force one to try and get solutions which are angular specific and not dirty quick fixes. Going by those opinions, is there a way to not use jquery and still achieve what you have demonstrated here? Is it possible to get the example working with jqlite included with angular? Or is the full jQuery library required? I am planning on using ui-router, so instead of using $httpProvider interceptor, I will have to push the request and responseError to $stateProvider interceptor - Am I right? Please excuse me if you find my questions to be silly. I will really appreciate your help in understanding these things.
jameswagoner
Shouldn't it be stateless? You pass the token with every request, see if it's valid and move on, 40x if not. If there is no token you are not authorized.
Ahmed Abdel Razzak
Yes it should... But how else would you revoke a valid token ? Say a user got his phone stolen and he needs to invalidate the sessions (tokens) ? (Like Facebook session management)
jameswagoner
Point taken there. Multiple devices does pose more thought.
Ahmed Abdel Razzak
On other hand... I don't think that this solution is stateful... And correct me if I'm wrong, The server doesn't save any "state" about the user... And the user token (as a resource) save info about it's own state much like a user post... It belong to a user and much like a user post... He can delete it... I think of the jwt much like a "handshake" between the received request and the api... Not as a token of authenticity... The server issues it and validate its validity (and more importantly its ) existence with each request... Which I don't think (IMHO) invalidate the stateless principle... One last note about the scenario you are describing... From what I understand... You oppose that if a user generated (forged) a valid token (that was not generated by the api) the request should be authenticated correctly and valid... If that is correct, I feel that its insecure solution... A token that the API didn't generate is valid ?
Ahmed Abdel Razzak
Check this angular module https://github.com/sahat/satellizer It work with oauth and jwt... Checking the examples (and configurations) will give you an idea
Ahmed Abdel Razzak
Too bad that I'm not into php... And definitely will check if the jwt-ruby implements those same features or not
Florian Zemke
I’ve built a starter boilerplate project with token-based authentication featuring Laravel 5 as the back-end RESTful API and AngularJS in the front-end. It’s a good foundation for building anything you like with Laravel and AngularJS. I hope it will help some of you getting started quicker. https://github.com/Zemke/starter-laravel-angular/
Florian Zemke
Hey, I’ve built a starter boilerplate project with token-based authentication using local storage featuring Laravel 5 as the back-end RESTful API and AngularJS in the front-end. It’s a good foundation for building anything you like with Laravel and AngularJS. I hope it will help some of you getting started quicker. https://github.com/Zemke/starter-laravel-angular/
Porfirio Chavez
Let me understand this... you make BackEnd for create a view, for request an API that was working in the same BackEnd. This was tested on real ? (Front without Laravel only Angular, Back only api services with Laravel). The CROS and CSFR for post its a headache,
Andy Roddam
Brilliant article. I was just wondering, if all of my authentication is now using the JWT token, does this mean that we do not need Laravel to create a XSRF-TOKEN and laravel_session for each response to the front-end? Similarly, does this also mean that we do not need AngularJS to create the XSRF-TOKEN cookie and X-XSRF-TOKEN header? I am still a little confused as to whether these techniques should be combined with JWT authorization in some way??? :)
RealEyesOpen
Thanks for a very detailed on one of the hottest potatoes for the upcoming years. ;) Though one thing is on my mind (out of my many concerns of using this method), is the local storage really safe? I mean, if someone COULD pass a script or get to it somehow he could fish it without a problem and use it. This token isn't basically like leaving a key to your house under the carpet and hoping no one will ever bother check for it down there?
Johaness
its just too complex for practical use. nice try
Stivenson Rincon Mora
Definitely. No work for me. The Cors it is a problem. In ./app/Http/Middleware/Cors.php I have $response = $next($request); $response->headers->set('Access-Control-Allow-Origin' , '*'); $response->headers->set('Access-Control-Allow-Methods', 'POST, GET, OPTIONS, PUT, DELETE'); $response->headers->set('Access-Control-Allow-Headers', 'Content-Type, Accept, Authorization, X-Requested-With'); return $response; And in Kernel.php have protected $middleware = [ 'Illuminate\Foundation\Http\Middleware\CheckForMaintenanceMode', 'Illuminate\Cookie\Middleware\EncryptCookies', 'Illuminate\Cookie\Middleware\AddQueuedCookiesToResponse', 'Illuminate\Session\Middleware\StartSession', 'Illuminate\View\Middleware\ShareErrorsFromSession', // 'gimnasio\Http\Middleware\VerifyCsrfToken', // ommit 'gimnasio\Http\Middleware\Cors', 'Barryvdh\Cors\Middleware\HandleCors', ]; But always is "No allowed" Also i try omitting the Cors protected $middleware = [ 'Illuminate\Foundation\Http\Middleware\CheckForMaintenanceMode', 'Illuminate\Cookie\Middleware\EncryptCookies', 'Illuminate\Cookie\Middleware\AddQueuedCookiesToResponse', 'Illuminate\Session\Middleware\StartSession', 'Illuminate\View\Middleware\ShareErrorsFromSession', // 'gimnasio\Http\Middleware\VerifyCsrfToken', // ommit // 'gimnasio\Http\Middleware\Cors', // 'Barryvdh\Cors\Middleware\HandleCors', ]; But nothing restricts and allows the request Route::get('/prueba', ['before' => 'jwt-auth', function () { //$token = JWTAuth::getToken(); //$user = JWTAuth::toUser($token); return 'HOLA'; } ]);
Stivenson Rincon Mora
And I have three days in this. What is happening?
Cesar Fernandes
Great article! Just one thing. I downloaded your code, and it is running here almost 100% ok. The only point i have doubt is on checking out... I have to click 3 or more times to get it ou from restricted area... it is like the token keeps alive after the first clicks. Do you have any idea about what can be causing this? Cheers!
Cesar Fernandes
Just to let you know.. there ir a problem with the ngStorage within the github project.. i replaced it with this version https://github.com/raynode/ngStorage/blob/master/ngStorage.27.js and it is ok now
Giolvani
Nice post! At my local env, I get the error "The token could not be parsed from the request", and I have no idea what I can do.
Giolvani
Sami
I second that, does anyone know of tutorials/examples of secure, production-ready JWT client-side storage?
Matheus Schettino
Tino, I gotta say, I spent the last 10 days studying about jwt tokens, and I haven't seen no article as yours. It is a huge mind blowing and reduced I lot of complexity in my mind. Thanks a lot. There's just a few things I would like to know better: 1) The API I'm working on accepts CORS. But there's no restriction. Adding this laravel cors you're using, will I be able to restrict the domains I want to give access? And if it is a mobile application, how laravel will know the client origin's is an app? 2) Let's say I want to work with Google and Facebook oAuth, and provide a sing up page for that user who doesn't have an account on these sites. How can I put all those things together, which practice do you recommend? Again, thanks a lot. Hope you see my message.
Mark Bucknell
What about refreshing tokens? and how can this be handled when Angular could be making several concurrent requests?
SamMonk
For laravel 5 you would use: php artisan vendor:publish --provider="Tymon\JWTAuth\Providers\JWTAuthServiceProvider"
Moin Ahmed
There is a problem of interoperability of this implementation with other. In file Namshi/JOSE/Signer/HMAC.php line 15 should be replaced with following to make it compatible across all implementations of JWT: return hash_hmac($this->getHashingAlgorithm(), $input, $key, true);
Sean Tymon
Moin Ahmed
I have installed 0.5.3 few days back and it still has the issue; probably the old namshi/JOSE signer dependency is still there.
Moin Ahmed
How can we use it to acquire a JWE?
Sean Tymon
yep you are right, it was lingering on master. 0.5.4 will fix
Zakaria Dbani
Thank you very much Tino for the wonderful tutorial ,all work like a charm . after that when i want to use (ionic) i think the interceptor do nothing i get :status code:403 forbiden . anyone can help me please :) .
Konstantin
Every time I login I get new JWT token, however, my old talking still working when I send request. Is there is easy way to logout of JWT without storing it in user table?
Bernardino Guerrero
Hi, I was deployed my proyect (RESTful API) which use JWT, in a digital ocean droplet , but i've the error: "Column not found: 1054 Unknown column 'query_string' in 'where clause'" when I trying to call signIn endpoint. signUp works fine and I can retrieve a token. The doplet is a LEMP, any help: thank you.
zlz
i am getting 500 internal server error in restricted area access. JWTException : token is required . as i understood token is sent in requested header . any help plz ?
Liangjun Jiang
It's pain in the ass for a native app to use session based authentication. You have to ask a user to log in every time while he wants to use your app.
Neri Junior
Using php artisan route:list I receive "The token could not be parsed from the request" I'm doing something wrong?
Moin Ahmed
I want to include couple of custom claims into my jwt, please recommend me the options.
Moin Ahmed
Never mind. I found out by myself. Great job.
Moin Ahmed
Any update on this? how to get jwe, the encrypted token?
Peciorin
Congrats for the article! Can you guys take a look here (http://stackoverflow.com/questions/32163724/angularjs-and-slim-framework-jwt-authentication-and-toke...) and tell if there's anything wrong with my auth flow?
Emoh
It works fine when client is hosted on same domain.But when hosted on different domain it gives following error. XMLHttpRequest cannot load http://example.com/api. The 'Access-Control-Allow-Origin' header contains multiple values 'http://localhost, *', but only one is allowed. Origin 'http://localhost' is therefore not How to fix this hosted on IIS 8. Details: https://github.com/barryvdh/laravel-cors/issues/63 Same issue explained here: http://www.ngroutes.com/questions/AUy0YjmHJGEimGEpEt7Z/how-do-i-erase-one-access-control-allow-origi... http://stackoverflow.com/questions/28596694/how-do-i-erase-one-access-control-allow-origin-from-my-h...
Jag
I cam across this video which explains the basics of JWT here: https://www.youtube.com/watch?v=oXxbB5kv9OA
Omar Jebari
The example code you give is missing quite a lot of stuff. Going to the demo helped to get all of the front end code. Also, very importantly, once authenticated i was unable to get the /restricted route to work until i added the following to my .htaccess, as the Authorization header was getting stripped off (by apache presumably): RewriteRule ^ - [E=HTTP_AUTHORIZATION:%{HTTP:Authorization}]
Aaron Gray
Very nice piece. I did want to point out that storing tokens in localStorage or sessionStorage is vulnerable to XSS attacks and that the data can be viewed by scripts on the page - so if you have a compromised script served from a CDN or if there is malicious code in one of your JS libraries, they can steal the token out of those storage places. Further reading here: https://stormpath.com/blog/where-to-store-your-jwts-cookies-vs-html5-web-storage/ I think a more secure approach would be to store a JWT + CSRF token in the cookie, and then place your computed JWT with the CSRF token inside it in the request header, and validate based on the header.
Roberto Cárdenas
Hello, I am working with Doctrine so my model User is not an Eloquent model. Do I need to migrate my model to be an Eloquent model or is there any way to use my doctrine model with JWT?
Saqueib
It's good for SPA but the API part I am not sure how to manage the expire token on mobile app. Where we only ask user to login once upon first launch of app. If user reopens mobile app long enough the token will be expired and he/she will be required to login again. How can we tackle this issue, it's not good to ask user to login again. Any thoughts guys
Nick
I am trying to go through your steps but no matter how much I try I get ...[Symfony\Component\Debug\Exception\FatalErrorException] Class 'Barryvdh\Cors\CorsServiceProvider' not found I am using Laravel 5.
Mike
Has anyone got any pointers on client app level authorisation? This is not an issue using the described model once a user has logged in but what is to stop a third party creating a valid account and retrieving an access token and use this to bang away at the API? I appreciate they will (should) be limited to only acting on resources they own but this still doesn't seem good. More crucially if someone's access token is compromised a third party could use that to access the user data and potentially refresh the token locking the real user out entirely. This can be avoided if we can prove that the token is being sent by an authorised client application but how can we do that without a secret key?
Chris
I wanted to add to this as well. If i have a user management system, and a user logged in and received a token back, what is to stop the user from doing base64 decode on the payload then manipulating the data, encoding it and use the new token? Especially if the payload contains a user_id or something used to send back information from the server.
Mike
In this case the signature validation would fail so you would be good. What I don't get is how to stop any joker from getting a token in the first place..
Lasha Kakhidze
great post, thanks
Pavel
When registering the user, you should hash the password, otherwise the login won't work, I spent hours trying to find why it the authentification fails.
DJ
What if somebody intercept in the login, the user and the password? Is there a mechanism for encrypt user and password before send to login request?
Keyner TYC
No work for me. I added RewriteEngine On RewriteCond %{HTTP:Authorization} ^(.*) RewriteRule .* - [e=HTTP_AUTHORIZATION:%1] And no work. I am using Laravel 5.0 , please help me. Thanks.
MURATSPLAT
Great article, thanks...
vicky
you need to send "Authorization" -> "Bearer YOUR_TOKEN_HERE" as key value pair in header.
Deric Lima
Thanks for you comment Omar, i spent hours trying to figure out which problem i had. Because i was trying to send the token via Authorization Header but the Laravel didn't read the token. I putted this rule in .htaccess and solved. Thanks o//
Barbaros Kurt
imho, when user logout, you put token to redis server as a black list, and when authenticate with same token at server side first you check if it's in black list or not. if black list send 401 else no problem. if user lost his token force to logout so token will be in black list (if you store them in a db).
Bruno Santana
HI, I'm getting the same problem. I'm trying to use the most recent version of laravel-cors (version 7 or something like this)
Bruno Santana
I think I did it! instead of composer require barryvdh/laravel-cors 0.4.x@dev, use composer require barryvdh/laravel-cors 0.7.x (the current version as I write this comment); in config/app.php, use Barryvdh\Cors\ServiceProvider instead of tutorial's, in Kernel.php, use \Barryvdh\Cors\HandleCors without the "middleware"
Greg
I am not sure I understand the signature part. To HMAC you need a key. Beacuse you said that "signature's secret key is held by the server", I am inclined to assume that we have a public key, which is wrong, as HMAC is not public-private, but shared key. So it is the same key that is known by the server and need to be known by the client. If the client is a SPA in PHP, than the key (any string) is not visible, which is convenient. If the client is all coded in JavaScript, what it will happen with the key? Could be that all this flow is based on the shared secret? I've seen that others suggesting a "dynamic" shared secret. The shared secret is a shared algorithm that generates what could only be a generated shared string. I see no point in doing it as far as the shared secret is "hidden". At this point one can simply put a session_id as shared secret (which was suggested by some).
Ka Yuk LEE
The JWT is generated by the auth server and the signature secret key is shared amongst the API servers. The JWT is supposed to be opaque to the client.
mlops
Amazing. Tnks. I have been thinking how send some id to browser(mobile) via session or cookie(whats best?) and the same id record in database. When the user enter check id if its the same in db show cart otherwise go to home. All this withought form login. Just when enter in site.
Slim Khan
in signup and after succeed instead of returning the token in JSON it redirect me to /
Gopal G
Read the description on github it says - "This app is not meant to be used in Production environment. It's a very basic example, that lacks any kind of input validation, handling of expired tokens, local storage fallback to cookies or any other storage." This might help - https://stormpath.com/blog/build-secure-user-interfaces-using-jwts/
Tiago Matos
Such good tips! Could you give more? :D I am using Laravel to consume an API from another server. This API uses JWT. My app uses Laravel + Guzzle to make http request. I can make a request and get the JWT from API. After that, I can also make any request to get any data from API. All good so far. However, how can I give users access to restricted area? I am assuming that once I have the JWT the user is authenticated already, but I would like do use Laravel Authentication to make the things easier. Is it possible? What do you recommend in this case once AngularJS is not required?
Andy
I have fully implemented a solution similar to the article using JWT tokens. I am not sure how to stop Laravel creating the XSRF-TOKEN. I should be able to reduce the header packet size if i can prevent Laravel from creating the XSRF-tokens. Do you have any experience with this? Is it worth reducing the packet size?
LaraLara
Did you forget to hash the password on signup or is something wrong with my User::create ? I can create users with your /signup route code, but the password is stored as text and then signin doesn't work. Signin works for a user that I created with Laravel though, since their passwords are hashed. Finally, if I add hashing to your signup, then both signup and signin works as they should. $credentials['password'] = Hash::make ($credentials['password']);
MarcioCamello
$HTTP_RAW_POST_DATA, thats problem, disable in php.ini to always_populate_raw_post_data -1, and enable your CORS in laravel, withCredentials: true and test.
r0ber
Great article, but it would be perfect if you showed the endpoints queries, params, etc,,, , I have a problem when I try to access a restricted endpoint, because I want to send the TOKEN like a HEADER param, an it only works when I send it like a URL param, I can not understand. Cheers!
Cliverson Batista
Hi, My header : Accept: application/json, text/plain, */* Accept-Language: pt-BR,pt;q=0.8,en-US;q=0.5,en;q=0.3 Accept-Encoding: gzip, deflate Authorization: Bearer eyJ0eXAiOiJKV1QiLCJhbGciOiJIUzI1NiJ9.eyJzdWIiOjEsImlzcyI6Imh0dHA6XC9cL2xvY2FsaG9zdFwvand0MVwvcHVibGljXC9zaWdudXAiLCJpYXQiOjE0NjA1MTAzMzMsImV4cCI6MTQ2MDUxMzkzMywibmJmIjoxNDYwNTEwMzMzLCJqdGkiOiI0MjU0NDA1MDMzYzU1ODJhYThkZTQzM2RjOGQ1ZDkxOSJ9.xxAbUfWWDPiBEV6ObVG_xt-tDnwVR7mdHa7w-cLztN4 X-XSRF-TOKEN: eyJpdiI6IjJJdXV5WmdoY3ZnQ01TK3hoRHlaVUE9PSIsInZhbHVlIjoiVTlYVTBqQkxFV1VMVlRRYTROUDdPMU9iOFB6MmNsczZNNTNJMDRzZ01XbVc5RGgrOE8yS1pGNlU2XC9WbThMUVpLSm1VZFV0akFwK0F2V1FUYXh1VHpBPT0iLCJtYWMiOiIxOGJiYjZmZjA5NWMxYzM0MjVhMTZhNThjNTk5MGY4OGEwMTYyY2QwNDg5NjM1MDFlNGE2ZmZjMzNhZDc0Yzg2In0= Referer: http://localhost/jwt/public/ Cookie: laravel_session=eyJpdiI6ImRrTmxHRE5oYzhWMG1OakxzMndyN3c9PSIsInZhbHVlIjoiRkxpRExFZjVvUlBNamN1UEFweTdURTNZa0RxMHM3K3pWeGJcL0xIdm1sNjdhTHZBeVgyd08zZUJUcDZXS080cHA1Q0o0RlRVVmFRdUtMeGlMelRWTUp3PT0iLCJtYWMiOiIwYjZmZGMxMzhjM2QzMWE3Zjg5YTcwYmFiY2YyNTc4ZmI5NmFmODMwODRiODk2MDgxZjc1NmZhZTMzMjljMzZkIn0%3D Connection: keep-alive Response in JWTAuth.php line 296 at JWTAuth->requireToken(null) in JWTAuth.php line 189
Sekhar
Composer.josn -------------------- "require": { "php": ">=5.5.9", "laravel/framework": "5.2.*", "guzzlehttp/guzzle": "~6.0", "doctrine/dbal": "^2.5", "barryvdh/laravel-cors": "^0.7.3", "tymon/jwt-auth": "0.5.*" }, app.php ------------ Barryvdh\Cors\CorsServiceProvider::class The above provider is not supporting and I am getting bellow error while executing "php artisan vendor:publish": [Symfony\Component\Debug\Exception\FatalErrorException] Class 'Barryvdh\LaravelCors\CorsServiceProvider' not found Please let me know the solution ASAP.
Simone NoLogo
Hi, I have a question; when I try the login my angular app crash: this is the error: angular.js:12783 TypeError: Cannot read property 'replace' of undefined.....any idea?
Simone NoLogo
Very Good Article !!! I have a simple question: after login I refresh the page , with htmlMode = false, and in the console I see: Cannot read property 'replace' of undefined. I'm trying to solve it but no solution at this moment....
Arun Karthi Mani
hi Your article was good enough,Is there is any of ur repo with an advanced version which has 99% security
Wadii Basmi
thank you very much !
Olof
Hi! Any chance you can update this tutorial for the latest Laravel version? I see the config/app.php file have different way of listing the providers in 5.3.
Ferri Sutanto
whats your suggestion to get current user? add to custom claims? or just add to response data along with token? or maybe after login we need to fetch /me to get current user? Thanks
Mathieu Rossignol
May I ask you what tool did you use for your beautiful network flow charts? Something with mscgen as engine or a specialized tool for network charts? Or just A classical drawing tool? If it's a dedicated tool I'd like to use it. Thx
Dmitry Litvinenko
Excellent article! Very neat solution.
Raees Uzhunnan
Can someone help me here ; can JWT be implemented with GET ?
Lokesh L M
It Clear's my confusions and got clear solutions for API authentication and Token generation. Thanks for posting awasome article.
Kashyap Gandhi
How to create JWT token without credential for guest api response for all future calls? My plan is app developer first call my guest api, in that api we match some logic for valid request, based on successful match lumen generate guest token without any credential and return back in response. This guest token further use for all future api calls. If any user take login/signup then we generate new token and return back in api response. Please help me to generate the guest token which will work same as authorize token.
nikhil gaikwad
@disqus_hePYgZ134A:disqus Did u solve the issue. i am also facing the same issue.
nikhil gaikwad
@disqus_pchuJt26Qj:disqus and @brunosantana:disqus Did u solve the issue... I am also facing the same issue. I am using L5 and laravel cors 0.8.*
Abraham Bosch
for publishing configs, the correct command is : "php artisan vendor:publish --tag=config"
Muhammad Ali
learn lots of concepts from article
Andrie Tri Laksono
im get an error in signup POST http://localhost:8000/signup 409 (Conflict) how to solve this?
Jhansi Pasupuleti
Can we implement JWT in php? can you help me out?.
adhiana mastur
Thank you.
The Brain™
Laravel is a PHP Framework.
Daniel Wolf
To publish the config in Laravel 5 use: $ php artisan vendor:publish --provider="Tymon\JWTAuth\Providers\JWTAuthServiceProvider" You can find the Installation Configuration here: https://github.com/tymondesigns/jwt-auth/wiki/Installation
John johnson
Hands-down the best explanation of JWT I've read. Thank you!
Syrine Jamel
Please how can i log out the user from all devices ? Thanks
comments powered by Disqus
SUBSCRIBE
THE #1 BLOG FOR ENGINEERS
Get the latest content first.
No spam. Just great engineering posts.
TRENDING ARTICLES
RELEVANT TECHNOLOGIES
ABOUT THE AUTHOR
Tino Tkalec
PHP Developer
Tino is a software engineer with over 10 years of experience in creating native Windows and Web Applications. He has a strong experience with the LAMP stack and the ability to refactor spaghetti code into reusable and testable code.

来自  https://www.toptal.com/web/cookie-free-authentication-with-json-web-tokens-an-example-in-laravel-and...

普通分类: