You are here
马哥 14_02 _Linux系统启动流程之二 内核及init 有大用
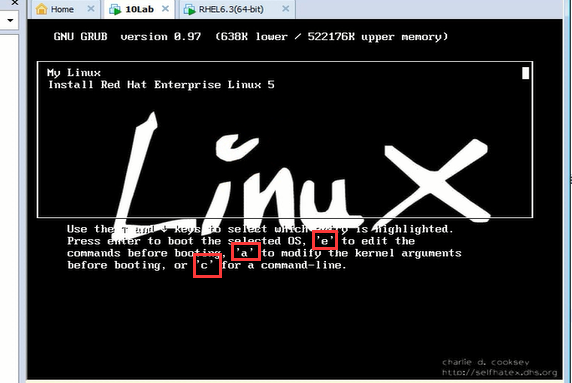
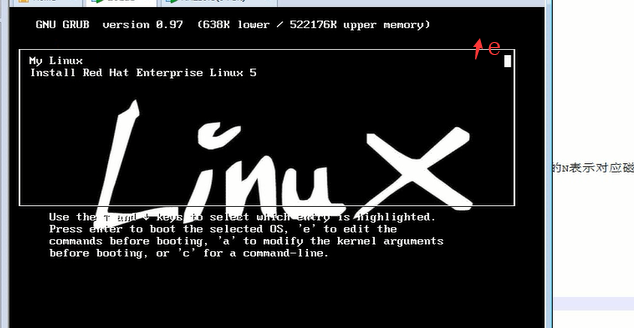
(a表示修改kernel参数 e表示编辑命令)
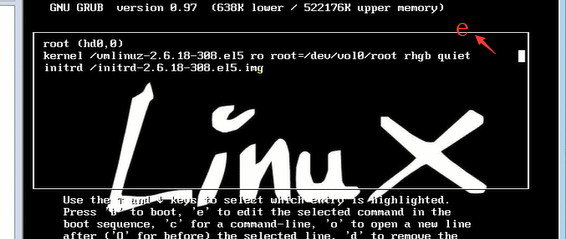
敲空格 添加字符 1 表示启动级别为1 ,然后敲回车
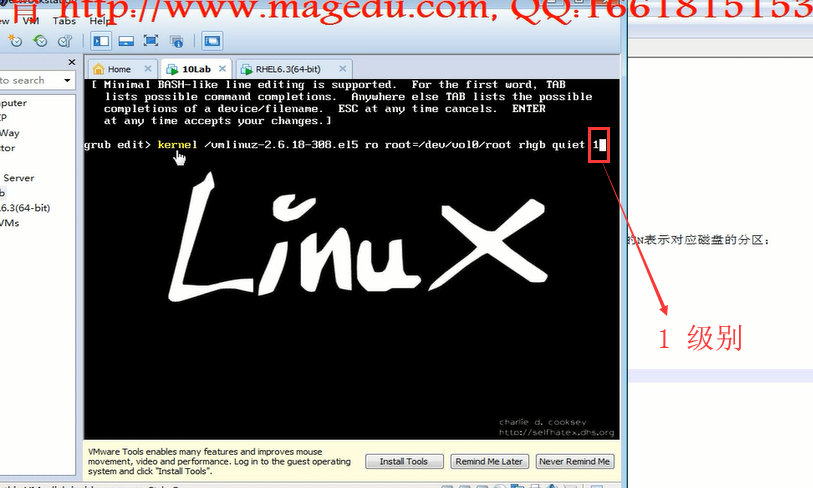
我们这里敲了single (这里sing可能是显示不完整吧) 然后 回车
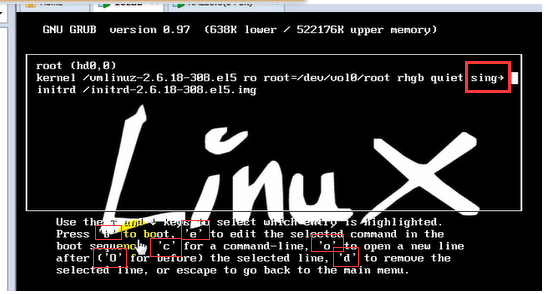
c 表示命令行模式 e 表示编辑 d 表示删除这一行)
一切完成之后敲 b 键 就启动了
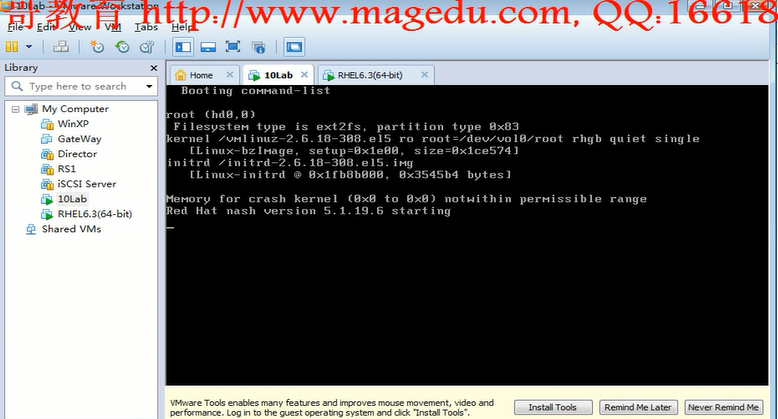
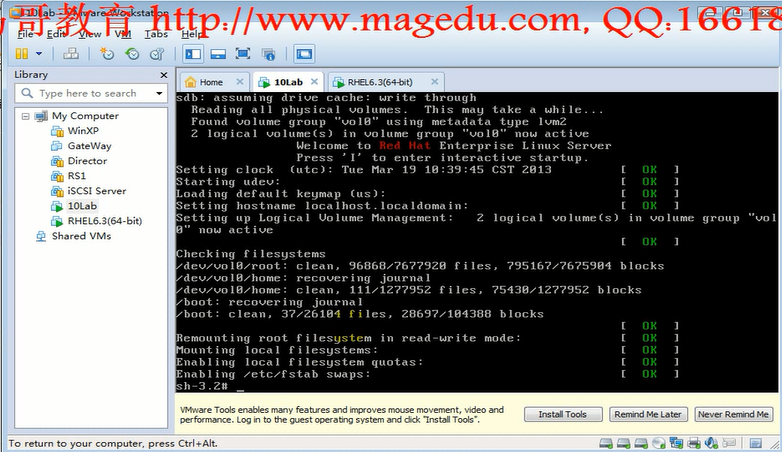
此时因为是 single 是单用户模式,不需要密码就可以登录的,此时登录以后,直接以root用户的身份访问,
忘了root密码,此时就可以改一改了 (这里改的时候,不需要提供原密码)
启动的服务不同
运行级别: 0-6 7个级别 在不同的级别下,启动的服务不一样而已(不一定完全精确)
0: halt 关机
1:single user mode 单用户模式,相当于windows的安全模式,维护模式 直接以管理员身份切入(密码都不需要)
管理员密码忘了,通过这个模式可以进去改改 1,s,S,single
2:multi user mode 多用户模式,而且有网络功能,不启用NFS (no NFS)(network file system)
挂载了网络文件系统,它不会给你自动挂载的
当nfs出故障的时候,开机挂载nft系统时,nfs文件系统死活挂不上(系统down在那里)
出了这个问题,可以进入2级别
3:multi user mode 正常的多用户模式,text mode(文本模式) (只有命令行,不启动图形界面)
我们平时的时候,就是3级别 默认级别
4:reserved 保留模式,保留级别,尚未使用的模式,没有定义
5:multi user mode 多用户模式,graphic mode (图形终端模式)
6: reboot 重启
如果不想让别人进单用户模式,可以在/boot/grub/grub.conf中加个密码 (在任何一个title上面加密码)
但是 /boot/grub/grub.conf 随便任何人都可以看 可以使用加密格式的 (记住是 password 不是 passwd)


如何查看当前运行级别:
runlevel
who -r
查看内核和平台架构
uname -r (r 表示 release)显示当前正在使用的版本号(内核release号)
uname -a 显示更全部的信息
grub坏了怎么办?演示一下怎么装grub
修复(安装)grub (仅是MBR中的bootloader坏了,但是分区表不能坏,在446个字节之前坏了)
安装 grub stage1
# grub
grub> root (hd1,0) 指定内核所在的分区(指定root)
grub> setup (hd1) 指定在哪个硬盘上安装(只要指定硬盘即可)
安装 grub第二种方法: (在新的另外一个磁盘上新安装一个grub)
# grub-install --root-directory=/path/to/boot's_parent_dir /PATH/TO/DEVICE (这不是根文件系统的根,而是启动时grub所在的分区对应的根(内核所在分区对应的根))
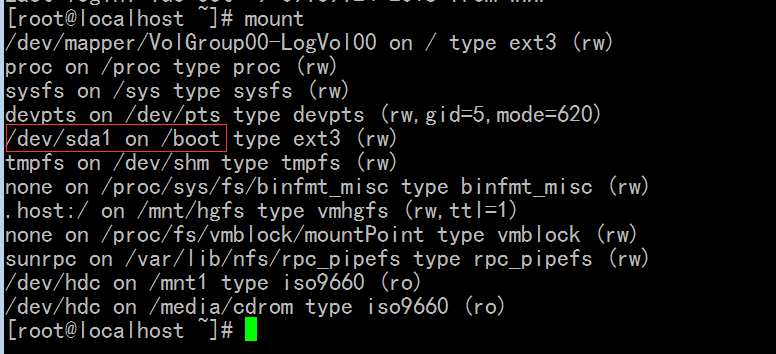
(看mount ,一定要把内核所在的分区挂载到boot目录下才可以,只需要指定boot的父目录就可以了)
grub文件损坏了,怎么办
grub.conf文件坏了 (马哥把它移到其它地方了)
开机后
看到 grub>
grub> find 尝试找boot到底在哪个分区
grub> root (hd#,#) 指定内核所在的分区(指定root)
grub> kernel /PATH/TO/KERNEL_FILE 指定内核文件
grub> initrd /PATH/TO/INITRD_FILE 指定initrd文件
grub> boot 一回车,就启动了
如果启动后创建一个grub.conf的配置文件,下次就不用手动输了
Kernel初始化的过程:
1,设备探测
2,驱动初始化(很可能需要从initrd(红帽6上叫initramfs)文件中装载驱动模块的)
3,以只读方式挂载根文件系统 (否则假如读写挂载的话,任何一个bug,都会导致根文件系统崩溃的)(此时,它只需要从里面读文件,执行程序就行了,过一会儿了,init会重新把根挂载为可读写的)
4,装载第一个进程init ( PID: 1)
/sbin/init: (它要读取的配置文件 /etc/inittab) (sbin s是super超级的意思)
在红帽6.0之后 init 不在是传统的unix 的 init程序, 红帽6.0之后的使用的是upstart(另外一种版本的init)
原来的 init 启动速度,执行速度很慢 (一次只能启动一个服务(后台程序),串行启动的)
upstart: ubuntu开发出来的一个开源项目,另外一种形式的init,可以并行的去启动好多进程,所以启动速度比传统的init要快 (支持并行启动服务)(服务依赖关系有体现) (使用d-bus来完成各自之间的通信,不再需要inittab中后面的更多的子系统,启动这个,启动那个)(系统内部各子系统之间IPC的机制(进程间通信))(基于d-bus各个进程间的依赖关系,通信机制,都是有统一的风格来进行管理,而且统一调配的)(upstart基于d-bus,是基于事件来完成系统启动的 event-driven) (IPC(Inter-Process Communication,进程间通信))
systemd (红帽6.2应该用的是它):据说比upstart还要好,是纯粹完整意义上的并行启动多个进程的一种机制 (支持并行启动服务)(服务依赖关系有体现)(它是完全并行的)
(红帽6.2应该用的是systemd,6.3后又换回了upstart,说明systemd可能不稳定)(但是systemd在设计理念上,实现方式上确实比upstart要优秀)
5.8上用的是init,6.3上用的是upstart
upstart,在红帽6.3上依然叫init,读取的文件依然是/etc/inittab ,但是文件大不相同了
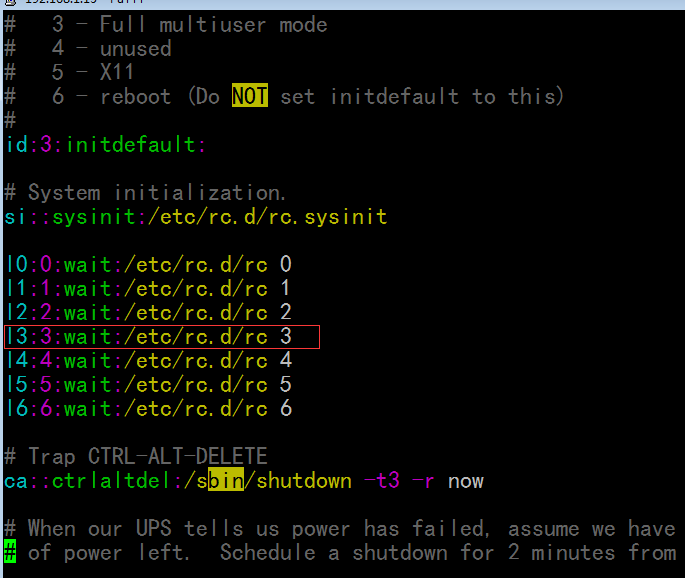
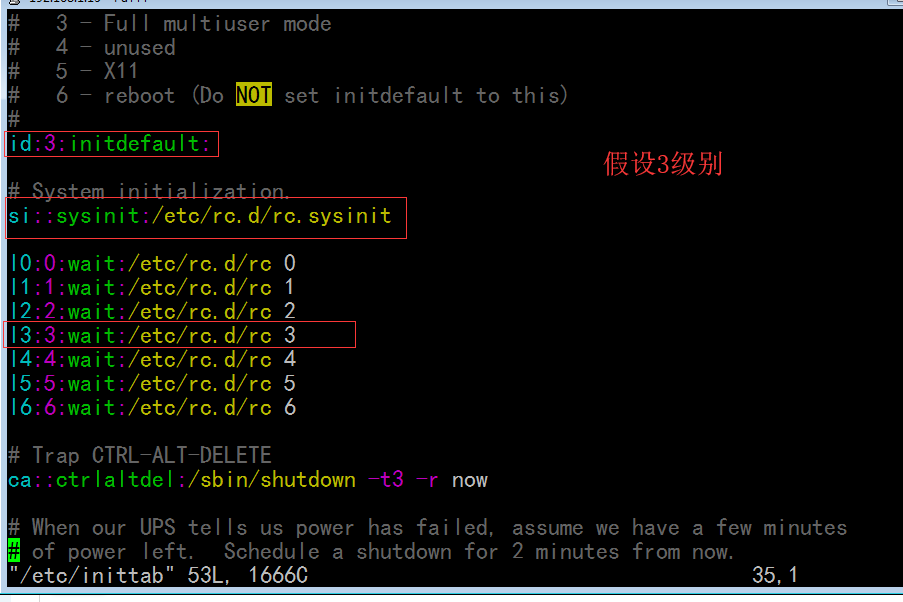
红帽5 ( redhat 5 rhel 5 redhat5 rhel5) inittab
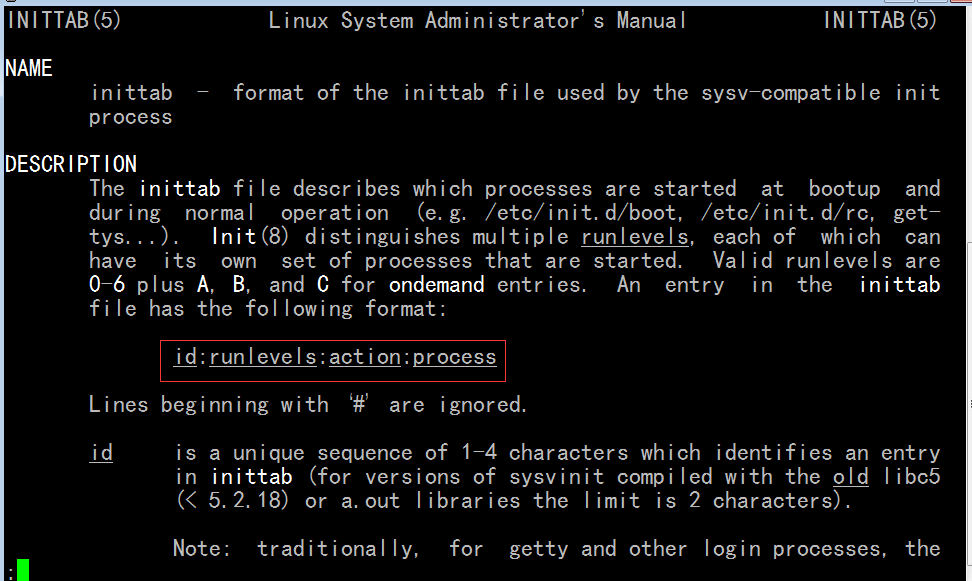
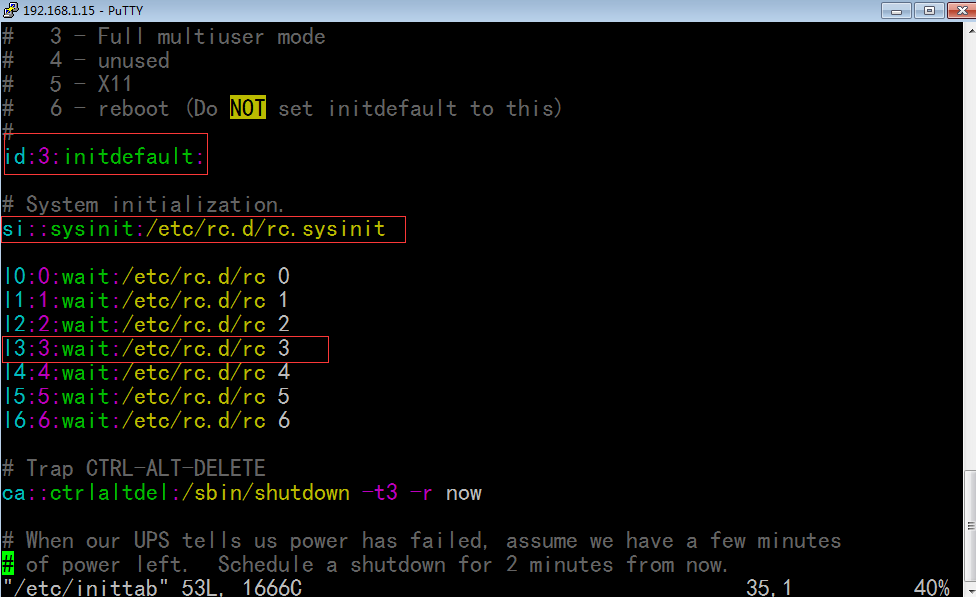
每一行定义了要启动的进程(服务)
id:runlevels:action:process
id: 是不一样的,唯一标识符
runlevels: 在哪个级别下运行此行
action:什么情况下执行,什么时候执行,什么事件下执行
process:执行的进程,要运行的程序
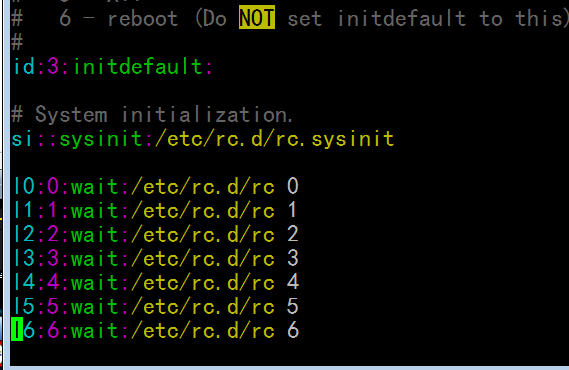
id标识符,3,运行等级 initdefault 是用来设定默认级别的 此时没有指定运行的程序
id:3:initdefault:
si标识符 没有指级别,表示所有级别,sysinit表示系统初始化这种情况 /etc/rc.d/rc.sysinit 表示要运行的程序,这是一个脚本,这是一个系统的初始化脚本 这一行的意思就是表示要执行系统的初始化的
si::sysinit:/etc/rc.d/rc.sysinit
ACTION:
initdefault:设守默认运行级别 一般只执行一次
sysinit:系统初始化 (装载键盘,进行键映射的,设置系统识度(没理解),把文件系统重新挂载为可读写等等,(包括额外的其它硬件设备的驱动程序的初始化),不光是硬件的初始化) 只执行一次
wait:等待切换,只要切换到这个级别,它就执行一次,等待级别切换至此级别时执行 可执行多次
ctrlaltdel:同时按下ctrl + alt + del 时 执行
respawn:(一旦程序终止),(好像是开机时也)会重新执行一次;一旦程序终止,(好像是开机时也)会重新启动 (spawn 启动 发起 引起,酿成)
ca::ctrlaltdel:/sbin/shutdown -t3 -r now 一般不能让用户重启的,可以改一改
pf::powerfail:/sbin/shutdown -f -h +2 "Power Failure; System Shutting Down" 这个需要有ups电源的,否则没意义 断电后2分钟后关机 (意义不大)(-f啥意思 在重启计算器〔reboot〕时忽略fsck)
pr:12345:powerokwait:/sbin/shutdown -c "Power Restored; Shutdown Cancelled" 电了回来了,就取消刚才的关机 (意义不大)
(-c cancel 取消shutdown )
1:2345:respawn:/sbin/mingetty tty1 (只要/sbin/mingetty tty1 命令停了,就重启一次)(进程终止,再启动)(respawn是用来控制终端的)


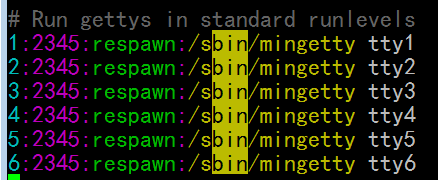
如果 只想3个起作用的话,就删掉后面的 4,5,6三行吧

切换到5级别,就是初始化图形界面的
/etc/rc.d/rc.sysinit 完成的任务
1,激活udev和selinux: (前200行,就不用读了,前面十几行还是可以看得懂的吧)
2,根据/etc/sysct.conf文件,来设定内核参数
3,设定系统时间
4,装载键映射
5,启用交换分区
6,设置主机名
7,根文件系统检测,并以读写方式重新挂载
8,激活RAID(及软RAID)和LVM设备 (额外的,除了根以外和其它的)
9,启用磁盘配额 (限定用户最多使用多少磁盘空间的,用处不大)
10,根据/etc/fstab,检查并挂载其它文件系统
11,清理过期的锁和PID文件
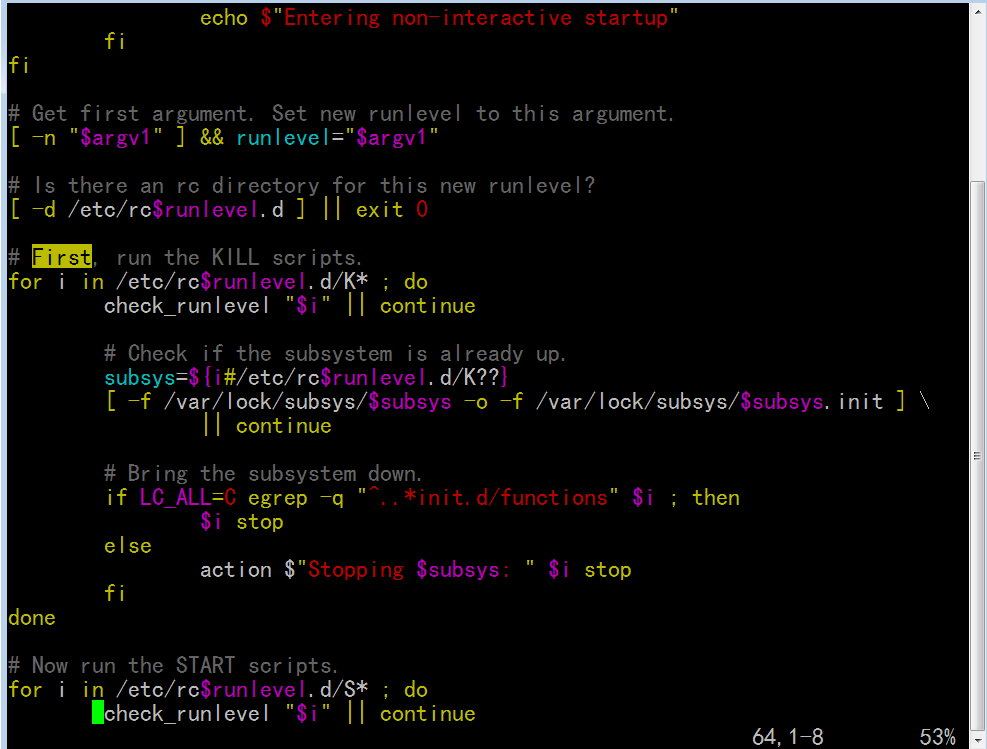
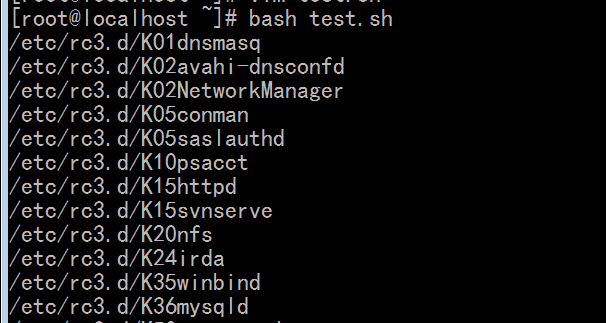
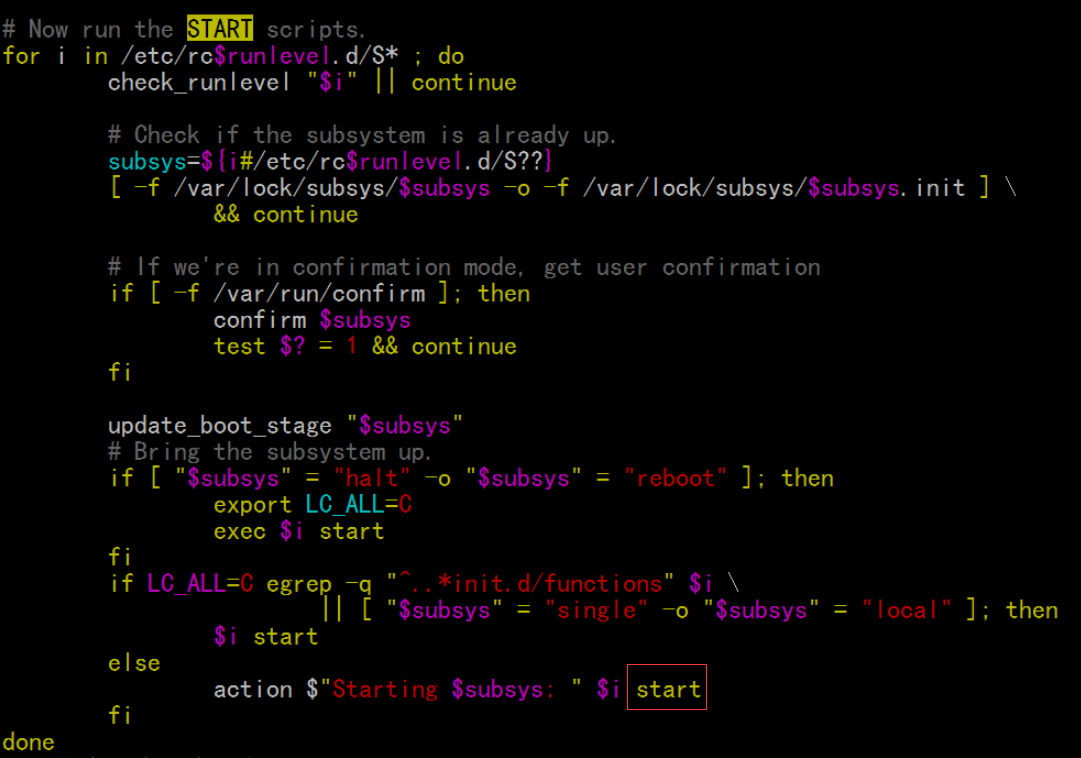
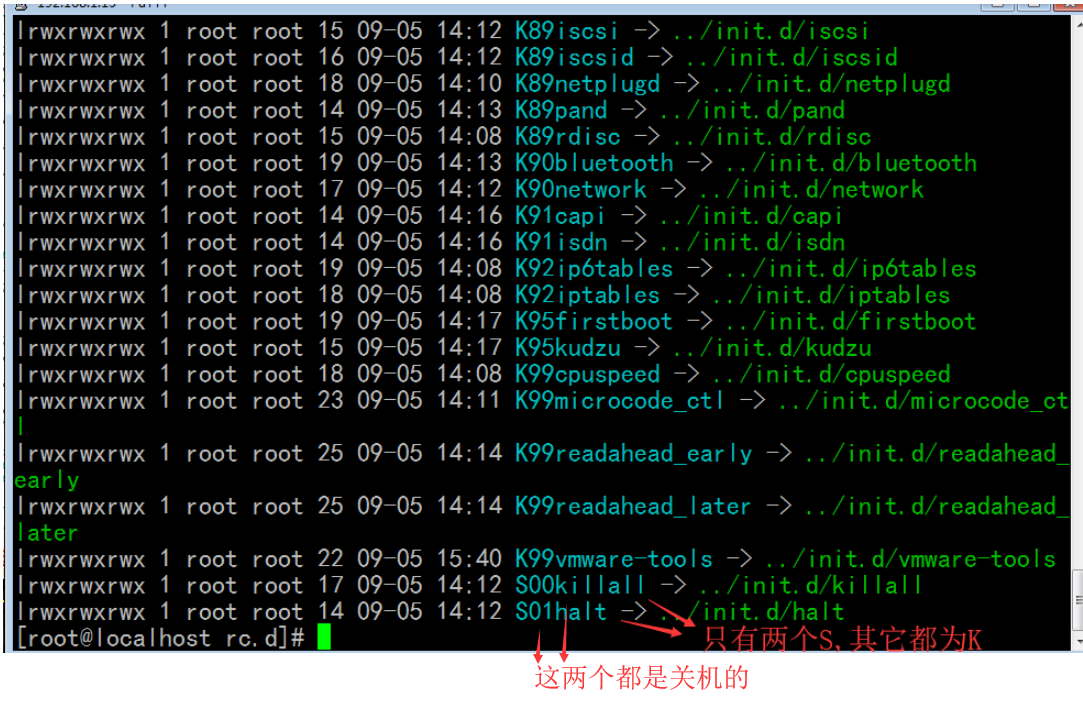
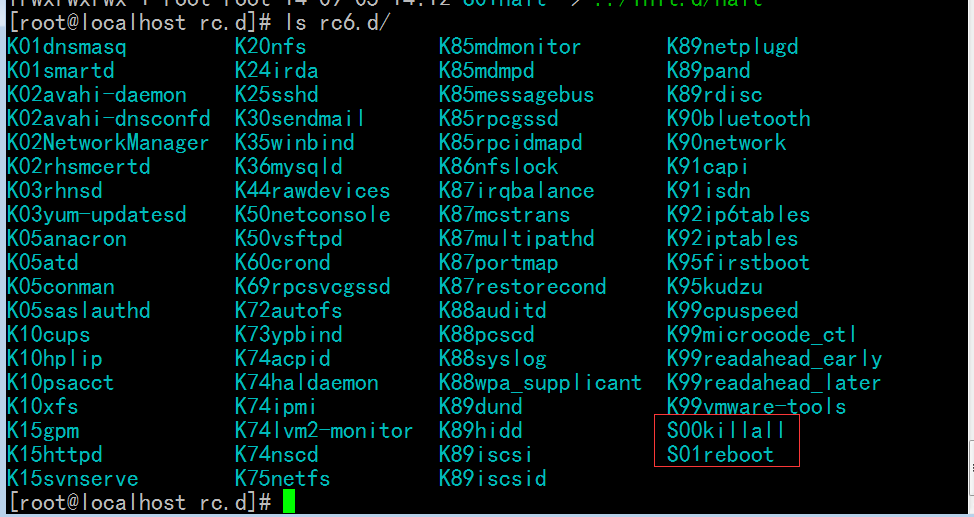
K开头的网络服务将会被关闭,S开头的网络服务将会被启动,而且都是有次序的
##: 表示关闭或启动的优先次序,数据越小越优先被选定
先关闭以K开头的服务,后启动以S开头的服务
for I in /etc/rc3.d/K*; do
$I stop
done
for I in /etc/rc3.d/S*; do
$I start
done
[root@localhost ~]# grub (我的grub为什么与马哥的grub不一样) (我的)

马哥的

[root@localhost ~]# grub-md5-crypt (我输入的是redhat 就生成了md5)
Password:
Retype password:
$1$burR50$Tjq2jPesYzd78PwSMMbJy/
[root@localhost ~]#
直接把这个md5的值贴到贴到 上面的grub.conf中就可以了
以后再想编辑grub菜单(启动时的菜单,就得提供密码了)

# 虽然也是 输入的 redhat ,但是每次值不一样,因为salt不一样

[root@localhost ~]# vim /etc/grub.conf
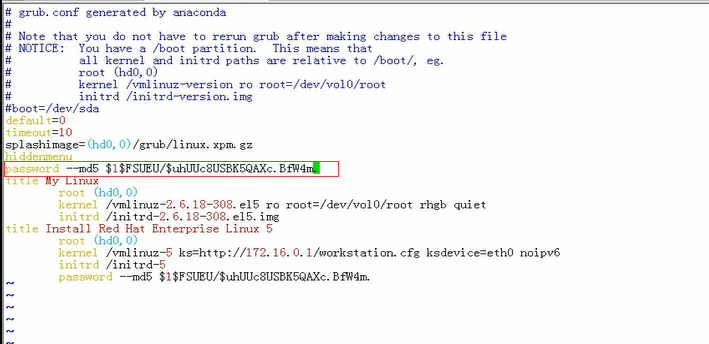
再生成一次吧
[root@localhost ~]# grub-md5-crypt
[root@localhost ~]# grub-md5-crypt
Password:
Retype password:
$1$15wR50$0Br7YQEJOZYPzSBZYR3vj/
[root@localhost ~]#

[root@localhost ~]# vim /etc/grub.conf
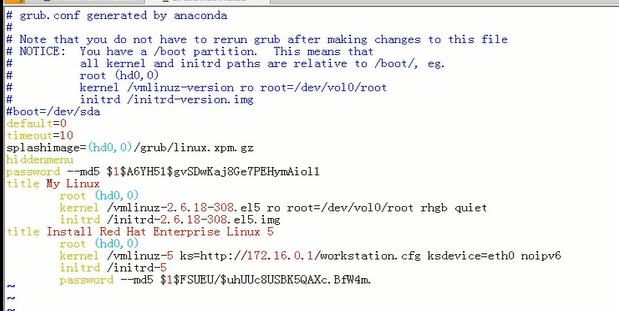
[root@localhost ~]# sync
[root@localhost ~]# shutdown -r now
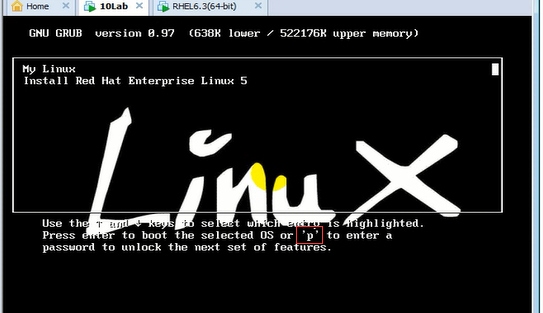
e
敲p键 输密码(我是用redhat生成的md5的密码)后 看到 可以编辑了
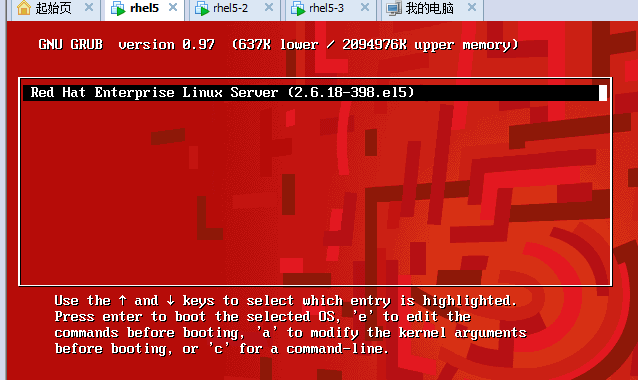
password 放在 title 上面 和 title里面是不一样的

password 放在title 上面表示要编辑grub.conf,才需要的密码
password 放在title 里面 然后 开机后,让你选择某个系统,此时需要的是 title里面的密码
[root@localhost ~]# runlevel (第一个N 表示上一次级别(N表示没有切换) 第二个3 表示当前级别)
N 3
[root@localhost ~]#
[root@localhost ~]# who -r
run-level 3 2018-10-29 16:59 last=S
[root@localhost ~]#
[root@localhost ~]# fdisk -l
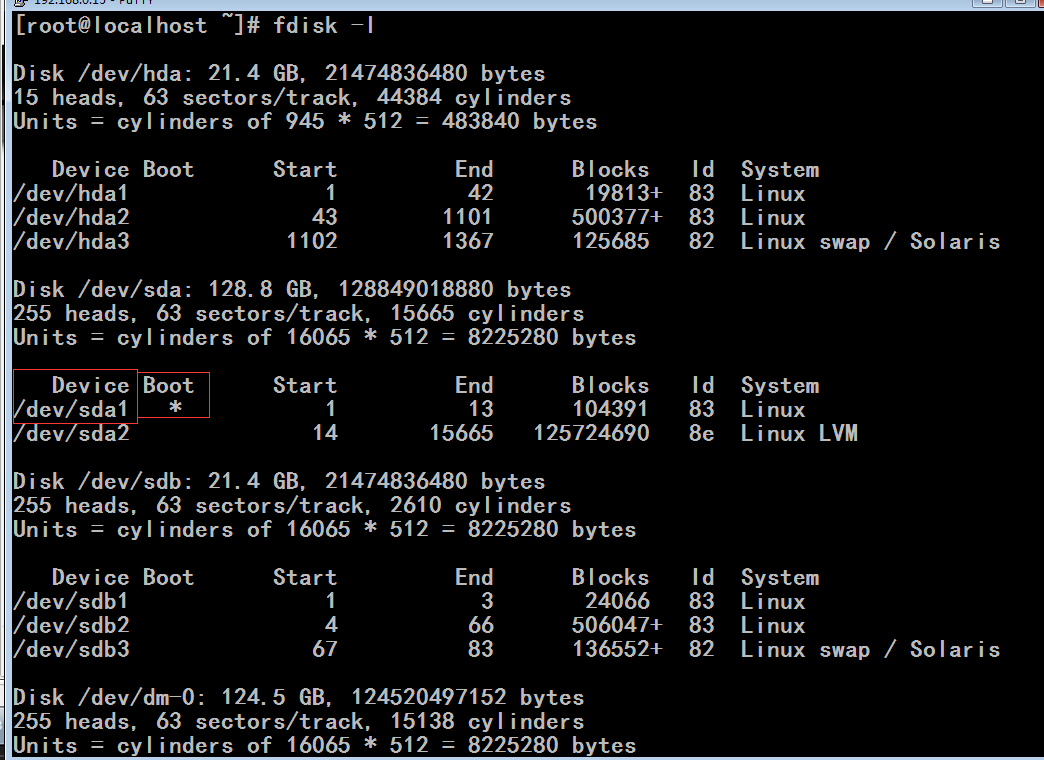
破坏 /dev/sda1上的 MBR,千万不能破坏分区表,只破坏它的bootloader
[root@localhost ~]# dd if=/dev/zero of=/dev/sda count=1 bs=400 (只要不超过446就行)
[root@localhost ~]# dd if=/dev/zero of=/dev/sda count=1 bs=400
1+0 records in
1+0 records out
400 bytes (400 B) copied, 0.000419 seconds, 955 kB/s
[root@localhost ~]# sync
再重启系统,系统就会挂了
我们来修改 MBR
[root@localhost ~]# grub
Probing devices to guess BIOS drives. This may take a long time.
GNU GRUB version 0.97 (640K lower / 3072K upper memory)
[ Minimal BASH-like line editing is supported. For the first word, TAB
lists possible command completions. Anywhere else TAB lists the possible
completions of a device/filename.]
grub> root (hd0,0)
root (hd0,0)
Filesystem type is ext2fs, partition type 0x83
grub> root (hd1,0)
root (hd1,0)
Filesystem type is ext2fs, partition type 0x83
grub> root (hd2,0)
root (hd2,0)
Filesystem type unknown, partition type 0x83
grub>root (hd1,0)
Filesystem type is ext2fs, partition type 0x83
grub> setup (hd1)
Checking if "/boot/grub/stage1" exists... no
Checking if "/grub/stage1" exists... yes
Checking if "/grub/stage2" exists... yes
Checking if "/grub/e2fs_stage1_5" exists... yes
Running "embed /grub/e2fs_stage1_5 (hd1)"... 15 sectors are embedded. (embedded 植入,嵌入 embed植入,嵌入 ) (sectors 扇区)
succeeded
Running "install /grub/stage1 (hd1) (hd1)1+15 p (hd1,0)/grub/stage2 /grub/grub.conf"... succeeded
Done.
grub>quit (退出)
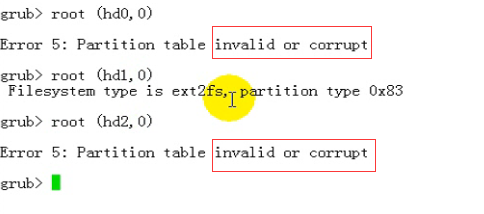
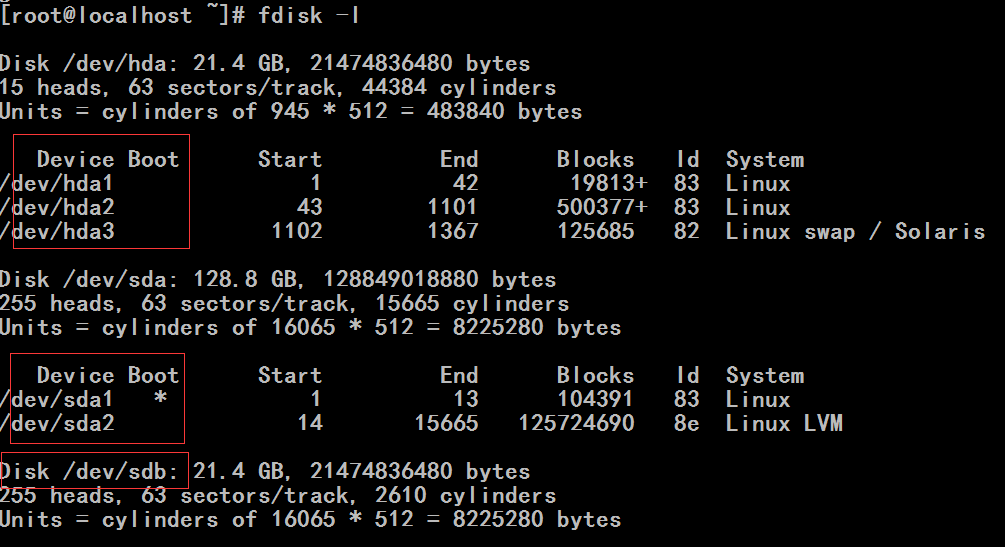
[root@localhost ~]# fdisk -l (hda被识别grub为hda0,sda被grub识别为hda1,sdb被grub识别为hda2 ,,,因为我们要修复的是sda1,所以上面应该是(hda1,0))
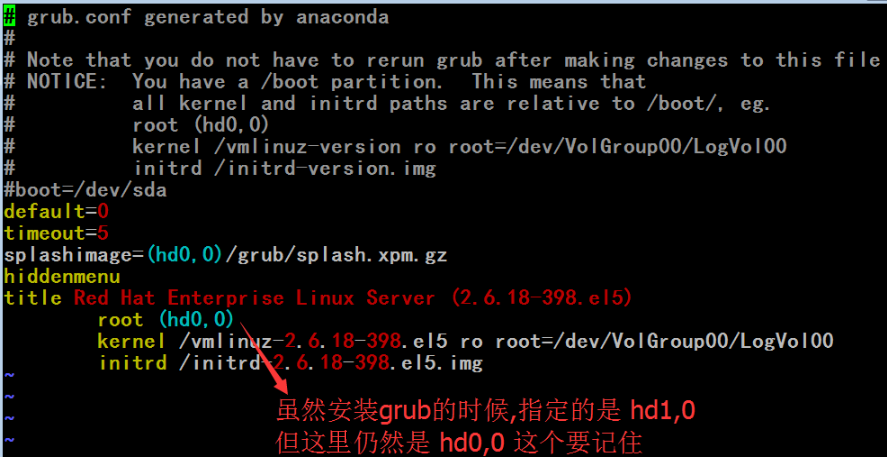
[root@localhost ~]# vim /etc/grub.conf
这里看到的是 root (hd0,0)与 安装grub时使用 (hd1,0)不一致,但是不用担心,这是对的,因为
我重启系统后是正常的
[root@localhost ~]# mount
[root@localhost ~]# fdisk /dev/hda
Device contains neither a valid DOS partition table, nor Sun, SGI or OSF disklabel
Building a new DOS disklabel. Changes will remain in memory only,
until you decide to write them. After that, of course, the previous
content won't be recoverable.
The number of cylinders for this disk is set to 44384.
There is nothing wrong with that, but this is larger than 1024,
and could in certain setups cause problems with:
1) software that runs at boot time (e.g., old versions of LILO)
2) booting and partitioning software from other OSs
(e.g., DOS FDISK, OS/2 FDISK)
Warning: invalid flag 0x0000 of partition table 4 will be corrected by w(rite)
Command (m for help): n
Command action
e extended
p primary partition (1-4)
p
Partition number (1-4): 1
First cylinder (1-44384, default 1):
Using default value 1
Last cylinder or +size or +sizeM or +sizeK (1-44384, default 44384): +20M
Command (m for help): n
Command action
e extended
p primary partition (1-4)
p
Partition number (1-4): 2
First cylinder (43-44384, default 43):
Using default value 43
Last cylinder or +size or +sizeM or +sizeK (43-44384, default 44384): +512M
Command (m for help): n
Command action
e extended
p primary partition (1-4)
p
Partition number (1-4): 3
First cylinder (1102-44384, default 1102):
Using default value 1102
Last cylinder or +size or +sizeM or +sizeK (1102-44384, default 44384): +128M
Command (m for help): t
Partition number (1-4): 3
Hex code (type L to list codes): L
0 Empty 1e Hidden W95 FAT1 80 Old Minix bf Solaris
1 FAT12 24 NEC DOS 81 Minix / old Lin c1 DRDOS/sec (FAT-
2 XENIX root 39 Plan 9 82 Linux swap / So c4 DRDOS/sec (FAT-
3 XENIX usr 3c PartitionMagic 83 Linux c6 DRDOS/sec (FAT-
4 FAT16 <32M 40 Venix 80286 84 OS/2 hidden C: c7 Syrinx
5 Extended 41 PPC PReP Boot 85 Linux extended da Non-FS data
6 FAT16 42 SFS 86 NTFS volume set db CP/M / CTOS / .
7 HPFS/NTFS 4d QNX4.x 87 NTFS volume set de Dell Utility
8 AIX 4e QNX4.x 2nd part 88 Linux plaintext df BootIt
9 AIX bootable 4f QNX4.x 3rd part 8e Linux LVM e1 DOS access
a OS/2 Boot Manag 50 OnTrack DM 93 Amoeba e3 DOS R/O
b W95 FAT32 51 OnTrack DM6 Aux 94 Amoeba BBT e4 SpeedStor
c W95 FAT32 (LBA) 52 CP/M 9f BSD/OS eb BeOS fs
e W95 FAT16 (LBA) 53 OnTrack DM6 Aux a0 IBM Thinkpad hi ee EFI GPT
f W95 Ext'd (LBA) 54 OnTrackDM6 a5 FreeBSD ef EFI (FAT-12/16/
10 OPUS 55 EZ-Drive a6 OpenBSD f0 Linux/PA-RISC b
11 Hidden FAT12 56 Golden Bow a7 NeXTSTEP f1 SpeedStor
12 Compaq diagnost 5c Priam Edisk a8 Darwin UFS f4 SpeedStor
14 Hidden FAT16 <3 61 SpeedStor a9 NetBSD f2 DOS secondary
16 Hidden FAT16 63 GNU HURD or Sys ab Darwin boot fb VMware VMFS
17 Hidden HPFS/NTF 64 Novell Netware b7 BSDI fs fc VMware VMKCORE
18 AST SmartSleep 65 Novell Netware b8 BSDI swap fd Linux raid auto
1b Hidden W95 FAT3 70 DiskSecure Mult bb Boot Wizard hid fe LANstep
1c Hidden W95 FAT3 75 PC/IX be Solaris boot ff BBT
Hex code (type L to list codes): 82
Changed system type of partition 3 to 82 (Linux swap / Solaris)
Command (m for help): p
Disk /dev/hda: 21.4 GB, 21474836480 bytes
15 heads, 63 sectors/track, 44384 cylinders
Units = cylinders of 945 * 512 = 483840 bytes
Device Boot Start End Blocks Id System
/dev/hda1 1 42 19813+ 83 Linux
/dev/hda2 43 1101 500377+ 83 Linux
/dev/hda3 1102 1367 125685 82 Linux swap / Solaris
Command (m for help): w
The partition table has been altered!
Calling ioctl() to re-read partition table.
Syncing disks.
[root@localhost ~]#
[root@localhost ~]# partprobe /dev/hda
[root@localhost ~]#
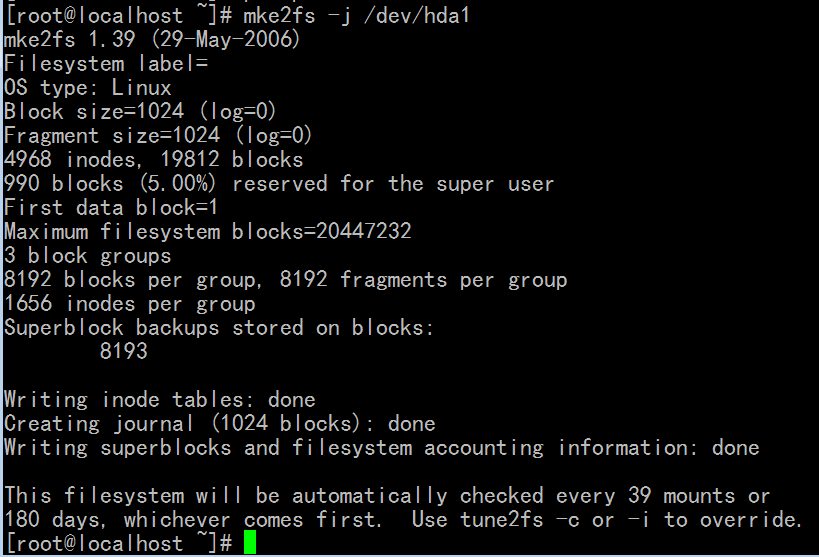
[root@localhost ~]# mke2fs -j /dev/hda1
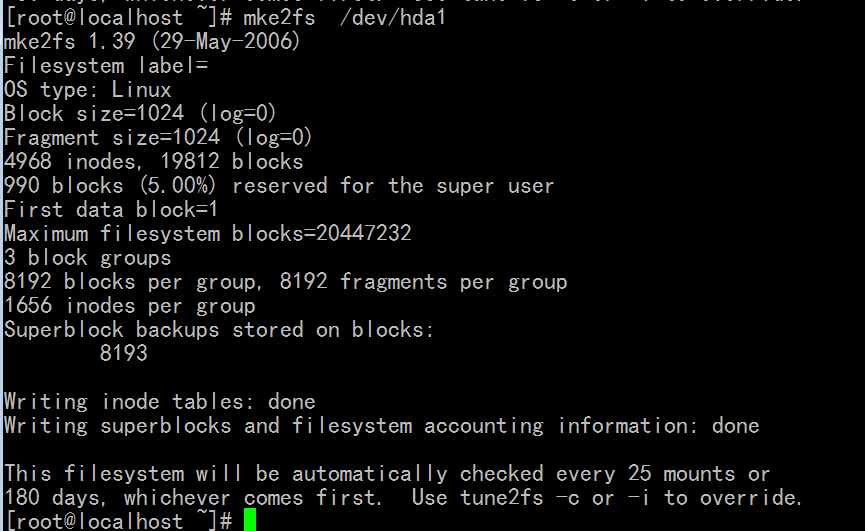
[root@localhost ~]# mke2fs /dev/hda1
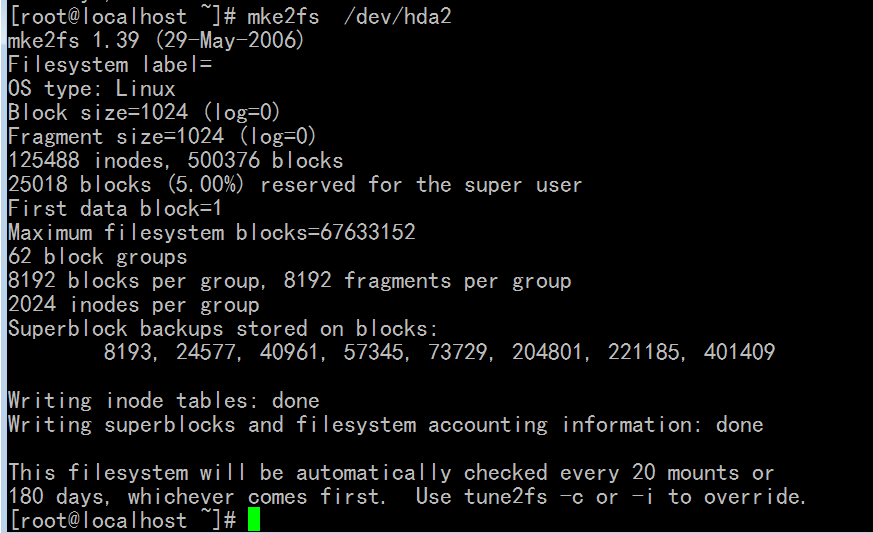
[root@localhost ~]# mke2fs /dev/hda2
[root@localhost ~]# mkswap /dev/hda3

[root@localhost ~]# mkdir /mnt/boot
[root@localhost ~]# mount /dev/hda1 /mnt/boot/
[root@localhost ~]# grub-install --root-directory=/mnt /dev/hda
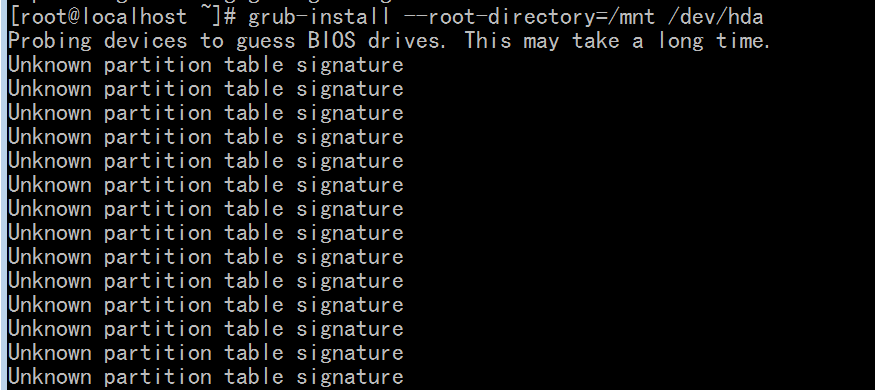

[root@localhost ~]# cd /mnt/boot
[root@localhost boot]# ls
grub lost+found
[root@localhost boot]# ls grub
device.map iso9660_stage1_5 stage1 xfs_stage1_5
e2fs_stage1_5 jfs_stage1_5 stage2
fat_stage1_5 minix_stage1_5 ufs2_stage1_5
ffs_stage1_5 reiserfs_stage1_5 vstafs_stage1_5
[root@localhost boot]#
[root@localhost boot]# vim /mnt/boot/grub/grub.conf
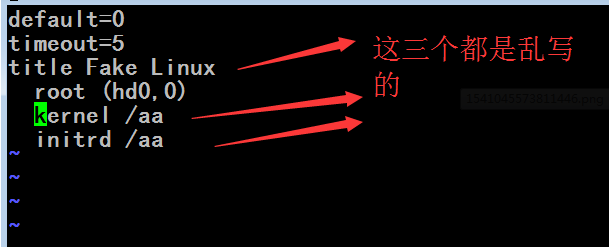
[root@localhost boot]# sync
[root@localhost ~]# cd
[root@localhost ~]# umount /mnt/boot
创建一个新的虚拟机
使用已存在的虚拟硬盘 就是上一步装了grub的hda
启动后发觉到是这样子的 (因为没有操作系统)
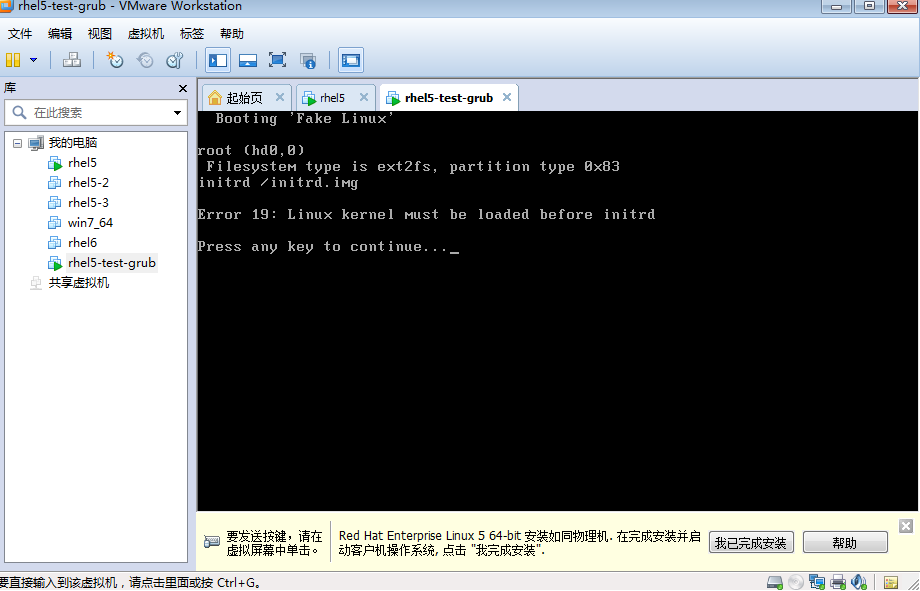
有了grub 再提供内核,提供initrd,内核就可以跑起来了,再提供init文件,用户空间的进程也就起来了
马哥说让这个小系统关机,然后,再运行我们正式的redhat虚拟机,我这边好像也需要(因为否则的话,小系统占据这个磁盘,原系统就启动不起来了)
移动 grub.conf文件到/root目录下
[root@localhost ~]# mv /boot/grub/grub.conf /root
[root@localhost ~]# sync
[root@localhost ~]# shutdown -r now
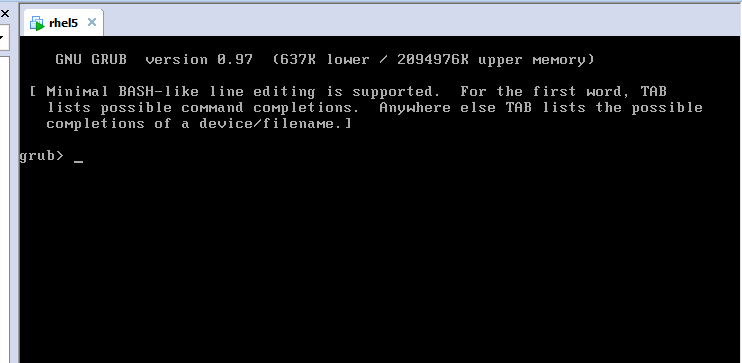
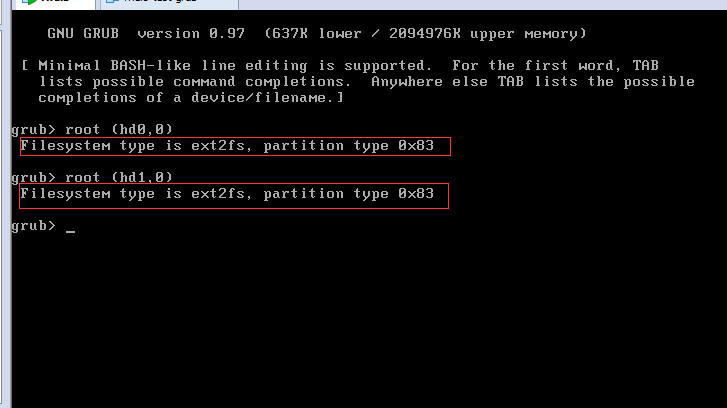

find (hd1,0)/ 光标移到最后按 Tab键
find (hd0,0)/ 光标移到最后按 Tab键
(因为linux是装在sda上)由此可见 sda会被识别成 hd0, hda会被识别成hd1 (可能启动后不是这么回事)
1) root 指定 内核 所在的根分区(指定root)
2) kernel 指定内核 (其实内核后面有参数的)

这里 kernel 后面的内容 可以按tab键自动补全的
3)initrd 指定初始化的内存磁盘 (initrd与kernel内核必须保持一致,以img结尾)

4) 执行 boot 回车 后面就会有一大堆信息 (系统会尝试找根,如果能找到的话,就启动起来了,一般在当前的磁盘上找根文件系统,
一般都是能找到的 所以第2步,不给 kernel 内核 后面的参数,也能找到)
grub> boot
如果启动后创建一个grub.conf的配置文件,下次就不用手动输了
从刚才mv的地方 再move回去
[root@localhost ~]# mv grub.conf /boot/grub/
grub.conf丢失了,或者语法错误了,开机启动时,都会给出一个grub的提示符的
下面是红帽6中的 initramfs
[root@localhost ~]# ls /boot

红帽6上
[root@localhost ~]# cat /etc/inittab
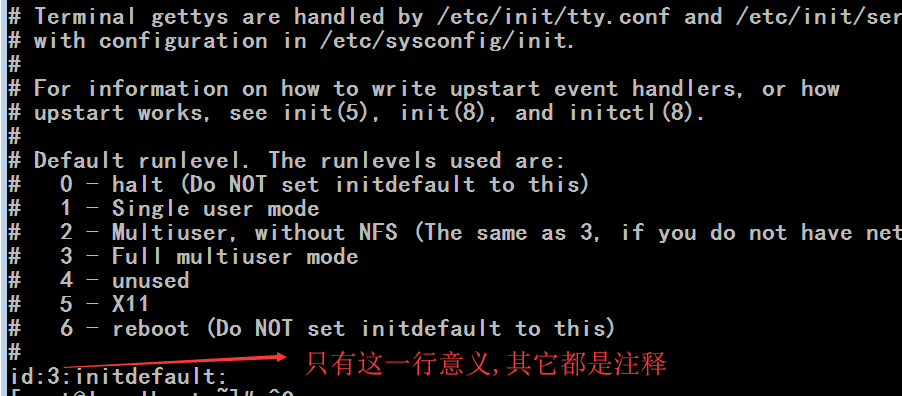
红帽5上区别太大了
[root@localhost ~]# cat /etc/inittab
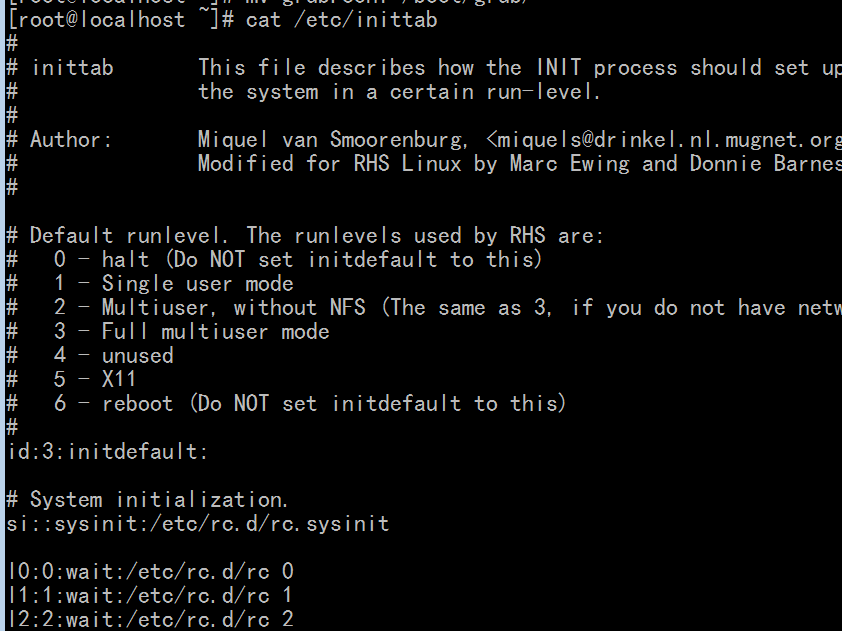
红帽6上 有个目录 init (它把/etc/inittab 的配置 切成n片,放在/etc/init 目录下)
(红帽6上还有一个目录, /etc/init.d)
[root@localhost ~]# ls /etc/init (里面一大堆conf文件) (每一个文件都是基于事件驱动的方式来编写的)
ck-log-system-restart.conf rcS-emergency.conf
ck-log-system-start.conf rcS-sulogin.conf
ck-log-system-stop.conf readahead-collector.conf
control-alt-delete.conf readahead.conf
init-system-dbus.conf readahead-disable-services.conf
kexec-disable.conf serial.conf
plymouth-shutdown.conf splash-manager.conf
prefdm.conf start-ttys.conf
quit-plymouth.conf tty.conf
rc.conf vmware-tools.conf
rcS.conf
[root@localhost ~]#
红帽6上还有一个目录, /etc/init.d (这是脚本存放的目录)
[root@localhost ~]# ls /etc/init.d
abrt-ccpp cpuspeed killall nfs-rdma restorecond single
abrtd crond lvm2-lvmetad ntpd rhnsd smartd
abrt-oops cups lvm2-monitor ntpdate rhsmcertd sshd
acpid functions mcelogd numad rngd sssd
atd haldaemon mdmonitor oddjobd rpcbind svnserve
auditd halt messagebus portreserve rpcgssd sysstat
autofs ip6tables netconsole postfix rpcidmapd udev-post
blk-availability ipsec netfs psacct rpcsvcgssd winbind
certmonger iptables network quota_nld rsyslog ypbind
cgconfig irqbalance nfs rdisc sandbox
cgred kdump nfslock rdma saslauthd
[root@localhost ~]#
红帽6上
[root@localhost ~]# cd /etc/init
[root@localhost init]# vim rcS.conf (通过这种方式,也能够支持模拟多个运行级别的,所以
upstart也能够支持运行级别 1级别 2级别 3级别等等)(但是它的控制机制和配置文件大不相同)

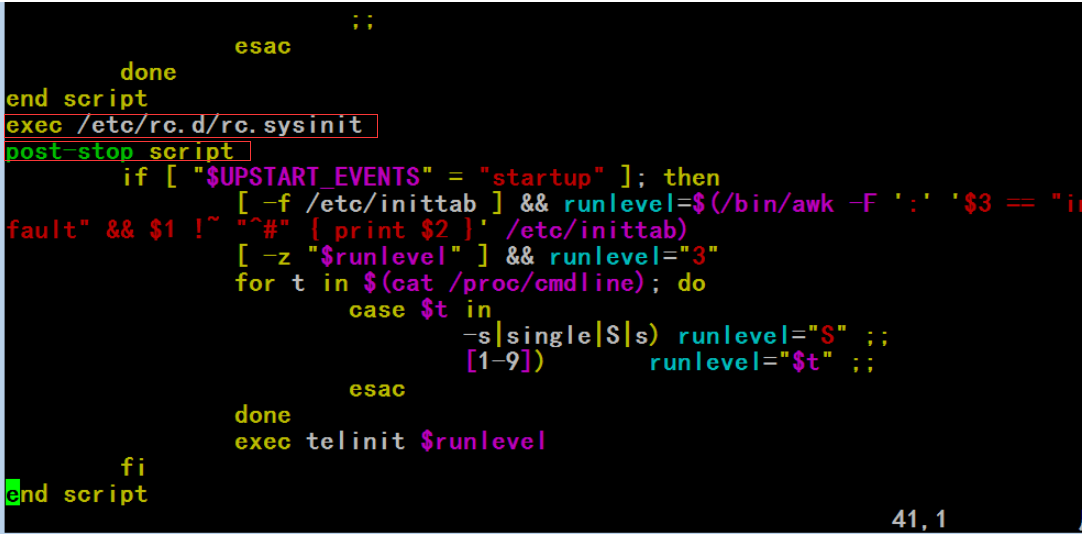
红帽5上没有/etc/init
[root@localhost ~]# ls /etc/init
ls: /etc/init: 没有那个文件或目录
[root@localhost ~]# vim /etc/inittab
[root@localhost ~]# man inittab

[root@localhost ~]# wc -l /etc/rc.d/rc.sysinit
974 /etc/rc.d/rc.sysinit
[root@localhost ~]#
[root@localhost ~]# file /etc/rc.d/rc.sysinit (看看这个脚本吧,有作用,作用大)
/etc/rc.d/rc.sysinit: Bourne-Again shell script text executable
[root@localhost ~]#
[root@localhost ~]# less /etc/rc.d/rc.sysinit
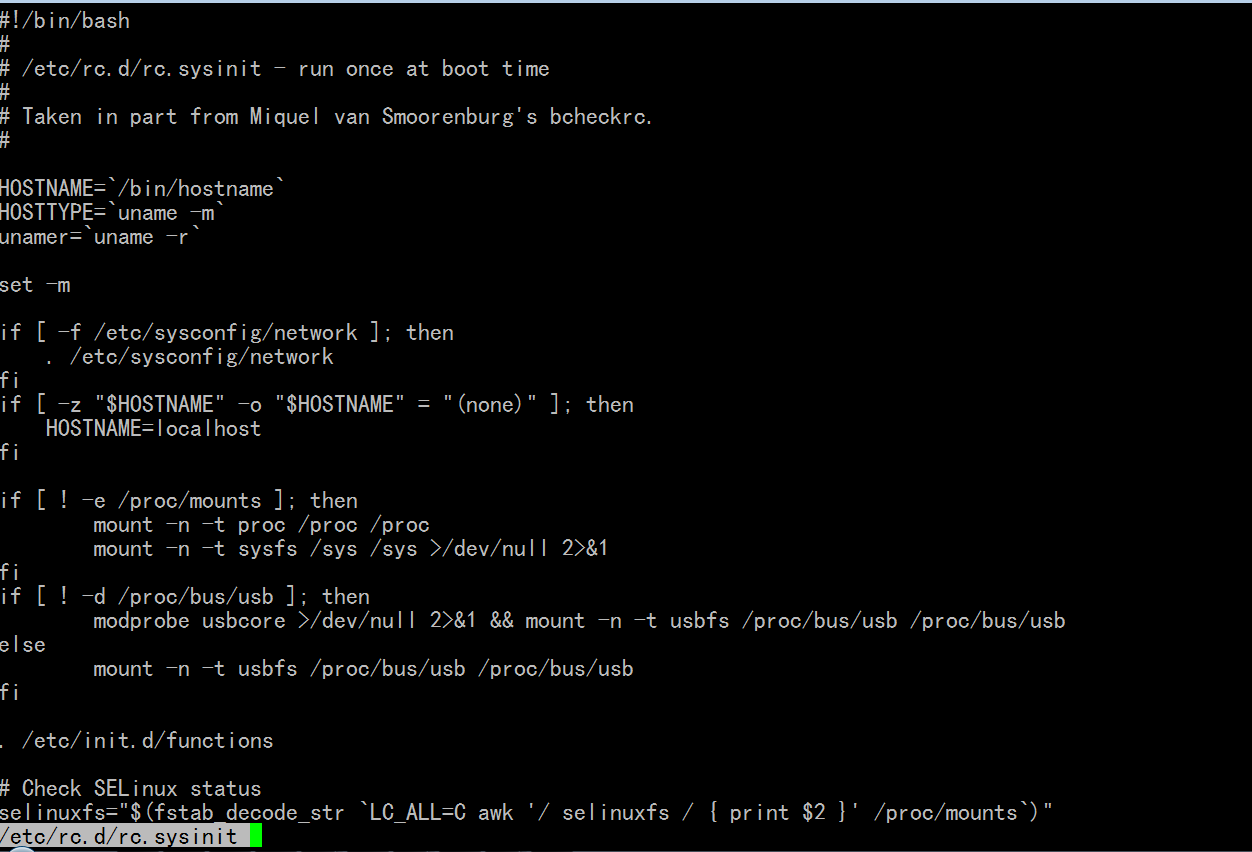
key_is_random() 生成随机键种子?
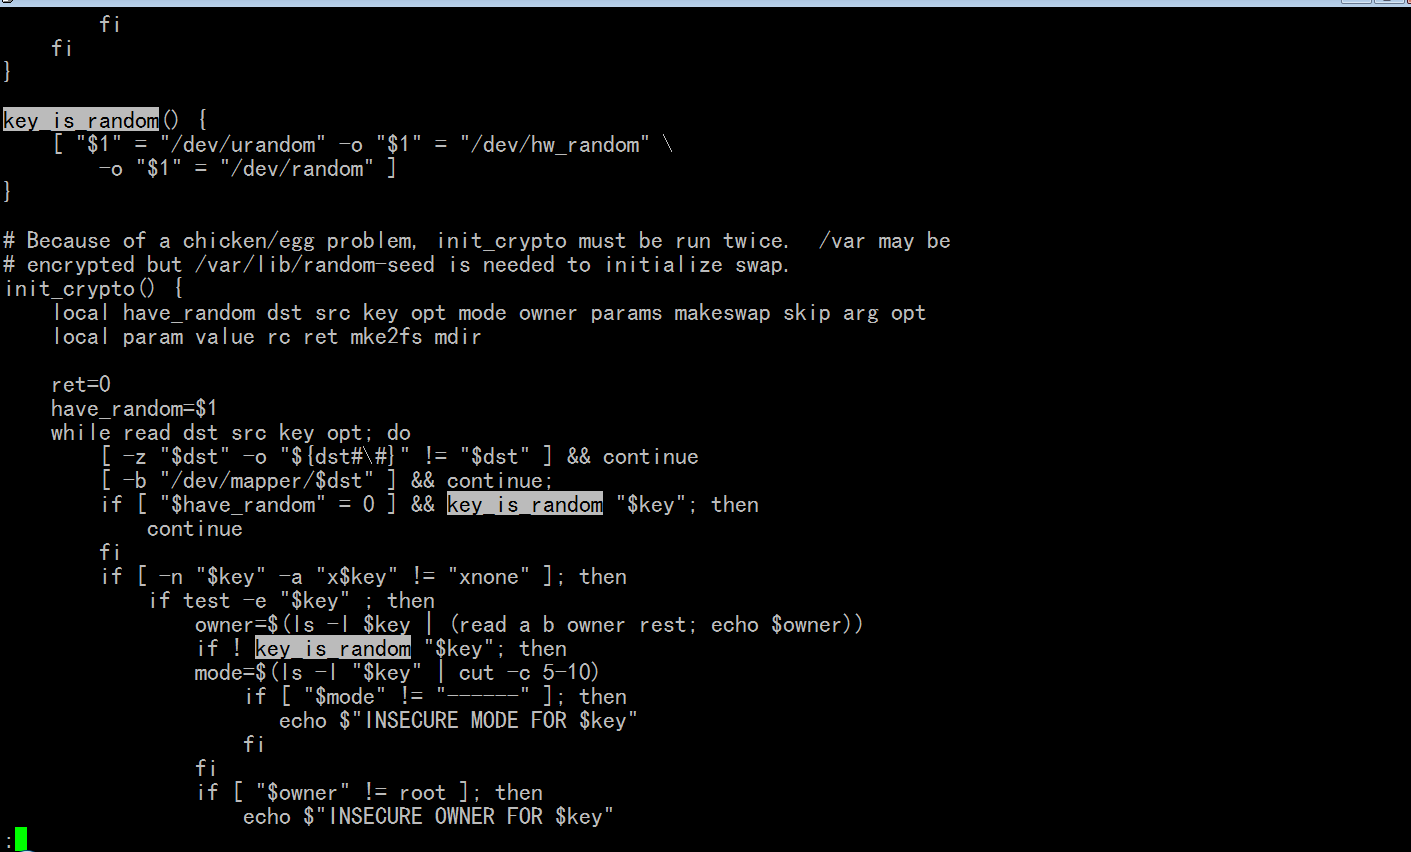
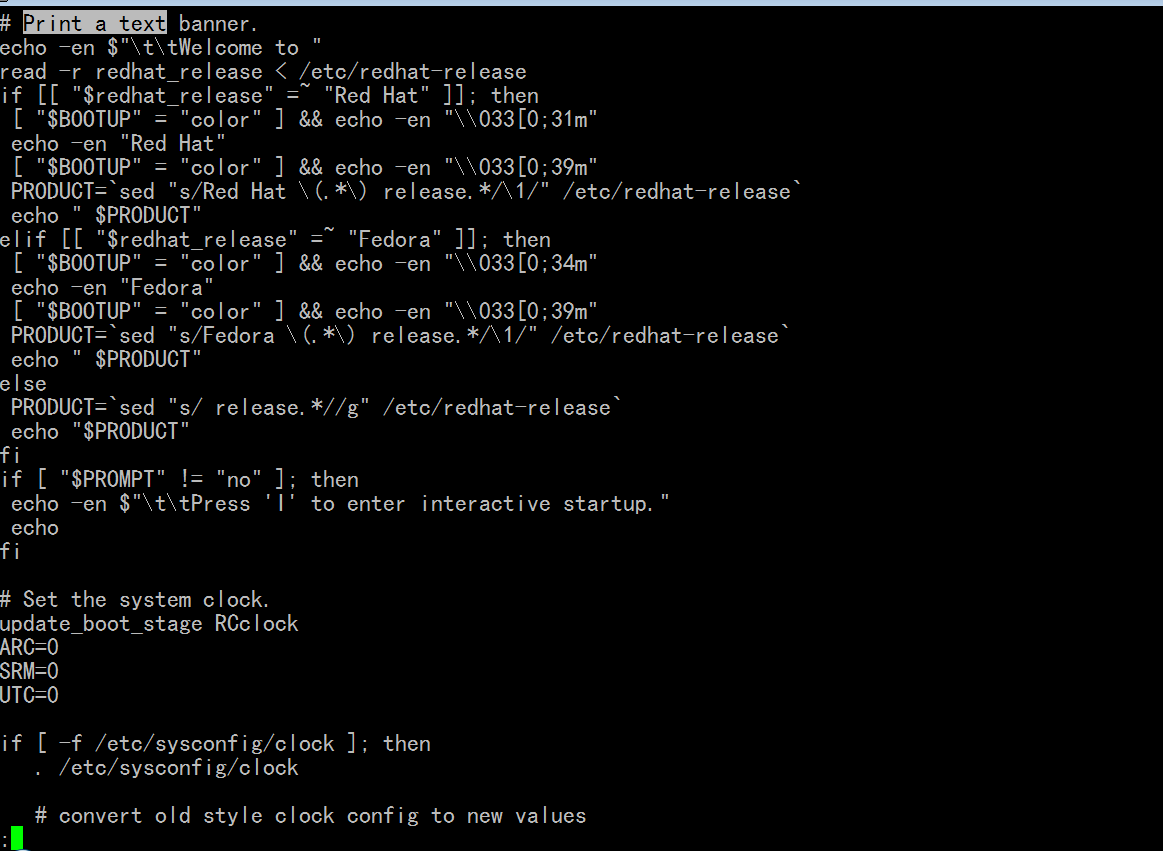
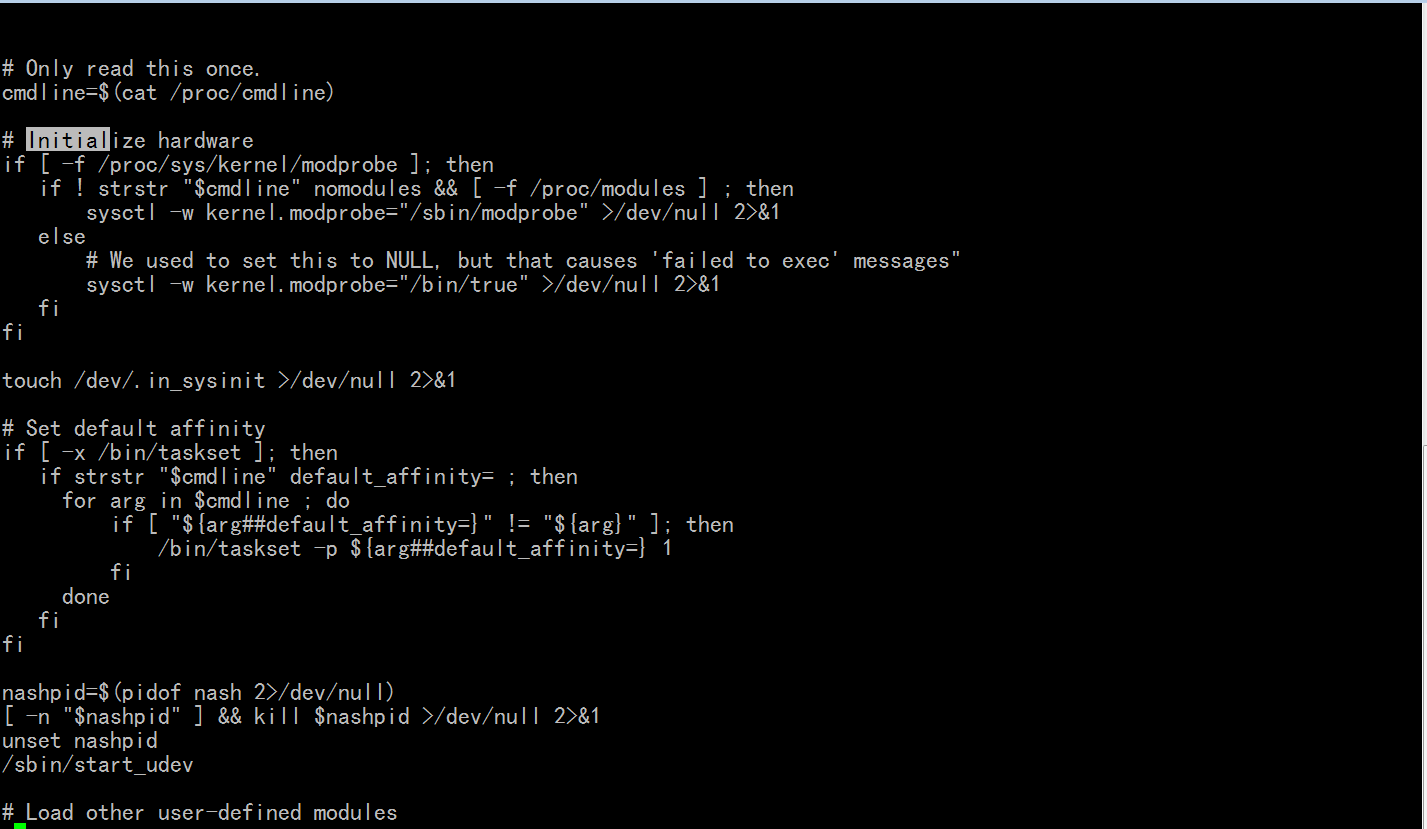
红帽6上也有 /etc/rc.d/rc.sysinit 文件
红帽6
[root@localhost ~]# wc -l /etc/rc.d/rc.sysinit
685 /etc/rc.d/rc.sysinit
[root@localhost ~]#
红帽5
[root@localhost ~]# vim /etc/inittab
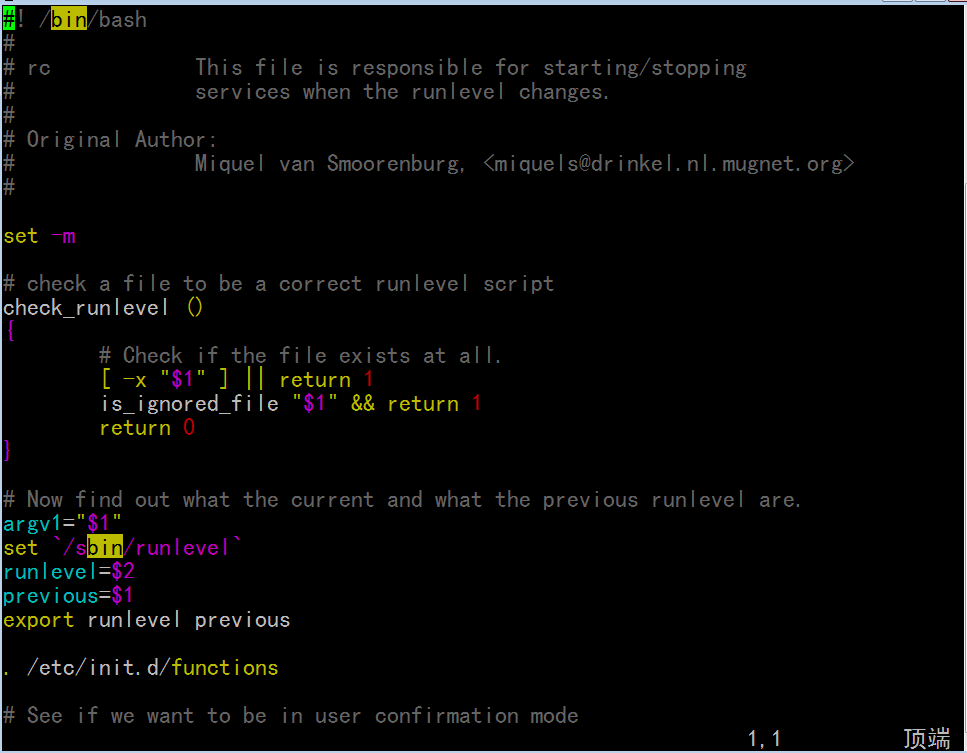
[root@localhost ~]# vim /etc/rc.d/rc
[root@localhost ~]# ls /etc/rc3.d/
K01dnsmasq K87multipathd S12restorecond S50hplip
K02avahi-dnsconfd K88wpa_supplicant S12syslog S55sshd
K02NetworkManager K89dund S13cpuspeed S56cups
K05conman K89netplugd S13irqbalance S56rawdevices
K05saslauthd K89pand S13iscsi S80sendmail
K10psacct K89rdisc S13portmap S85gpm
K15httpd K91capi S14nfslock S90crond
K15svnserve K99readahead_later S15mdmonitor S90xfs
K20nfs S00microcode_ctl S18rpcidmapd S95anacron
K24irda S03vmware-tools S19rpcgssd S95atd
K35winbind S04readahead_early S22messagebus S97rhnsd
K36mysqld S05kudzu S25bluetooth S97rhsmcertd
K50netconsole S07iscsid S25netfs S97yum-updatesd
K50vsftpd S08ip6tables S25pcscd S98avahi-daemon
K69rpcsvcgssd S08iptables S26acpid S99firstboot
K73ypbind S08mcstrans S26haldaemon S99local
K74ipmi S09isdn S26hidd S99smartd
K74nscd S10network S26lvm2-monitor
K85mdmpd S11auditd S28autofs
[root@localhost ~]#
[root@localhost ~]# vim test.sh

[root@localhost ~]# bash test.sh
[root@localhost ~]# vim /etc/rc.d/rc
[root@localhost ~]# vim /etc/inittab
[root@localhost ~]# ls -d /etc/rc*
/etc/rc /etc/rc1.d /etc/rc3.d /etc/rc5.d /etc/rc.d /etc/rc.sysinit
/etc/rc0.d /etc/rc2.d /etc/rc4.d /etc/rc6.d /etc/rc.local

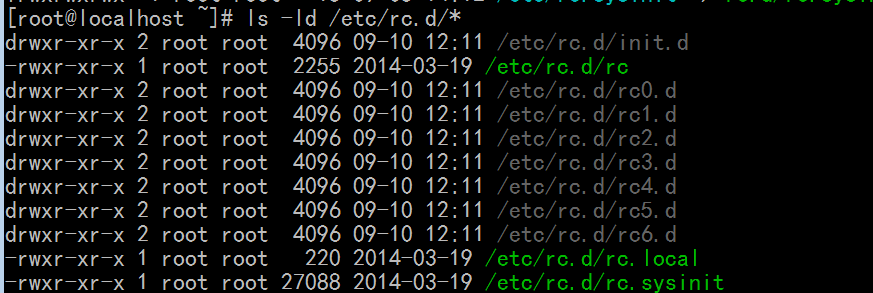
[root@localhost ~]# ls -ld /etc/rc* (蓝颜色都是链接文件)

[root@localhost ~]# ls -ld /etc/rc.d/*
[root@localhost ~]# cd /etc/rc.d/rc3.d/
[root@localhost rc3.d]# ls -la

[root@localhost rc3.d]# cd ../
[root@localhost rc.d]# ls

[root@localhost rc.d]# cd init.d/
[root@localhost init.d]# ls
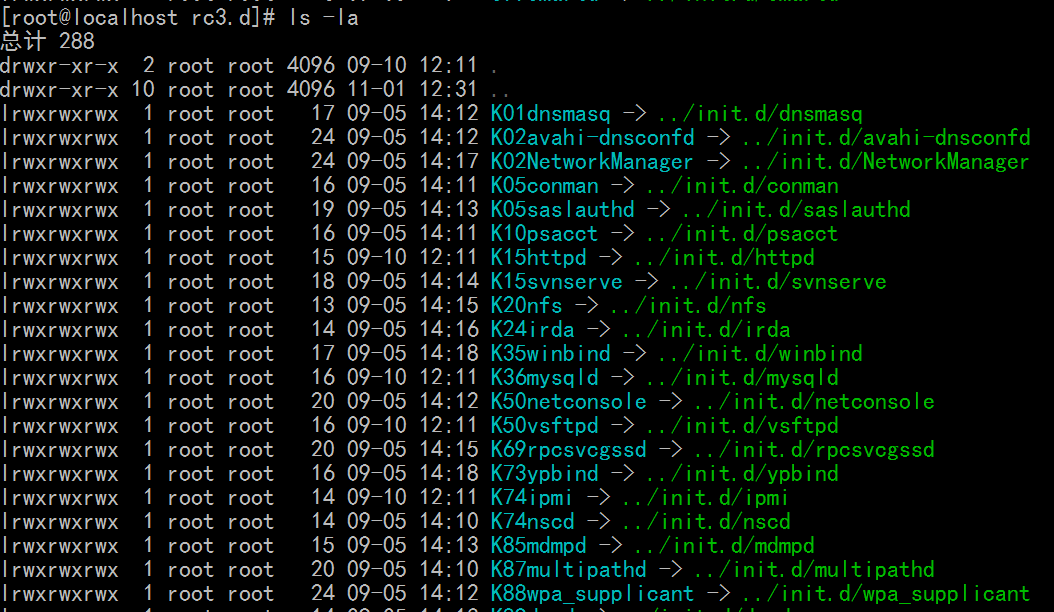
这里面才是真正的脚本, 这些脚本在每个级别下都有个链接,每一个链接就决定的每一个脚本,
每个脚本几乎代表一个服务,(而且是开机时会被执行的服务)(这个服务到底会不会在某个级别下启动起来,
取决于 /etc/rc等级.d/ 下以K开头的,还是以S开头的,如果K (kill)开头的,表示关掉这个服务,如果S (start)开头的,表示启动这个服务)

[root@localhost init.d]# vim /etc/inittab
[root@localhost init.d]# cd ..
[root@localhost rc.d]# pwd
/etc/rc.d
[root@localhost rc.d]# ls
init.d rc0.d rc2.d rc4.d rc6.d rc.sysinit
rc rc1.d rc3.d rc5.d rc.local
[root@localhost rc.d]#
[root@localhost rc.d]# ls -l rc0.d/
[root@localhost rc.d]# ls rc6.d/
[root@localhost rc.d]# cd init.d/
[root@localhost init.d]# pwd
/etc/rc.d/init.d
[root@localhost init.d]#
上面这些蓝色的链接可不是我们手动创建的,有个命令去创建这些链接
任何一个服务 给它任何一个脚本(只要支持 start stop restart status) 加到 /etc/rc.d/init.d 这个目录里面,
我们都可以给它可以创建链接,还可以使用一个命令给它自动创建几个链接
