You are here
马哥 15_01 _bash脚本编程之十二(Linux系统裁减之二) 系统函数库 有大用
系统启动流程:
POST-->BIOS(Boot Sequence)-->BootLoader(446个字节)(MBR)(512个字节)-->Kernel(initrd,initramfs)-->init(/etc/inittab,RHEL6:upstart)
upstart(红帽6) (为了兼容依然叫init)
/etc/inittab
/etc/init/*.conf
以红帽5来讲/etc/inittab 这个配置文件
设定默认级别
系统初始化脚本(/etc/rc.d/rc.sysinit)
运行指定级别的服务脚本
/etc/rc.d/init.d/ (ISB 或SysV风格的服务脚本)
/etc/rc.d/rc#.d
rc0.d--rc6.d
K*
S*
00-99:运行次序,数字越小,越先被执行
chkconfig命令 生成
启动虚拟终端
启动图形终端(级别为5的时候)
/etc/rc.d/rc.sysinit:
检测并以读写方式重新挂载根文件系统
设定主机名
检测并挂载/etc/fstab中的其它文件系统
启动swap分区
初始化外围硬件设备的驱动:(insmode装载网卡,显卡) (除了核心硬件内存,cpu,根文件系统)
根据/etc/sysctl.conf设定内核参数
激活udev和selinux
激活LVM和RAID设备
清理过期的锁和RAID设备
清理过期的锁和PID文件
装载键映射
自己创建的微型的linux
# vim /etc/inittab
id:3:initdefault
si::sysinit:/etc/rc.d/rc.sysinit
# vim /etc/rc.d/rc.sysinit
echo
insmod
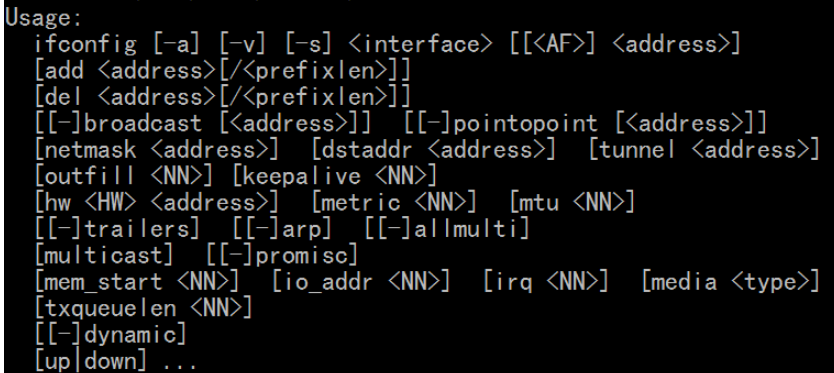
ifconfig
/bin/bash
1,关机和重启
2,主机名
3,运行对应服务脚本
4,启动终端
5,运行用户
6,定义单用户级别
7,装载网卡驱动,启用网络功能(配置ip地址)
8,提供一个web服务器
busybox:1M,模拟近数百个命令的使用 二进制程序,它有很多链接
Kernel:5M,
RHEL5,RHEL6
定制安装:
自动化安装
定制引导盘
mount
-n: 挂载时不更新(因为默认情况下会更新这个文件) /etc/mtab文件
cat /proc/mounts 相当于 mount命令 也相当于 cat /etc/mtab
脚本编程知识点:
变量中字符的长度: ${#VARNAME}
shutdown
halt
reboot
poweroff
init 0 关机
init 6 重启
内核初始化:
硬件探测
装载驱动(有可能在内核,也有可能在initrd)
挂载根文件系统(rootfs)
启动用户空间中的第一个进程init

安装自己简易的 linux
[root@localhost ~]# mount /dev/hda1 /mnt/boot
[root@localhost ~]# mount /dev/hda2 /mnt/sysroot/
[root@localhost ~]# cp /boot/vmlinuz-2.6.18-398.el5 /mnt/boot/vmlinuz (这里以前有了,不执行吧)
# ls
# mkdir test
# cd test/
# ls
 cp
cp
# pwd
/root/test
# zcat /boot/initrd--2.6.18-398.el5.img | cpio -id

# vim init (这是initrd的init)

1) 根目录
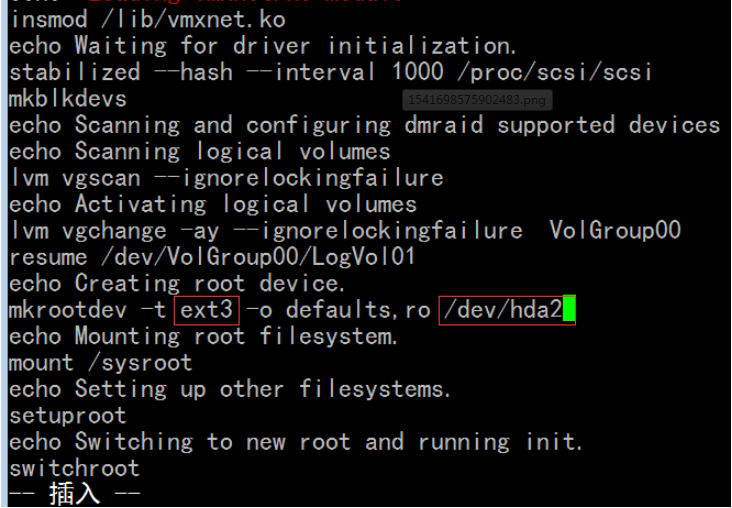
2)注释掉 dm .,+17s@^@#@g (vim是逐行处更换的吧)
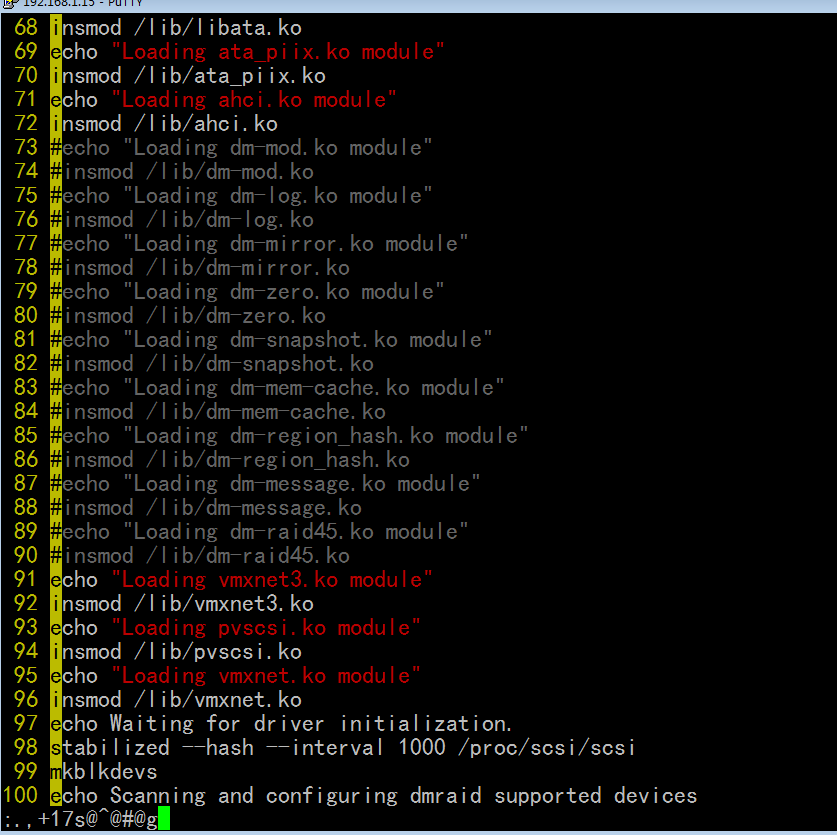
3) scsi用不着,逻辑卷用不着
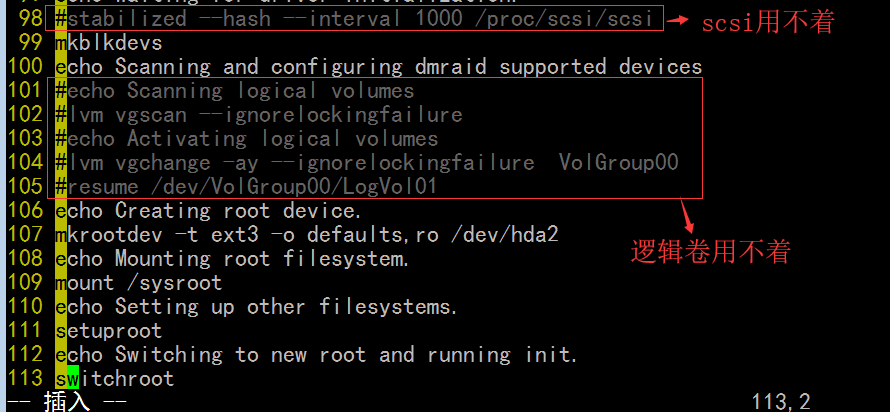
4)

[root@localhost test]# ls
bin dev etc init lib proc sbin sys sysroot
[root@localhost test]# cd lib
[root@localhost lib]# pwd
/root/test/lib
[root@localhost lib]# ls
ahci.ko dm-raid45.ko jbd.ko scsi_mod.ko
ata_piix.ko dm-region_hash.ko libata.ko scsi_transport_spi.ko
dm-log.ko dm-snapshot.ko mptbase.ko sd_mod.ko
dm-mem-cache.ko dm-zero.ko mptscsih.ko uhci-hcd.ko
dm-message.ko ehci-hcd.ko mptspi.ko vmxnet3.ko
dm-mirror.ko ext3.ko ohci-hcd.ko vmxnet.ko
dm-mod.ko firmware pvscsi.ko
[root@localhost lib]#
删除所有有关dm的库文件
[root@localhost lib]# rm -f dm-*
[root@localhost lib]#
[root@localhost lib]# ls
ahci.ko firmware mptscsih.ko scsi_mod.ko vmxnet3.ko
ata_piix.ko jbd.ko mptspi.ko scsi_transport_spi.ko vmxnet.ko
ehci-hcd.ko libata.ko ohci-hcd.ko sd_mod.ko
ext3.ko mptbase.ko pvscsi.ko uhci-hcd.ko
[root@localhost lib]#
cpio -H newc 这是指cpio 归档文件的目录结构,把当前目录下和每一个文件包括子目录的整个映射路径按原有的路径进行保存,并且能够支持多于5120个文件(默认情况下,所支持的文件个数和非常少) 所以newc是新归范的方式来进行归档文件,支持更多的文件数量 --quiet静默模式 -o:copy-out 创建归档文件
gzip -9 指定压缩级别
[root@localhost test]# find . | cpio -H newc --quiet -o | gzip -9 > /mnt/sysroot/initrd.gz
[root@localhost test]#
[root@localhost test]# ls -lh /mnt/boot/
总计 5.5M
drwxr-xr-x 2 root root 1.0K 11-09 10:12 grub (这个是以前生成的)
-rw-r--r-- 1 root root 3.4M 11-12 09:39 initrd.gz
drwx------ 2 root root 12K 11-09 08:50 lost+found
-rw-r--r-- 1 root root 2.1M 11-09 09:58 vmlinuz
[root@localhost test]#
此时 initrd有了,vmlinuz 有了 就差grub了
[root@localhost test]# grub-install --root-directory=/mnt /dev/hda (这里以前有了,不执行吧)
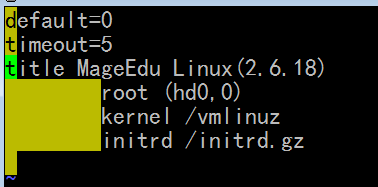
[root@localhost test]# vim /mnt/boot/grub/grub.conf
default=0
timeout=5
title MageEdu Linux(2.6.18)
root (hd0,0)
kernel /vmlinuz
initrd /initrd.gz
这时有颜色,以前搜索高亮显示 hightlight search
接下来要提供根文件系统了

[root@localhost test]# cd /mnt/sysroot/
[root@localhost sysroot]# mkdir -pv etc/{rc.d/init.d} bin sbin proc proc sys dev lib root mnt media var/{log,run,lock/subsys,tmp} usr/{bin,sbin,local} tmp home opt boot
mkdir: 已创建目录 “etc/{rc.d”
mkdir: 已创建目录 “etc/{rc.d/init.d}”
mkdir: 已创建目录 “mnt”
mkdir: 已创建目录 “media”
mkdir: 已创建目录 “varlog”
mkdir: 已创建目录 “varrun”
mkdir: 已创建目录 “varlock”
mkdir: 已创建目录 “varlock/subsys”
mkdir: 已创建目录 “vartmp”
mkdir: 已创建目录 “usr/local”
mkdir: 已创建目录 “opt”
[root@localhost sysroot]#

[root@localhost sysroot]# ls
bin dev home lib64 media opt root sys usr varlock varrun
boot etc lib lost+found mnt proc sbin tmp var varlog vartmp
[root@localhost sysroot]#
创建 init程序需要的配置文件
[root@localhost sysroot]# vim etc/inittab
id:3:initdefault:
si::sysinit:/etc/rc.d/rc.sysinit
创建 /etc/rc.d/rc.sysinit 脚本
[root@localhost sysroot]# vim etc/rc.d/rc.sysinit
#!/bin/bash
#
echo -e "\tWelcome to \033[31mMageEdu Team\033[0m Linux"
#/sbin/insmod /lib/modules/mii.ko
/sbin/insmod /lib/modules/e1000.ko
ifconfig eth0 192.168.1.19/24
ifconfig lo 127.0.0.1/8
/bin/bash
# tree
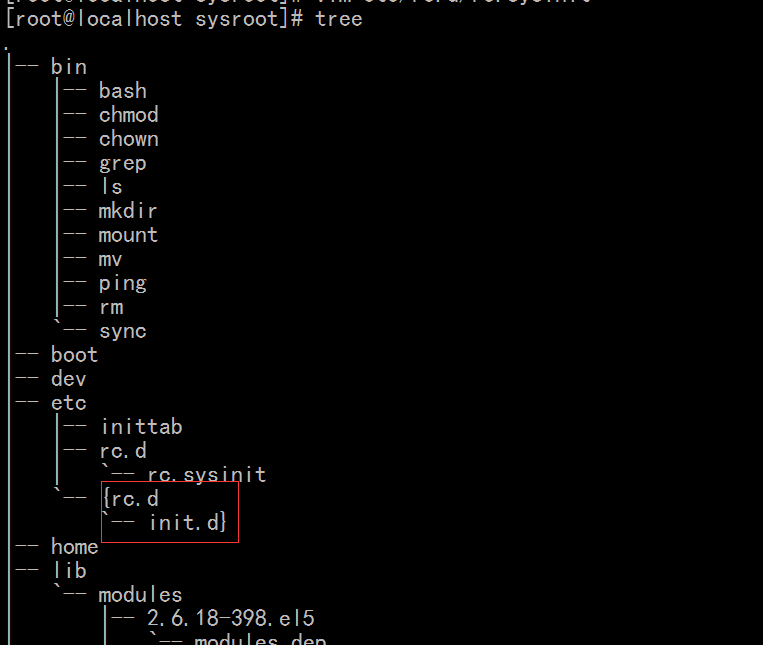
刚创建的目录有问题
# cd etc
# rm -Rf \{rc.d/
[root@localhost sysroot]# chmod +x etc/rc.d/rc.sysinit
[root@localhost sysroot]#
[root@localhost sysroot]# cd
[root@localhost ~]# cat bincopy.sh
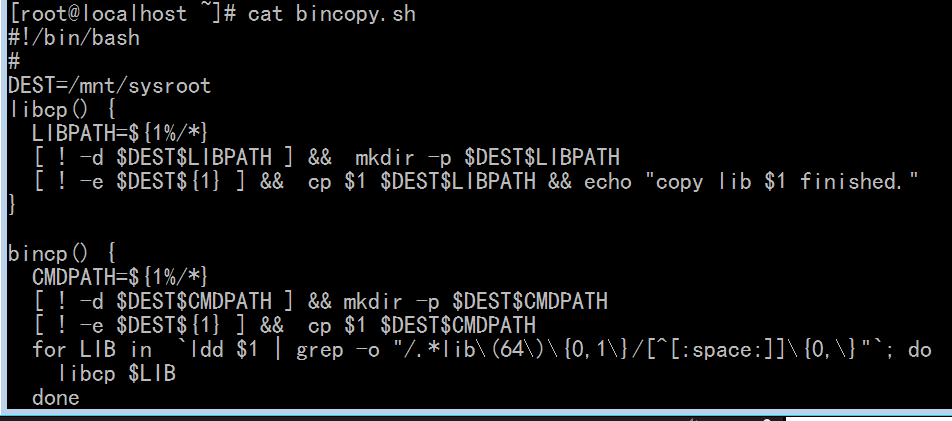
[root@localhost ~]# ./bincopy.sh
Your command:bash
/bin/bash
copy /bin/bash finished.
Continue:init
/sbin/init
copy /sbin/init finished.
Continue:ls
/bin/ls
copy /bin/ls finished.
Continue:q
[root@localhost ~]# sync
[root@localhost ~]# sync
[root@localhost ~]# sync
[root@localhost ~]# chroot /mnt/sysroot/
bash-3.2# ls
bin dev home lib64 media opt root sys usr varlock varrun
boot etc lib lost+found mnt proc sbin tmp var varlog vartmp
bash-3.2# ls /etc
inittab rc.d
bash-3.2# exit
exit
[root@localhost ~]#
挂起本linux,启动小linux
切换太快的话,可能导致小系统错乱的
马哥说要装载另一个磁盘, 马哥说可能是因为 vmware workstation 9 版本的问题,
但是 我的是 vmware workstation 8 好像也有问题
我个人感觉可能是快照的问题(好像必须要建一个快照,才能产生另一个磁盘 (又好像不必建一个快照)),当然自己不敢肯定

启动小系统后 下面这些信息可以不让它显示
只需要 kernel中 定义 quiet 即可
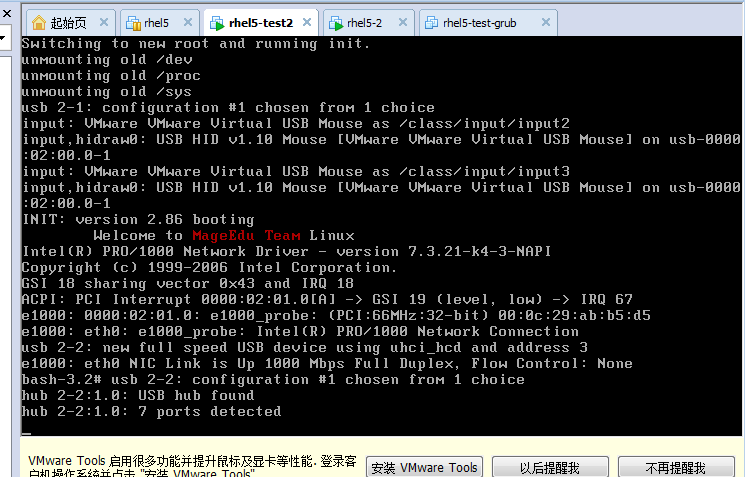
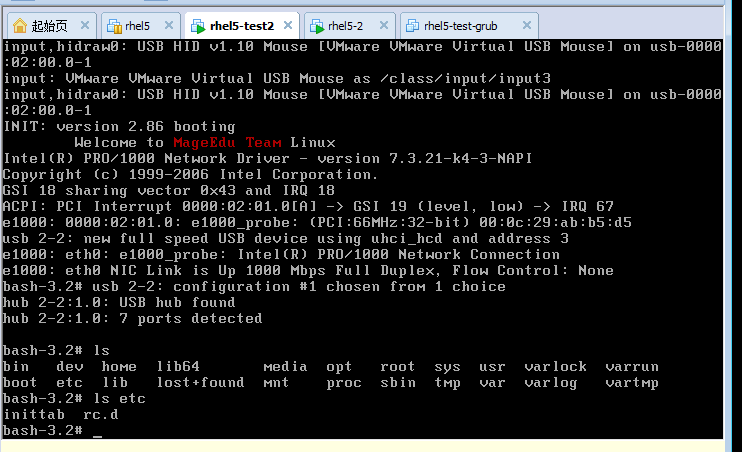
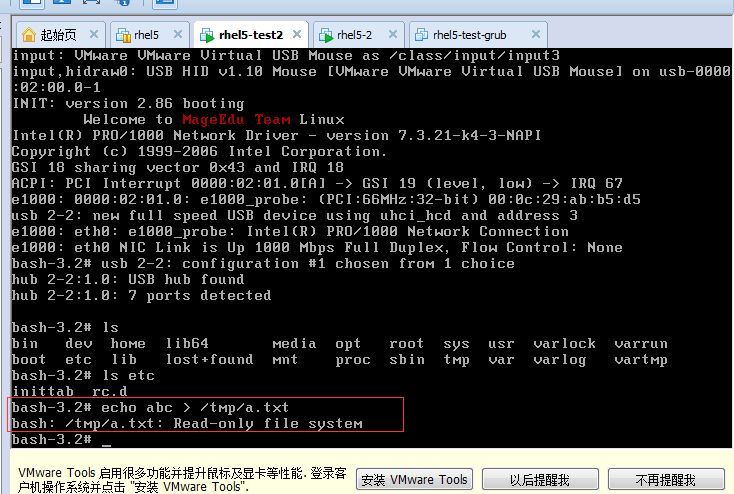
小linux 根文件系统是只读的
让我们的小linux 有关机功能
先关闭小虚拟机,再恢复挂起的源虚拟机
[root@localhost ~]# pwd
/root
[root@localhost ~]# ./bincopy.sh
Your command:touch
/bin/touch
copy /bin/touch finished.
Continue:mkdir
/bin/mkdir
copy /bin/mkdir finished.
Continue:rm
/bin/rm
copy /bin/rm finished.
Continue:mv
/bin/mv
copy /bin/mv finished.
Continue:cp
/bin/cp
copy /bin/cp finished.
Continue:vi
/bin/vi
copy /bin/vi finished.
Continue:vim
/usr/bin/vim
copy /usr/bin/vim finished.
Continue:chmod
/bin/chmod
copy /bin/chmod finished.
Continue:chown
/bin/chown
copy /bin/chown finished.
Continue:ping
/bin/ping
copy /bin/ping finished.
Continue:inconfig
which: no inconfig in (/usr/kerberos/sbin:/usr/kerberos/bin:/usr/local/sbin:/usr/local/bin:/sbin:/bin:/usr/sbin:/usr/bin:/sbin:/root/bin)
Wrong command
Input again:ifconfig
/sbin/ifconfig
copy /sbin/ifconfig finished.
Continue:insmod
/sbin/insmod
copy /sbin/insmod finished.
Continue:rmmod
/sbin/rmmod
copy /sbin/rmmod finished.
Continue:modprobe
/sbin/modprobe
copy /sbin/modprobe finished.
Continue:route
/sbin/route
copy /sbin/route finished.
Continue:halt
/sbin/halt
copy /sbin/halt finished.
Continue:reboot
/sbin/reboot
copy /sbin/reboot finished.
Continue:shutdown
/sbin/shutdown
copy /sbin/shutdown finished.
Continue:hostname
/bin/hostname
copy /bin/hostname finished.
Continue:cat
/bin/cat
copy /bin/cat finished.
Continue:mount
/bin/mount
copy lib /lib64/libblkid.so.1 finished.
copy lib /lib64/libuuid.so.1 finished.
copy lib /lib64/libdevmapper.so.1.02 finished.
copy /bin/mount finished.
Continue:q
[root@localhost ~]# sync
[root@localhost ~]# sync
[root@localhost ~]# sync
[root@localhost ~]# sync
[root@localhost ~]#
挂起源linux.打开小linux (我起的名字 rhel5-test2 )
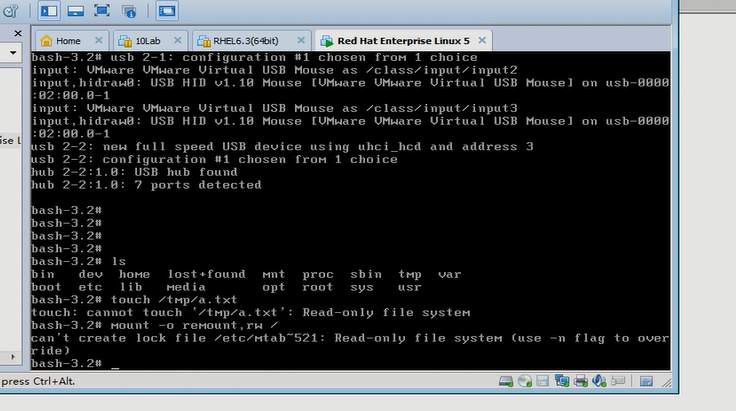
由下图可以看到 这个系统是只读的,我们重新挂载为可读写
# ls
# touch /tmp/a.txt
# mount -o remount,rw /
(每挂载一个分区的话,就会把信息写到/etc/mtab里,但是整个根都是只读的,所以呢,数据写不进去)
mount
选项 -n: (-n no的意思)默认情况下,mount 命令每挂载一个设备,都会把挂载的设备信息保存至/etc/mtab文件;使和-n选项意味着挂载设备时,不把信息写入此文件,不更新此文件
# cat /proc/mounts 效果与 mount 一样

# mount -n -o remount,rw / (虽有警告,但是挂载成功了,由此可见,挂载(还是重新挂载)会读取/etc/fstab文件的)

# touch /tmp/a.txt (由此可见,可以写了)
# ls /tmp

/tmp 的权限是 1777 的,1表示sticky位
# halt (无法关机)(halt 在这里只是把当前的进程给关掉了,无法切掉电源的)

重启一下小 linux 吧
# halt -p ( -p power(-p 其实是默认选项) 此时是切断电源的,但是只关掉自己这个进程,无法关闭父进程bash)
# help exec

exec 让子进程直接替换父进程,而不是作为父进程的子进程来执行的(运行的)
这样一来 halt 一结束,那么 bash 也结束了

# exec halt -p (表示让exec启动halt命令,并且直接替换bash 进程,此时还不行)

它切换到0级别下了,跟当前级别没有关系,所以我们还需要执行对应级别下的操作才可以
(换句话非要到0级别下 执行 exec halt -p 才可以把halt来替换bash)
所以我们应该把halt命令放在对应级别下的可执行文件里面,并且执行halt命令的时候,它能够自动的去完成执行对应级别下的K*开头的脚本和S*开头的脚本,把K*开头的都stop,把S*开头的都start
关闭小linux , 恢复源linux
[root@localhost ~]# cd /mnt/sysroot/
[root@localhost sysroot]# ls
bin dev home lib64 media opt root sys usr
boot etc lib lost+found mnt proc sbin tmp var
[root@localhost sysroot]#
[root@localhost sysroot]# vim etc/rc.d/rc.sysdone
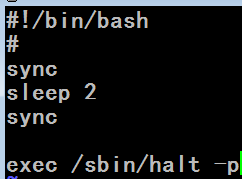
下面 先同步到硬盘 睡2秒,再同步一下,,确保真正写到磁盘
下面 /sbin/halt 要使用全路径,因为不登陆的话,可能找不着环境变量
#!/bin/bash
#
sync
sleep 2
sync
exec /sbin/halt -p
[root@localhost sysroot]# chmod +x etc/rc.d/rc.sysdone
[root@localhost sysroot]#
[root@localhost ~]# ./bincopy.sh
Your command:sync
/bin/sync
copy /bin/sync finished.
Continue:sleep
/bin/sleep
copy /bin/sleep finished.
Continue:q
[root@localhost ~]#
[root@localhost ~]# sync
[root@localhost ~]# sync
[root@localhost ~]# sync
[root@localhost ~]# sync
[root@localhost ~]# sync
[root@localhost ~]# sync
[root@localhost ~]#
[root@localhost ~]# cd /mnt/sysroot/
切换到0级别时执行/etc/rc.d/rc.sysdone脚本
[root@localhost sysroot]# vim etc/inittab
id:3:initdefault:
si::sysinit:/etc/rc.d/rc.sysinit
l0:0:wait:/etc/rc.d/rc.sysdone
[root@localhost sysroot]# cd (先到 /root 目录下,再sync)
[root@localhost ~]# sync
[root@localhost ~]# sync
[root@localhost ~]# sync
[root@localhost ~]# sync
[root@localhost ~]#
再挂起源linux, 开启小linux
(不装载dm模块,系统启动快多了)
# init 0 (关机) (此时halt也能关机了)

关闭小linux(其时此时已关闭了),恢复源linux
我们做重启功能
[root@localhost ~]# cd /mnt/sysroot/
[root@localhost sysroot]# ls
bin dev home lib64 media opt root sys usr
boot etc lib lost+found mnt proc sbin tmp var
[root@localhost sysroot]# vim etc/inittab
id:3:initdefault:
si::sysinit:/etc/rc.d/rc.sysinit
l0:0:wait:/etc/rc.d/rc.sysdone
l6:6:wait:/etc/rc.d/rc.reboot
[root@localhost sysroot]# vim etc/rc.d/rc.reboot
#!/bin/bash
#
sync
sleep 1
sync
exec /sbin/reboot
[root@localhost sysroot]# sync
[root@localhost sysroot]# sync
[root@localhost sysroot]# sync
[root@localhost sysroot]# sync
[root@localhost sysroot]# sync
[root@localhost sysroot]#
[root@localhost sysroot]# cd (回到/root,是为了挂起此源虚拟机,打开小linux,否则占用目录,可能对小linux有影响吧,这是我猜想马哥这么做的目的 )
[root@localhost ~]#
挂起源虚拟机,打开小linux
# init 6 (重启,这时好像不行,原来是忘了给执行权限,手动按重启按钮,重启吧 给它个执行权限吧)
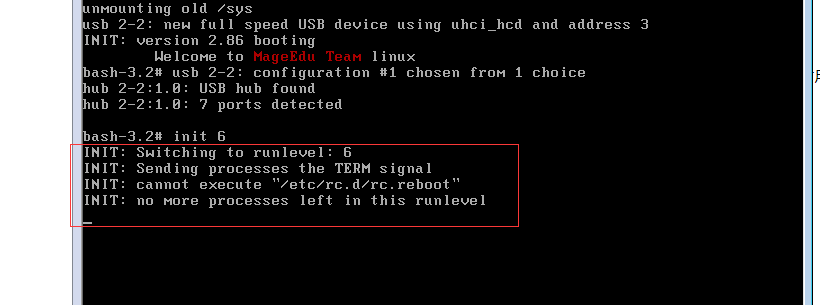
先关闭小虚拟机,再恢复源虚拟机 加上 chmod 等命令
[root@localhost ~]# ./bincopy.sh
Your command:chmod
/bin/chmod
copy /bin/chmod finished.
Continue:chown
/bin/chown
copy /bin/chown finished.
Continue:chgrp
/bin/chgrp
copy /bin/chgrp finished.
Continue:q
[root@localhost ~]# sync
[root@localhost ~]# sync
[root@localhost ~]# sync
[root@localhost ~]# sync
挂起源虚拟机,打开小linux,给 etc/rc.d/rc.reboot 执行权限
# mount -n -o remount,rw /
# chmod +x etc/rc.d/rc.reboot
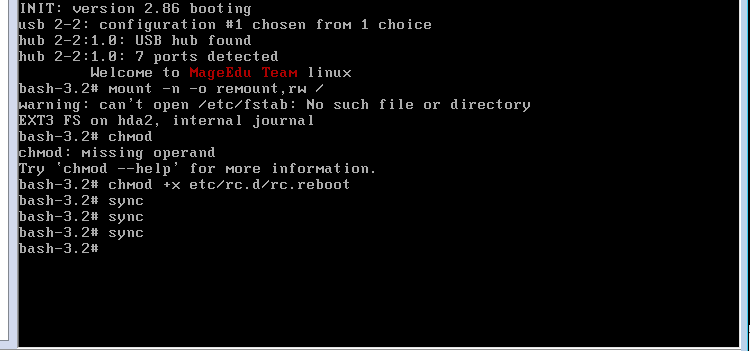
# init 6 (重启 reboot 照理也能重启)

# reboot (使用reboot再重启)
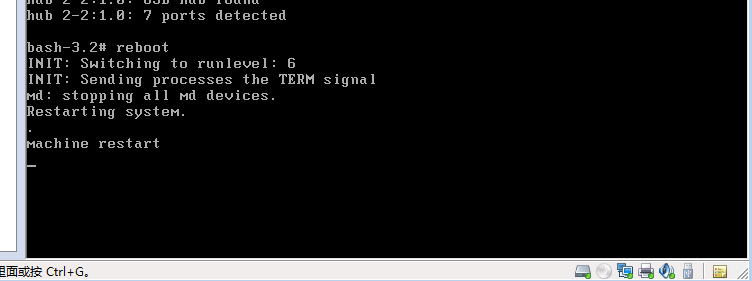
这里 通过小linux 改chmod,(两个主机改一个磁盘) 可能会导致源linux系统(因为它挂起的)崩溃的
我发现 rc.reboot 文件坏了 (因为 小linux 无法重启) (下面马哥 小linux 也出现了与我同样的问题
EXT-fs error(device hda2): ext3_lookup: unlinked inode 121458 in dir #121441 INIT: No inittab file found
)
fsck 命令
通过 e2fsck 进行修复吧 ,修复后好像变成只读的了,然后,重启就可以
执行 e2fsck mke2fs 这些命令之前 应该要先进行卸载umount吧 e2fsck -f (强制检查) -p (-p 相当于-a 自动修复)
#cd /mnt/sysroot/etc/rc.d
# ls -li

# e2fsck -f -p /dev/hda2

# reboot
挂载 # mount /dev/hda2 /mnt/sysroot
#cd /mnt/sysroot/etc/rc.d
# vim rc.reboot
#!/bin/bash
#
sync
sleep 2
sync
exec /sbin/reboot
[root@localhost ~]# chmod +x /mnt/sysroot/etc/rc.d/rc.reboot
[root@localhost rc.d]# sync
[root@localhost rc.d]# sync
[root@localhost rc.d]# sync
[root@localhost rc.d]#
做成规范的脚本吧
关闭小linux ,恢复源linux
[root@localhost ~]# cd /mnt/sysroot/
[root@localhost sysroot]# ls
bin etc lib media proc sys var varrun
boot halt lib64 mnt root tmp varlock vartmp
dev home lost+found opt sbin usr varlog
[root@localhost sysroot]#
下面这脚本既能重启 又能关机
[root@localhost sysroot]# pwd
/mnt/sysroot
[root@localhost sysroot]# mkdir etc/rc.d/init.d/
[root@localhost sysroot]# vim etc/rc.d/init.d/halt
#!/bin/bash
#
case $0 in
*reboot)
COMMAND='/sbin/reboot';;
*halt)
COMMAND='/sbin/halt -p';;
*)
echo "Only call this script by *reboot OR *halt;";;
esac
case $1 in
start)
;;
stop)
;;
*)
echo "Usage:`basename $0` {start|stop}";;
esac
exec $COMMAND
[root@localhost sysroot]# chmod +x etc/rc.d/init.d/halt
[root@localhost sysroot]#
下面准备创建两个链接 有关halt和reboot的
[root@localhost sysroot]# ls
bin etc lib media proc sys var varrun
boot halt lib64 mnt root tmp varlock vartmp
dev home lost+found opt sbin usr varlog
[root@localhost sysroot]# cd etc/rc.d
[root@localhost rc.d]# ls
init.d rc.reboot rc.sysdone rc.sysinit
[root@localhost rc.d]# ls init.d/
halt
[root@localhost rc.d]# mkdir rc0.d
[root@localhost rc.d]# mkdir rc6.d
[root@localhost rc.d]# cd rc0.d/
[root@localhost rc0.d]# ln -sv ../init.d/halt S99halt
创建指向“../init.d/halt”的符号链接“S99halt”
[root@localhost rc0.d]#
[root@localhost rc0.d]# ll
总计 0
lrwxrwxrwx 1 root root 14 11-13 10:16 S99halt -> ../init.d/halt
[root@localhost rc0.d]#
[root@localhost rc0.d]# cd ..
[root@localhost rc.d]# cd rc6.d/
[root@localhost rc6.d]#
[root@localhost rc6.d]# ln -sv ../init.d/halt S99reboot
创建指向“../init.d/halt”的符号链接“S99reboot”
[root@localhost rc6.d]#
[root@localhost rc6.d]# ls
S99reboot
[root@localhost rc6.d]# ls
S99reboot
[root@localhost rc6.d]# cd ..
[root@localhost rc.d]# pwd
/mnt/sysroot/etc/rc.d
[root@localhost rc.d]# ls
init.d rc0.d rc6.d rc.reboot rc.sysdone rc.sysinit
[root@localhost rc.d]#
[root@localhost rc.d]# rm -f rc.reboot rc.sysdone
[root@localhost rc.d]#
[root@localhost rc.d]# ls
init.d rc0.d rc6.d rc.sysinit
[root@localhost rc.d]# sync
[root@localhost rc.d]# sync
[root@localhost rc.d]# sync
[root@localhost rc.d]#
下面的脚本把K*开头的stop 把S*开头的start
[root@localhost rc.d]# vim rc
#!/bin/bash
#
RUNLEVEL=$1
for I in /etc/rc.d/rc$RUNLEVEL.d/K*;do
$I stop
done
for I in /etc/rc.d/rc$RUNLEVEL.d/S*; do
$I start
done
[root@localhost rc.d]# chmod +x rc
[root@localhost rc.d]# ls
init.d rc rc0.d rc6.d rc.sysinit
[root@localhost rc.d]#
[root@localhost rc.d]# pwd
/mnt/sysroot/etc/rc.d
[root@localhost rc.d]#
[root@localhost rc.d]# cd ../../
[root@localhost sysroot]# pwd
/mnt/sysroot
[root@localhost sysroot]# vim etc/inittab
id:3:initdefault:
si::sysinit:/etc/rc.d/rc.sysinit
l0:0:wait:/etc/rc.d/rc 0
l6:6:wait:/etc/rc.d/rc 6

改成

[root@localhost sysroot]# sync
[root@localhost sysroot]# sync
[root@localhost sysroot]# sync
[root@localhost sysroot]# sync
[root@localhost sysroot]#
[root@localhost sysroot]# cd
[root@localhost ~]#
挂起源linux(我这里是 rhel5) 小linux (我这里是 rhel5-test2 )启动
# init 6
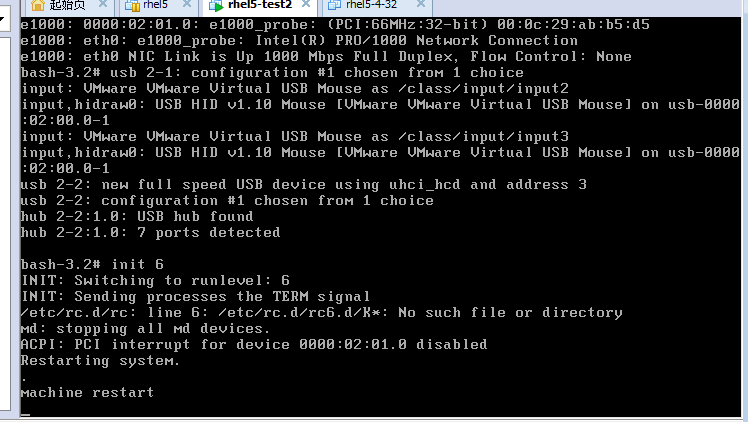
# init 0
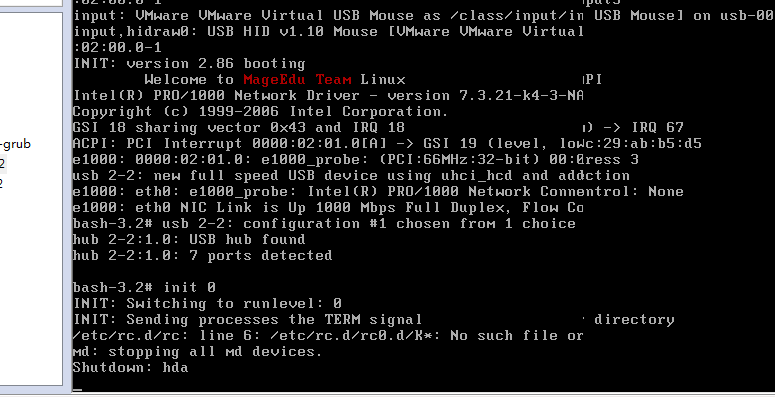
关于小linux已关闭) 恢复源虚拟机
准备在3级别下执行一脚本
[root@localhost ~]# cd /mnt/sysroot/
[root@localhost sysroot]# vim etc/inittab
id:3:initdefault:
si::sysinit:/etc/rc.d/rc.sysinit
l0:0:wait:/etc/rc.d/rc 0
l3:3:wait:/etc/rc.d/rc 3
l6:6:wait:/etc/rc.d/rc 6
[root@localhost sysroot]# cd etc/rc.d
[root@localhost rc.d]# ls
init.d rc rc0.d rc6.d rc.sysinit
[root@localhost rc.d]# mkdir rc3.d
[root@localhost rc.d]# ls
init.d rc rc0.d rc3.d rc6.d rc.sysinit
[root@localhost rc.d]#
[root@localhost rc.d]# vim init.d/tserver
#!/bin/bash
#
prog=`basename $0`
lockfile=/var/lock/subsys/$prog
start() {
echo "Staring $prog..."
touch $lockfile
}
stop() {
echo "Stopping $prog..."
rm -f $lockfile
}
status() {
if [ -f $lockfile ]; then
echo "Running ..."
else
echo "Stopping ..."
fi
}
usage(){
echo "Usage:$prog {start|stop|status|restart}"
}
case $1 in
start)
start ;;
stop)
stop ;;
restart)
stop
start
;;
status)
status
;;
*)
usage
exit 1
;;
esac
[root@localhost rc.d]# chmod +x init.d/tserver
[root@localhost rc.d]# init.d/tserver start
Staring tserver...
[root@localhost rc.d]#
[root@localhost rc.d]# ls /var/lock/subsys/
acpid cups hpssd.py lvm2-monitor rhsmcertd sshd
atd gpm ip6tables messagebus rpc.idmapd syslog
auditd haldaemon iptables microcode_ctl rpc.statd tserver
autofs hcid iscsi netfs sdpd vmware-tools
avahi-daemon hidd iscsid network sendmail xfs
bluetooth hpiod kudzu pcscd smartd xinetd
crond hplip local portmap sm-client yum-updatesd
[root@localhost rc.d]# init.d/tserver stop
Stopping tserver...
[root@localhost rc.d]# ls /var/lock/subsys/ (tserver 没有了)
acpid cups hpssd.py lvm2-monitor rhsmcertd sshd
atd gpm ip6tables messagebus rpc.idmapd syslog
auditd haldaemon iptables microcode_ctl rpc.statd vmware-tools
autofs hcid iscsi netfs sdpd xfs
avahi-daemon hidd iscsid network sendmail xinetd
bluetooth hpiod kudzu pcscd smartd yum-updatesd
crond hplip local portmap sm-client
[root@localhost rc.d]# init.d/tserver status
Stopping ...
[root@localhost rc.d]# init.d/tserver statuss
Usage:tserver {start|stop|status|restart}
加上 # chkconfig: 35 66 33
# description: test service script
[root@localhost rc.d]# vim init.d/tserver
#!/bin/bash
#
# chkconfig: 35 66 33
# description: test service script
#
prog=`basename $0`
lockfile=/var/lock/subsys/$prog
start() {
echo "Staring $prog..."
touch $lockfile
}
stop() {
echo "Stopping $prog..."
rm -f $lockfile
}
status() {
if [ -f $lockfile ]; then
echo "Running ..."
else
echo "Stopping ..."
fi
}
usage(){
echo "Usage:$prog {start|stop|status|restart}"
}
case $1 in
start)
start ;;
stop)
stop ;;
restart)
stop
start
;;
status)
status
;;
*)
usage
exit 1
;;
esac
[root@localhost rc.d]# cd rc3.d/
[root@localhost rc3.d]# pwd
/mnt/sysroot/etc/rc.d/rc3.d
[root@localhost rc3.d]# ls
[root@localhost rc3.d]# ln -sv ../init.d/tserver S66tserver
创建指向“../init.d/tserver”的符号链接“S66tserver”
[root@localhost rc3.d]#
[root@localhost rc3.d]# ll
总计 0
lrwxrwxrwx 1 root root 17 11-13 12:45 S66tserver -> ../init.d/tserver
[root@localhost rc3.d]#
[root@localhost rc3.d]# cd ../rc0.d
[root@localhost rc0.d]# pwd
/mnt/sysroot/etc/rc.d/rc0.d
[root@localhost rc0.d]# ln -sv ../init.d/tserver K33tserver
创建指向“../init.d/tserver”的符号链接“K33tserver”
[root@localhost rc0.d]# cd ../rc6.d/
[root@localhost rc6.d]# ln -sv ../init.d/tserver K33tserver
创建指向“../init.d/tserver”的符号链接“K33tserver”
[root@localhost rc6.d]# ll
总计 0
lrwxrwxrwx 1 root root 17 11-13 12:48 K33tserver -> ../init.d/tserver
lrwxrwxrwx 1 root root 14 11-13 10:17 S99reboot -> ../init.d/halt
[root@localhost rc6.d]#
[root@localhost rc6.d]# sync
[root@localhost rc6.d]# sync
[root@localhost rc6.d]# sync
[root@localhost rc6.d]# cd
[root@localhost ~]#
3级别下

正常的红帽系统是要在/etc/rc.d/rc 这个脚本后面 启动终端的 启动终端mingetty
[root@localhost ~]# man mingetty
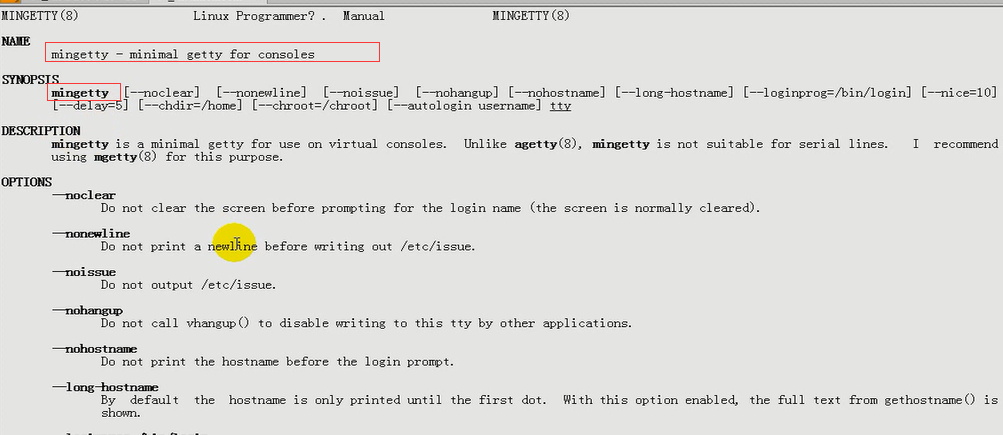
看红帽原生的 /etc/inittab
[root@localhost ~]# vim /etc/inittab

[root@localhost ~]# cd /mnt/sysroot/
[root@localhost sysroot]# pwd
/mnt/sysroot
[root@localhost sysroot]# vim etc/inittab
执行mingetty的时候,它还要执行另外一个程序login
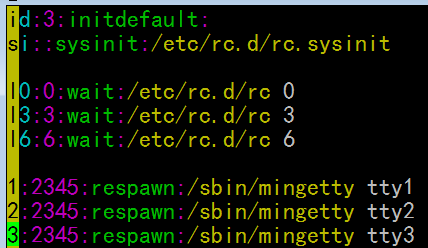
当执行mingtty的时候,它会启动一个终端,同时它又会执行另外一个程序login,让你进行账号密码登录的

# man mingetty

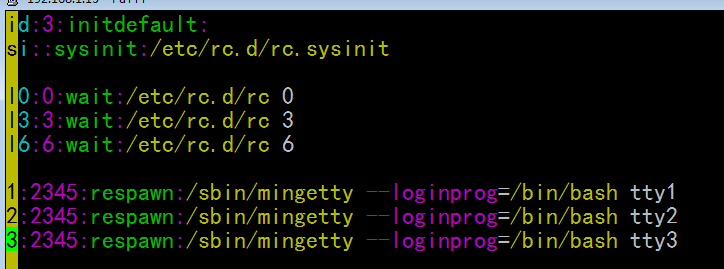
所以 [root@localhost sysroot]# vim etc/inittab 的样子应该为
id:3:initdefault:
si::sysinit:/etc/rc.d/rc.sysinit
l0:0:wait:/etc/rc.d/rc 0
l3:3:wait:/etc/rc.d/rc 3
l6:6:wait:/etc/rc.d/rc 6
1:2345:respawn:/sbin/mingetty --loginprog=/bin/bash tty1
2:2345:respawn:/sbin/mingetty --loginprog=/bin/bash tty2
3:2345:respawn:/sbin/mingetty --loginprog=/bin/bash tty3
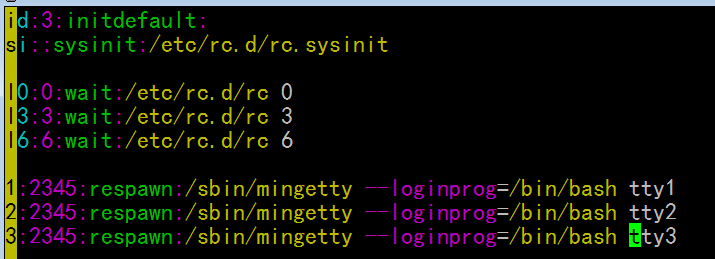
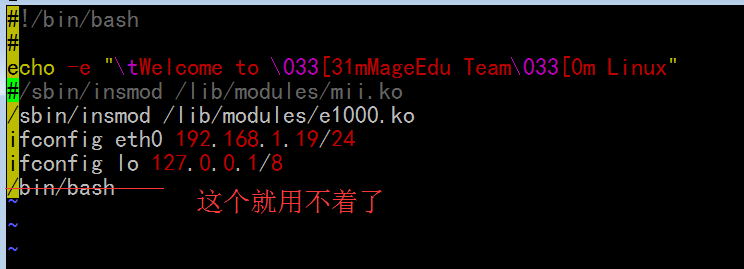
于是 si::sysinit:/etc/rc.d/rc.sysinit 里面的程序 就用不着/bin/bash了
[root@localhost sysroot]# vim etc/rc.d/rc.sysinit
#!/bin/bash
#
echo -e "\tWelcome to \033[31mMageEdu Team\033[0m Linux"
#/sbin/insmod /lib/modules/mii.ko
/sbin/insmod /lib/modules/e1000.ko
ifconfig eth0 192.168.1.19/24
ifconfig lo 127.0.0.1/8
~
[root@localhost sysroot]# sync
[root@localhost sysroot]# sync
[root@localhost sysroot]# sync
[root@localhost sysroot]# sync
[root@localhost sysroot]# cd (这个cd 应该是无所谓的,虽然切换系统,但感觉切换不切换到 /root 无谓, 因为这个系统将要挂起)
[root@localhost ~]#
挂起源linux,开启小linux
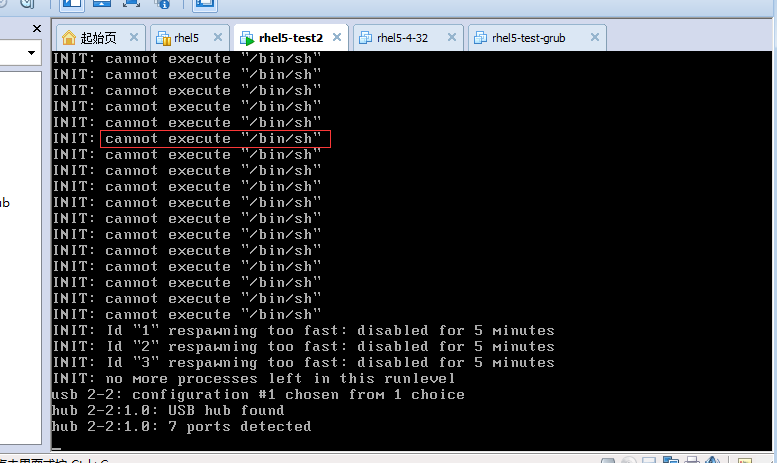
报错 (忘了移植mingetty)
什么叫 /bin/sh 我们创建一个 /bin/sh的链接指向到 /bin/bash吧
关闭小linux,恢复源linux
[root@localhost ~]# ./bincopy.sh
Your command:mingetty
/sbin/mingetty
copy /sbin/mingetty finished.
Continue:q
[root@localhost ~]#sync
[root@localhost ~]#sync
[root@localhost ~]#sync
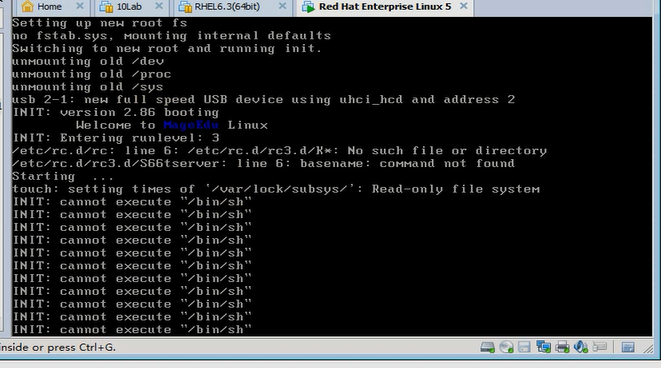
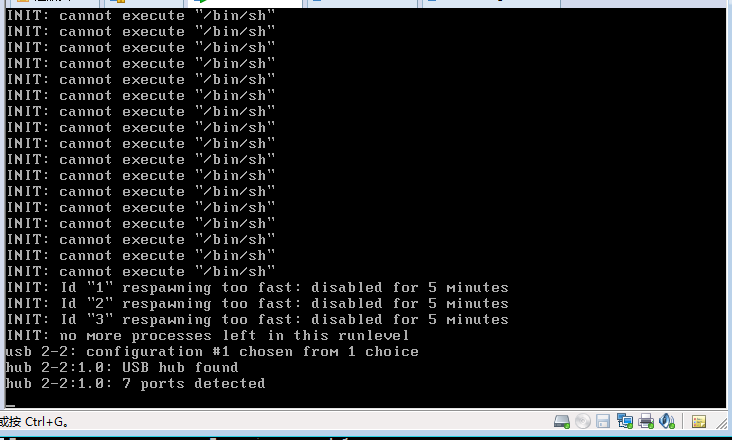
挂起源linux,开启小linux (切换太快可能会出现错误)
下面是马哥的
下面是我的
关闭小linux,恢复源linux
[root@localhost ~]# ./bincopy.sh
Your command:basename
/bin/basename
copy /bin/basename finished.
Continue:q
[root@localhost ~]# sync
[root@localhost ~]# sync
[root@localhost ~]# sync
[root@localhost ~]#
[root@localhost ~]# cd /mnt/sysroot/bin
[root@localhost bin]# ls
basename cat chmod cp hostname mkdir mv rm sync vi
bash chgrp chown grep ls mount ping sleep touch
[root@localhost bin]# ln -sv bash sh
创建指向“bash”的符号链接“sh”
[root@localhost bin]#
[root@localhost bin]# sync
[root@localhost bin]# sync
[root@localhost bin]# sync
[root@localhost bin]# cd
[root@localhost ~]#
挂起源linux,开启小linux (切换太快可能会出现错误)
(先要让虚拟机获得焦点 然后 ctrl+alt+F1 ctrl+alt+F2才有用,才能切换终端)
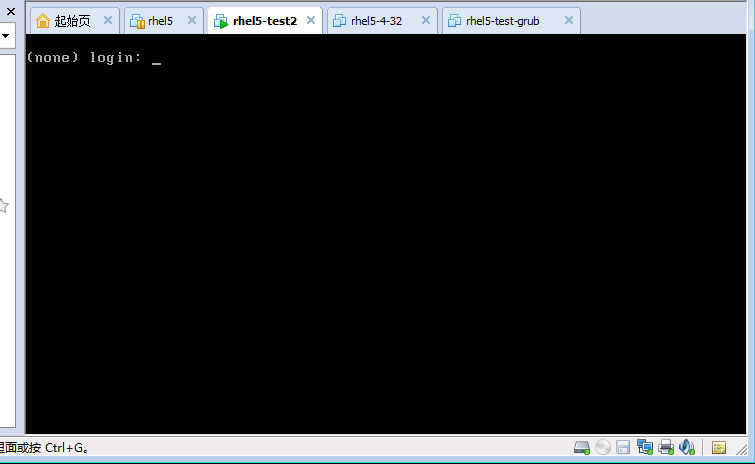
(none 是因为没有主机名)(tserver服务 应该启动起来了,不过 锁文件应该没有创建,因为是只读的)
关闭小linux,恢复源linux
1) 在 rc.sysinit脚本中以读写方式重新挂载
2) 让它能够使用终端,到底怎么做
在小linux根文件系统以读写方式重新挂载
[root@localhost ~]# cd /mnt/sysroot/
[root@localhost sysroot]# ls
bin etc lib media proc sys var varrun
boot halt lib64 mnt root tmp varlock vartmp
dev home lost+found opt sbin usr varlog
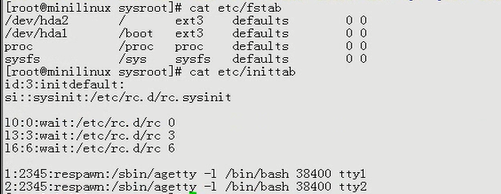
[root@localhost ~]# cat /etc/fstab

[root@localhost sysroot]# vim etc/fstab
/dev/hda2 / ext3 defaults 0 0
/dev/hda1 /boot ext3 defaults 0 0
proc /proc proc defaults 0 0
sysfs /sys sysfs defaults 0 0
[root@localhost etc]# pwd
/mnt/sysroot
[root@localhost ~]# cd /mnt/sysroot/
[root@localhost sysroot]# pwd
/mnt/sysroot
[root@localhost sysroot]# vim etc/rc.d/rc.sysinit
#!/bin/bash
#
echo -e "\tWelcome to \033[31mMageEdu Team\033[0m Linux"
echo "Remount rootfs..."
mount -n -o remount,rw /
#/sbin/insmod /lib/modules/mii.ko
/sbin/insmod /lib/modules/e1000.ko
ifconfig eth0 192.168.1.19/24
ifconfig lo 127.0.0.1/8
下面是关于主机名
[root@localhost sysroot]# mkdir etc/sysconfig
[root@localhost sysroot]# vim etc/sysconfig/network
HOSTNAME=minilinux.magedu.com
让主机名生效
. 点 或 source 读取文件 (包含文件导入文件) mount -n -o remount,rw / (重新挂载的时候,可以指定挂载点或挂载设备)
[root@localhost sysroot]# vim etc/rc.d/rc.sysinit
#!/bin/bash
#
echo -e "\tWelcome to \033[31mMageEdu Team\033[0m Linux"
echo "Remount rootfs..."
mount -n -o remount,rw /
echo "Set the hostname ..."
[ -f /etc/sysconfig/network ] && . /etc/sysconfig/network
[ -z $HOSTNAME -o "$HOSTNAME" == '(none)' ] && HOSTNAME=localhost
/bin/hostname $HOSTNAME
#/sbin/insmod /lib/modules/mii.ko
/sbin/insmod /lib/modules/e1000.ko
ifconfig eth0 192.168.1.19/24
ifconfig lo 127.0.0.1/8
切换根目录试一下
[root@localhost sysroot]# chroot /mnt/sysroot/
bash-3.2# /etc/rc.d/rc.sysinit
(下面这个装载网卡 报错不管它,虽然它导致系统崩溃,卡住了,重启下网卡吧)

[root@localhost sysroot]# sync
[root@localhost sysroot]# sync
[root@localhost sysroot]# sync
[root@localhost sysroot]# cd
此时mingetty 还是要我们登录,想办法解决
[root@localhost ~]# man mingetty
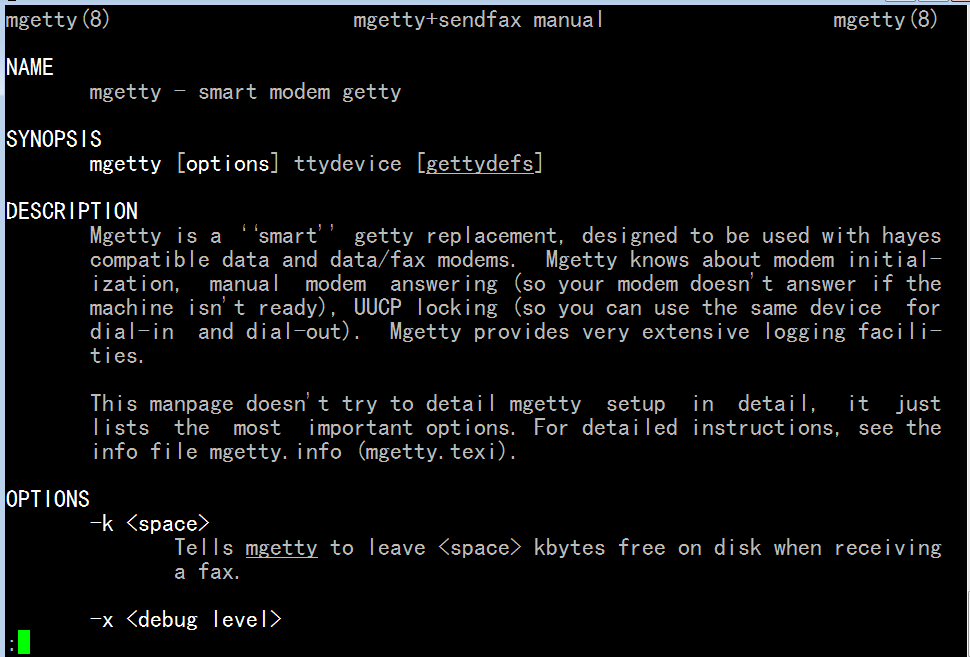
agetty mgetty
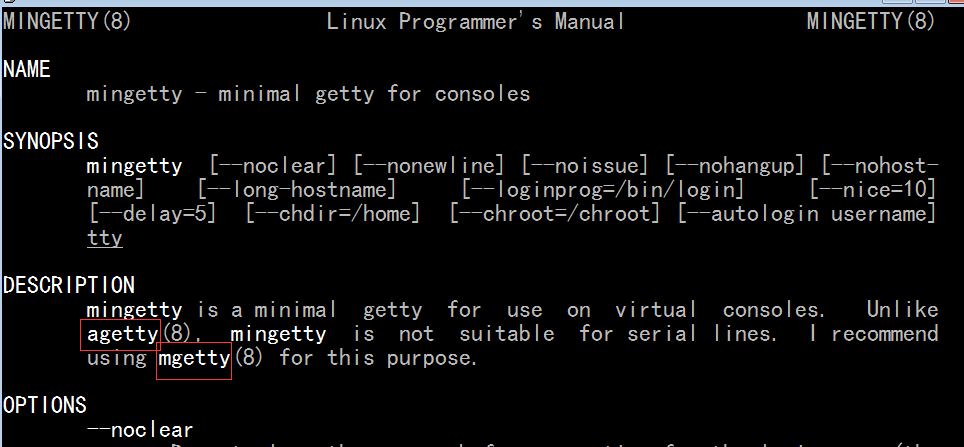
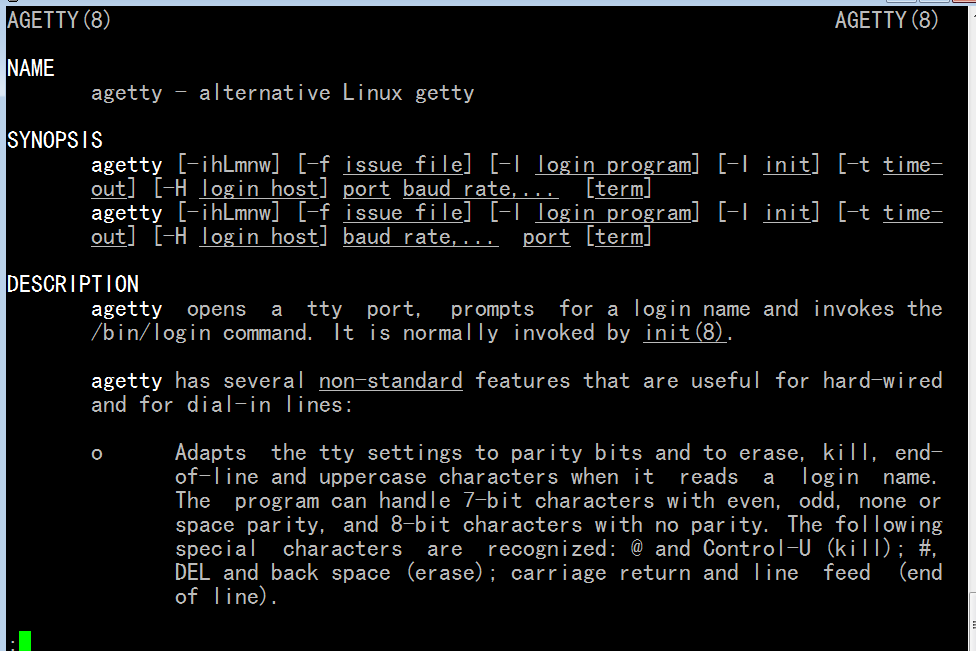
[root@localhost ~]# man agetty
[root@localhost ~]# man mgetty
agetty 可以用的
# man agetty 模拟的是getty, getty在串行终端上 设备两种类型:字符设备和块设备
显示器是字符设备,串行的显示的,串行设备都得有速率,每秒钟显示多少字符
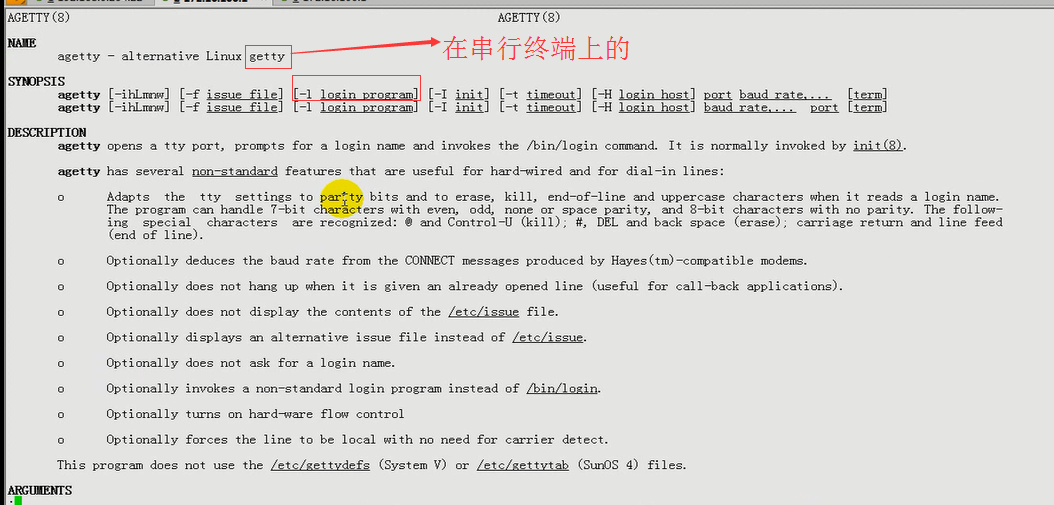
按 st 然后按 Tab 不行的话 按两次Tab 可以自动补全
大部分命令都在 /sbin /bin 目录下吧

# man stty
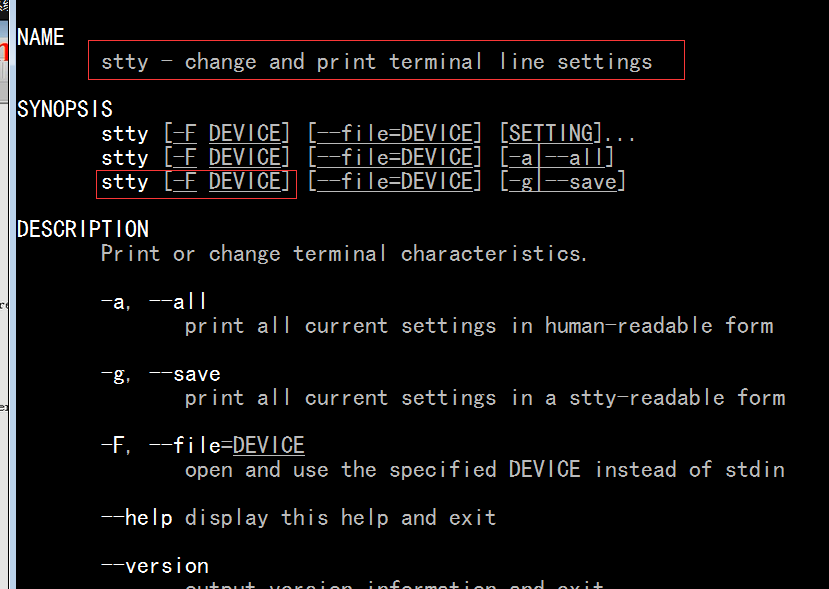
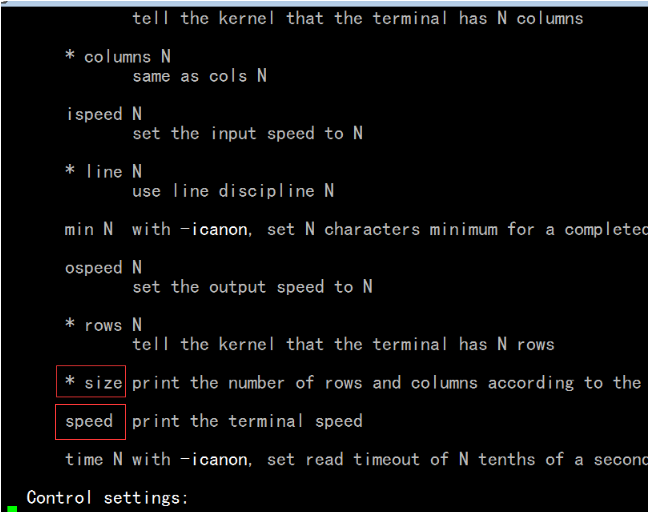
能显示终端速率的
stty -F
( -F, --file=DEVICE
open and use the specified DEVICE instead of stdin )
/dev/console 是物理终端(控制台) 25 80 指的是横列,纵列 (行和列)
[root@localhost ~]# stty -F /dev/console size
25 80
[root@localhost ~]#
每秒钟能显示 38400个字符
[root@localhost ~]# stty -F /dev/console speed
38400
[root@localhost ~]#
[root@localhost ~]# man agetty
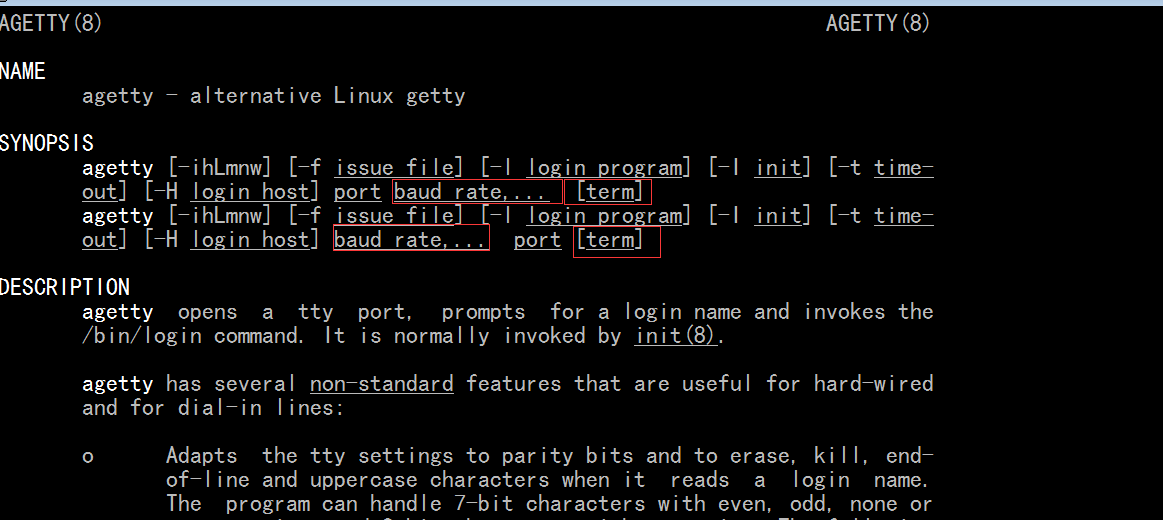
使用agetty吧
[root@localhost ~]# ./bincopy.sh
Your command:agetty
/sbin/agetty
copy /sbin/agetty finished.
Continue:q
[root@localhost ~]#
[root@localhost ~]# cd /mnt/sysroot/
[root@localhost sysroot]# ls
bin etc lib media proc sys var varrun
boot halt lib64 mnt root tmp varlock vartmp
dev home lost+found opt sbin usr varlog
[root@localhost sysroot]# vim etc/inittab
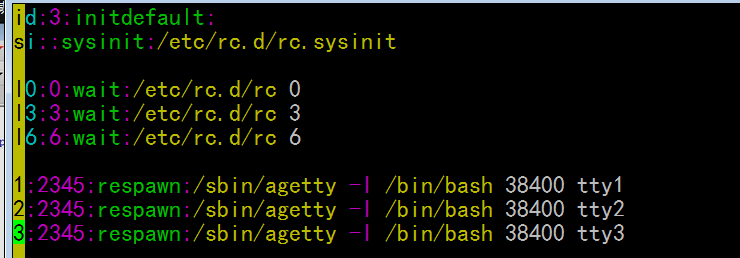
agetty [-l login_program]
id:3:initdefault:
si::sysinit:/etc/rc.d/rc.sysinit
l0:0:wait:/etc/rc.d/rc 0
l3:3:wait:/etc/rc.d/rc 3
l6:6:wait:/etc/rc.d/rc 6
1:2345:respawn:/sbin/agetty -l /bin/bash 38400 tty1
2:2345:respawn:/sbin/agetty -l /bin/bash 38400 tty2
3:2345:respawn:/sbin/agetty -l /bin/bash 38400 tty3
原来
改成
[root@localhost sysroot]# sync
[root@localhost sysroot]# sync
[root@localhost sysroot]# sync
[root@localhost sysroot]# sync
[root@localhost sysroot]# cd
[root@localhost ~]#
挂起源linux,开启小linux
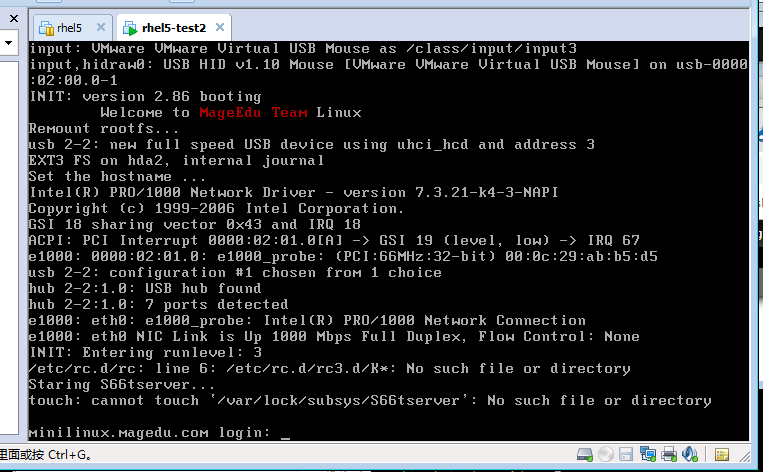
马哥出现了跟我同样的错 (好像是inode错乱)
EXT-fs error(device hda2): ext3_lookup: unlinked inode 121458 in dir #121441 INIT: No inittab file found
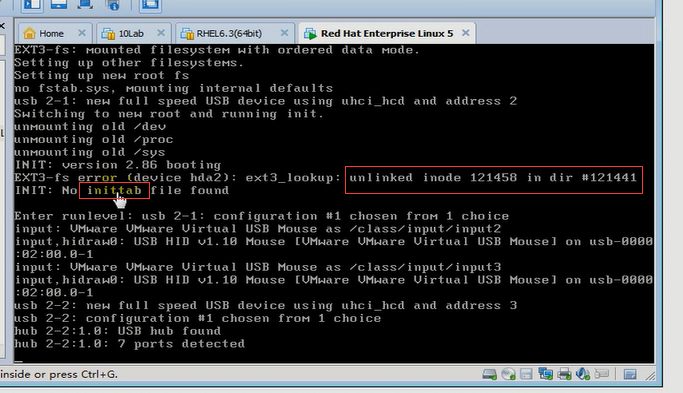
文件系统错乱 (错误),就是因为切换的太快了,
用第一种方法 )使用e2fsck 可以修复,但是此时inittab会丢失
用第二种方法
1)把/mnt/sysroot下面的所有的内容打包
# cd /mnt/sysroot
# ls
# find . | cpio -H newc --quiet -o | gzip > /root/sysroot.gz

2)卸载 发现卸不掉 ,先fuser -km 再卸载
# cd
# umount /dev/hda2

# fuser -km /dev/hda2 (是不是force user? 还是 file user)
# umount /dev/hda2

3)重新格式化
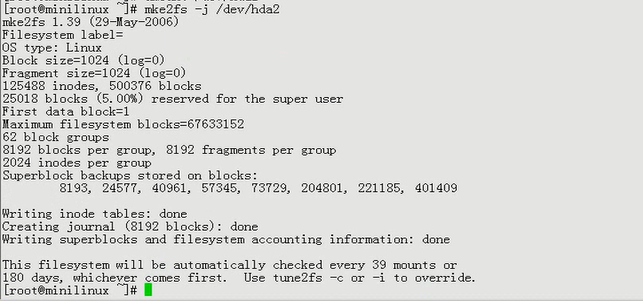
# mke2fs -j /dev/hda2
4)再挂载
# mount /dev/hda2 /mnt/sysroot/

5) 把备份的文件再弄过来
# cd /mnt/sysroot
# zcat /root/sysroot.gz | cpio -id
# ls

# cat etc/fstab
# cat etc/inittab
# sync
# sync
# sync

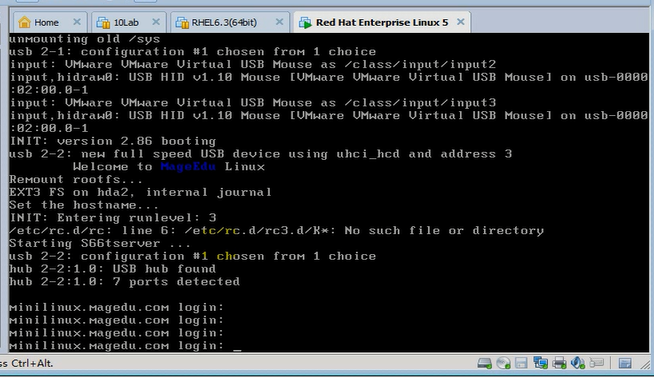
挂起源liunx,开启小liunx (还是要登录)(马哥的和我的差不多)
# man agetty

大意是 -n (not)与 -l (login_program)一起用,就不再需要让用户输入登录信息
38400的意思是字符设备上的字符的速率,如果没有的话,默认值是不是有,我也不清楚,反正这个字符设备不加个速率(通过 # stty -F /dev/console speed )的话,会有问题
agetty -n -l /bin/bash 38400 tty2

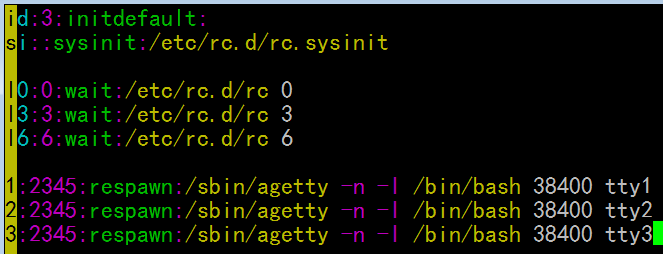
[root@localhost ~]# cd /mnt/sysroot/ (下面这个是最终结果)
[root@localhost sysroot]# vim etc/inittab
id:3:initdefault:
si::sysinit:/etc/rc.d/rc.sysinit
l0:0:wait:/etc/rc.d/rc 0
l3:3:wait:/etc/rc.d/rc 3
l6:6:wait:/etc/rc.d/rc 6
1:2345:respawn:/sbin/agetty -n -l /bin/bash 38400 tty1
2:2345:respawn:/sbin/agetty -n -l /bin/bash 38400 tty2
3:2345:respawn:/sbin/agetty -n -l /bin/bash 38400 tty3
[root@localhost sysroot]# sync
[root@localhost sysroot]# sync
[root@localhost sysroot]# sync
[root@localhost sysroot]# cd
[root@localhost ~]#
挂起源linux,启动小linux
这一段启动的信息 可以传递给 内核 --quiet ,让它不再显示
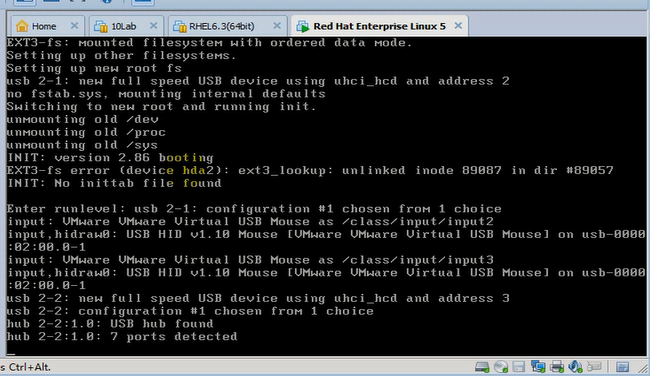
又出错了
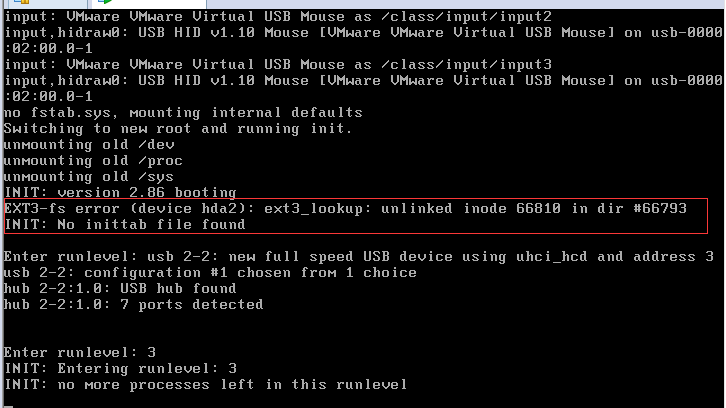
关闭小linux,恢复源linux
[root@localhost ~]# cd /mnt/sysroot/
[root@localhost sysroot]# find . | cpio -H newc --quiet -o | gzip > /root/sysroot.gz
[root@localhost sysroot]# cd
[root@localhost ~]# umount /dev/hda2
[root@localhost ~]# e2fsck -f /dev/hda2
e2fsck 1.39 (29-May-2006)
Pass 1: Checking inodes, blocks, and sizes
Pass 2: Checking directory structure
Pass 3: Checking directory connectivity
Pass 4: Checking reference counts
Pass 5: Checking group summary information
/dev/hda2: 133/125488 files (4.5% non-contiguous), 38116/500376 blocks
[root@localhost ~]# mount /dev/hda2 /mnt/sysroot/
[root@localhost ~]# cd /mnt/sysroot/
[root@localhost sysroot]# ls
bin etc lib media proc sys var varrun
boot halt lib64 mnt root tmp varlock vartmp
dev home lost+found opt sbin usr varlog
[root@localhost sysroot]# ls etc
fstab inittab rc.d sysconfig
[root@localhost sysroot]# vim etc/inittab
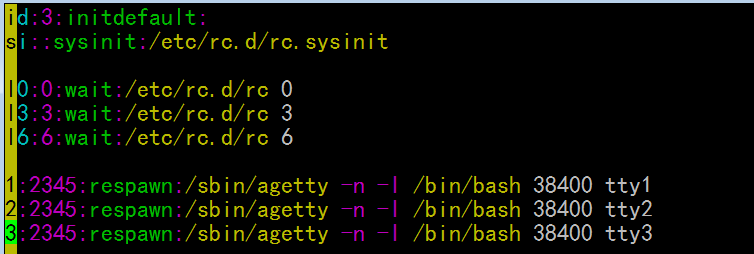
虽然不停的sync 但是它是虚拟机,windows 可能未同步到磁盘上去
挂起源linux,开启小linux, (上面其实什么操作也没有做吧 e2fsck -f /dev/hda2 这个好像没有查出问题
我发现 etc/inittab 是好的,我重新 执行了下面几次 sync 然后 挂起源linux,等一会儿开启小linux就好了
[root@localhost ~]# cd /mnt/sysroot/
[root@localhost sysroot]# ls -la etc
总计 7
drwxr-xr-x 5 root root 1024 11-13 20:45 .
drwxr-xr-x 20 root root 1024 11-12 19:35 ..
-rw-r--r-- 1 root root 125 11-13 20:16 fstab
drwxr-xr-x 2 root root 1024 11-12 19:04 init.d
-rw-r--r-- 1 root root 294 11-13 20:45 inittab
drwxr-xr-x 6 root root 1024 11-13 20:24 rc.d
drwxr-xr-x 2 root root 1024 11-13 20:19 sysconfig
[root@localhost sysroot]# vim etc/inittab
[root@localhost sysroot]# sync
[root@localhost sysroot]# sync
[root@localhost sysroot]# sync
[root@localhost sysroot]# sync
[root@localhost sysroot]# cd
[root@localhost ~]# sleep
)
但是现在好了
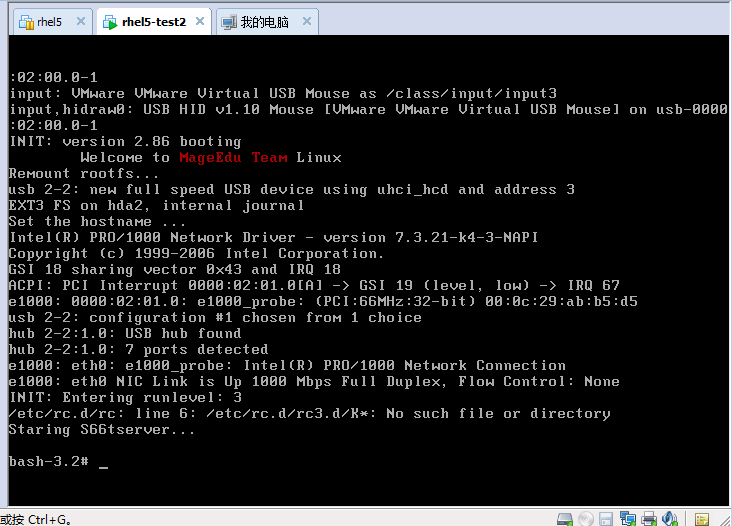
CTRL+ALT+F1,CTRL+ALT+F2,CTRL+ALT+F3, 是可以切换终端的
不过要记住,必须是虚拟机窗口获得焦点,快捷键才起作用
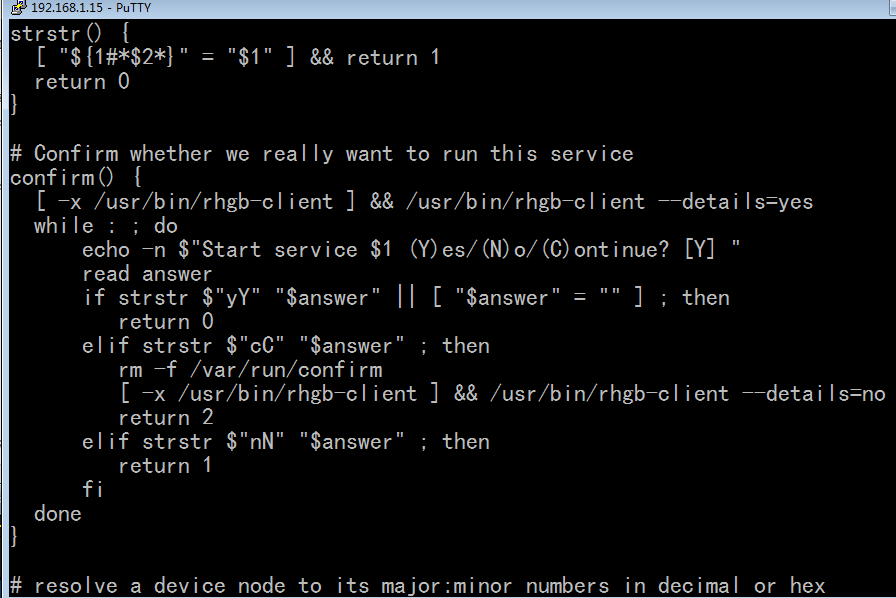
这个函数 是脚本通用的函数
[root@localhost ~]# cat /etc/rc.d/init.d/functions
[root@localhost ~]# cd /mnt/sysroot
这里 functions 叫作重函数,啥意思?只有函数,没有主程序 不需要写 #!/bin/bash
为了执行,先加上 #!/bin/bash 吧 ,等会儿去掉吧
[root@localhost sysroot]# vim etc/rc.d/init.d/functions
#!/bin/bash
#
echo -n "Starting tserver"
echo -e " [ \033[1;32mOK\033[\0m ]"
[root@localhost sysroot]# chmod +x etc/rc.d/init.d/functions
[root@localhost sysroot]# etc/rc.d/init.d/functions
Starting tserver [ OK ]
在变量前加井号 # 取字符串的长度
[root@localhost sysroot]# A="Starting tserver"
[root@localhost sysroot]# echo ${#A}
16
[root@localhost sysroot]#
取得屏幕的长字符个数和宽字符个数 25行 80列
[root@localhost sysroot]# stty -F /dev/console size
25 80
[root@localhost sysroot]#
cut -d' ' -f2 (-d, --delimiter 定界符,分隔符 -f, --fields 字段)
[root@localhost sysroot]# stty -F /dev/console size | cut -d' ' -f2
80
[root@localhost sysroot]# stty -F /dev/console size | cut -d ' ' -f2
80
[root@localhost sysroot]#
[root@localhost sysroot]# stty -F /dev/console size | awk '{print $2}'
80
[root@localhost sysroot]#
[root@localhost sysroot]# A=`stty -F /dev/console size`
[root@localhost sysroot]# echo $A
25 80
[root@localhost sysroot]# echo ${A#* }
80
[root@localhost sysroot]#
[root@localhost sysroot]# echo ${A##* }
80
[root@localhost sysroot]#
[root@localhost sysroot]# A='25 80 100 90'
[root@localhost sysroot]# echo ${A#* }
80 100 90
[root@localhost sysroot]# echo ${A##* }
90
[root@localhost sysroot]#
[root@localhost sysroot]# echo ${A% *}
25 80 100
[root@localhost sysroot]# echo ${A%% *}
25
[root@localhost sysroot]# vim etc/rc.d/init.d/functions
#!/bin/bash
#
SCREEN=`stty -F /dev/console size`
COLUMNS=${SCREEN#* }
SPA_COL=$[$COLUMNS-12] # 12 是 [ OK ] 或 [ FAILURE ]的长度
success() {
string=$1
RT_SPA=$[$SPA_COL-${#string}]
echo -n "$string"
for I in `seq 1 $RT_SPA`;do
echo -n " "
done
echo -e "[ \033[1;32mOK\033[\0m ]"
}
success "starting server"
success "String hello world how are you"
[root@localhost sysroot]# vim etc/rc.d/init.d/functions
#!/bin/bash
#
SCREEN=`stty -F /dev/console size`
COLUMNS=${SCREEN#* }
SPA_COL=$[$COLUMNS-14]
RED='\033[31m'
GREEN='\033[32m'
YELLOW='\033[33m'
BLUE='\033[34m'
NORMAL='\033[0m'
success() {
string=$1
RT_SPA=$[$SPA_COL-${#string}]
echo -n "$string"
for I in `seq 1 $RT_SPA`;do
echo -n " "
done
echo -e "[ ${GREEN}OK${NORMAL} ]"
}
failure(){
string=$1
RT_SPA=$[$SPA_COL-${#string}]
echo -n "$string"
for I in `seq 1 $RT_SPA`;do
echo -n " "
done
echo -e "[ ${RED}FAILED${NORMAL} ]"
}
success "starting server"
success "String hello world how are you"
failure "String tserver"
去调 #!/bin/bash 再去调调用者
[root@localhost sysroot]# vim etc/rc.d/init.d/functions
SCREEN=`stty -F /dev/console size`
COLUMNS=${SCREEN#* }
SPA_COL=$[$COLUMNS-14]
RED='\033[31m'
GREEN='\033[32m'
YELLOW='\033[33m'
BLUE='\033[34m'
NORMAL='\033[0m'
success() {
string=$1
RT_SPA=$[$SPA_COL-${#string}]
echo -n "$string"
for I in `seq 1 $RT_SPA`;do
echo -n " "
done
echo -e "[ ${GREEN}OK${NORMAL} ]"
}
failure(){
string=$1
RT_SPA=$[$SPA_COL-${#string}]
echo -n "$string"
for I in `seq 1 $RT_SPA`;do
echo -n " "
done
echo -e "[ ${RED}FAILED${NORMAL} ]"
}
改 tserver 引入上面的函数
[root@localhost sysroot]# vim etc/rc.d/init.d/tserver
#!/bin/bash
#
# chkconfig: 35 66 33
# description: test service script
#
. /etc/rc.d/init.d/functions
prog=tserver
lockfile=/var/lock/subsys/$prog
start() {
touch $lockfile
[ $? -eq 0 ] && success "Starting $prog" || failure "Starting $prog"
}
stop() {
rm -f $lockfile
[ $? -eq 0 ] && success "Stopping $prog" || failure "Stopping $prog"
}
status() {
if [ -f $lockfile ]; then
echo "Running ..."
else
echo "Stopping ..."
fi
}
usage(){
echo "Usage:$prog {start|stop|status|restart}"
}
case $1 in
start)
start ;;
stop)
stop ;;
restart)
stop
start
;;
status)
status
;;
*)
usage
exit 1
;;
esac
原来
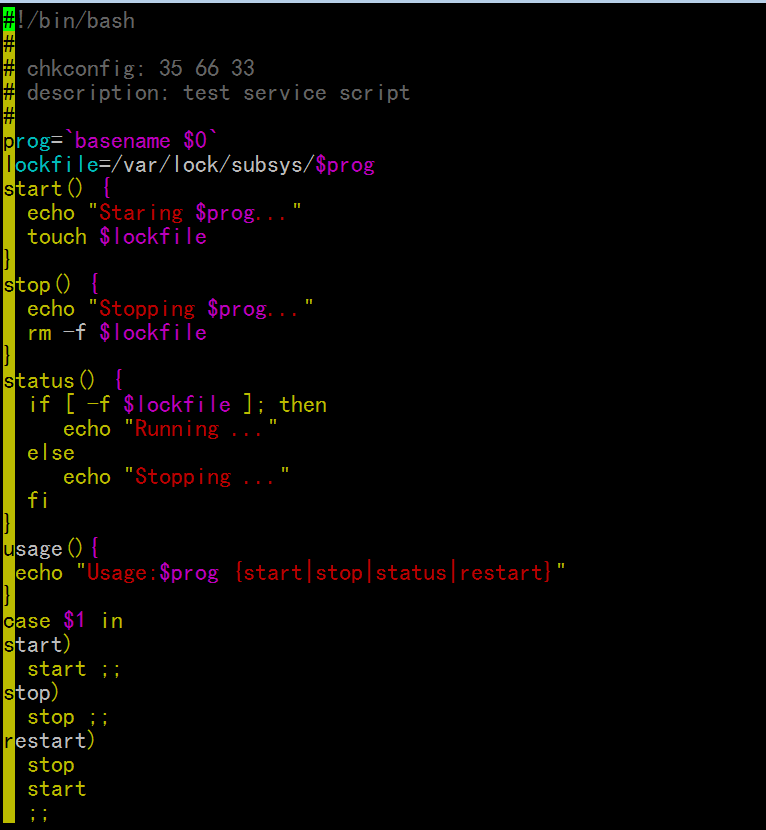
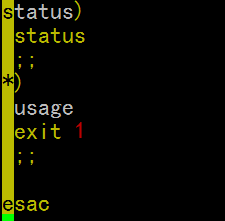
修改后
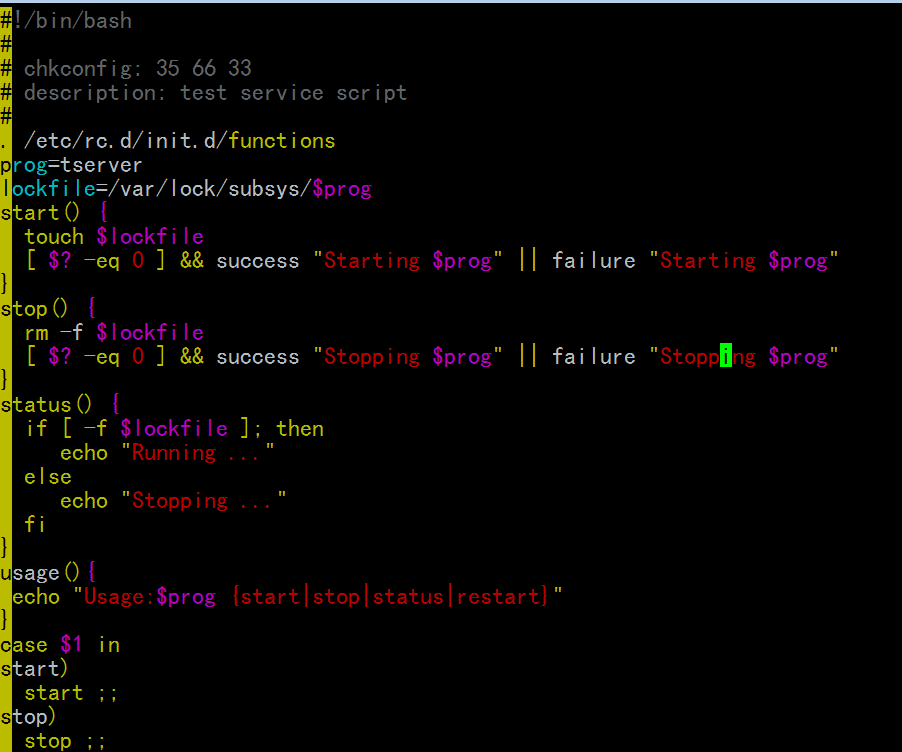
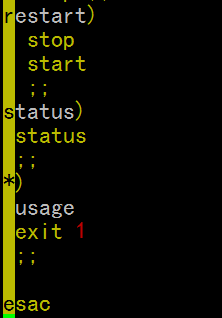
复制一下 两个命令
[root@localhost sysroot]# /root/bincopy.sh
Your command:stty
/bin/stty
copy /bin/stty finished.
Continue:seq
/usr/bin/seq
copy /usr/bin/seq finished.
Continue:q
[root@localhost sysroot]#
切换根目录 执行试试
[root@localhost sysroot]# chroot /mnt/sysroot/
bash-3.2# /etc/rc.d/init.d/tserver start
stty: /dev/console: No such file or directory
Starting tserver[ OK ]
bash-3.2# exit
exit
[root@localhost sysroot]#
因为不是登录的 所以找不到 /dev/console文件

再修改 functions 文件
[root@localhost sysroot]# vim etc/rc.d/init.d/functions
SCREEN=`stty -F /dev/console size 2> /dev/null`
COLUMNS=${SCREEN#* }
[ -z $COLUMNS ] && COLUMNS=80
SPA_COL=$[$COLUMNS-14]
RED='\033[31m'
GREEN='\033[32m'
YELLOW='\033[33m'
BLUE='\033[34m'
NORMAL='\033[0m'
success() {
string=$1
RT_SPA=$[$SPA_COL-${#string}]
echo -n "$string"
for I in `seq 1 $RT_SPA`;do
echo -n " "
done
echo -e "[ ${GREEN}OK${NORMAL} ]"
}
failure(){
string=$1
RT_SPA=$[$SPA_COL-${#string}]
echo -n "$string"
for I in `seq 1 $RT_SPA`;do
echo -n " "
done
echo -e "[ ${RED}FAILED${NORMAL} ]"
}
切换根目录 执行试试
[root@localhost sysroot]# chroot /mnt/sysroot/
bash-3.2# /etc/rc.d/init.d/tserver start
Starting tserver [ OK ]
bash-3.2# /etc/rc.d/init.d/tserver start
Starting tserver [ OK ]
bash-3.2# /etc/rc.d/init.d/tserver stop
Stopping tserver [ OK ]
bash-3.2# /etc/rc.d/init.d/tserver stop
Stopping tserver [ OK ]
bash-3.2# /etc/rc.d/init.d/tserver stop
Stopping tserver [ OK ]
bash-3.2# /etc/rc.d/init.d/tserver restart
Stopping tserver [ OK ]
Starting tserver [ OK ]
bash-3.2# /etc/rc.d/init.d/tserver restart
Stopping tserver [ OK ]
Starting tserver [ OK ]
bash-3.2# sync
bash-3.2# exit
exit
[root@localhost sysroot]#
同步一下 cd 到/root
[root@localhost sysroot]# sync
[root@localhost sysroot]# sync
[root@localhost sysroot]# sync
[root@localhost sysroot]# sync
[root@localhost sysroot]# sync
[root@localhost sysroot]# sync
[root@localhost sysroot]# cd
[root@localhost ~]#
依赖的外围的东西越少越好
挂起源linux 开启小linux
老是出现下面的错
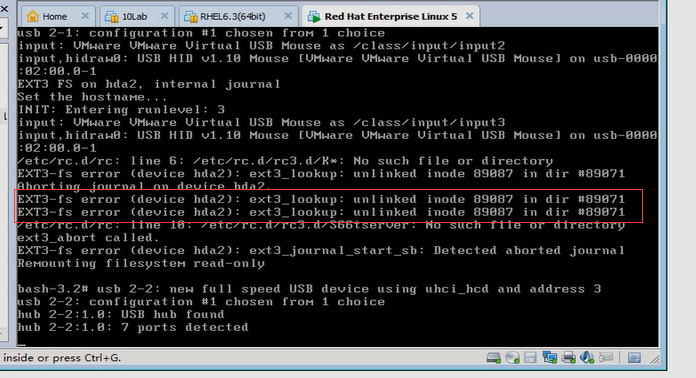
经过 多次 e2fsck 或 mke2fs
终于看到 OK 了

关闭小linux机
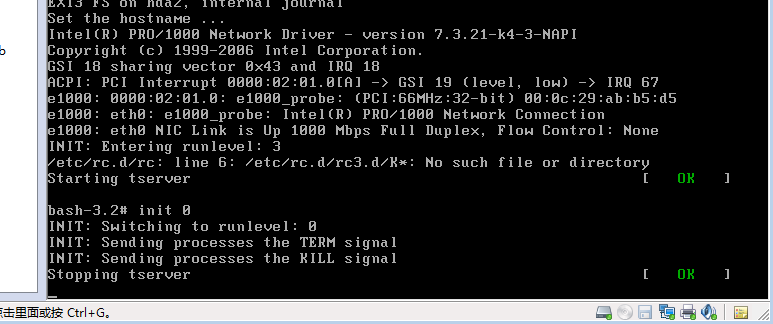
关闭小linux机(已经关闭),恢复源linux
通过服务脚本来配置ip地址
rc.sysinit 一般只是用来初始化驱动,不是用来设定ip地址的
原来的rc.sysinit 是如下图的
[root@localhost ~]# cat /mnt/sysroot/etc/rc.d/rc.sysinit
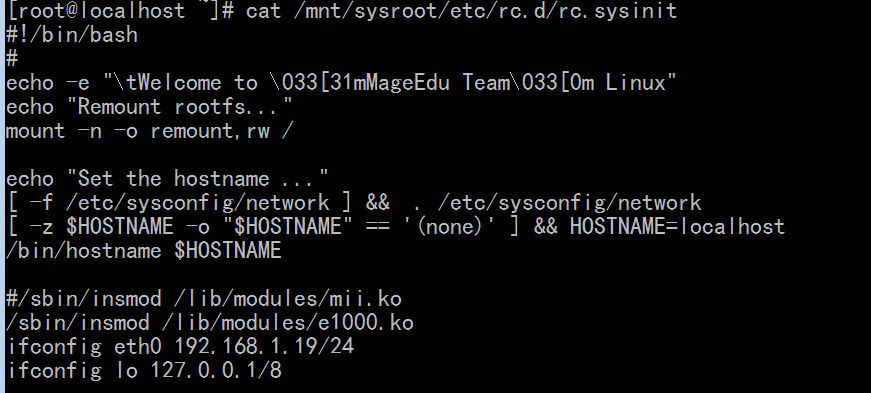
移植模块
[root@localhost ~]# cd /mnt/sysroot/
[root@localhost sysroot]# mkdir lib/modules/
mkdir: 无法创建目录 “lib/modules/”: 文件已存在
[root@localhost sysroot]#
32位的 红帽5 网卡模块是 pcnet32
[root@localhost sysroot]# modinfo pcnet32
filename: /lib/modules/2.6.18-398.el5/kernel/drivers/net/pcnet32.ko
license: GPL
description: Driver for PCnet32 and PCnetPCI based ethercards
author: Thomas Bogendoerfer
srcversion: F81443556AAE169CBF80F55
alias: pci:v00001023d00002000sv*sd*bc02sc00i*
alias: pci:v00001022d00002000sv*sd*bc*sc*i*
alias: pci:v00001022d00002001sv*sd*bc*sc*i*
depends: mii
vermagic: 2.6.18-398.el5 SMP mod_unload gcc-4.1
parm: debug:pcnet32 debug level (int)
parm: max_interrupt_work:pcnet32 maximum events handled per interrupt (int)
parm: rx_copybreak:pcnet32 copy breakpoint for copy-only-tiny-frames (int)
parm: tx_start_pt:pcnet32 transmit start point (0-3) (int)
parm: pcnet32vlb:pcnet32 Vesa local bus (VLB) support (0/1) (int)
parm: options:pcnet32 initial option setting(s) (0-15) (array of int)
parm: full_duplex:pcnet32 full duplex setting(s) (1) (array of int)
parm: homepna:pcnet32 mode for 79C978 cards (1 for HomePNA, 0 for Ethernet, default Ethernet (array of int)
module_sig: 883f35053e9eca55b93ee8bfdff79941124b109e287e123e7a8136e4ade13212fda26655a9f4e909e2a4cd35e632e2741c84ee573d5a64105619db
[root@localhost sysroot]#
64的 红帽5 网卡模块是 e1000 我的是 64位
[root@localhost sysroot]# modinfo e1000
filename: /lib/modules/2.6.18-398.el5/kernel/drivers/net/e1000/e1000.ko
version: 7.3.21-k4-3-NAPI
license: GPL
description: Intel(R) PRO/1000 Network Driver
author: Intel Corporation, <linux.nics@intel.com>
srcversion: 33E8B555167E9BCC6A1C604
alias: pci:v00008086d00002E6Esv*sd*bc*sc*i*
alias: pci:v00008086d000010B5sv*sd*bc*sc*i*
alias: pci:v00008086d00001099sv*sd*bc*sc*i*
alias: pci:v00008086d0000108Asv*sd*bc*sc*i*
alias: pci:v00008086d0000107Csv*sd*bc*sc*i*
alias: pci:v00008086d0000107Bsv*sd*bc*sc*i*
[root@localhost sysroot]# cp /lib/modules/2.6.18-398.el5/kernel/drivers/net/e1000/e1000.ko /mnt/sysroot/lib/modules/
cp:是否覆盖“/mnt/sysroot/lib/modules/e1000.ko”? y
[root@localhost sysroot]#
系统启动时自动装载这个模块 (可以按需装载)
[root@localhost sysroot]# vim etc/rc.d/rc.sysinit
#!/bin/bash
#
echo -e "\tWelcome to \033[31mMageEdu Team\033[0m Linux"
echo "Remount rootfs..."
mount -n -o remount,rw /
echo "Set the hostname ..."
[ -f /etc/sysconfig/network ] && . /etc/sysconfig/network
[ -z $HOSTNAME -o "$HOSTNAME" == '(none)' ] && HOSTNAME=localhost
/bin/hostname $HOSTNAME
echo "Initializing network device ..."
/sbin/insmod /lib/modules/e1000.ko
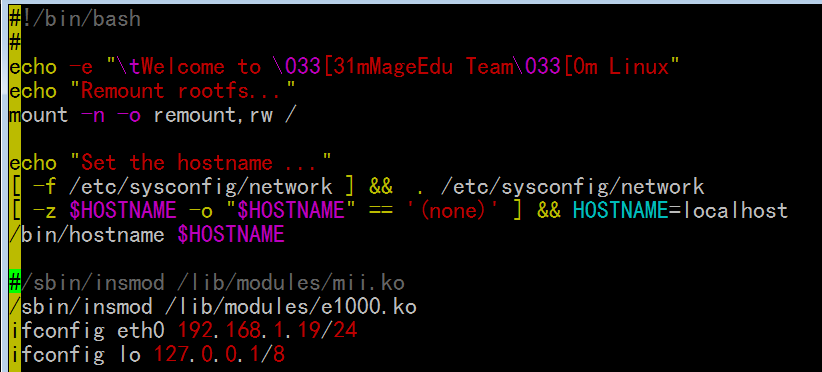
修改成
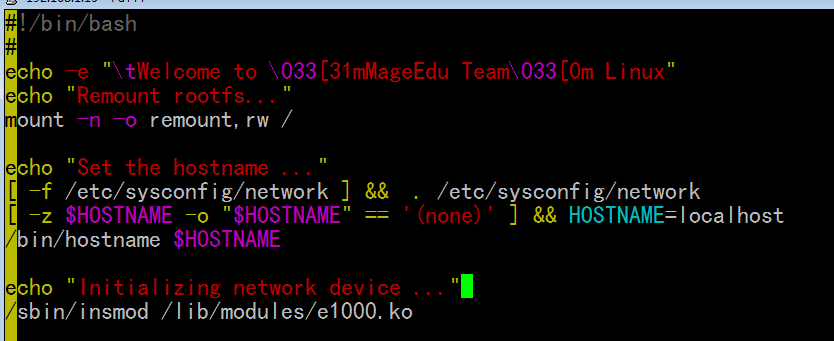
ip 地址通过服务来实现
etc/sysconfig/network-scripts这个目录下的配置文件里面读取ip的
[root@localhost sysroot]# mkdir -pv etc/sysconfig/network-scripts
mkdir: 已创建目录 “etc/sysconfig/network-scripts”
[root@localhost sysroot]# vim etc/sysconfig/network-scripts/ifcfg-eth0
DEVICE=eth0
BOOTPROTO=static
IPADDR=192.168.1.19
NETMASK=255.255.255.0
GATEWAY=192.168.1.1
ONBOOT=yes
[root@localhost sysroot]#
chkconfig: 35 09 90 在3,5级别下启动,启动级别09,关闭级别90
[root@localhost sysroot]# vim etc/rc.d/init.d/network
#!/bin/bash
# chkconfig: 35 09 90
# description: network service
#
prog=network
. /etc/rc.d/init.d/functions
CONF=/etc/sysconfig/network-scripts/ifcfg-eth0
. $CONF
start() {
ifconfig eth0 $IPADDR/$NETMASK up
[ -z $GATEWAY ] && route add default gw $GATEWAY
}
stop() {
ifconfig eth0 down
}
status() {
ifconfig eth0
}
usage() {
echo "$prog: {start|stop|restart|status}"
}
case $1 in
start)
start
success "Config network eth0"
;;
stop)
stop
success "Stop network card eth0"
;;
restart)
stop
start
success "Restart network card eth0"
;;
status)
status
;;
*)
usage
exit 1
;;
esac
[root@localhost sysroot]# chmod +x etc/rc.d/init.d/network
创建服务链接
[root@localhost sysroot]# cd etc/rc.d/rc0.d/
[root@localhost rc0.d]# ln -sv ../init.d/network K90network
创建指向“../init.d/network”的符号链接“K90network”
[root@localhost rc0.d]# cd ../rc6.d/
[root@localhost rc6.d]# ln -sv ../init.d/network K90network
创建指向“../init.d/network”的符号链接“K90network”
[root@localhost rc6.d]# cd ../rc3.d/
[root@localhost rc3.d]# ln -sv ../init.d/network S09network
创建指向“../init.d/network”的符号链接“S09network”
[root@localhost rc3.d]#
切换根目录看能不能执行
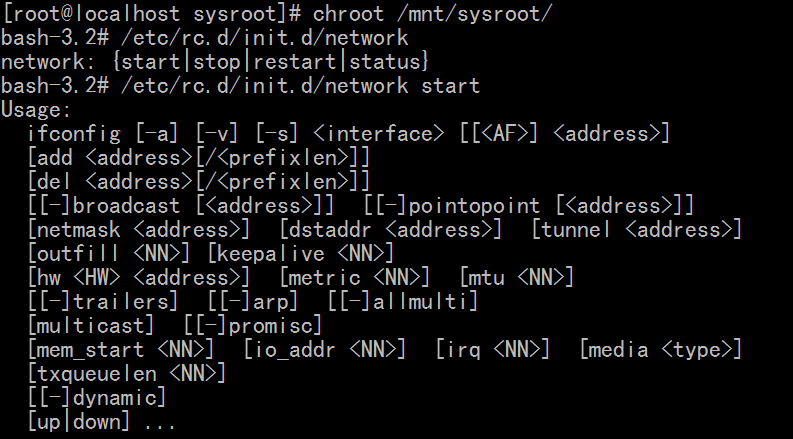
[root@localhost sysroot]# chroot /mnt/sysroot/
bash-3.2# /etc/rc.d/init.d/network
network: {start|stop|restart|status}
bash-3.2# /etc/rc.d/init.d/network start
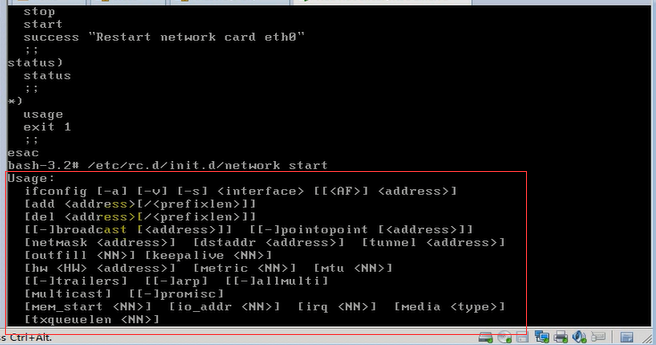
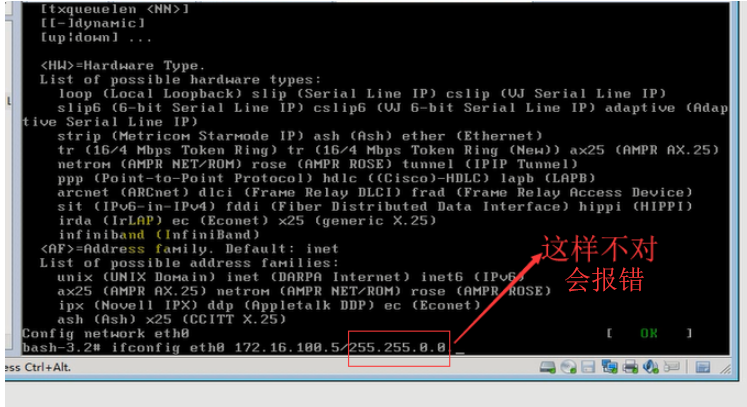
(这个错是 ifconfig 的用法错了 ifconfig eth0 $IPADDR/$NETMASK up
这里不用用 $NETMASK 只能用 8,16,24,32的数字 见下面对 etc/rc.d/init.d/network的改写(红色字 NETMASK=24)
)
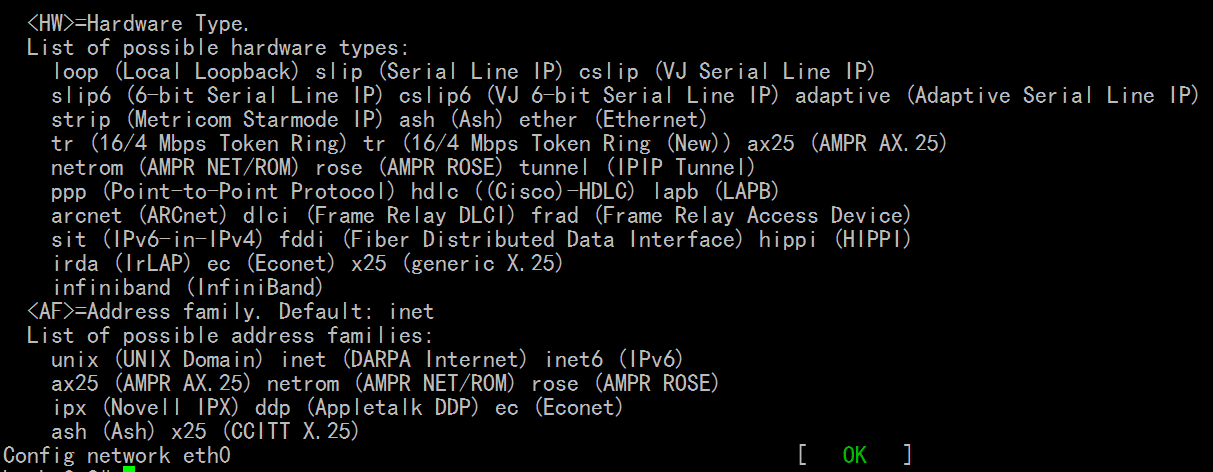
此时网卡禁用了(起作用了),所以停在这儿了

进虚拟机 重启下网卡
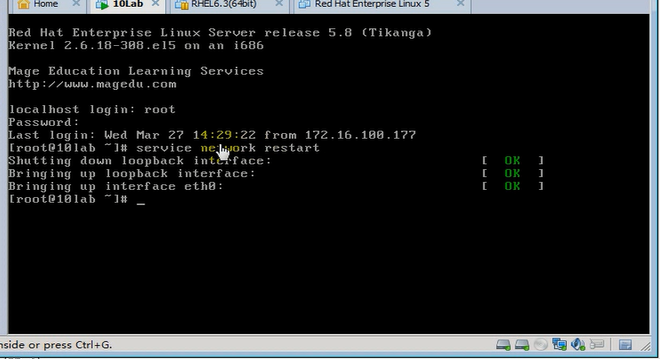
[root@localhost sysroot]# cd
[root@localhost ~]# sync
[root@localhost ~]# sync
[root@localhost ~]# sync
[root@localhost ~]# sync
[root@localhost ~]# sync
[root@localhost ~]# sync
[root@localhost ~]# sync
[root@localhost ~]#
挂起源linux,(稍等一会儿)启动小linux (慢一点吧,防止数据未写到盘上)
再加上用户 整个系统就完善了
整个系统的启动流程全靠脚本来控制的
下面几张图我的
(
这个小图是下图的图的截取
应该是文件损坏吧,还是因为 ipconfig eth0 $IPADDR/$NETMASK 有问题 $NETMASK 不能是255.255.255.0, 只能是8,16,24,32 )
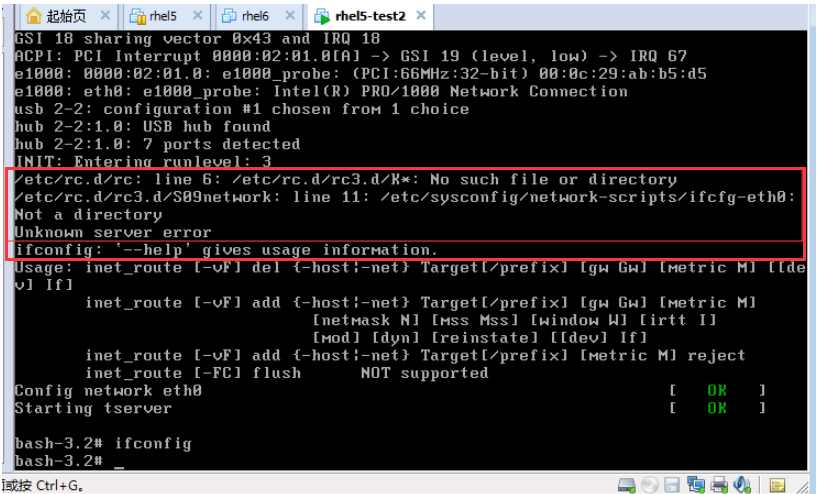
[root@localhost sysroot]# vim etc/rc.d/init.d/network
#!/bin/bash
# chkconfig: 35 09 90
# description: network service
#
prog=network
. /etc/rc.d/init.d/functions
CONF=/etc/sysconfig/network-scripts/ifcfg-eth0
. $CONF
NETMASK=24
start() {
ifconfig eth0 $IPADDR/$NETMASK up
[ -z $GATEWAY ] && route add default gw $GATEWAY
}
stop() {
ifconfig eth0 down
}
status() {
ifconfig eth0
}
usage() {
echo "$prog: {start|stop|restart|status}"
}
case $1 in
start)
start
success "Config network eth0"
;;
stop)
stop
success "Stop network card eth0"
;;
restart)
stop
start
success "Restart network card eth0"
;;
status)
status
;;
*)
usage
exit 1
;;
esac
[root@localhost ~]# sync
[root@localhost ~]# sync
[root@localhost ~]# sync
[root@localhost ~]# sync
[root@localhost ~]# sleep
[root@localhost ~]# sync
(稍等一会儿)挂起源linux,(稍等一会儿)启动小linux (慢一点吧,防止数据未写到盘上)
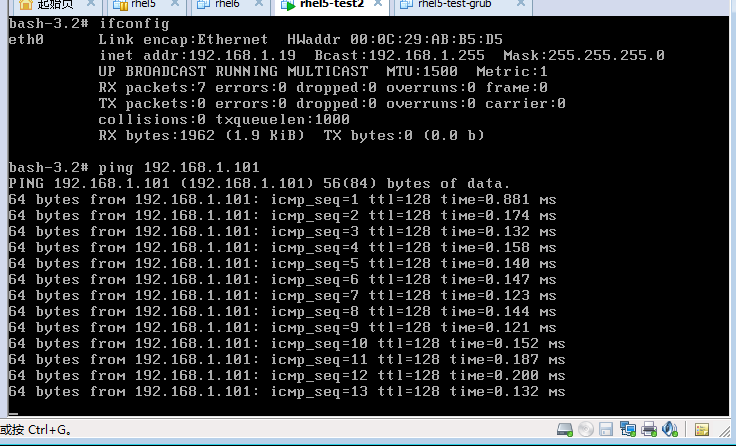
(网络服务数字小,优先级高,会先开启)
下面几张图我的
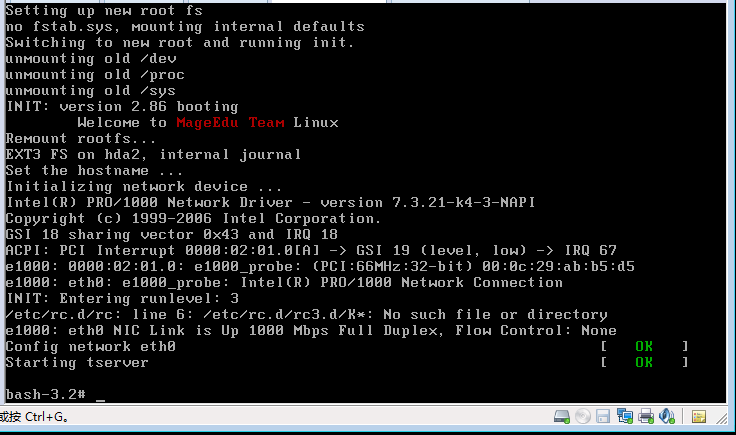
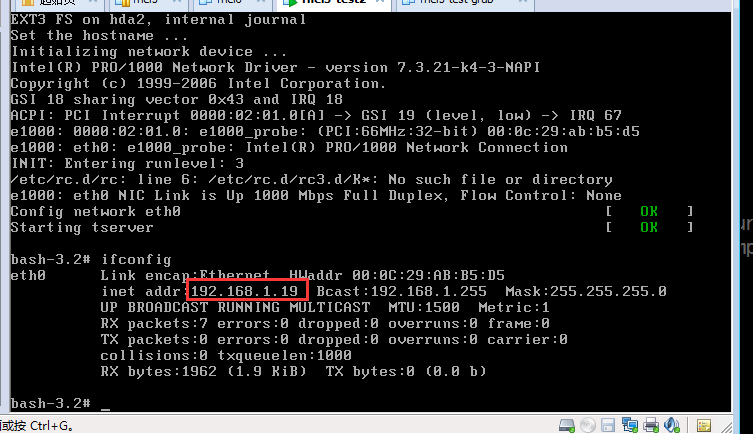

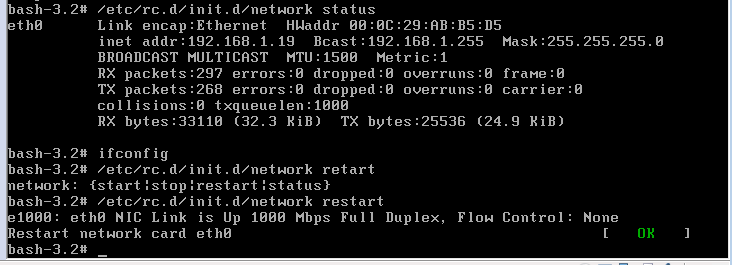
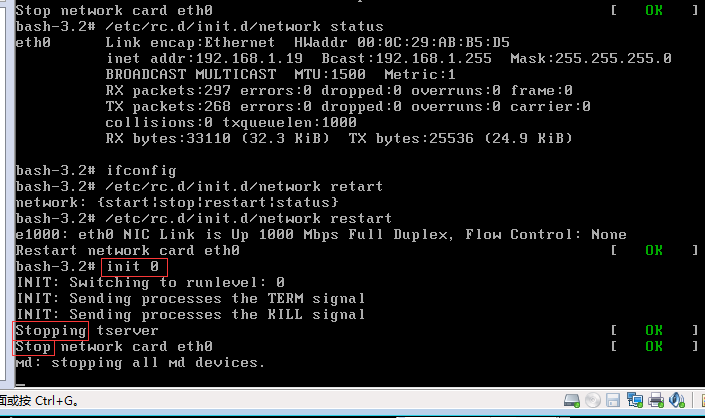
关闭时网务服务数字大,优先级低,所以后关闭
下面几张图是马哥的
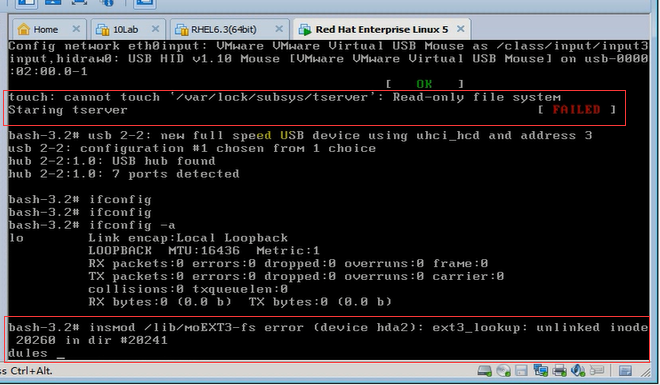
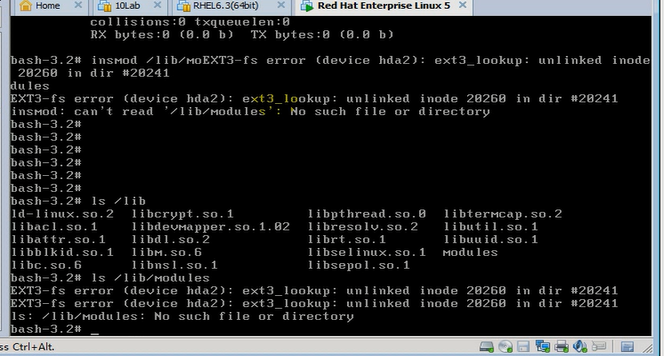
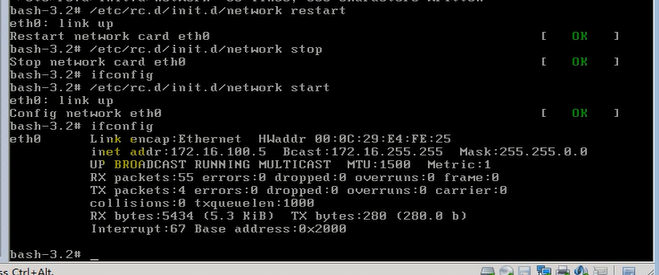
马哥做了 mke2fs 或 e2fsck 就好了
马哥的问题 (也是由于 ifconfig eth0 ip/netmask 这里不能用netmask,只能用8,16,24,32的数字)
下面几张图是马哥的
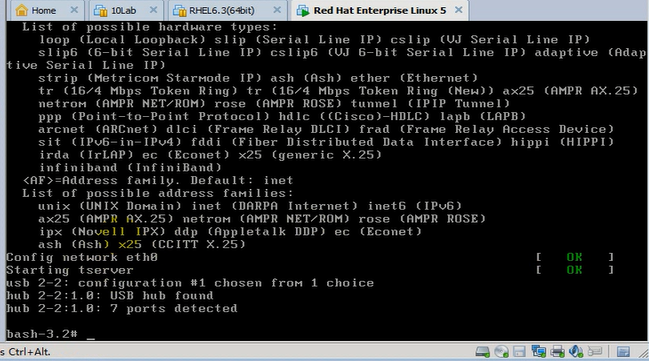
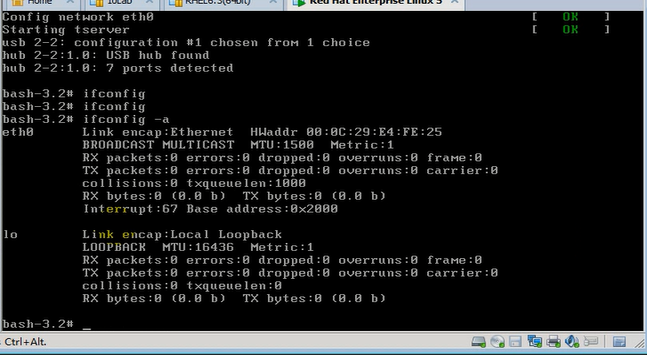
报的错如下图
