访问频率限制概述
频率限制经常用在API中,用于限制独立请求者对特定API的请求频率。例如,如果设置频率限制为每分钟1000次,如果一分钟内超过这个限制,那么服务器就会返回 429: Too Many Attempts.响应。
通常,一个编码良好的、实现了频率限制的应用还会回传三个响应头: X-RateLimit-Limit, X-RateLimit-Remaining和 Retry-After(如果达到限制次数只能获取到 Retry-After头)。 X-RateLimit-Limit告诉我们在指定时间内允许的最大请求次数, X-RateLimit-Remaining指的是在指定时间段内剩下的请求次数, Retry-After指的是距离下次重试请求需要等待的时间(s)。
每个API都会选择一个自己的频率限制时间跨度,GitHub选择的是1小时,Twitter选择的是15分钟,Laravel中间件选择的是1分钟。
如何使用Laravel的访问频率限制中间件
在Laravel中,你可以使用一个中间件 throttle,让我们先来看看这个中间件的用法,首先我们定义一个路由规则如下:
Route::group(['prefix'=>'api'],function(){
    Route::get('users',function(){
        return \App\User::all();
    });
});
然后我们将中间件throttle添加到其中,throttle默认限制每分钟尝试60次,并且在一分钟内访问次数达到60次后禁止访问:
Route::group(['prefix'=>'api','middleware'=>'throttle'],function(){
    Route::get('users',function(){
        return \App\User::all();
    });
});
如果你访问api/users路由,就会看到响应头如下所示:
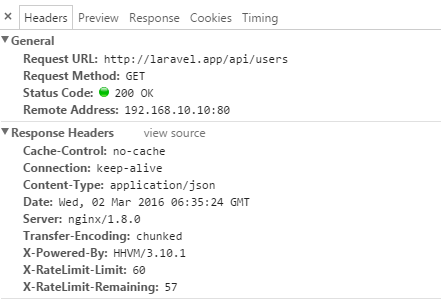
该响应意味着:
请求成功(状态码为200)
每分钟只能访问60次
在本时间段内还能访问57次
如果访问次数超过60次,响应头如下:
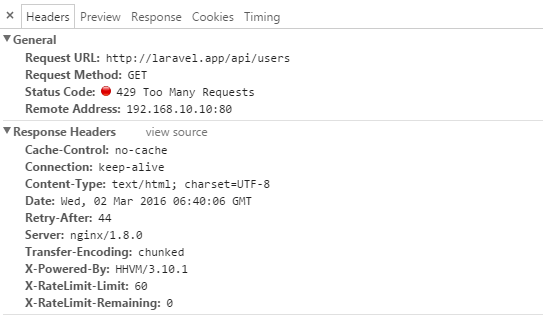
同时,响应内容文本为:Too Many Attempts。
如果44s后重试,页面恢复正常访问。
自定义throttle中间件
让我们来做一点自定义,现在我们想要限制每分钟访问5次:
Route::group(['prefix'=>'api','middleware'=>'throttle:5'],function(){
    Route::get('users',function(){
        return \App\User::all();
    });
});
如果我们想要改变达到指定限制次数后的等待时间,可以这样自定义:
Route::group(['prefix'=>'api','middleware'=>'throttle:5,10'],function(){
    Route::get('users',function(){
        return \App\User::all();
    });
});
源码解读
throttle中间件 入口是vendor/laravel/framework/src/Illuminate/Routing/Middleware/ThrottleRequests.php中的handle方法, 其命名空间是Illuminate\Routing\Middleware。实现原理比较简单(handle方法内容):
public function handle($request, Closure $next, $maxAttempts = 60, $decayMinutes = 1)
{
    $key = $this->resolveRequestSignature($request);

    if ($this->limiter->tooManyAttempts($key, $maxAttempts, $decayMinutes)) {
        return $this->buildResponse($key, $maxAttempts);
    }

    $this->limiter->hit($key, $decayMinutes);

    $response = $next($request);

    return $this->addHeaders(
        $response, $maxAttempts,
        $this->calculateRemainingAttempts($key, $maxAttempts)
    );
}
首先分析依赖关系:
该方法依赖Illuminate\Cache\RateLimiter ,RateLimiter是laravel Cache服务的一部分,并且是依赖Cache(此处Cache指Contracts\Cache\Repository,Contracts是一系列的接口,laravel设计如此,全部定义接口(interface),通过具体实现和接口的绑定注入容器以从容器中进行依赖解析取出对象,Repository是一种设计模式,laravel的cache实现可以是多种,不局限于file,redis等,通过Repository可以自如的切换Cache的具体实现)的具体实现,此处以redis为Cache驱动为例,他的实现是Illuminate\Cache\RedisStore。
具体逻辑分析:resolveRequestSignature方法调用了Request对象中fingerprint:
return sha1(implode('|', array_merge(
        $route->methods(), [$route->domain(), $route->uri(), $this->ip()]
    )));
将请求方式域名路由和客户端IP以'|'连接再sha1生成key.
接着调用了RateLimiter中的tooManyAttempts方法判断是否是过多尝试.
在tooManyAttempts方法中
public function tooManyAttempts($key, $maxAttempts, $decayMinutes = 1)
{
    if ($this->cache->has($key.':lockout')) {
        return true;
    }

    if ($this->attempts($key) > $maxAttempts) {
        $this->lockout($key, $decayMinutes);

        $this->resetAttempts($key);

        return true;
    }

    return false;
}
可以看到是通过判断key+:lockout的lockout_key(大于最大访问次数时写入该key,用于标记禁止访问)是否存在和 key对应的value是否大于最大允许尝试次数。
RateLimiter中的hit方法:
public function hit($key, $decayMinutes = 1)
{
    $this->cache->add($key, 1, $decayMinutes);

    return (int) $this->cache->increment($key);
}
先添加key 然后自增长数值记录访问次数.
最后就是cache服务redis具体实现中的add方法到底做了什么:
在RedisStore中的add方法:
public function add($key, $value, $minutes)
    {
        $lua = "return redis.call('exists',KEYS[1])<1 and redis.call('setex',KEYS[1],ARGV[2],ARGV[1])";

        return (bool) $this->connection()->eval(
            $lua, 1, $this->prefix.$key, $this->serialize($value), (int) max(1, $minutes * 60)
        );
    }
可以看到是通过redis 脚本(lua实现) 先判断key是否存在,再执行了setex设置了过期时间.