You are here
马哥 22_02_基于openssl的https服务配置 有大用
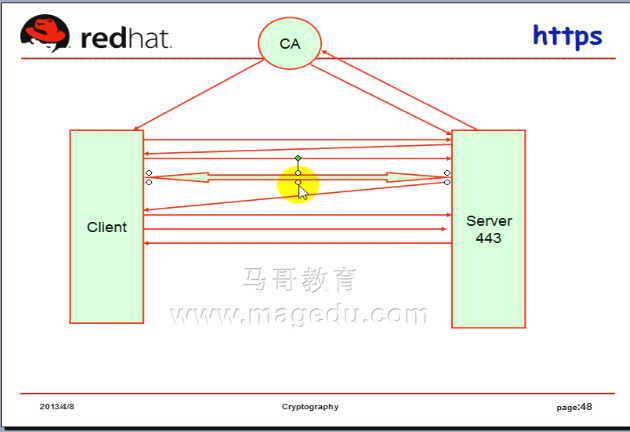
https 会话的建立过程
(http 在客户端和 服务器端传输数据都是明文的,很不安全)
https 443 端口
客户端发送请求 (三次握手)
三次握手后,可以建立ssl会话了
双方首先要协商要使用的 单向加密算法,对称加密算法,公钥加密算法
双方选择一个大家都支持的算法,每一种算法几乎都用得到,(单向加密用一种,对称加密用一种,公钥加密用一种)
所以这些算法都要会进行选择的
一旦选择完成了,双方发现可以建立ssl会话,可以继续,因为我们所支持的算法是有交合点的
Server就会把证书发送给客户端了
ssl 会话协商完成之后,服务端就会发送公钥信息(证书)给客户端,
客户端要验证证书,客户端对证书验证完成之后,如果发现没有问题,客户端就会生成一个对称密钥(可能是随机的)发送给服务器端
此时客户端要请求哪个页面就发过去了, 此时服务器端就会把客户端要请求的内容通过客户端发来的密码加密以后回送给客户端 接下来 ssl会话就建立了
(Server 要发送自己的证书给客户端,而且客户端要能够验证这个证书,才能信任的,这个过程才能进行,,,这个意味着我们的server端得首先给我们的服务器有一个可用的证书)
(因此我们得有一个第三方颁发机构给我们的服务器端发证)
(很显然,客户端为了能够验证并信任这个证书,客户端得先信任这个第三方机构(就是把这个第三方机构的证书放在本机上,用来验证其它人的证书的))
(所以我们接下来的操作就包括 我们没有办法去互联网上去申请一个证书 来验证,所以我们自建一个CA) 所以我们使用Openssl去建一个CA,一个CA自己也有一个证书,这个证书叫自签的证书
(然后服务器端也要生成一段密钥,生成密钥后把公钥发给CA,由CA负责签署给它生成证书,然后再回送给Web Server端) (Server 配置自己的服务器能够使用这个证书)(并且在客户端发起请求的时候,把证书发送给客户端) (客户端使用自己保存在自己主机上的CA的证书来来验证服务器端发来的证书)
把 CA和Server放在同一台主机上也可以 (或者找两台主机,一台做CA,一台做http server)
要强调的一点是 ssl 在建立会话的时候,跟主机名是没有关系的
(协商ssl ,ssl会话,两台主机通信靠的是ip地址和端口,那因此ssl会话是没办法基于主机名来做区分的)
(意味着如果我们的主机只有一个ip地址,它只能给一个主机提供 ssl 的功能 )
(如果我们当前的主机提供了基于域名的虚拟主机的话,那么ssl的功能只能提供给其中一个虚拟主机 现在 apache和nginx都可以提供给多个基于域名的虚拟主机了)
(ssl会话仅能基于ip地址进行的) (要么是中心主机,要么是基于名称的虚拟主机,但是只能有一个虚拟主机是ssl 现在 apache和nginx都可以提供给多个基于域名的虚拟主机了)
要想使httpd服务器支持ssl的功能,需要先安装 ssl 模块
[root@localhost ~]# httpd -M
Loaded Modules:
core_module (static)
mpm_prefork_module (static)
http_module (static)
so_module (static)
auth_basic_module (shared)
auth_digest_module (shared)
authn_file_module (shared)
authn_alias_module (shared)
authn_anon_module (shared)
authn_dbm_module (shared)
authn_default_module (shared)
authz_host_module (shared)
authz_user_module (shared)
authz_owner_module (shared)
authz_groupfile_module (shared)
authz_dbm_module (shared)
authz_default_module (shared)
ldap_module (shared)
authnz_ldap_module (shared)
include_module (shared)
log_config_module (shared)
logio_module (shared)
env_module (shared)
ext_filter_module (shared)
mime_magic_module (shared)
expires_module (shared)
deflate_module (shared)
headers_module (shared)
usertrack_module (shared)
setenvif_module (shared)
mime_module (shared)
dav_module (shared)
status_module (shared)
autoindex_module (shared)
info_module (shared)
dav_fs_module (shared)
vhost_alias_module (shared)
negotiation_module (shared)
dir_module (shared)
actions_module (shared)
speling_module (shared)
userdir_module (shared)
alias_module (shared)
rewrite_module (shared)
proxy_module (shared)
proxy_balancer_module (shared)
proxy_ftp_module (shared)
proxy_http_module (shared)
proxy_connect_module (shared)
cache_module (shared)
suexec_module (shared)
disk_cache_module (shared)
file_cache_module (shared)
mem_cache_module (shared)
cgi_module (shared)
version_module (shared)
perl_module (shared)
php5_module (shared)
proxy_ajp_module (shared)
python_module (shared)
ssl_module (shared)
Syntax OK
[root@localhost ~]#
[root@localhost ~]# httpd -M | grep ssl (输出的数据流比较独特,它输不出来) (好像找不到有关于 ssl 的模块 ,没看到吧,根据后面的 # yum install mod_ssl 命令 说明已经安装了ssl 模块)
Loaded Modules:
core_module (static)
mpm_prefork_module (static)
http_module (static)
so_module (static)
auth_basic_module (shared)
auth_digest_module (shared)
authn_file_module (shared)
authn_alias_module (shared)
authn_anon_module (shared)
authn_dbm_module (shared)
authn_default_module (shared)
authz_host_module (shared)
authz_user_module (shared)
authz_owner_module (shared)
authz_groupfile_module (shared)
authz_dbm_module (shared)
authz_default_module (shared)
ldap_module (shared)
authnz_ldap_module (shared)
include_module (shared)
log_config_module (shared)
logio_module (shared)
env_module (shared)
ext_filter_module (shared)
mime_magic_module (shared)
expires_module (shared)
deflate_module (shared)
headers_module (shared)
usertrack_module (shared)
setenvif_module (shared)
mime_module (shared)
dav_module (shared)
status_module (shared)
autoindex_module (shared)
info_module (shared)
dav_fs_module (shared)
vhost_alias_module (shared)
negotiation_module (shared)
dir_module (shared)
actions_module (shared)
speling_module (shared)
userdir_module (shared)
alias_module (shared)
rewrite_module (shared)
proxy_module (shared)
proxy_balancer_module (shared)
proxy_ftp_module (shared)
proxy_http_module (shared)
proxy_connect_module (shared)
cache_module (shared)
suexec_module (shared)
disk_cache_module (shared)
file_cache_module (shared)
mem_cache_module (shared)
cgi_module (shared)
version_module (shared)
perl_module (shared)
php5_module (shared)
proxy_ajp_module (shared)
python_module (shared)
ssl_module (shared)
Syntax OK
[root@localhost ~]#
得先安装
[root@localhost ~]# yum install mod_ssl
[root@localhost ~]# yum install mod_ssl
Loaded plugins: product-id, security, subscription-manager
This system is not registered to Red Hat Subscription Management. You can use subscription-manager to register.
file:///media/cdrom/Server/repodata/repomd.xml: [Errno 5] OSError: [Errno 2] 没有那个文件或目录: '/media/cdrom/Server/repodata/repomd.xml'
Trying other mirror.
Setting up Install Process
Package 1:mod_ssl-2.2.3-82.el5_9.i386 already installed and latest version
Nothing to do
[root@localhost ~]#
[root@localhost ~]# rpm -ql mod_ssl (看看安装 mod_ssl 模块后生成了哪些文件)
/etc/httpd/conf.d/ssl.conf # 配置文件,它将作为主配置文件的一部分来使用 (重启或重新加载才能生效)(由于ssl中监听了新的端口,所以一般来讲,只要涉及到打开新端口的话,套接字的话,都必须得重启, 重新装载可能不会生效)
/usr/lib/httpd/modules/mod_ssl.so # 这是一个模块
/var/cache/mod_ssl #缓存目录 这是ssl会话的缓存数据,将数据缓存下来使用的 下面几个不用管
/var/cache/mod_ssl/scache.dir
/var/cache/mod_ssl/scache.pag
/var/cache/mod_ssl/scache.sem
[root@localhost ~]#
提供 CA 自签证书,然后让我们的服务器生成一段密钥,把公钥发送给服务器端,让服务器端来实现签名
使用 192.168.0.15 来做我们的CA
要想做CA,先生成自签证书
192.168.0.15 上面
[root@localhost CA]# pwd
/etc/pki/CA
[root@localhost CA]# ls
private
[root@localhost CA]#
genrsa 生成rsa格式的私钥 -out 保存至 private/cakey.pem 2048位的密钥(多少位的长度,多少位的密钥)
私钥是不能让其它人来访问的 ,使用 umask 077 来生成这个文件
生成一个私钥
[root@localhost CA]# (umask 077; openssl genrsa -out private/cakey.pem 2048)
Generating RSA private key, 2048 bit long modulus
.......+++
.................................+++
e is 65537 (0x10001)
[root@localhost CA]#
生成以后 权限是 600 的
[root@localhost CA]# ls -l private/
总计 4
-rw------- 1 root root 1679 03-26 20:50 cakey.pem
[root@localhost CA]#
生成一个私钥之后,接下来 来生成自签证书
(生成自签证书的时候,会让我们填很多信息 (我们的组织,国家,省份之类的) 这一大堆信息写起来很麻烦,它有默认信息,我们可以把默认改成我们平时用得最多的信息,到时候直接敲回车就可以了)
于是 vim ../tls/openssl.cnf
[root@localhost CA]# vim ../tls/openssl.cnf
.........................
[ req_distinguished_name ]
countryName = Country Name (2 letter code)
countryName_default = CN #GB
countryName_min = 2
countryName_max = 2
stateOrProvinceName = State or Province Name (full name)
stateOrProvinceName_default = Henan #Berkshire
localityName = Locality Name (eg, city)
localityName_default = Zhengzhou #Newbury
0.organizationName = Organization Name (eg, company)
0.organizationName_default = MagEdu #My Company Ltd
# we can do this but it is not needed normally :-)
#1.organizationName = Second Organization Name (eg, company)
#1.organizationName_default = World Wide Web Pty Ltd
organizationalUnitName = Organizational Unit Name (eg, section)
#organizationalUnitName_default =
organizationalUnitName_default = Tech
.........................
其它的名字我们就不使用默认了, EmailAddress 也不要默认了,等会儿填
生成一个自签证书
( -days 3655 有效期)
(hostname 这个证书发给谁,就应该是谁的主机名 (比如访问一个站点 www.a.org 之类的,等会儿发给服务器的时候 , 证书的名称的主机名 一定要跟访问的域名的名称保持一致,不一致会有警告的 ) 但是这里发的是自签证书,发给自己的,我们写上 ca.magedu.com 吧 )
[root@localhost CA]# openssl req -new -x509 -key private/cakey.pem -out cacert.pem -days 3655
[root@localhost CA]# openssl req -new -x509 -key private/cakey.pem -out cacert.pem -days 3655
You are about to be asked to enter information that will be incorporated
into your certificate request.
What you are about to enter is what is called a Distinguished Name or a DN.
There are quite a few fields but you can leave some blank
For some fields there will be a default value,
If you enter '.', the field will be left blank.
-----
Country Name (2 letter code) [CN]:
State or Province Name (full name) [Henan]:
Locality Name (eg, city) [Zhengzhou]:
Organization Name (eg, company) [MagEdu]:
Organizational Unit Name (eg, section) [Tech]:
Common Name (eg, your name or your server's hostname) []:ca.magedu.com
Email Address []:admin@magedu.com
[root@localhost CA]#
好了,自签证书生成结束
要把它扮演成一个自签的CA(或者叫私有CA来使用),我们还需要改 vim ../tls/openssl.cnf
dir = /etc/pki/CA #../../CA 改下路径 (我们为什么把目录定在这儿,因为默认下面的好多文件(比如 certificate = $dir/cacert.pem )都在这个目录下,所以为了避免改这个名称,我们的文件名就叫 cacert.pem 这就是我们刚才生成的时候 要放在 private 目录下的原因 )
CA下面有好几个子目录来放一些文件
certs = $dir/certs # 生成的证书放在这个目录下
crl_dir = $dir/crl # 吊销的证书放在这个目录下
certificate = $dir/cacert.pem
database = $dir/index.txt #索引文件,我们签了都有哪些证书,每个证书叫什么,这些每个信息都要放在这个索引文件当中
new_certs_dir = $dir/newcerts # 新签的证书放在这个目录下
serial = $dir/serial #序列号,已经签到第几个了
private_key = $dir/private/cakey.pem#
这些文件都要去准备
[root@localhost CA]# vim ../tls/openssl.cnf
.........................
[ CA_default ]
dir = /etc/pki/CA #../../CA # Where everything is kept
certs = $dir/certs # Where the issued certs are kept
crl_dir = $dir/crl # Where the issued crl are kept
database = $dir/index.txt # database index file.
#unique_subject = no # Set to 'no' to allow creation of
# several ctificates with same subject.
new_certs_dir = $dir/newcerts # default place for new certs.
certificate = $dir/cacert.pem # The CA certificate
serial = $dir/serial # The current serial number
crlnumber = $dir/crlnumber # the current crl number
# must be commented out to leave a V1 CRL
crl = $dir/crl.pem # The current CRL
private_key = $dir/private/cakey.pem# The private key
RANDFILE = $dir/private/.rand # private random number file
x509_extensions = usr_cert # The extentions to add to the cert
# Comment out the following two lines for the "traditional"
# (and highly broken) format.
name_opt = ca_default # Subject Name options
cert_opt = ca_default # Certificate field options
.........................
我们创建几个目录
[root@localhost CA]# mkdir certs crl newcerts
[root@localhost CA]#
[root@localhost CA]# touch index.txt
[root@localhost CA]# echo 01 > serial (00也可以)
[root@localhost CA]#
[root@localhost CA]# ls
cacert.pem certs crl index.txt newcerts private serial
[root@localhost CA]#
[root@localhost CA]# pwd
/etc/pki/CA
[root@localhost CA]#
接下来,如果有人需要用到证书,他只需要生成一堆密钥,并且把它的申请放到我们这里来,并生成一个证书签署请求,并且把请求发到我们的服务器上来做一下签署就可以了
到web服务器电脑 192.168.0.55 (假如说证书就是给我们的web服务器使用的,我们把证书放在 /etc/httpd 目录下面吧)
[root@localhost ~]# cd /etc/httpd/
[root@localhost httpd]# ls
conf conf.d logs modules run
[root@localhost httpd]# mkdir ssl 建一个目录 ssl
[root@localhost httpd]# ls
conf conf.d logs modules run ssl
[root@localhost httpd]#
(给它生成一段密钥,我们要把公钥包装成证书签署请求发送给服务器端)
[root@localhost httpd]# cd ssl
[root@localhost ssl]# (umask 077; openssl genrsa 1024 > httpd.key) (寻位短一点 ,长度 1024 可以不用-out 通过右尖括号 输出重定向 保存文件)
Generating RSA private key, 1024 bit long modulus
.....................................++++++
.......++++++
e is 65537 (0x10001)
[root@localhost ssl]#
[root@localhost ssl]# ll
总计 8
-rw------- 1 root root 891 03-29 19:13 httpd.key
读写权限是 root 用户
[root@localhost ssl]#openssl req -new -key httpd.key -out httpd.csr (生成证书颁发请求)(这里输出的信息跟服务器上的信息不一样,因为我们的openssl配置文件不一样,我们刚才改了 ca服务器 (192.168.0.15)上的配置文件 ,我们的web服务器上192.168.0.55的配置文件没有改,所以得重新手动输一遍,要么是把192.168.0.15的 openssl 的配置文件 复制到192.168.0.55上 ,当然对于我们来讲其实无所谓了 ) ( httpd.csr 证书签署请求 certificate signature request ,现在不是个证书,只是个请求)
You are about to be asked to enter information that will be incorporated
into your certificate request.
What you are about to enter is what is called a Distinguished Name or a DN.
There are quite a few fields but you can leave some blank
For some fields there will be a default value,
If you enter '.', the field will be left blank.
-----
Country Name (2 letter code) [GB]:CA # 一定要跟 ca服务器 (192.168.0.15)上的信息保持一致,不然的话,它不给你签,因为我们是私有CA
State or Province Name (full name) [Berkshire]:Henan #保持一致
Locality Name (eg, city) [Newbury]:Zhengzhou #保持一致
Organization Name (eg, company) [My Company Ltd]:MageEdu #保持一致
Organizational Unit Name (eg, section) []:Tech #保持一致
Common Name (eg, your name or your server's hostname) []: hello.magedu.com #这个主机名给谁,就看要给哪个虚拟主机了,就要保存成那个虚拟主机访问的时候所使用的名称
Email Address []:hello@magedu.com #留空也可以
Please enter the following 'extra' attributes
to be sent with your certificate request
A challenge password []: # 这个就不填吧
An optional company name []: # 这个就不填吧
[root@localhost ssl]# ls
httpd.csr httpd.key
[root@localhost ssl]#
此时证书请求已经好了
把证书请求发送到 ca 服务器( 192.168.0.15 )上
[root@localhost ssl]# scp httpd.csr 192.168.0.15:/tmp
root@192.168.0.15's password:
httpd.csr 100% 704 0.7KB/s 00:00
[root@localhost ssl]#
此时ca服务器( 192.168.0.15 ) 就可以签署了 下面进行签署吧
[root@localhost ~]# openssl ca -in /tmp/httpd.csr -out /tmp/httpd.crt -days 3650 (-days 3650 就是10年吧
Using configuration from /etc/pki/tls/openssl.cnf
Check that the request matches the signature
Signature ok
Certificate Details:
Serial Number: 1 (0x1)
Validity
Not Before: Mar 29 12:37:05 2019 GMT
Not After : Mar 26 12:37:05 2029 GMT
Subject:
countryName = CN
stateOrProvinceName = Henan
organizationName = MagEdu
organizationalUnitName = Tech
commonName = hello.magedu.com
emailAddress = hello@magedu.com
X509v3 extensions:
X509v3 Basic Constraints:
CA:FALSE
Netscape Comment:
OpenSSL Generated Certificate
X509v3 Subject Key Identifier:
4F:14:CA:C7:F2:56:58:82:F7:66:29:ED:F7:50:F6:E0:1A:88:77:A4
X509v3 Authority Key Identifier:
keyid:E6:D0:D4:57:C4:57:BF:05:18:DE:26:A8:7E:CB:0F:DD:40:E2:61:CD
Certificate is to be certified until Mar 26 12:37:05 2029 GMT (3650 days)
Sign the certificate? [y/n] y #信任吗? 确信要不要签署
1 out of 1 certificate requests certified, commit? [y/n]y #确认吗
Write out database with 1 new entries
Data Base Updated
这时签署成功
[root@localhost ~]#
ca服务器上 ( 192.168.0.15)
[root@localhost ~]# cd /etc/pki/CA
[root@localhost CA]# ls
cacert.pem crl index.txt.attr newcerts serial
certs index.txt index.txt.old private serial.old
[root@localhost CA]# cat index.txt # 里面有个01了 (原来是01 这里就是01,下一个是02 再下一个是03 )
V 290326123705Z 01 unknown /C=CN/ST=Henan/O=MagEdu/OU=Tech/CN=hello.magedu.com/emailAddress=hello@magedu.com
[root@localhost CA]#
[root@localhost CA]# cat serial #变成02了 (事实上是从00开始是最好的 (echo 00 > serial),这里的02 表示 下一个就是02了 所以从00开始或01开始无所谓) (serial 是为 index.txt 这里面的条目使用的)
02
[root@localhost CA]#
好了证书发好了,于是把证书复制给请求者就可以了
到 web服务器(192.168.0.55)
[root@localhost ssl]# pwd
/etc/httpd/ssl
[root@localhost ssl]#
[root@localhost ssl]# scp 192.168.0.15:/tmp/httpd.crt ./
root@192.168.0.15's password:
httpd.crt 100% 3858 3.8KB/s 00:00
web服务器(192.168.0.55)
[root@localhost ssl]# ls
httpd.crt httpd.csr httpd.key
[root@localhost ssl]#
ca服务器上 ( 192.168.0.15)
[root@localhost CA]# pwd
/etc/pki/CA
[root@localhost CA]#
[root@localhost CA]# ls
cacert.pem crl index.txt.attr newcerts serial
certs index.txt index.txt.old private serial.old
[root@localhost CA]# ls certs/
[root@localhost CA]# ls newcerts/ #这里有个01.pem
01.pem
[root@localhost CA]#
所以 /tmp 目录下的刚刚的内容 httpd.crt httpd.csr 都没有用了
[root@localhost CA]# ls /tmp
httpd.crt httpd.csr VMwareDnD vmware-root
[root@localhost CA]# cd /tmp
[root@localhost tmp]# rm httpd.c* -f #删除掉它们 httpd.crt httpd.csr 吧,不然的话 /tmp目录下的文件别人会获取到的
[root@localhost tmp]#
如何配置我们的服务器上可以使用此证书
web服务器(192.168.0.55)
[root@localhost ssl]# pwd
/etc/httpd/ssl
[root@localhost ssl]# ls # httpd.csr 证书颁发申请就没有用了
httpd.crt httpd.csr httpd.key
#下面进行配置
[root@localhost ssl]# cd /etc/httpd/conf.d
[root@localhost conf.d]# ls
manual.conf proxy_ajp.conf squid.conf webalizer.conf
perl.conf python.conf ssl.conf welcome.conf-bak
php.conf README virtual.conf
[root@localhost conf.d]#
先备份下 万一改错了,还可以恢复
[root@localhost conf.d]# cp ssl.conf ssl.conf.bak
[root@localhost conf.d]# vim ssl.conf
#
# This is the Apache server configuration file providing SSL support.
# It contains the configuration directives to instruct the server how to
# serve pages over an https connection. For detailing information about these
# directives see <URL:http://httpd.apache.org/docs/2.2/mod/mod_ssl.html>
#
# Do NOT simply read the instructions in here without understanding
# what they do. They're here only as hints or reminders. If you are unsure
# consult the online docs. You have been warned.
#
LoadModule ssl_module modules/mod_ssl.so # 装载一个模块
#
# When we also provide SSL we have to listen to the
# the HTTPS port in addition.
#
Listen 443 #监听443端口
##
## SSL Global Context
##
## All SSL configuration in this context applies both to
## the main server and all SSL-enabled virtual hosts.
##
#
# Some MIME-types for downloading Certificates and CRLs
#
#添加了支持独特的类型 要支持.crt .crl这样的文件类型 要识别这两种不同的文件
AddType application/x-x509-ca-cert .crt #证书
AddType application/x-pkcs7-crl .crl #证书吊销列表
# Pass Phrase Dialog:
# Configure the pass phrase gathering process.
# The filtering dialog program (`builtin' is a internal
# terminal dialog) has to provide the pass phrase on stdout.
SSLPassPhraseDialog builtin #SSL的pass阶段,就是我们的密码(密钥)生成阶段的会话机制是由内建的
# Inter-Process Session Cache:
# Configure the SSL Session Cache: First the mechanism
# to use and second the expiring timeout (in seconds).
#SSLSessionCache dc:UNIX:/var/cache/mod_ssl/distcache
SSLSessionCache shmcb:/var/cache/mod_ssl/scache(512000) #ssl会话的缓存空间
SSLSessionCacheTimeout 300 #ssl会话的缓存的清空时间
# Semaphore:
# Configure the path to the mutual exclusion semaphore the
# SSL engine uses internally for inter-process synchronization.
SSLMutex default #互斥量,这些不解释 意义不大,也不用去了解了
# Pseudo Random Number Generator (PRNG):
# Configure one or more sources to seed the PRNG of the
# SSL library. The seed data should be of good random quality.
# WARNING! On some platforms /dev/random blocks if not enough entropy
# is available. This means you then cannot use the /dev/random device
# because it would lead to very long connection times (as long as
# it requires to make more entropy available). But usually those
# platforms additionally provide a /dev/urandom device which doesn't
# block. So, if available, use this one instead. Read the mod_ssl User
# Manual for more details.
SSLRandomSeed startup file:/dev/urandom 256
SSLRandomSeed connect builtin
#SSLRandomSeed startup file:/dev/random 512
#SSLRandomSeed connect file:/dev/random 512
#SSLRandomSeed connect file:/dev/urandom 512
#
# Use "SSLCryptoDevice" to enable any supported hardware
# accelerators. Use "openssl engine -v" to list supported
# engine names. NOTE: If you enable an accelerator and the
# server does not start, consult the error logs and ensure
# your accelerator is functioning properly.
#
SSLCryptoDevice builtin
#SSLCryptoDevice ubsec
##
## SSL Virtual Host Context
##
<VirtualHost _default_:443> #关键是这里,定义了一个虚拟主机 使用了_default_为443 表示这是监听在 443 上的一个默认的虚拟主机 如果使用了多个ip地址,这个虚拟主机所使用的地址是不是应该监听在某一个特定的地址上 所以如果想监听两个地址 这里的__default__ 应该改为 192.168.0.55
# General setup for the virtual host, inherited from global configuration
#DocumentRoot "/var/www/html"
#ServerName www.example.com:443 # 既然有多个虚拟主机,这里必须要提供 ServerName
ServerName hello.magedu.com
DocumentRoot "/www/magedu.com" #这里与使用http的DocumentRoot 要一致
# Use separate log files for the SSL virtual host; note that LogLevel
# is not inherited from httpd.conf.
ErrorLog logs/ssl_error_log #错误日志
TransferLog logs/ssl_access_log #对于ssl来讲,它用的不再是CustomLog,而叫TransferLog
LogLevel warn #日志级别
# SSL Engine Switch:
# Enable/Disable SSL for this virtual host.
SSLEngine on #是不是启用ssl功能的 改成off就禁用了
# SSL Protocol support:
# List the enable protocol levels with which clients will be able to
# connect. Disable SSLv2 access by default:
SSLProtocol all -SSLv2 # 我们能够支持使用哪些ssl的协议 *(-SSLv2 不支持SSLv2,表示只有支持SSLv3和TLSv1了)
# SSL Cipher Suite:
# List the ciphers that the client is permitted to negotiate.
# See the mod_ssl documentation for a complete list.
SSLCipherSuite ALL:!ADH:!EXPORT:!SSLv2:RC4+RSA:+HIGH:+MEDIUM:+LOW #SSL加密机制,加密套件 ALL所有的但不包括使用ADH,不使用EXPORT,不使用SSLv2,当然没必要细细解释了
# Server Certificate:
# Point SSLCertificateFile at a PEM encoded certificate. If
# the certificate is encrypted, then you will be prompted for a
# pass phrase. Note that a kill -HUP will prompt again. A new
# certificate can be generated using the genkey(1) command.
#SSLCertificateFile /etc/pki/tls/certs/localhost.crt #证书文件 我们发过来的,我们请求过来的别人给我们签署的这个证书
SSLCertificateFile /etc/httpd/ssl/httpd.crt
# Server Private Key:
# If the key is not combined with the certificate, use this
# directive to point at the key file. Keep in mind that if
# you've both a RSA and a DSA private key you can configure
# both in parallel (to also allow the use of DSA ciphers, etc.)
#SSLCertificateKeyFile /etc/pki/tls/private/localhost.key #私钥文件
SSLCertificateKeyFile /etc/httpd/ssl/httpd.key
# Server Certificate Chain:
# Point SSLCertificateChainFile at a file containing the
# concatenation of PEM encoded CA certificates which form the
# certificate chain for the server certificate. Alternatively
# the referenced file can be the same as SSLCertificateFile
# when the CA certificates are directly appended to the server
# certificate for convinience.
#SSLCertificateChainFile /etc/pki/tls/certs/server-chain.crt #证书链什么的,我们就不用管它,因为我们只使用了一个简单证书,后面这些内容,我们基本上就不用管了
# Certificate Authority (CA):
# Set the CA certificate verification path where to find CA
# certificates for client authentication or alternatively one
# huge file containing all of them (file must be PEM encoded)
#SSLCACertificateFile /etc/pki/tls/certs/ca-bundle.crt
# Client Authentication (Type):
# Client certificate verification type and depth. Types are
# none, optional, require and optional_no_ca. Depth is a
# number which specifies how deeply to verify the certificate
# issuer chain before deciding the certificate is not valid.
#SSLVerifyClient require
#SSLVerifyDepth 10
# Access Control:
# With SSLRequire you can do per-directory access control based
# on arbitrary complex boolean expressions containing server
# variable checks and other lookup directives. The syntax is a
# mixture between C and Perl. See the mod_ssl documentation
# for more details.
#<Location />
#<Location />
#SSLRequire ( %{SSL_CIPHER} !~ m/^(EXP|NULL)/ \
# and %{SSL_CLIENT_S_DN_O} eq "Snake Oil, Ltd." \
# and %{SSL_CLIENT_S_DN_OU} in {"Staff", "CA", "Dev"} \
# and %{TIME_WDAY} >= 1 and %{TIME_WDAY} <= 5 \
# and %{TIME_HOUR} >= 8 and %{TIME_HOUR} <= 20 ) \
# or %{REMOTE_ADDR} =~ m/^192\.76\.162\.[0-9]+$/
#</Location>
# SSL Engine Options:
# Set various options for the SSL engine.
# o FakeBasicAuth:
# Translate the client X.509 into a Basic Authorisation. This means that
# the standard Auth/DBMAuth methods can be used for access control. The
# user name is the `one line' version of the client's X.509 certificate.
# Note that no password is obtained from the user. Every entry in the user
# file needs this password: `xxj31ZMTZzkVA'.
# o ExportCertData:
# This exports two additional environment variables: SSL_CLIENT_CERT and
# SSL_SERVER_CERT. These contain the PEM-encoded certificates of the
# server (always existing) and the client (only existing when client
# authentication is used). This can be used to import the certificates
# into CGI scripts.
# o StdEnvVars:
# This exports the standard SSL/TLS related `SSL_*' environment variables.
# Per default this exportation is switched off for performance reasons,
# because the extraction step is an expensive operation and is usually
# useless for serving static content. So one usually enables the
# exportation for CGI and SSI requests only.
# o StrictRequire:
# This denies access when "SSLRequireSSL" or "SSLRequire" applied even
# under a "Satisfy any" situation, i.e. when it applies access is denied
# and no other module can change it.
# o OptRenegotiate:
# This enables optimized SSL connection renegotiation handling when SSL
# directives are used in per-directory context.
#SSLOptions +FakeBasicAuth +ExportCertData +StrictRequire
<Files ~ "\.(cgi|shtml|phtml|php3?)$">
SSLOptions +StdEnvVars
</Files>
<Directory "/var/www/cgi-bin">
SSLOptions +StdEnvVars
</Directory>
# SSL Protocol Adjustments:
# The safe and default but still SSL/TLS standard compliant shutdown
# approach is that mod_ssl sends the close notify alert but doesn't wait for
# the close notify alert from client. When you need a different shutdown
# approach you can use one of the following variables:
# o ssl-unclean-shutdown:
# This forces an unclean shutdown when the connection is closed, i.e. no
# SSL close notify alert is send or allowed to received. This violates
# the SSL/TLS standard but is needed for some brain-dead browsers. Use
# this when you receive I/O errors because of the standard approach where
# mod_ssl sends the close notify alert.
# o ssl-accurate-shutdown:
# This forces an accurate shutdown when the connection is closed, i.e. a
# SSL close notify alert is send and mod_ssl waits for the close notify
# alert of the client. This is 100% SSL/TLS standard compliant, but in
# practice often causes hanging connections with brain-dead browsers. Use
# this only for browsers where you know that their SSL implementation
# works correctly.
# Notice: Most problems of broken clients are also related to the HTTP
# keep-alive facility, so you usually additionally want to disable
# keep-alive for those clients, too. Use variable "nokeepalive" for this.
# Similarly, one has to force some clients to use HTTP/1.0 to workaround
# their broken HTTP/1.1 implementation. Use variables "downgrade-1.0" and
# "force-response-1.0" for this.
SetEnvIf User-Agent ".*MSIE.*" \
nokeepalive ssl-unclean-shutdown \
downgrade-1.0 force-response-1.0
# Per-Server Logging:
# The home of a custom SSL log file. Use this when you want a
# compact non-error SSL logfile on a virtual host basis.
CustomLog logs/ssl_request_log \
"%t %h %{SSL_PROTOCOL}x %{SSL_CIPHER}x \"%r\" %b" #这里也有CustomLog 它只是定义 CustomLog 日志格式的记录方法,但是要记录还是要靠translog?来完成
</VirtualHost>
[root@localhost conf.d]# httpd -t (检查语法)
Syntax OK
[root@localhost conf.d]#
[root@localhost conf.d]# service httpd restart (重启服务器)
停止 httpd: [确定]
启动 httpd: [确定]
[root@localhost conf.d]#
[root@localhost conf.d]# netstat -tnlp (看看有没有监听443端口)
Active Internet connections (only servers)
Proto Recv-Q Send-Q Local Address Foreign Address State PID/Program name
tcp 0 0 0.0.0.0:111 0.0.0.0:* LISTEN 4346/portmap
tcp 0 0 192.168.0.108:53 0.0.0.0:* LISTEN 4693/named
tcp 0 0 192.168.0.57:53 0.0.0.0:* LISTEN 4693/named
tcp 0 0 192.168.0.55:53 0.0.0.0:* LISTEN 4693/named
tcp 0 0 127.0.0.1:53 0.0.0.0:* LISTEN 4693/named
tcp 0 0 0.0.0.0:22 0.0.0.0:* LISTEN 4754/sshd
tcp 0 0 127.0.0.1:631 0.0.0.0:* LISTEN 3226/cupsd
tcp 0 0 127.0.0.1:25 0.0.0.0:* LISTEN 4792/sendmail
tcp 0 0 127.0.0.1:953 0.0.0.0:* LISTEN 4693/named
tcp 0 0 0.0.0.0:761 0.0.0.0:* LISTEN 4395/rpc.statd
tcp 0 0 :::8080 :::* LISTEN 2196/httpd
tcp 0 0 :::80 :::* LISTEN 2196/httpd
tcp 0 0 :::22 :::* LISTEN 4754/sshd
tcp 0 0 ::1:953 :::* LISTEN 4693/named
tcp 0 0 :::443 :::* LISTEN 2196/httpd
[root@localhost conf.d]#
windows的 hosts 文件里面增加一行
192.168.0.57 hello.magedu.com
浏览器打开 http://hello.magedu.com/

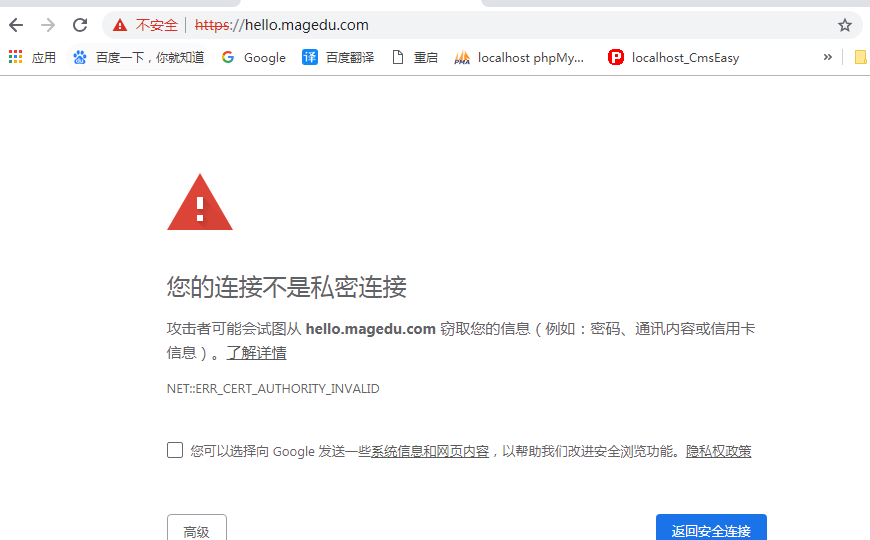
马哥的
 人家发过来的证书没错,但是给它发证书的那个机构我们没有认可,要想信任怎么办?
我们要把 CA 的证书发送给客户端一份
CA服务器上 192.168.1.15
[root@localhost ~]# cd /etc/pki/CA/
[root@localhost CA]#

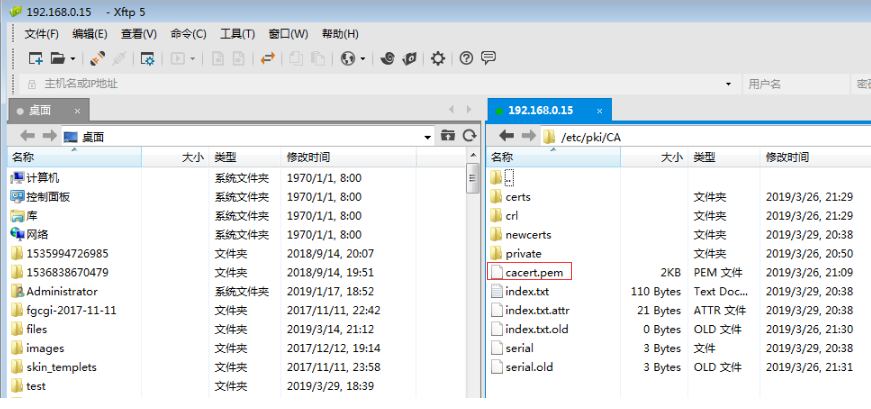
把cacert.pem 证书 (它是公开的)传送给物理主机
后缀名改成 .crt 即名称为 cacert.crt (本来就应该叫crt的,只不过cacert.pem的默认名称是pem)
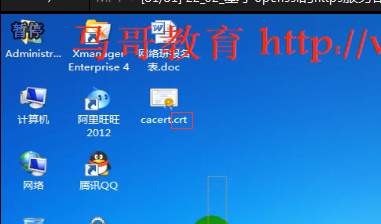
双击 cacert.crt
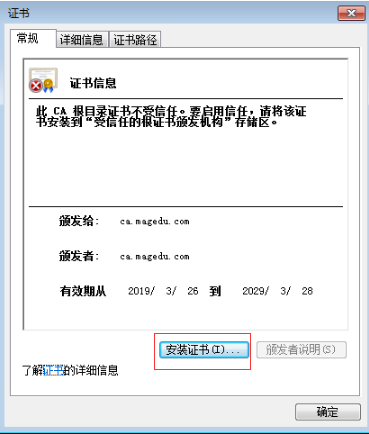
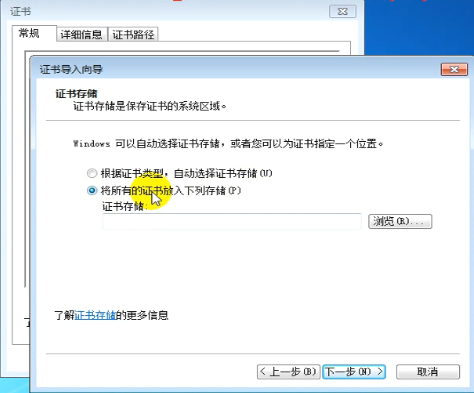
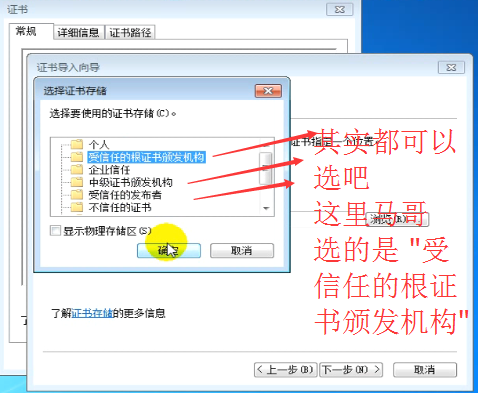
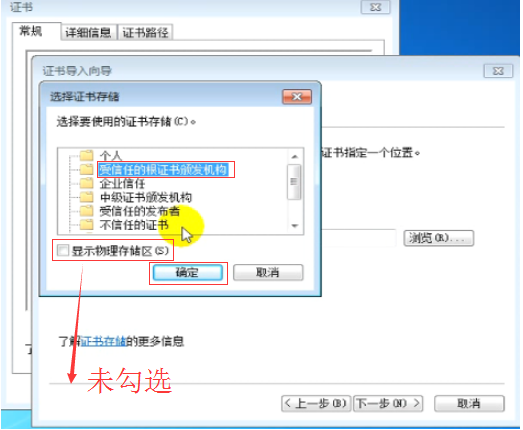
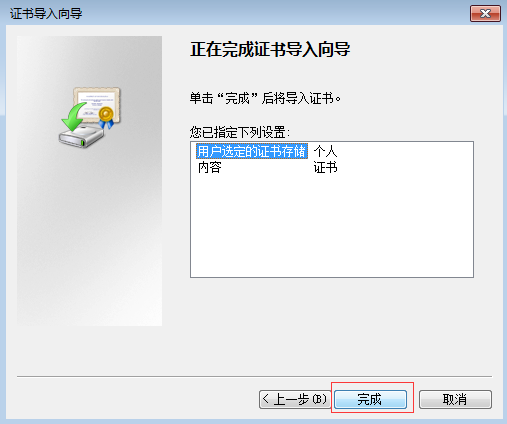
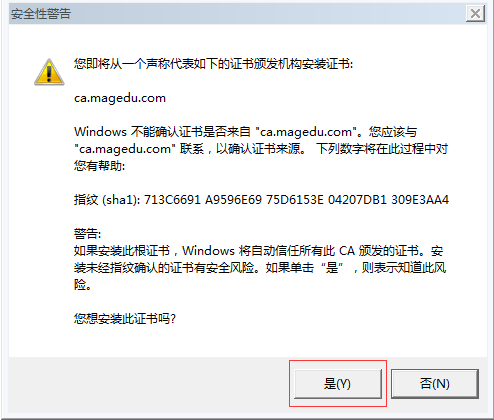
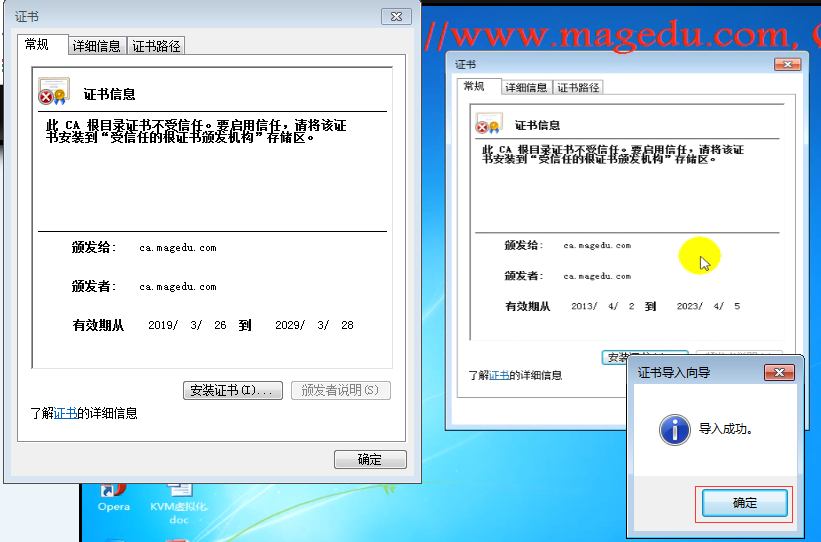
chrome 浏览器中 看这个证书 chrome://settings/
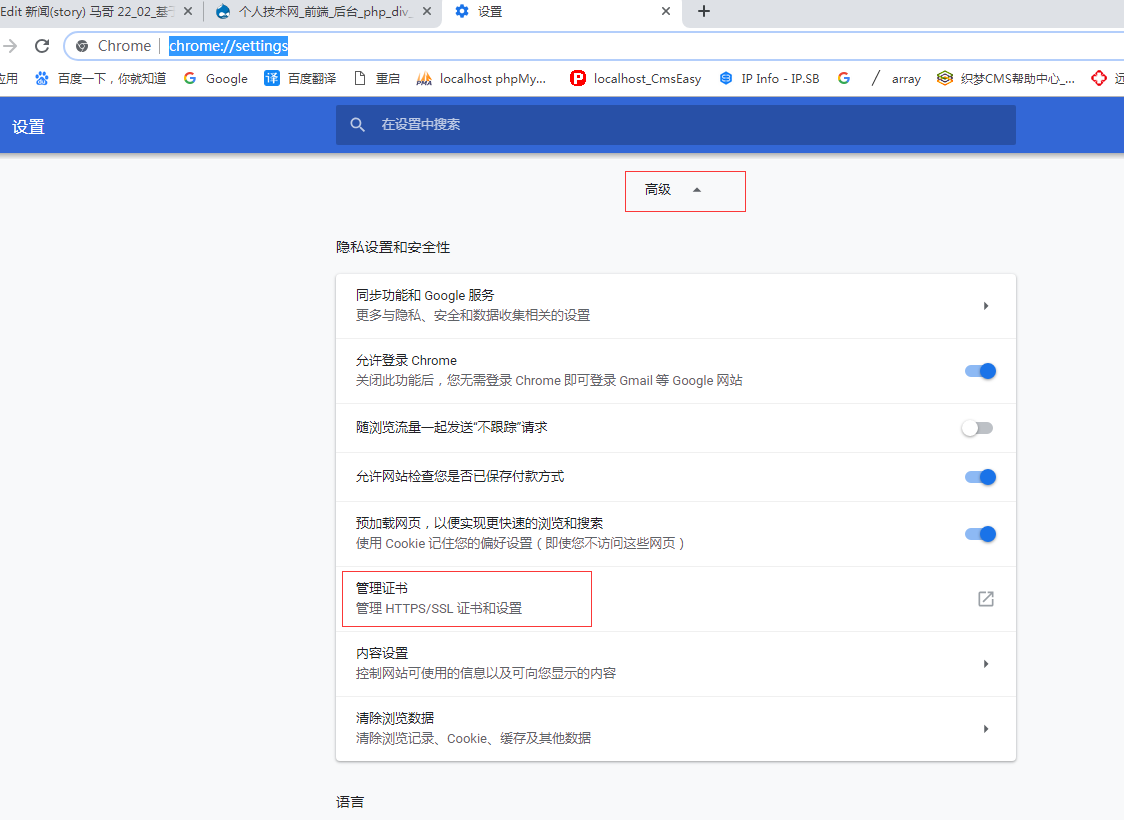
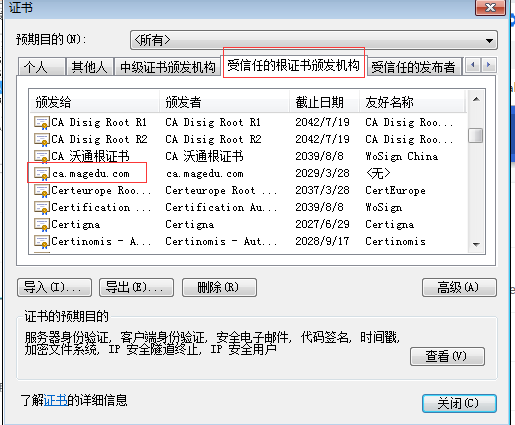
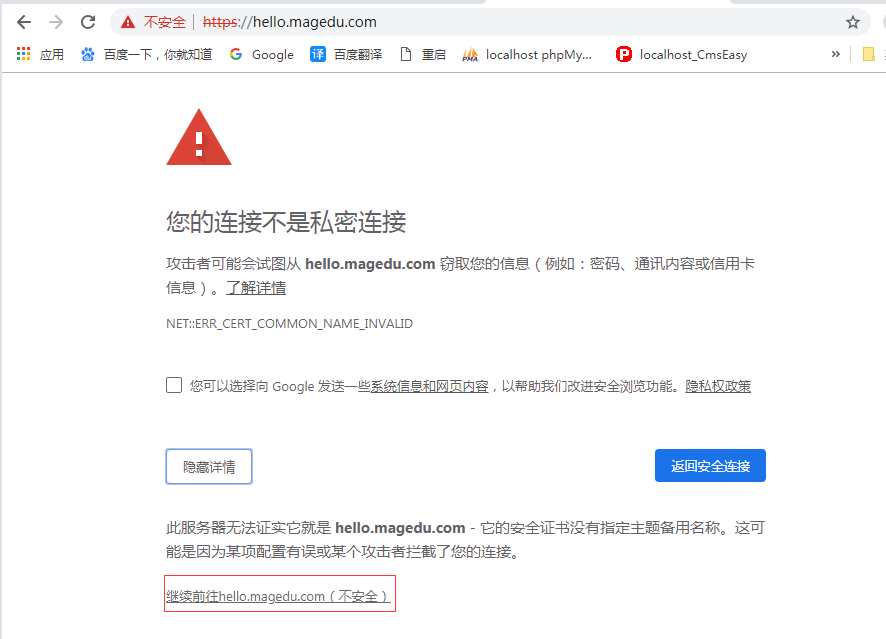
https://hello.magedu.com/ 仍然不受信任 (chrome 好像有这个警告,感觉马哥也没有说出个所以然 可以这么理解,chrome 相对来讲,比较严格吧)
下面是马哥的
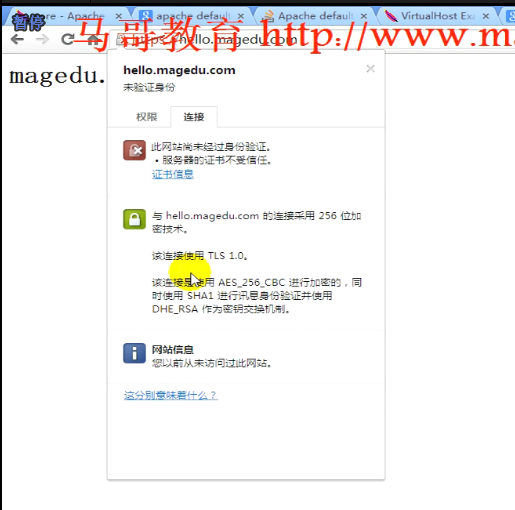
360 好像没有警告

IE 没有警告
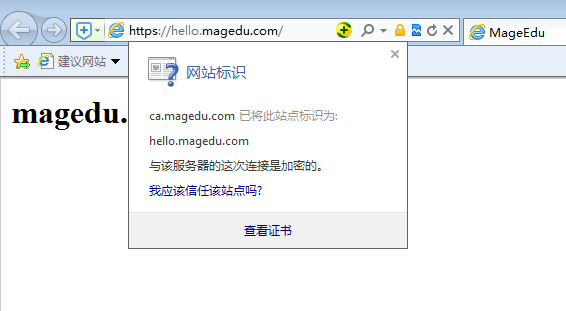
https://hello.magedu.com/ 主机名称hello.magedu.com一定要跟证书服务器的名称hello.magedu.com保持一致,不然的话,无论如何它会有警告的
一个ip地址上只能建立一个ssl虚拟主机?(问西部数码为什么可以建多个呢)
