欢迎各位兄弟 发布技术文章

这里的技术是共享的

You are here

sass安装 (对 gem 使用 淘宝镜像) 有大用

使用淘宝镜像 见本页面下面红色的字

sass安装 使用

一 什么是sass
     sass是一种css开发工具。提供了很多便利的写法,使得css开发变得简单  易维护
      sass有两种后缀名文件:一种后缀名为sass,不使用大括号和分号;另一种就是我们这里使用的scss文件,这种和我们平时写的css文件格式差不多,使用大括号和分号,所以一般都是用第二种写法
二 官网
     阮一峰博客(sass部分):http://www.ruanyifeng.com/blog/2012/06/sass.html
 
三 ruby安装

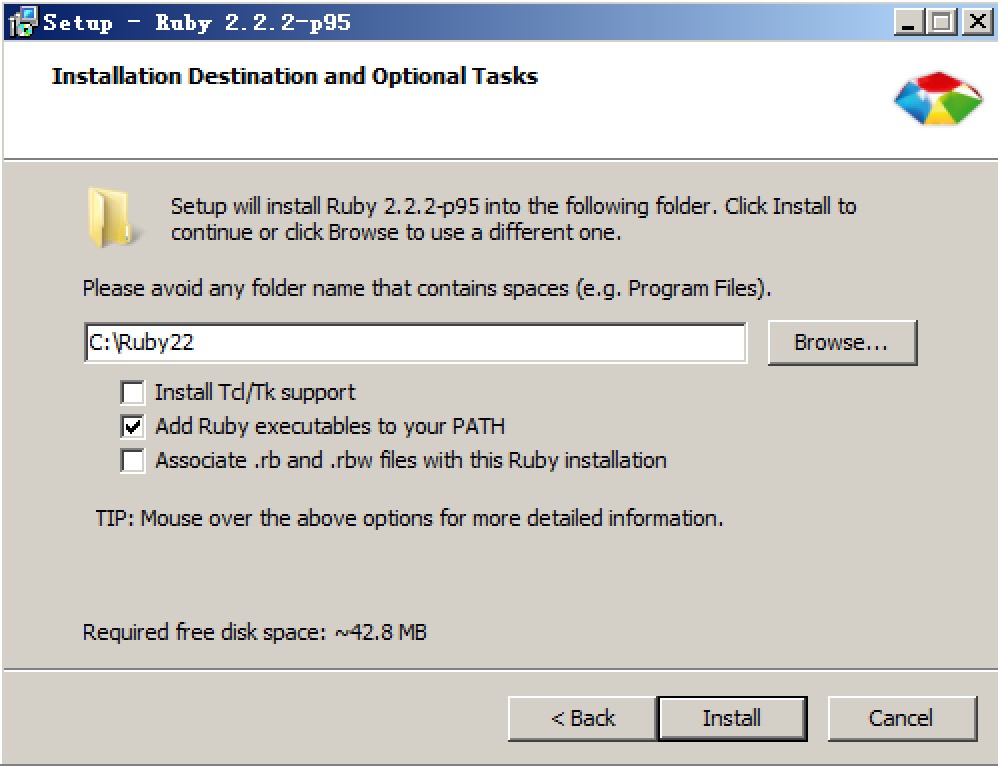
因为sass依赖于ruby环境,所以装sass之前先确认装了ruby。先导官网下载个ruby

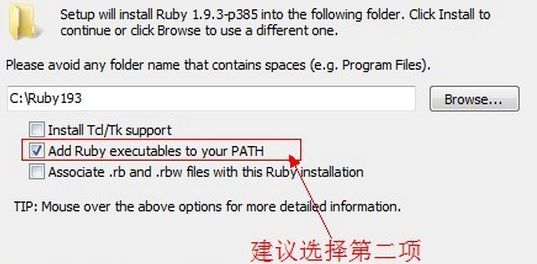
在安装的时候,请勾选Add Ruby executables to your PATH这个选项,添加环境变量,不然以后使用编译软件的时候会提示找不到ruby环境

     
四 sass安装
          

然后直接在命令行中输入

1
gem install sass


按回车键确认,等待一段时间就会提示你sass安装成功。最近因为墙的比较厉害,如果你没有安装成功,那么请参考下面的淘宝的RubyGems镜像安装sass,如果成功则忽略。

如果要安装beta版本的,可以在命令行中输入

1
gem install sass --pre


你还可以从sass的Git repository来安装,git的命令行为

1
2
3
git clone git://github.com/nex3/sass.git
cd sass
rake install


升级sass版本的命令行为

1
gem update sass


查看sass版本的命令行为

1
sass -v


你也可以运行帮助命令行来查看你需要的命令

1
sass -h


淘宝RubyGems镜像安装 sass
由于国内网络原因,导致 rubygems.org 存放在 Amazon S3 上面的资源文件间歇性连接失败。这时候我们可以通过gem sources命令来配置源,先移除默认的https://rubygems.org源,然后添加淘宝的源https://ruby.taobao.org/,然后查看下当前使用的源是哪个,如果是淘宝的,则表示可以输入sass安装命令gem install sass了,关于常用gem source命令可参看:常用的gem source
1
2
3
4
$ gem sources --remove https://rubygems.org/
$ gem sources -a https://ruby.taobao.org/
$ gem sources -l
*** CURRENT SOURCES ***

1
2
3
https://ruby.taobao.org
# 请确保只有 ruby.taobao.org
$ gem install sass
 
淘宝镜像也不好用了
1
2
3
gem sources --remove https://rubygems.org/
gem sources -a  http://gems.ruby-china.org/
gem sources -l
 
五 使用   
sass文件就是普通的文本文件   里面可以直接使用css语法。后缀名为.scss     (Sassy  css)
               下面的命令,可以在屏幕上显示.scss文件转化的css代码。(假设文件名为test。)
                         
1
sass test.scss


               如果要将显示结果保存成文件,后面再跟一个.css文件名。
          sass test.scss test.css
     sass 提供4种编译风格的选项
                         nested  嵌套缩进的css代码。是默认值
                         expanded  没有缩进 扩展的css代码
                         compact  简洁格式的css代码
                         compressed  压缩后的css代码
                         
                         生产环境中,一般使用最后一个选项: sass --style compressed test.scss test.css
      sass官方的在线转换器:http://www.sassmeister.com/
              sass 也可以监听文件,一旦文件被改动,就自动生成编辑后的版本
                      
1
sass --watch test.scss:test.css


               监听文件夹:
1
sass --watch sassFileDirectory:cssFileDirectory


六 基本用法
     6.1 变量(在选择器中声明的变量会覆盖全局声明的变量)
          任何可以用作css属性值的赋值都 可以用作sass的变量值,甚至是以空格分割的多个属性值,如$basic-border: 1px solid black;,或以逗号分割的多个属性值,如$plain-font: "Myriad Pro"、Myriad、"Helvetica Neue"、Helvetica、"Liberation Sans"、Arial和sans-serif; sans-serif;变量声明后被引用才算生效。
         6.1.1 sass所以的变量以$开头  变量名中的中划线和下划线相互兼容
             
1
2
$blue:#1875e7;
 div{color:$blue;}
                        
         6.1.2 如果变量需要镶嵌在字符串之中   就必须写在#{}之中
            
1
2
  $left:left;
.rounded {border-#{$left}-radius:5px;}


                 6.1.3 默认变量:sass的默认变量仅需要在值后面加上!default即可。 sass的默认变量一般是用来设置默认值,然后根据需求来覆盖的,覆盖的方式也很简单,只需要在默认变量之前重新声明下变量即可
                    6.1.4 多值变量
                         6.1.4.1  list类型
                                    list数据可通过空格,逗号或小括号分隔多个值,可用nth($var,$index)取值
                                      
1
2
3
4
5
6
7
8
9
10
11
12
13
$px: 5px 6px 8px 10px;//一维数组
$pxT: 10px 20px 30px 40px;//二维数组
$trpx:(1px solid #eee ) (16px solid #aaa);//二维数组
  
.class8 {
    font-size: nth($px,3);
}
.class9 {
    border: nth($trpx,1);
}
.class10 {
    margin: nth($pxT,2);
}


                         6.1.4.2  map类型
                                     map数据以key和value成对出现,其中value又可以是list。格式为:$map: (key1: value1, key2: value2, key3: value3);。可通过map-get($map,$key)取值。
                                
1
2
3
4
5
6
7
8
9
10
11
$headings:(h1:2em,h2:1.5em,h3:1em);
.class11 {
    font-size: map-get($headings,h2);
}
  
@each $heade , $size in $headings {
        #{$heade} {
            font-size: $size;
        }
}


    6.2 可使用算术
        
1
2
$var:10;
body{margin:(14px/2);top:50px+100px;right:$var*10%;}


    6.3 嵌套
          6.3.1选择器嵌套:
          
1
2
3
4
5
6
div{
               color:$blue;
               h1 {
                   color:red;
               }
           }


           6.3.2属性嵌套:
             
1
2
3
4
5
6
p {
       border:{
                  color:red;
                   }
               }
     }


                       此时  border后面的冒号必须加
          
                        6.3.3&引用父元素
                       
1
2
3
4
  a {
          &:hover {color:red;}
      }
#content aside { colorred;body.ie & { colorgreen }}


                        6.3.4 群组选择器的嵌套
                       
1
2
.container { h1, h2, h3 {margin-bottom: .8em} }
nav, aside { a {colorblue} }


            6.4注释
                         中文注释的报错,乱码的问题解决:
                                    步骤:1、找到下面这个文件C:\Ruby22-x64\lib\ruby\gems\2.2.0\gems\sass-3.4.22\lib\sass\engine.rb      即自己的安装目录路径
                                            2、找到require 'sass/supports'这一行,在下面一行添加Encoding.default_external = Encoding.find('utf-8')
                       

标准的CSS注释 /* comment */ ,会保留到编译后的文件。

单行注释 // comment,只保留在SASS源文件中,编译后被省略。

在/*后面加一个感叹号,表示这是"重要注释"。即使是压缩模式编译,也会保留这行注释,通常可以用于声明版权信息。


1
2
3
/*!
   重要注释!
 */


七  代码的重用
     7.1继承
                sass可以实现选择器的继承
                     
1
2
3
4
5
6
7
.class1 {
                 border1px solid #ddd;
                       }
.calss2 {
                  @extend .class1;
                    font-size20px;
          }


                               结果截图:
                                             
      7.2 sass代码块的重用
                    使用@mixin命令   定义一个代码块   例如下面的left
                  
1
2
3
4
@mixin left {
                           floatleft;
                           margin-left10px;
                  }


                    使用@include命令  调用这个mixin
                       
1
2
3
.class3 {
                           @include left;
                       }


                    @mixin 还可以指定参数和缺省值
                       
1
2
3
4
@mixin right($value:10px) {
                           floatright;
                           margin-right: $value;
                       }


                    使用的时候,根据需要加入参数:
                            
1
2
3
.class5 {
           @include right()
}


如果不传参数,就是默认值
1
2
3
.class4 {
    @include right(40px)
}


          常用于:生产浏览器前缀
             
1
2
3
4
5
6
7
8
9
10
11
@mixin rounded ($vert,$horz,$radius:10px) {
    border-#{$vert}-#{$horz}-radius:$radius;
    -moz-border-#{$vert}-#{$horz}-radius:$radius;
    -webkit-border-#{$vert}-#{$horz}-radius:$radius;
}
.nav {
    @include rounded(top,left)
}
.footer {
    @include rounded(top,left,5px)
}


多组值参数mixin

如果一个参数可以有多组值,如box-shadow、transition等,那么参数则需要在变量后加三个点表示,如$variables...
    
1
2
3
4
@mixin box-shadow ($shadow...) {
    -webkit-box-shadow:$shadow;
    box-shadow: $shadow;
}


@content: 使@mixin接受一整块样式,接受的样式从@content开始
         
1
2
3
4
5
6
7
8
9
10
@mixin max-screen ($res) {
    @media only screen and (max-width: $res) {
        @content;
    }
}
@include max-screen(480px) {
    body {color:red;}
}


7.3 颜色函数
      
1
2
3
4
lighten(#cc310%) // #d6d65c
darken(#cc310%) // #a3a329
grayscale(#cc3) // #808080
complement(#cc3) // #33c


       7.4 插入文件
               @import 命令可以插入外部文件
               scss文件:@import 'path/name.scss'
     css文件:@import 'name.css' 
 
8 高级用法
      8.1 条件语句
@if  可以用来判断     配套的还有@else命令
    
1
2
3
4
5
6
.class6 {
    @if 1+1 == 2 {color:red}
    @if 5 3 {color:blue}@else {
        background-color#FFF
    }
}


8.2循环语句
     8.2.1 for循环   for循环有两种形式,分别为:@for $var from <start> through <end>@for $var from <start> to <end>。$i表示变量,start表示起始值,end表示结束值,这两个的区别是关键字through表示包括end这个数,而to则不包括end这个数。
           
1
2
3
4
5
    @for $i from 1 to 10 {
    .border-#{$i} {
        border: #{$i}px solid red;
    }
}


8.2.2 while
       
1
2
3
4
5
   $i:6;
@while $i > 0 {
    .item-#{$i} {width:20px;}
    $i:$i - 2;
}


8.2.3 each 
     
1
2
3
4
5
6
@each $member in a,b,c,d {
    .#{$member} {
        background-imageurl("/image/#{$member}.jpg");
    }
}


8.3 自定义函数 @function  @return
    
1
2
3
4
5
6
@function double($n) {
    @return $n * 2;
}
.class7 {
    widthdouble(5px);
}


          8.4 @at-root  为了跳出选择器嵌套的。默认所以得嵌套,继承所有上级选择器。但有了这个就可以跳出所有上级选择器。
1
2
3
4
5
6
7
8
9
10
11
12
13
14
15
  //单个选择器跳出
.parent {
    color:red;
    @at-root .child {
        width100px;
    }
}
//多个选择器跳出
.parent2 {
    color:blue;
    @at-root {
        .child1 {width100px;}
        .child2 {width200px;}
    }
}


        8.4.1默认@at-root只会跳出选择器嵌套,而不能跳出@media@support,如果要跳出这两种,则需使用@at-root (without: media)@at-root (without: support)
         
1
2
3
4
5
6
7
8
9
10
11
12
13
14
15
16
17
18
19
20
21
22
23
24
25
26
27
28
29
30
31
//跳出父级元素嵌套
@media print {
    .parent2 {
        colorred;
        @at-root .child3 {
            colorblue;
        }
    }
}
  
//跳出media嵌套  父级有效
@media print4 {
    .parent4 {
        colorred;
        @at-root (without: media) {
            .child4 {
                width200px;
            }
        }
    }
}
  
//跳出media和父级
@media print5 {
    .parent5 {
        color:red;
        @at-root (without:all) {
            .child5{height200px;}
        }
    }
}


8.4.2  @at-root 于 & 配合使用
1
2
3
4
5
.child6 {
    @at-root .parent6 & {
        height300px;
    }
}


 8.4.3占位选择器%
从sass 3.2.0以后就可以定义占位选择器%。这种选择器的优势在于:如果不调用则不会有任何多余的css文件,避免了以前在一些基础的文件中预定义了很多基础的样式,然后实际应用中不管是否使用了@extend去继承相应的样式,都会解析出来所有的样式。占位选择器以%标识定义,通过@extend调用。
   
1
2
3
4
5
6
7
8
9
10
11
12
13
14
15
16
17
18
19
20
21
22
23
24
25
26
27
28
  %ir {
    color:transparent;
    text-shadow:none;
    background-colortransparent;
    border:0;
}
%clearfix {
    @if $ie7 {
        *zoom :1;
    }
    &:before,
    &:after {
        content"";
        display: table;
        font0/0;
  
    }
    &:after {
        clearboth;
    }
}
#header {
    width2100px;  
    @extend %ir;
}
.ir {
    @extend %ir;
}


九 编译          
          9.1 sublime装SASS build插件,可以在sublime的packages文件夹下打开终端从github的https://github.com/jaumefontal/SASS-Build-SublimeText2.git上clone。然后编辑.scss直接保存即可编译
                   9.2 官方的在线转换器:http://www.sassmeister.com/
                   9.3  在项目的scss文件夹下用终端命令
               9.4  据说webstorm内置了sass的编译
               9.5  图形化工具 koala
               9.6  gulp


来自  https://www.cnblogs.com/lhy-93/p/5473377.html


如何安装Sass

安装Sass和Compass

sass基于Ruby语言开发而成,因此安装sass前需要安装Ruby。(注:mac下自带Ruby无需在安装Ruby!)

window下安装SASS首先需要安装Ruby,先从官网下载Ruby并安装。安装过程中请注意勾选Add Ruby executables to your PATH添加到系统环境变量。如下图:

安装完成后需测试安装有没有成功,运行CMD输入以下命令:

ruby -v
//如安装成功会打印
ruby 2.2.2p95 (2015-04-13 revision 50295) [i386-mingw32]

如上已经安装成功。但因为国内网络的问题导致gem源间歇性中断因此我们需要更换gem源。(使用淘宝的gem源https://ruby.taobao.org/)如下:

//1.删除原gem源
gem sources --remove https://rubygems.org/

//2.添加国内淘宝源
gem sources -a https://ruby.taobao.org/

//3.打印是否替换成功
gem sources -l

//4.更换成功后打印如下
*** CURRENT SOURCES ***
https://ruby.taobao.org/

Ruby自带一个叫做RubyGems的系统,用来安装基于Ruby的软件。我们可以使用这个系统来 轻松地安装SassCompass。要安装最新版本的SassCompass,你需要输入下面的命令:

//安装如下(如mac安装遇到权限问题需加 sudo gem install sass)
gem install sass
gem install compass

在每一个安装过程中,你都会看到如下输出:

Fetching: sass-3.x.x.gem (100%)
Successfully installed sass-3.x.x
Parsing documentation for sass-3.x.x
Installing ri documentation for sass-3.x.x
Done installing documentation for sass after 6 secon
1 gem installed

安装完成之后,你应该通过运行下面的命令来确认应用已经正确地安装到了电脑中:

sass -v
Sass 3.x.x (Selective Steve)

compass -v
Compass 1.x.x (Polaris)
Copyright (c) 2008-2015 Chris Eppstein
Released under the MIT License.
Compass is charityware.
Please make a tax deductable donation for a worthy cause: http://umdf.org/compass

如下sass常用更新、查看版本、sass命令帮助等命令:

//更新sass
gem update sass

//查看sass版本
sass -v

//查看sass帮助
sass -h


编译sass

sass编译有很多种方式,如命令行编译模式、sublime插件SASS-Build、编译软件koala、前端自动化软件codekit、Grunt打造前端自动化工作流grunt-sass、Gulp打造前端自动化工作流gulp-ruby-sass等。

命令行编译;

//单文件转换命令
sass input.scss output.css

//单文件监听命令
sass --watch input.scss:output.css

//如果你有很多的sass文件的目录,你也可以告诉sass监听整个目录:
sass --watch app/sass:public/stylesheets

命令行编译配置选项;

命令行编译sass有配置选项,如编译过后css排版、生成调试map、开启debug信息等,可通过使用命令sass -v查看详细。我们一般常用两种--style``--sourcemap

//编译格式
sass --watch input.scss:output.css --style compact

//编译添加调试map
sass --watch input.scss:output.css --sourcemap

//选择编译格式并添加调试map
sass --watch input.scss:output.css --style expanded --sourcemap

//开启debug信息
sass --watch input.scss:output.css --debug-info
  • --style表示解析后的css是什么排版格式;
    sass内置有四种编译格式:nested``expanded``compact``compressed

  • --sourcemap表示开启sourcemap调试。开启sourcemap调试后,会生成一个后缀名为.css.map文件。

四种编译排版演示;

//未编译样式
.box {
  width: 300px;
  height: 400px;
  &-title {
    height: 30px;
    line-height: 30px;
  }
}

nested 编译排版格式

/*命令行内容*/
sass style.scss:style.css --style nested

/*编译过后样式*/
.box {
  width: 300px;
  height: 400px; }
  .box-title {
    height: 30px;
    line-height: 30px; }

expanded 编译排版格式

/*命令行内容*/
sass style.scss:style.css --style expanded

/*编译过后样式*/
.box {
  width: 300px;
  height: 400px;
}
.box-title {
  height: 30px;
  line-height: 30px;
}

compact 编译排版格式

/*命令行内容*/
sass style.scss:style.css --style compact

/*编译过后样式*/
.box { width: 300px; height: 400px; }
.box-title { height: 30px; line-height: 30px; }

compressed 编译排版格式

/*命令行内容*/
sass style.scss:style.css --style compressed

/*编译过后样式*/
.box{width:300px;height:400px}.box-title{height:30px;line-height:30px}

软件方式编译;

这里推荐koala&codekit,它们是优秀的编译器,界面清晰简洁,操作起来也非常简单。鉴于koala是免费编译器,简单操作如下图:

LESS/Sass 编译工具Koala介绍

易上手的Sass编译工具koala支持多个环境的安装文件 下载Koala

koala是一个国产免费前端预处理器语言图形编译工具,支持Less、Sass、Compass、CoffeeScript,帮助web开发者更高效地使用它们进行开发。跨平台运行,完美兼容windows、linux、mac。


来自  https://www.sass.hk/install/


RubyGems 镜像

RubyGems 镜像的管理工作以后将交由 Ruby China 负责,以便能有更多的社区爱好者参与进来,保持持续发展。
本站将不在继续维护,本站的维护者已经或即将参与到 Ruby China 镜像 的维护工作中,目前已将安装请求重定向到 Ruby China 镜像,请大家注意更换本地的 Gem Source。
如何使用?
$ gem sources --add https://gems.ruby-china.org/ --remove https://rubygems.org/
$ gem sources -l
*** CURRENT SOURCES ***

https://gems.ruby-china.org
# 请确保只有 gems.ruby-china.org
$ gem install rails
如果你使用 Gemfile 和 Bundle (例如:Rails 项目)
你可以用 Bundler 的 Gem 源代码镜像命令
$ bundle config mirror.https://rubygems.org https://gems.ruby-china.org
这样你不用改你的 Gemfile 的 source。
source 'https://rubygems.org/'
gem 'rails', '4.1.0'
...
Ruby 源代码镜像

本镜像来源于 cache.ruby-lang.org 用于改善国内 Ruby 安装的速度。

修改 RVM ,改用本站作为下载源, 提高安装速度。

For Mac
$ sed -i .bak -E 's!https?://cache.ruby-lang.org/pub/ruby!https://ruby.taobao.org/mirrors/ruby!' $rvm_path/config/db
For Linux
$ sed -i -E 's!https?://cache.ruby-lang.org/pub/ruby!https://ruby.taobao.org/mirrors/ruby!' $rvm_path/config/db
常见问题
  1. Q: 为何我新发布的 Gem 在淘宝源上面无法安装?

    A: 由于同步是定期执行的,新发布的 Gem 可能没有那么快同步过来,你需要稍等一段时间后才能使用。

  2. Q: 已经换成淘宝源了,但 bundle install 或 gem install xxx 的时候卡住很久不动?

    A: 这有可能是你网络问题,或者没有正确的好 gem 的源,你可以尝试 gem install xxx -V 并把执行过程的结果在 Ruby China 上面发帖求助。

  3. Q: gem install xxx 的时候遇到错误信息包含:“Error fetching data: Errno::ETIMEDOUT: Operation timed out - connect(2)”

    A: 网络问题导致请求淘宝服务器被连接重置了,在遇到此类情况的时候,你可以尝试换一台机器或网络尝试安装,看是否还有同样的问题,以确定是淘宝镜像服务器的问题还是你的环境问题,如果你换了环境仍然有问题,请上 Ruby China 发帖求助。

来自  https://ruby.taobao.org/


RubyGems 一直以来在国内都非常难访问到,在本地你或许可以翻墙,当你要发布上线的时候,你就很难搞了!

这是一个完整 RubyGems 镜像,你可以用此代替官方版本,我们是完全基于 CDN 技术来实现,能确保几乎无延迟的同步。
公告!域名变化,请大家使用 https://gems.ruby-china.com
如何使用?

请尽可能用比较新的 RubyGems 版本,建议 2.6.x 以上。

$ gem update --system # 这里请翻墙一下
$ gem -v
2.6.3
下面这个暂时肯定是好的

$
gem sources --add https://gems.ruby-china.com/ --remove https://rubygems.org/ $ gem sources -l https://gems.ruby-china.com # 确保只有 gems.ruby-china.com
如果你使用 Gemfile 和 Bundler (例如:Rails 项目)

你可以用 Bundler 的 Gem 源代码镜像命令

$ bundle config mirror.https://rubygems.org https://gems.ruby-china.com

这样你不用改你的 Gemfile 的 source。

source 'https://rubygems.org/'
gem 'rails', '4.2.5'
...
SSL 证书错误

正常情况下,你是不会遇到 SSL 证书错误的,除非你的 Ruby 安装方式不正确。

如果遇到 SSL 证书问题,你又无法解决,请修改 ~/.gemrc 文件,增加 ssl_verify_mode: 0 配置,以便于 RubyGems 可以忽略 SSL 证书错误。

---
:sources:
- https://gems.ruby-china.com
:ssl_verify_mode: 0

如果你在意 Gem 下载的安全问题,请正确安装 Ruby、OpenSSL,建议部署 Linux 服务器的时候采用 这个 RVM 安装脚本 的方式安装 Ruby。

其他说明
  • Bundler::GemspecError: Could not read gem at /home/xxx/.rvm/gems/ruby-2.1.8/cache/rugged-0.23.3.gem. It may be corrupted.,这类错误是网络原因下载到了坏掉的文件到本地,请直接删除那个文件。

  • 请珍惜社区资源,勿基于本镜像做二次镜像网站,我们会定期检查 CDN 请求量统计,单日请求量过大(流量超过 20G) 的 IP 将会被永久屏蔽。


来自  https://gems.ruby-china.com/

普通分类: