
安装
composer require tymon/jwt-auth:"^1.0@dev"
1
配置
添加服务提供商
将下面这行添加至 config/app.php 文件 providers 数组中:
'providers' => [

    ...

    Tymon\JWTAuth\Providers\LaravelServiceProvider::class,
]
1
2
3
4
5
6
发布配置文件
在你的 shell 中运行如下命令发布 jwt-auth 的配置文件:
$ php artisan vendor:publish --provider="Tymon\JWTAuth\Providers\LaravelServiceProvider"
1
此命令会在 config 目录下生成一个 jwt.php 配置文件,你可以在此进行自定义配置。
生成密钥
jwt-auth 已经预先定义好了一个 Artisan 命令方便你生成 Secret,你只需要在你的 shell 中运行如下命令即可:
$ php artisan jwt:secret
1
此命令会在你的 .env 文件中新增一行 JWT_SECRET=secret。
配置 Auth guard
在 config/auth.php 文件中,你需要将 guards/driver 更新为 jwt:
'defaults' => [
    'guard' => 'api',
    'passwords' => 'users',
],

...

'guards' => [
    'api' => [
        'driver' => 'jwt',
        'provider' => 'users',
    ],
],
1
2
3
4
5
6
7
8
9
10
11
12
13
更改 Model
如果需要使用 jwt-auth 作为用户认证,我们需要对我们的 User 模型进行一点小小的改变,实现一个接口,变更后的 User 模型如下:
User.php
<?php

namespace App;

use Tymon\JWTAuth\Contracts\JWTSubject;
use Illuminate\Notifications\Notifiable;
use Illuminate\Foundation\Auth\User as Authenticatable;

class User extends Authenticatable implements JWTSubject
{
   use Notifiable;

   // Rest omitted for brevity

   /**
    * Get the identifier that will be stored in the subject claim of the JWT.
    *
    * @return mixed
    */
   public function getJWTIdentifier()
   {
       return $this->getKey();
   }

   /**
    * Return a key value array, containing any custom claims to be added to the JWT.
    *
    * @return array
    */
   public function getJWTCustomClaims()
   {
       return [];
   }
}
1
2
3
4
5
6
7
8
9
10
11
12
13
14
15
16
17
18
19
20
21
22
23
24
25
26
27
28
29
30
31
32
33
34
配置项详解
jwt.php
<?php

return [

    /*
    |--------------------------------------------------------------------------
    | JWT Authentication Secret
    |--------------------------------------------------------------------------
    |
    | 用于加密生成 token 的 secret
    |
    */

    'secret' => env('JWT_SECRET'),

    /*
    |--------------------------------------------------------------------------
    | JWT Authentication Keys
    |--------------------------------------------------------------------------
    |
    | 如果你在 .env 文件中定义了 JWT_SECRET 的随机字符串
    | 那么 jwt 将会使用 对称算法 来生成 token
    | 如果你没有定有,那么jwt 将会使用如下配置的公钥和私钥来生成 token
    |
    */

    'keys' => [

        /*
        |--------------------------------------------------------------------------
        | Public Key
        |--------------------------------------------------------------------------
        |
        | 公钥
        |
        */

        'public' => env('JWT_PUBLIC_KEY'),

        /*
        |--------------------------------------------------------------------------
        | Private Key
        |--------------------------------------------------------------------------
        |
        | 私钥
        |
        */

        'private' => env('JWT_PRIVATE_KEY'),

        /*
        |--------------------------------------------------------------------------
        | Passphrase
        |--------------------------------------------------------------------------
        |
        | 私钥的密码。 如果没有设置,可以为 null。
        |
        */

        'passphrase' => env('JWT_PASSPHRASE'),

    ],

    /*
    |--------------------------------------------------------------------------
    | JWT time to live
    |--------------------------------------------------------------------------
    |
    | 指定 access_token 有效的时间长度(以分钟为单位),默认为1小时,您也可以将其设置为空,以产生永不过期的标记
    |
    */

    'ttl' => env('JWT_TTL', 60),

    /*
    |--------------------------------------------------------------------------
    | Refresh time to live
    |--------------------------------------------------------------------------
    |
    | 指定 access_token 可刷新的时间长度(以分钟为单位)。默认的时间为 2 周。
    | 大概意思就是如果用户有一个 access_token,那么他可以带着他的 access_token
    | 过来领取新的 access_token,直到 2 周的时间后,他便无法继续刷新了,需要重新登录。
    |
    */

    'refresh_ttl' => env('JWT_REFRESH_TTL', 20160),

    /*
    |--------------------------------------------------------------------------
    | JWT hashing algorithm
    |--------------------------------------------------------------------------
    |
    | 指定将用于对令牌进行签名的散列算法。
    |
    */

    'algo' => env('JWT_ALGO', 'HS256'),

    /*
    |--------------------------------------------------------------------------
    | Required Claims
    |--------------------------------------------------------------------------
    |
    | 指定必须存在于任何令牌中的声明。
    |
    |
    */

    'required_claims' => [
        'iss',
        'iat',
        'exp',
        'nbf',
        'sub',
        'jti',
    ],

    /*
    |--------------------------------------------------------------------------
    | Persistent Claims
    |--------------------------------------------------------------------------
    |
    | 指定在刷新令牌时要保留的声明密钥。
    |
    */

    'persistent_claims' => [
        // 'foo',
        // 'bar',
    ],

    /*
    |--------------------------------------------------------------------------
    | Blacklist Enabled
    |--------------------------------------------------------------------------
    |
    | 为了使令牌无效,您必须启用黑名单。
    | 如果您不想或不需要此功能,请将其设置为 false。
    |
    */

    'blacklist_enabled' => env('JWT_BLACKLIST_ENABLED', true),

    /*
    | -------------------------------------------------------------------------
    | Blacklist Grace Period
    | -------------------------------------------------------------------------
    |
    | 当多个并发请求使用相同的JWT进行时,
    | 由于 access_token 的刷新 ,其中一些可能会失败
    | 以秒为单位设置请求时间以防止并发的请求失败。
    |
    */

    'blacklist_grace_period' => env('JWT_BLACKLIST_GRACE_PERIOD', 0),

    /*
    |--------------------------------------------------------------------------
    | Providers
    |--------------------------------------------------------------------------
    |
    | 指定整个包中使用的各种提供程序。
    |
    */

    'providers' => [

        /*
        |--------------------------------------------------------------------------
        | JWT Provider
        |--------------------------------------------------------------------------
        |
        | 指定用于创建和解码令牌的提供程序。
        |
        */

        'jwt' => Tymon\JWTAuth\Providers\JWT\Namshi::class,

        /*
        |--------------------------------------------------------------------------
        | Authentication Provider
        |--------------------------------------------------------------------------
        |
        | 指定用于对用户进行身份验证的提供程序。
        |
        */

        'auth' => Tymon\JWTAuth\Providers\Auth\Illuminate::class,

        /*
        |--------------------------------------------------------------------------
        | Storage Provider
        |--------------------------------------------------------------------------
        |
        | 指定用于在黑名单中存储标记的提供程序。
        |
        */

        'storage' => Tymon\JWTAuth\Providers\Storage\Illuminate::class,

    ],

];
1
2
3
4
5
6
7
8
9
10
11
12
13
14
15
16
17
18
19
20
21
22
23
24
25
26
27
28
29
30
31
32
33
34
35
36
37
38
39
40
41
42
43
44
45
46
47
48
49
50
51
52
53
54
55
56
57
58
59
60
61
62
63
64
65
66
67
68
69
70
71
72
73
74
75
76
77
78
79
80
81
82
83
84
85
86
87
88
89
90
91
92
93
94
95
96
97
98
99
100
101
102
103
104
105
106
107
108
109
110
111
112
113
114
115
116
117
118
119
120
121
122
123
124
125
126
127
128
129
130
131
132
133
134
135
136
137
138
139
140
141
142
143
144
145
146
147
148
149
150
151
152
153
154
155
156
157
158
159
160
161
162
163
164
165
166
167
168
169
170
171
172
173
174
175
176
177
178
179
180
181
182
183
184
185
186
187
188
189
190
191
192
193
194
195
196
197
198
199
200
201
202
203
自定义认证中间件
先来说明一下我想要达成的效果,我希望用户提供账号密码前来登录。如果登录成功,那么我会给前端颁发一个 access _token ,设置在 header 中以请求需要用户认证的路由。
同时我希望如果用户的令牌如果过期了,可以暂时通过此次请求,并在此次请求中刷新该用户的 access _token,最后在响应头中将新的 access _token 返回给前端,这样子可以无痛的刷新 access _token ,用户可以获得一个很良好的体验,所以开始动手写代码。
执行如下命令以新建一个中间件
php artisan make:middleware RefreshToken
1
中间件代码如下:
RefreshToken.php
<?php

namespace App\Http\Middleware;

use Illuminate\Support\Facades\Auth;
use Closure;
use Tymon\JWTAuth\Exceptions\JWTException;
use Tymon\JWTAuth\Http\Middleware\BaseMiddleware;
use Tymon\JWTAuth\Exceptions\TokenExpiredException;
use Symfony\Component\HttpKernel\Exception\UnauthorizedHttpException;

class RefreshToken extends BaseMiddleware
{
    /**
     * Handle an incoming request.
     *
     * @param  \Illuminate\Http\Request  $request
     * @param  \Closure  $next
     * @return mixed
     */
    public function handle($request, Closure $next)
    {
        // 检查此次请求中是否带有 token,如果没有则抛出异常。
        $this->checkForToken($request);

        // 使用 try 包裹,以捕捉 token 过期所抛出的 TokenExpiredException  异常
        try {
            // 检测用户的登录状态,如果正常则通过
            if ($this->auth->parseToken()->authenticate()) {
                return $next($request);
            }
            throw new UnauthorizedHttpException('jwt-auth', '未登录');
        } catch (TokenExpiredException $exception) {
            // 此处捕获到了 token 过期所抛出的 TokenExpiredException 异常,我们在这里需要做的是刷新该用户的 token 并将它添加到响应头中
            try {
                // 刷新用户的 token
                $token = $this->auth->refresh();
                // 使用一次性登录以保证此次请求的成功
                Auth::guard('api')->onceUsingId($this->auth->manager()->getPayloadFactory()->buildClaimsCollection()->toPlainArray()['sub']);
            } catch (JWTException $exception) {
                // 如果捕获到此异常,即代表 refresh 也过期了,用户无法刷新令牌,需要重新登录。
                throw new UnauthorizedHttpException('jwt-auth', $exception->getMessage());
            }
        }

        // 在响应头中返回新的 token
        return $this->setAuthenticationHeader($next($request), $token);
    }
}
1
2
3
4
5
6
7
8
9
10
11
12
13
14
15
16
17
18
19
20
21
22
23
24
25
26
27
28
29
30
31
32
33
34
35
36
37
38
39
40
41
42
43
44
45
46
47
48
49
50
更新异常处理的 Handler
由于我们构建的是 api 服务,所以我们需要更新一下 app/Exceptions/Handler.php 中的 render
方法,自定义处理一些异常。
Handler.php
<?php

namespace App\Exceptions;

use Exception;
use Illuminate\Foundation\Exceptions\Handler as ExceptionHandler;
use Illuminate\Validation\ValidationException;
use Symfony\Component\HttpKernel\Exception\UnauthorizedHttpException;

class Handler extends ExceptionHandler
{
   ...

   /**
    * Render an exception into an HTTP response.
    *
    * @param  \Illuminate\Http\Request $request
    * @param  \Exception $exception
    * @return \Illuminate\Http\Response
    */
   public function render($request, Exception $exception)
   {
       // 参数验证错误的异常,我们需要返回 400 的 http code 和一句错误信息
        if ($exception instanceof ValidationException) {
            return response()->json([ 'code'=>'401', 'msg' => array_first(array_collapse($exception->errors()))]);
        }
        // 用户认证的异常,我们需要返回 401 的 http code 和错误信息
        if ($exception instanceof UnauthorizedHttpException) {
            return response()->json([ 'code'=>'401', 'msg' => $exception->getMessage()]);
        }
        //token异常
        if($exception instanceof TokenBlacklistedException){
            return response()->json([ 'code'=>'401', 'msg' => $exception->getMessage()]);
        }
       return parent::render($request, $exception);
   }
}
1
2
3
4
5
6
7
8
9
10
11
12
13
14
15
16
17
18
19
20
21
22
23
24
25
26
27
28
29
30
31
32
33
34
35
36
37
使用
现在,我们可以在我们的 routes/api.php 路由文件中新增几条路由来测试一下了:
Route::post('/login','LoginController@login'); //登录
    Route::group(['middleware' => 'refresh.token'], function ()
    {
        Route::post('/logout','LoginController@logout'); //退出登录
        Route::get('/user/info','LoginController@me');//用户信息
    });
1
2
3
4
5
6
打开对应控制器写如下代码
<?php
/**
 * Created by PhpStorm.
 * User: jack
 * Date: 2019/5/22
 * Time: 2:49 PM
 */

namespace App\Http\Controllers\Api;


use App\Http\Controllers\Controller;
use Illuminate\Http\Request;
use Illuminate\Support\Facades\Validator;
use Illuminate\Support\Facades\Auth;
class LoginController extends Controller
{

    /**
     * [登录]
     * User: jack
     * Date: 2019-05-22
     * Time: 2:49 PM
     */
    public function login(Request $request){
        $input = $request->input();
        $validate = [
            //规则
            'rule' => [
                'mobile'   => 'required',
                'password'   => 'required|min:6'
            ],
            //提示信息
            'message' => [
                'required' => ':attribute不能为空',
                'min' => ':attribute不能小于6位'
            ],
            //自定义
            'custom' => [
                'mobile'   => '账号',
                'password'   => '密码',
            ]
        ];
        $validator = Validator::make( $input, $validate['rule'], $validate['message'], $validate['custom'] );
        if ($validator->fails()) {
            return response()->json([ 'code'=>'201', 'msg' => $validator->errors()->first()]);
        }
        if($token = Auth::guard('api')->attempt($input)){
            $data = [
                'user_detail' => Auth::guard('api')->user(),
                'token' => 'bearer ' . $token
            ];
            return response()->json([ 'code'=>'200', 'msg' => '', 'data' => $data]);
        }else{
            return response()->json([ 'code'=>'200', 'msg' => '账号或密码错误', 'data' => '']);
        }
    }

    /**
     * [退出登录]
     * User: jack
     * Date: 2019-05-23
     * Time: 2:01 PM
     */
    public function logout()
    {
        Auth::guard('api')->logout();

        return response()->json([ 'code'=>'200', 'msg' => '退出成功', 'data' => '']);
    }

    /**
     * [获取用户信息]
     * User: jack
     * Date: 2019-05-23
     * Time: 2:01 PM
     */
    public function me()
    {
        $user = Auth::guard('api')->user();
        return response()->json([ 'code'=>'200', 'msg' => '', 'data' => $user]);
    }

}
1
2
3
4
5
6
7
8
9
10
11
12
13
14
15
16
17
18
19
20
21
22
23
24
25
26
27
28
29
30
31
32
33
34
35
36
37
38
39
40
41
42
43
44
45
46
47
48
49
50
51
52
53
54
55
56
57
58
59
60
61
62
63
64
65
66
67
68
69
70
71
72
73
74
75
76
77
78
79
80
81
82
83
84
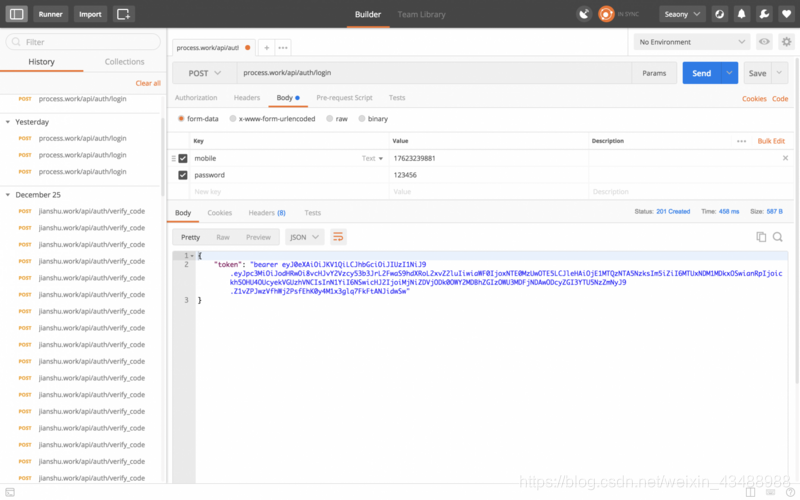
然后打开 Postman 来进行 api 测试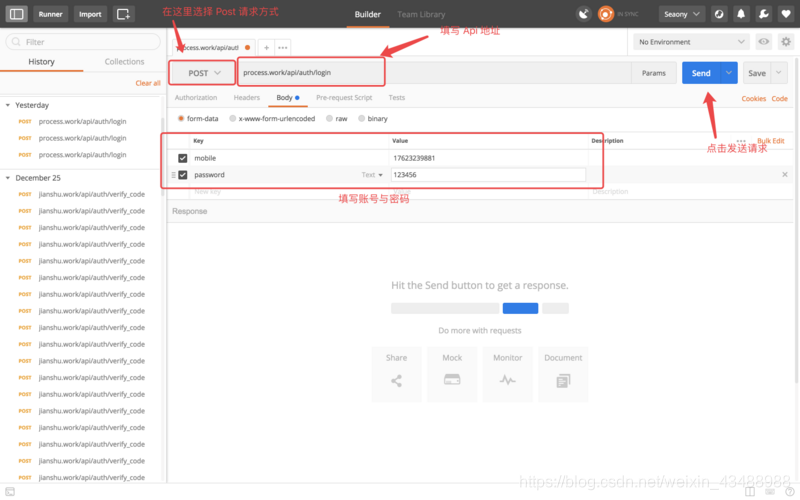

来自 https://blog.csdn.net/weixin_43488988/article/details/90483019