欢迎各位兄弟 发布技术文章

这里的技术是共享的

You are here

SSH 在ssh-copy-id 之后仍需输入密码 ssh复制秘钥成功后仍然需要输入密码 自己亲自做的 有大用 有大大用 有大大大用

image.png

[root@node1 ~]# ssh-keygen -t rsa -f ~/.ssh/id_isa -P ''

Generating public/private rsa key pair.

Your identification has been saved in /root/.ssh/id_isa.

Your public key has been saved in /root/.ssh/id_isa.pub.

The key fingerprint is:

d1:b9:64:b9:fc:96:22:e4:27:3c:d2:7a:b7:11:57:b8 root@node1.magedu.com

[root@node1 ~]#

[root@node1 ~]# ssh-copy-id -i .ssh/id_isa.pub root@192.168.0.55  (把公钥复制过去)

15

The authenticity of host '192.168.0.55 (192.168.0.55)' can't be established.

RSA key fingerprint is ae:fe:80:46:96:5b:2a:94:5e:8e:0c:ec:86:eb:e1:ee.

Are you sure you want to continue connecting (yes/no)? yes

Warning: Permanently added '192.168.0.55' (RSA) to the list of known hosts.

Nasty PTR record "192.168.0.55" is set up for 192.168.0.55, ignoring

root@192.168.0.55's password:

Now try logging into the machine, with "ssh 'root@192.168.0.55'", and check in:


  .ssh/authorized_keys


to make sure we haven't added extra keys that you weren't expecting.


[root@node1 ~]#

[root@node1 ~]# ssh 192.168.0.55 'ifconfig'    #可以通信,但是输密码,?为什么????为什么马哥不用输密码

具体的原因是 我使用的 文件名是 .ssh/id_isa        而应该使用默认的文件名  .ssh/id_rsa  

因为 # ssh 192.168.0.55 'ifconfig'    其实真正执行的是 # ssh -i .ssh/id_rsa 192.168.0.55 'ifconfig'  


具体排查过程如下

一)看ssh服务端的日志 

1) /var/log/secure        好像没看出什么结果

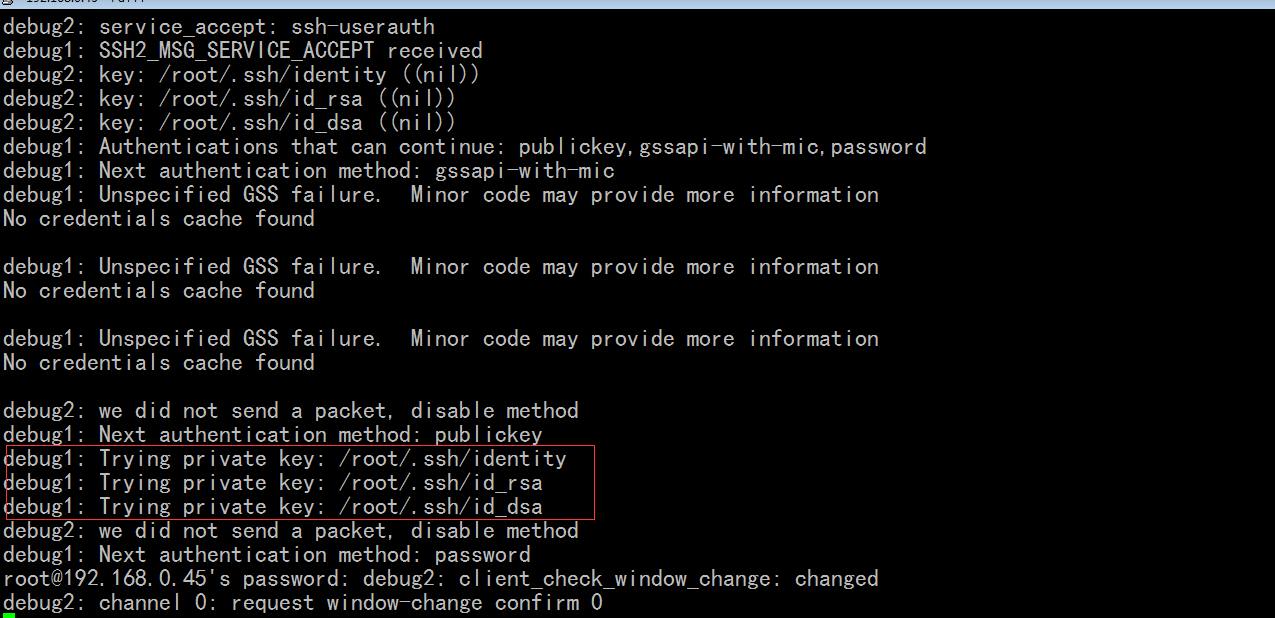
二)  # ssh 192.168.0.55 -v  或  # ssh 192.168.0.55 -vv   (这是调试模式)


image.png .......

debug1: Trying private key: /root/.ssh/identity

debug1: Trying private key: /root/.ssh/id_rsa

debug1: Trying private key: /root/.ssh/id_dsa

 .......

看到了默认是找 /root/.ssh/identity,/root/.ssh/id_rsa,/root/.ssh/id_dsa  这三个认证文件

由于我们使用的是  .ssh/id_isa 文件 ,所以自然找不到 上面的三种认证文件中的一个了

所以 我们 # ssh 192.168.0.55  命令 还需要输密码

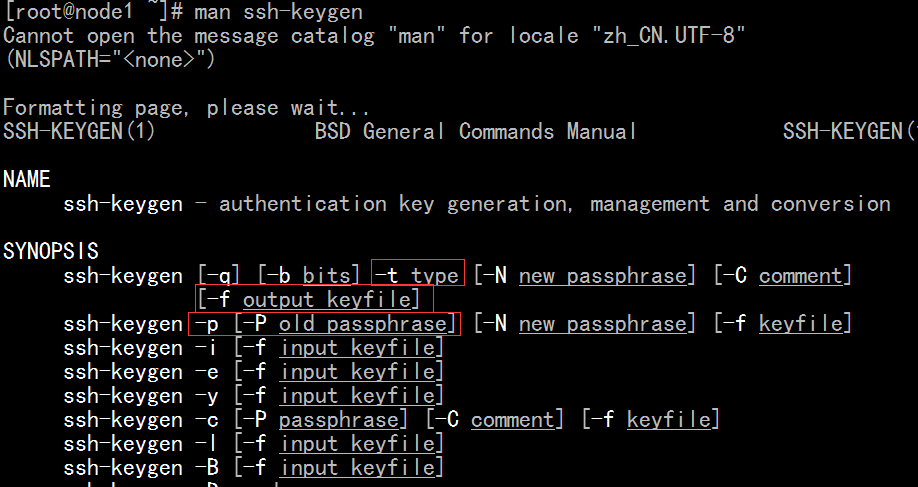
三)  # man ssh

# 有个 -i 选项指定身份认证文件 .如果不指定,默认是上面的三个文件,

所以我们 使用  # ssh -i ~/.ssh/id_isa 192.168.0.55 也是不需要密码验证的

image.png


四) 对于文件权限,可以看一下吧,,可看可不看

    1)客户端相应的文件权限

  • The .ssh folder: 700 (drwx------)

  • The public key: 644 (-rw-r--r--)

  • The private key: 600 (-rw-------)

    2)服务端相应的文件权限

        authorized_keys 600 (-rw-------)


确保对~/.ssh目录及其内容的权限正确。当我第一次设置ssh key auth时,我没有~/.ssh正确设置文件夹,它对我大吼大叫。

  • 你的主目录~,你的~/.ssh目录和~/.ssh/authorized_keys远程计算机上的文件必须是可写的只有你:rwx------rwxr-xr-x都很好,但rwxrwx---没有good¹,即使你是你的小组中唯一的用户(如果你喜欢的数字模式:700或者755,没有775) 。
    如果~/.ssh或是authorized_keys符号链接,则检查标准路径(符号链接已展开)

  • 您的~/.ssh/authorized_keys文件(在远程计算机上)必须是可读的(至少400),但是如果您要向其添加任何其他密钥,则还必须是可写的(600)。

  • 您的私钥文件(在本地计算机上)必须只有您可以读写:rw-------,即600

  • 另外,如果将SELinux设置为强制执行,则可能需要运行restorecon -R -v ~/.ssh(请


五) 对服务器端进行调试看看,可看可不看

如果您具有对服务器的root访问权,则解决此类问题的简单方法是在调试模式下运行sshd,方法是/usr/sbin/sshd -d -p 2222在服务器上发出类似的内容(需要sshd可执行文件的完整路径,这which sshd会有所帮助),然后使用来从客户端进行连接ssh -p 2222 user@host这将强制SSH守护程序停留在前台并显示有关每个连接的调试信息。寻找类似的东西

debug1: trying public key file /path/to/home/.ssh/authorized_keys
...
Authentication refused: bad ownership or modes for directory /path/to/home/

如果无法使用备用端口,则可以暂时停止SSH守护程序,并在调试模式下将其替换为一个。停止SSH守护程序不会杀死现有的连接,因此可以通过远程终端执行此操作,但是这样做有些冒险-如果在调试替换未运行时确实由于某种原因断开了连接,则您将被锁定在计算机之外直到您可以重新启动它。所需的命令:

service ssh stop
/usr/sbin/sshd -d
#...debug output...
service ssh start

(取决于您的Linux发行版,第一行/最后一行可能是systemctl stop sshd.servicesystemctl start sshd.service。)


我的执行 ,看不懂什么有价值的东西 

[root@node2 ~]# /usr/sbin/sshd -d -p 2222

debug1: sshd version OpenSSH_4.3p2

debug1: read PEM private key done: type RSA

debug1: private host key: #0 type 1 RSA

debug1: read PEM private key done: type DSA

debug1: private host key: #1 type 2 DSA

debug1: rexec_argv[0]='/usr/sbin/sshd'

debug1: rexec_argv[1]='-d'

debug1: rexec_argv[2]='-p'

debug1: rexec_argv[3]='2222'

debug1: Bind to port 2222 on ::.

Server listening on :: port 2222.

debug1: Bind to port 2222 on 0.0.0.0.

Server listening on 0.0.0.0 port 2222.

debug1: Server will not fork when running in debugging mode.

debug1: rexec start in 5 out 5 newsock 5 pipe -1 sock 8

debug1: inetd sockets after dupping: 3, 3

Connection from 192.168.0.55 port 41929

debug1: Client protocol version 2.0; client software version OpenSSH_4.3

debug1: match: OpenSSH_4.3 pat OpenSSH*

debug1: Enabling compatibility mode for protocol 2.0

debug1: Local version string SSH-2.0-OpenSSH_4.3

debug1: permanently_set_uid: 74/74

debug1: list_hostkey_types: ssh-rsa,ssh-dss

debug1: SSH2_MSG_KEXINIT sent

debug1: SSH2_MSG_KEXINIT received

debug1: kex: client->server aes128-ctr hmac-md5 none

debug1: kex: server->client aes128-ctr hmac-md5 none

debug1: SSH2_MSG_KEX_DH_GEX_REQUEST received

debug1: SSH2_MSG_KEX_DH_GEX_GROUP sent

debug1: expecting SSH2_MSG_KEX_DH_GEX_INIT

debug1: SSH2_MSG_KEX_DH_GEX_REPLY sent

debug1: SSH2_MSG_NEWKEYS sent

debug1: expecting SSH2_MSG_NEWKEYS

debug1: SSH2_MSG_NEWKEYS received

debug1: KEX done

debug1: userauth-request for user root service ssh-connection method none

debug1: attempt 0 failures 0

debug1: PAM: initializing for "root"

Address 192.168.0.55 maps to node2.magedu.com, but this does not map back to the address - POSSIBLE BREAK-IN ATTEMPT!

debug1: PAM: setting PAM_RHOST to "192.168.0.55"

debug1: PAM: setting PAM_TTY to "ssh"


来自  https://unix.stackexchange.com/questions/36540/why-am-i-still-getting-a-password-prompt-with-ssh-wit...

https://unix.stackexchange.com/questions/407394/ssh-copy-id-succeeded-but-still-prompt-password-input


普通分类: