You are here
马哥 42_02 _MySQL主从复制——MySQL-5.5异步、半同步配置及其注意事项 有大用
一个master: 多个slave 可以的
1-->N
一个slave:多个master 不可以的
1-->N :如果一个从服务器从多个主服务器那里复制数据,有些数据是重复的,有些数据会交叉,而且它们有可能属于不同的数据库,最终结果是混乱了,
一个从只能属于一个主服务器
MySQL 5.5之前复制功能实现起来很简单,
MySQL 5.6之后在复制上引入了gtid新机制,(gtid: 全局事务号 全局事务标示符 global transaction identifier ),gtid使得mysql的复制更加安全,不会在多事务并行的时候,产生数据混乱,,,引入了 multi-thread-replication (multi-thread replication: 多线程复制)
配置MySQL复制的基本步骤:
一) master 如何配置,
1,启用二进制日志,(默认是启用的吧)
log-bin = master-bin # 如果不定义,默认就是 mysql-bin 后面就是.000001
log-bin-index = master-bin.index # 二进制日志文件的索引文件名称,通常是二进制日志文件名加上.index
2,选择一个唯一的server-id
server-id = {0-2^32} #0到2的32次方
3,创建具有复制权限的用户
REPLICATION SLAVE #这是复制的权限,复制的从节点,从主服务器的二进制日志文件中复制事件的权限
REPLICATION CLINET #偶尔会用到,具有连接主服务器获取相关信息的权限
二) slave 如何配置,
1, 启用中继日志,默认是不会启用的
relay-log = relay-log #等于号后面的是中继日志的名称
relay-log-index = # relay-log的索引文件
#如果从服务器不打算做其它从服务器的主,是不用启用二进制日志的,所以可以关闭二进制日志
2,选择一个唯一的server-id
server-id = {0-2^32} #0到2的32次方
3,连接至主服务器,并开始复制数据
mysql> CHANGER MASTER TO MASTER_HOST='',MASTER_PORT='',MASTER_LOG_FILE='',MASTER_LOG_FILE_POS='',MASTER_USER='',MASTER_PASSWORD='';
mysql> START SLAVE; #通过这个命令启动mysql的从服务器的线程,它会启动IO线程和SQL线程 因为设定完成后不会立即启动mysql的从服务器的,
mysql> START SLAVE IO_Thread ; #仅启动IO线程
mysql> START SLAVE SQL_Thread; #仅启动SQL线程
复制线程:
master: dump
slave: IO_Thread,SQL_Thread
从服务器一定是复制主服务器的二进制日志的某个事件,应该从主服务器的哪一个二进制日志中的哪一个位置开始复制,
见下图图一,左边主服务器是刚新建的,里面没有建任何数据,此时从服务器连上来复制数据的话,直接启动就可以了,指向第一个日志文件mysql-bin.00001的position 107 (开始都是107) 或者不指定位置,从最首部开始,,,,,,,假如主服务器已经运行半年了,业务太繁忙,想读写分离,想找个从服务器分担读操作,此时从服务器从头开始会复制好久好久的,,,,此时,我们可以在主服务器执行一次备份,备份那一刻记录下来二进制日志的文件名和事件位置,而后将备份出来的数据在从服务器上还原回来,再告诉从服务器连接主服务器的哪个二进制文件的位置的开始位置,
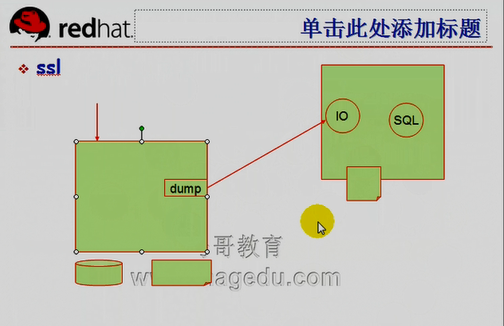
mysql的复制架构当中,主服务器写操作的时候,数据既保存在数据库中一份,又写在二进制中一份,,,,,,一旦有了从服务器,我们还应该把二进制的信息发给从,为每一个从启动一个线程,通过这个线程将信息发送给从服务器, 见下图图二,dump线程,从服务器有个线程来接入dump线程发送的信息
图一

图二

见下图,binarylog 通过dump线程,发送给slave,(服务器端只需要提供dump线程就可以了,这是根据有复制的话,会自动启动的),,,而从服务器端有两个关键性的线程,第一个是IO线程,这个线程到主服务器的dump那里去读取二进制日志,如果主服务器的二进制日志中有些事件从服务器没有,需要读过来的话,这时候我们的主服务器就会启动dump线程,将数据发给从服务器的IO线程,从服务器的IO线程在接收下来之后,保存在中继日志中,,,,,,,,,而后在从服务器中再启动一个 SQL 线程,这个SQL线程从中继日志中读一个事件后,就重放一个事件(在从服务器本地应用一次),实现了在从服务器本地应用数据更新,,,,,,,,,,,mysql5.6支持多线程复制,也就是SQL线程可以启动多个,多个SQL线程同时从relay log读数据,同时并行应用,会大大提高从服务器的速度,但是多SQL线程仍然是一个数据库只支持一个线程(此时即使启用了多SQL线程,也没有意义),,,,(复制的时候主服务器上有n个库,从服务器的SQL线程为多线程才有作用)
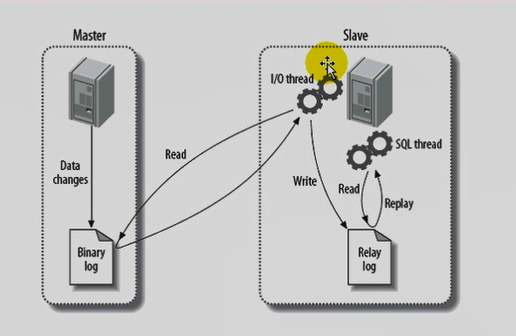
IO线程: IO Thread
SQL线程: SQL Thread
见下图如果主服务器的dump线程不在线了,从服务器上的IO线程也就不能工作了,就停了??,(因为IO线程连到dump上去获取数据的),,,,,当IO线程不能工作的时候,SQL线程还在工作(就是从从服务器的中继日志中读数据进行重放的,假如中继日志没内容的话,SQL线程还是不会停掉的(只不过它是空闲的,没有读数据罢了,),SQL线程只是等着中继日志更新就应用了,,,,,中继日志不更新,可能有多种原因:可能主服务器没有更新,主服务器不在线了(IO线程不工作了,连不上了),,,,,,,我们的主服务器上有些功能重新配置了,我们需要重启一下从服务器的时候,我们只需要重启IO线程即可

mysql的主从复制,mysql的客户端服务端连接的时候,mysql协议本身是明文,是加密的话,ssl,,,,,,,,,,如果不使用ssl的话,如果数据跨越互联网复制,公司的数据会被别人拿走一份的,(远程复制,跨越不安全网络的时候,应该要求客户端的IO线程使用某个用户的帐号连接主服务器的dump的时候,应该基于ssl的方式来复制,需要提供证书,密钥,,,,一般来说是客户端验证服务器端,服务器端验证客户端也可以,,甚至支持双向验证,,我们甚至可以不用帐号密码,帐号密码简单点都无所谓,因为只要客户端没有证书,就连不上来),,,,,,,,,,mysql5.5之后还支持半同步复制(从服务器多台的时候,只要一台响应其复制成功或者超时,这叫半同步),假如我们的从服务器不在线了,等待任何从服务器都没有答理我,我们主服务器该咋办?..................服务器还得继续工作,我们配置半同步复制模型的时候,需要指定一个超时时间间隔,一旦超出这样一个指定时间了,我们的主从可以断开,而后降级为异步模式继续工作,
两台主机
192.168.0.46 node1 主服务器
192.168.0.56 node2 从服务器
在第一个节点node1 192.168.0.46 上
[root@node1 ~]# mkdir -pv /mydata/data
mkdir: 已创建目录 “/mydata”
mkdir: 已创建目录 “/mydata/data”
[root@node1 ~]#
[root@node1 ~]# useradd -r mysql #自己直接建用户管不了太多了,正常情况下,是不是应该保证用户应该是系统用户,-r就表示系统帐户吧, id小于500的???
[root@node1 ~]# chown -R mysql:mysql /mydata/data/
[root@node1 ~]#
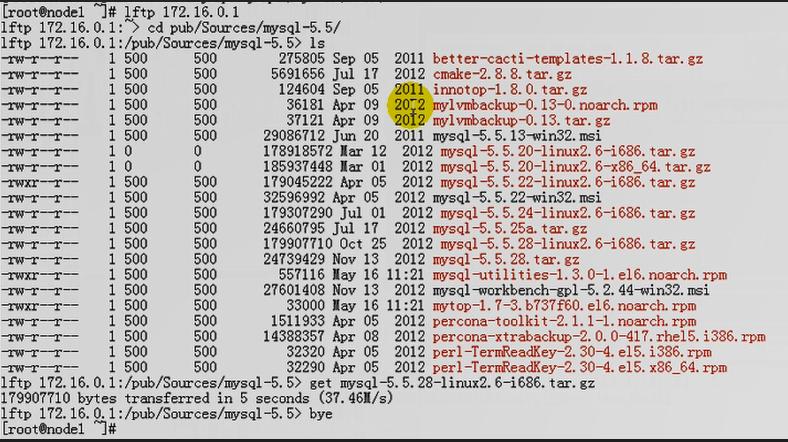
下载 5.5.28的二进制格式

在第一个节点node1 192.168.0.46 上 主服务器
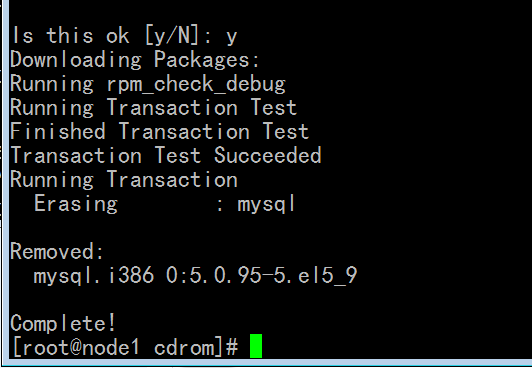
我先卸载原来的mysql吧
[root@node1 cdrom]# yum remove mysql
https://downloads.mysql.com/archives/ mysql历史版本下载
https://downloads.mysql.com/archives/community/ mysql历史版本下载
在第一个节点node1 192.168.0.46 上 主服务器
下载mysql5.5.28的二进制包
[root@node1 ~]# wget https://cdn.mysql.com/archives/mysql-5.5/mysql-5.5.28-linux2.6-i686.tar.gz
--2021-03-12 14:35:40-- https://cdn.mysql.com/archives/mysql-5.5/mysql-5.5.28-linux2.6-i686.tar.gz
正在解析主机 cdn.mysql.com... 23.54.201.4
Connecting to cdn.mysql.com|23.54.201.4|:443... 已连接。
已发出 HTTP 请求,正在等待回应... 200 OK
长度:179907710 (172M) [application/x-tar-gz]
Saving to: `mysql-5.5.28-linux2.6-i686.tar.gz'
100%[======================================>] 179,907,710 3.05M/s in 66s
2021-03-12 14:36:47 (2.61 MB/s) - `mysql-5.5.28-linux2.6-i686.tar.gz' saved [179907710/179907710]
[root@node1 ~]#
[root@node1 ~]# tar xf mysql-5.5.28-linux2.6-i686.tar.gz -C /usr/local
[root@node1 ~]# cd /usr/local
[root@node1 local]# ls
bin games lib mysql-5.5.28-linux2.6-i686 share
etc include libexec sbin src
[root@node1 local]#
[root@node1 local]# ln -sv mysql-5.5.28-linux2.6-i686 mysql
创建指向“mysql-5.5.28-linux2.6-i686”的符号链接“mysql”
[root@node1 local]# cd mysql
[root@node1 mysql]# pwd
/usr/local/mysql
[root@node1 mysql]# chown -R root.mysql ./* #改属主属组
[root@node1 mysql]#
[root@node1 mysql]# scripts/mysql_install_db --user=mysql --datadir=/mydata/data/ #初始化
Installing MySQL system tables...
OK
Filling help tables...
OK
To start mysqld at boot time you have to copy
support-files/mysql.server to the right place for your system
PLEASE REMEMBER TO SET A PASSWORD FOR THE MySQL root USER !
To do so, start the server, then issue the following commands:
./bin/mysqladmin -u root password 'new-password'
./bin/mysqladmin -u root -h node1.magedu.com password 'new-password'
Alternatively you can run:
./bin/mysql_secure_installation
which will also give you the option of removing the test
databases and anonymous user created by default. This is
strongly recommended for production servers.
See the manual for more instructions.
You can start the MySQL daemon with:
cd . ; ./bin/mysqld_safe &
You can test the MySQL daemon with mysql-test-run.pl
cd ./mysql-test ; perl mysql-test-run.pl
Please report any problems with the ./bin/mysqlbug script!
[root@node1 mysql]#
[root@node1 mysql]# cp support-files/my-large.cnf /etc/my.cnf # 复制配置文件
[root@node1 mysql]# cp support-files/mysql.server /etc/rc.d/init.d/mysqld #复制脚本
[root@node1 mysql]#
[root@node1 mysql]# chkconfig --add mysqld #chkconfig 加入 一下
[root@node1 mysql]# chkconfig --list mysqld
mysqld 0:关闭 1:关闭 2:启用 3:启用 4:启用 5:启用 6:关闭
[root@node1 mysql]#
[root@node1 mysql]# vim /etc/my.cnf
.....................................
# The MySQL server #所有与复制相关的配置都在mysqld这里
[mysqld]
port = 3306
socket = /tmp/mysql.sock
skip-external-locking
key_buffer_size = 256M
max_allowed_packet = 1M
table_open_cache = 256
sort_buffer_size = 1M
read_buffer_size = 1M
read_rnd_buffer_size = 4M
myisam_sort_buffer_size = 64M
thread_cache_size = 8
query_cache_size= 16M
# Try number of CPU's*2 for thread_concurrency
thread_concurrency = 8
data_dir = /mydata/data #数据目录
# Don't listen on a TCP/IP port at all. This can be a security enhancement,
# if all processes that need to connect to mysqld run on the same host.
# All interaction with mysqld must be made via Unix sockets or named pipes.
# Note that using this option without enabling named pipes on Windows
# (via the "enable-named-pipe" option) will render mysqld useless!
#
#skip-networking
# Replication Master Server (default)
# binary logging is required for replication
# log-bin=mysql-bin
log-bin=master-bin
#启用二进制日志 其实默认是不会启用二进制日志的,因为默认的我们复制过来的配置文件my-large.cnf已经默认有了
log-bin-index=master-bin.index #log-bin-index文件,这里如果不定义也没关系,就叫做master-bin.index
# binary logging format - mixed recommended
binlog_format=mixed #一般是row,或mixed了,不建议使用statement了
innodb_file_per_table= 1 #这一项很有用
# required unique id between 1 and 2^32 - 1
# defaults to 1 if master-host is not set
# but will not function as a master if omitted
server-id = 1 # 最大数是 2^32 - 1 ,就是2的32次方减1,,,server-id都不能一样
# Replication Slave (comment out master section to use this)
#
# To configure this host as a replication slave, you can choose between
# two methods :
#
# 1) Use the CHANGE MASTER TO command (fully described in our manual) -
# the syntax is:
#
# CHANGE MASTER TO MASTER_HOST=<host>, MASTER_PORT=<port>,
# MASTER_USER=<user>, MASTER_PASSWORD=<password> ;
#
# where you replace <host>, <user>, <password> by quoted strings and
# <port> by the master's port number (3306 by default).
#
# Example:
#
# CHANGE MASTER TO MASTER_HOST='125.564.12.1', MASTER_PORT=3306,
# MASTER_USER='joe', MASTER_PASSWORD='secret';
#
# OR
#
# 2) Set the variables below. However, in case you choose this method, then
# start replication for the first time (even unsuccessfully, for example
# if you mistyped the password in master-password and the slave fails to
# connect), the slave will create a master.info file, and any later
# change in this file to the variables' values below will be ignored and
# overridden by the content of the master.info file, unless you shutdown
# the slave server, delete master.info and restart the slaver server.
# For that reason, you may want to leave the lines below untouched
# (commented) and instead use CHANGE MASTER TO (see above)
#
# required unique id between 2 and 2^32 - 1
# (and different from the master)
# defaults to 2 if master-host is set
# but will not function as a slave if omitted
#server-id = 2
#
# The replication master for this slave - required
#master-host = <hostname>
#
# The username the slave will use for authentication when connecting
# to the master - required
#master-user = <username>
#
# The password the slave will authenticate with when connecting to
# the master - required
#master-password = <password>
#
# The port the master is listening on.
# optional - defaults to 3306
#master-port = <port>
#
# binary logging - not required for slaves, but recommended
#log-bin=mysql-bin
# Uncomment the following if you are using InnoDB tables
#innodb_data_home_dir = /usr/local/mysql/data
#innodb_data_file_path = ibdata1:10M:autoextend
#innodb_log_group_home_dir = /usr/local/mysql/data
# You can set .._buffer_pool_size up to 50 - 80 %
# of RAM but beware of setting memory usage too high
#innodb_buffer_pool_size = 256M
#innodb_additional_mem_pool_size = 20M
# Set .._log_file_size to 25 % of buffer pool size
#innodb_log_file_size = 64M
#innodb_log_buffer_size = 8M
#innodb_flush_log_at_trx_commit = 1
#innodb_lock_wait_timeout = 50
[root@node1 mysql]# service mysqld status
MySQL is not running [失败]
[root@node1 mysql]# service mysqld start
Starting MySQL.The server quit without updating PID file (/usr/local/mysql/data/node1.magedu.com.pid). [失败]
[root@node1 mysql]# vim /etc/my.cnf
...............................................................
datadir = /mydata/data
...............................................................
[root@node1 mysql]# service mysqld start #可以启动了
Starting MySQL.
. [确定]
[root@node1 mysql]#
[root@node1 ~]# mysql
-bash: mysql: command not found
[root@node1 ~]#
[root@node1 ~]# vim /etc/profile.d/mysql.sh #添加环境变量
export PATH=$PATH:/usr/local/mysql/bin
[root@node1 ~]# . /etc/profile.d/mysql.sh #读一下并且执行一下这个配置文件
[root@node1 ~]#
[root@node1 ~]# mysql #正常了
Welcome to the MySQL monitor. Commands end with ; or \g.
Your MySQL connection id is 1
Server version: 5.5.28-log MySQL Community Server (GPL)
Copyright (c) 2000, 2012, Oracle and/or its affiliates. All rights reserved.
Oracle is a registered trademark of Oracle Corporation and/or its
affiliates. Other names may be trademarks of their respective
owners.
Type 'help;' or '\h' for help. Type '\c' to clear the current input statement.
mysql>
[root@node1 ~]# scp mysql-5.5.28-linux2.6-i686.tar.gz node2:/root #复制到node2
mysql-5.5.28-linux2.6-i686.tar.gz 100% 172MB 24.5MB/s 00:07
[root@node1 ~]#
在第一个节点node1 192.168.0.46 上 主服务器
[root@node1 ~]# mysql
Welcome to the MySQL monitor. Commands end with ; or \g.
Your MySQL connection id is 2
Server version: 5.5.28-log MySQL Community Server (GPL)
Copyright (c) 2000, 2012, Oracle and/or its affiliates. All rights reserved.
Oracle is a registered trademark of Oracle Corporation and/or its
affiliates. Other names may be trademarks of their respective
owners.
Type 'help;' or '\h' for help. Type '\c' to clear the current input statement.
mysql> grant replication slave on *.* to 'repluser'@'192.168.%.%' identified by 'replpass'; #授权从复制权限
Query OK, 0 rows affected (0.00 sec)
mysql>
mysql> flush privileges; #刷新权限
Query OK, 0 rows affected (0.00 sec)
mysql>
mysql> \q
Bye
[root@node1 ~]#
主服务器上三配置:二进制日志,server-id,用户帐号 都弄好了
在第二个节点node2 192.168.0.56 上 从服务器
[root@node2 ~]# mkdir -pv /mydata/data
mkdir: 已创建目录 “/mydata”
mkdir: 已创建目录 “/mydata/data”
[root@node2 ~]# useradd -r mysql #-r表示系统帐户
[root@node2 ~]# chown -R mysql.mysql /mydata/data
[root@node2 ~]#
[root@node2 ~]# tar xf mysql-5.5.28-linux2.6-i686.tar.gz -C /usr/local/
[root@node2 ~]#
在第一个节点node1 192.168.0.46 上 主服务器
[root@node1 ~]# scp /etc/my.cnf node2:/etc/ #复制mysql的配置文件过去
my.cnf 100% 4763 4.7KB/s 00:00
[root@node1 ~]#
在第二个节点node2 192.168.0.56 上 从服务器
[root@node2 ~]# cd /usr/local/
[root@node2 local]# ln -sv mysql-5.5.28-linux2.6-i686 mysql
创建指向“mysql-5.5.28-linux2.6-i686”的符号链接“mysql”
[root@node2 local]#
[root@node2 local]# cd mysql
[root@node2 mysql]# pwd
/usr/local/mysql
[root@node2 mysql]# chown -R root.mysql ./* #改属主属组
[root@node2 mysql]# ll
总计 132
drwxr-xr-x 2 root mysql 4096 03-13 12:54 bin
-rw-r--r-- 1 root mysql 17987 2012-08-29 COPYING
drwxr-xr-x 4 root mysql 4096 03-13 12:54 data
drwxr-xr-x 2 root mysql 4096 03-13 12:54 docs
drwxr-xr-x 3 root mysql 4096 03-13 12:54 include
-rw-r--r-- 1 root mysql 7604 2012-08-29 INSTALL-BINARY
drwxr-xr-x 3 root mysql 4096 03-13 12:54 lib
drwxr-xr-x 4 root mysql 4096 03-13 12:54 man
drwxr-xr-x 10 root mysql 4096 03-13 12:54 mysql-test
-rw-r--r-- 1 root mysql 2552 2012-08-29 README
drwxr-xr-x 2 root mysql 4096 03-13 12:54 scripts
drwxr-xr-x 27 root mysql 4096 03-13 12:54 share
drwxr-xr-x 4 root mysql 4096 03-13 12:54 sql-bench
drwxr-xr-x 2 root mysql 4096 03-13 12:54 support-files
#不初始没法启动,所以必须初始化
[root@node2 mysql]# scripts/mysql_install_db --user=mysql --datadir=/mydata/data
Installing MySQL system tables...
OK
Filling help tables...
OK
To start mysqld at boot time you have to copy
support-files/mysql.server to the right place for your system
PLEASE REMEMBER TO SET A PASSWORD FOR THE MySQL root USER !
To do so, start the server, then issue the following commands:
./bin/mysqladmin -u root password 'new-password'
./bin/mysqladmin -u root -h node2.magedu.com password 'new-password'
Alternatively you can run:
./bin/mysql_secure_installation
which will also give you the option of removing the test
databases and anonymous user created by default. This is
strongly recommended for production servers.
See the manual for more instructions.
You can start the MySQL daemon with:
cd . ; ./bin/mysqld_safe &
You can test the MySQL daemon with mysql-test-run.pl
cd ./mysql-test ; perl mysql-test-run.pl
Please report any problems with the ./bin/mysqlbug script!
[root@node2 mysql]#
[root@node2 mysql]# cp support-files/mysql.server /etc/init.d/mysqld #复制服务脚本
[root@node2 mysql]# chkconfig --add mysqld #服务加到服务列表中去
[root@node2 mysql]# chkconfig --list mysqld
mysqld 0:关闭 1:关闭 2:启用 3:启用 4:启用 5:启用 6:关闭
[root@node2 mysql]#
[root@node2 mysql]# vim /etc/my.cnf #这是从主服务器上复制过来的,做点修改
.....................................
#log-bin=master-bin #不用二进制日志了,注释掉
#log-bin-index=master-bin.index #不用二进制日志的索引了,注释掉
# binary logging format - mixed recommended
binlog_format=mixed
relay-log = relay-log #中继日志,添加的这一行
relay-log-index = relay-log.index #中继日志的索引,添加的这一行
server-id = 11 #改下server-id 为11 ,为主的server-id为1的,中间隔几个吧,可能将来要调整id号的值
在第一个节点node1 192.168.0.46 上 主服务器
[root@node1 ~]# mysql
Welcome to the MySQL monitor. Commands end with ; or \g.
Your MySQL connection id is 3
Server version: 5.5.28-log MySQL Community Server (GPL)
Copyright (c) 2000, 2012, Oracle and/or its affiliates. All rights reserved.
Oracle is a registered trademark of Oracle Corporation and/or its
affiliates. Other names may be trademarks of their respective
owners.
Type 'help;' or '\h' for help. Type '\c' to clear the current input statement.
mysql> show master status
-> ;
+-------------------+----------+--------------+------------------+
| File | Position | Binlog_Do_DB | Binlog_Ignore_DB |
+-------------------+----------+--------------+------------------+
| master-bin.000002 | 340 | | |
+-------------------+----------+--------------+------------------+
1 row in set (0.00 sec)
mysql> show binlog events in 'master-bin.000001';
+-------------------+-----+-------------+-----------+-------------+---------------------------------------+
| Log_name | Pos | Event_type | Server_id | End_log_pos | Info |
+-------------------+-----+-------------+-----------+-------------+---------------------------------------+
| master-bin.000001 | 4 | Format_desc | 1 | 107 | Server ver: 5.5.28-log, Binlog ver: 4 |
+-------------------+-----+-------------+-----------+-------------+---------------------------------------+
1 row in set (0.00 sec)
mysql>
mysql> show binlog events in 'master-bin.000002'; #已经创建了授权用户
+-------------------+-----+-------------+-----------+-------------+-------------------------------------------------------------------------------------+
| Log_name | Pos | Event_type | Server_id | End_log_pos | Info |
+-------------------+-----+-------------+-----------+-------------+-------------------------------------------------------------------------------------+
| master-bin.000002 | 4 | Format_desc | 1 | 107 | Server ver: 5.5.28-log, Binlog ver: 4 |
| master-bin.000002 | 107 | Query | 1 | 265 | grant replication slave on *.* to 'repluser'@'192.168.%.%' identified by 'replpass' |
| master-bin.000002 | 265 | Query | 1 | 340 | flush privileges |
+-------------------+-----+-------------+-----------+-------------+-------------------------------------------------------------------------------------+
3 rows in set (0.00 sec)
mysql>
在第二个节点node2 192.168.0.56 上 从服务器
[root@node2 mysql]# service mysqld start
Starting MySQL.. [确定]
[root@node2 mysql]# vim /etc/profile.d/mysql.sh
export PATH=$PATH:/usr/local/mysql/bin
[root@node2 mysql]# . /etc/profile.d/mysql.sh
[root@node2 mysql]# mysql
Welcome to the MySQL monitor. Commands end with ; or \g.
Your MySQL connection id is 1
Server version: 5.5.28 MySQL Community Server (GPL)
Copyright (c) 2000, 2012, Oracle and/or its affiliates. All rights reserved.
Oracle is a registered trademark of Oracle Corporation and/or its
affiliates. Other names may be trademarks of their respective
owners.
Type 'help;' or '\h' for help. Type '\c' to clear the current input statement.
mysql> show slave status\G #可以查看slave的状态,因为slave没启动,所以为空
Empty set (0.00 sec)
#连接主服务器
mysql> change master to master_host='192.168.0.46',master_user='repluser',master_password='replpass',master_log_file='master-bin.000002',master_log_file_pos='340';
ERROR 1064 (42000): You have an error in your SQL syntax; check the manual that corresponds to your MySQL server version for the right syntax to use near 'master_log_file_pos='340'' at line 1
mysql>help change #查看帮助
Many help items for your request exist.
To make a more specific request, please type 'help <item>',
where <item> is one of the following
topics:
ALTER TABLE
CHANGE MASTER TO
mysql> help change master to
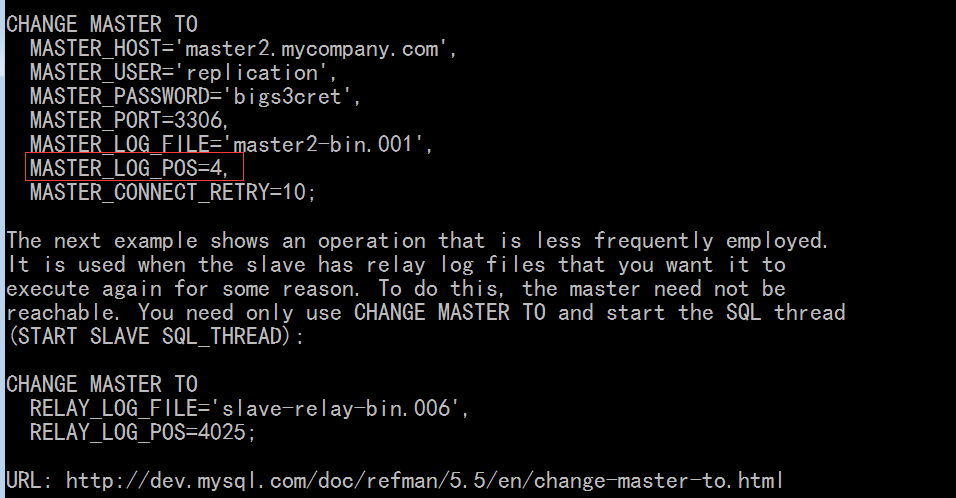
mysql> change master to master_host='192.168.0.46',master_user='repluser',master_password='replpass',master_log_file='master-bin.000002',master_log_pos=340;
Query OK, 0 rows affected (0.02 sec)
mysql>
mysql> show slave status\G #连上主服务器后,此时可以查看状态了 既可以读主的二进制日志,又可读从的中继日志
*************************** 1. row ***************************
Slave_IO_State:
Master_Host: 192.168.0.46 #主服务器ip
Master_User: repluser #主服务器用户
Master_Port: 3306
Connect_Retry: 60 #连不上去,多长时间重试一次
Master_Log_File: master-bin.000002 #当前读取的二进制日志文件
Read_Master_Log_Pos: 340 #读到的位置340
Relay_Log_File: relay-log.000001 #当前从服务器中继日志,与主的二进制日志未必统一,将来在从服务器备份的时候,应该记的是主服务器的二进制日志的文件及位置,,,,,因为将来是拿主服务器的二进制日志来做即时点还原的
Relay_Log_Pos: 4
Relay_Master_Log_File: master-bin.000002 #中继的Master Log File的文件名与 Master_Log_File是一致的
#排错的时候,看下面这两项 下面这两项为Yes,从服务器才能算正常
Slave_IO_Running: No # Slave 上面的 IO thread 没有运行
Slave_SQL_Running: No #Slave 上面的 SQL thread 没有运行
#下面几个做复制过滤的
Replicate_Do_DB:
Replicate_Ignore_DB:
Replicate_Do_Table:
Replicate_Ignore_Table:
Replicate_Wild_Do_Table:
Replicate_Wild_Ignore_Table:
Last_Errno: 0
Last_Error: #上一次的错误
Skip_Counter: 0 #跳过了几个
Exec_Master_Log_Pos: 340 #执行到了340,,上面读可能速度快,但是本地执行可能速度慢
Relay_Log_Space: 107 #Relay_Log的空间
Until_Condition: None
Until_Log_File:
Until_Log_Pos: 0
Master_SSL_Allowed: No #master主从复制上不允许使用ssl
Master_SSL_CA_File:
Master_SSL_CA_Path:
Master_SSL_Cert:
Master_SSL_Cipher:
Master_SSL_Key:
Seconds_Behind_Master: NULL #从服务器比主服务器慢,,可能慢n个事件,这里没有显示
Master_SSL_Verify_Server_Cert: No
#下面几行是从服务器本地线程运行的错误信息
Last_IO_Errno: 0
Last_IO_Error: #
Last_SQL_Errno: 0
Last_SQL_Error: #
Replicate_Ignore_Server_Ids:
Master_Server_Id: 0
1 row in set (0.00 sec)
#启动从服务器的两个服务 ,( start slave io_thread 只启动io线程)( start slave sql_thread 只启动sql线程)
mysql> start slave;
Query OK, 0 rows affected (0.00 sec)
mysql> show slave status\G
*************************** 1. row ***************************
Slave_IO_State: Waiting for master to send event
Master_Host: 192.168.0.46
Master_User: repluser
Master_Port: 3306
Connect_Retry: 60
Master_Log_File: master-bin.000002
Read_Master_Log_Pos: 340
Relay_Log_File: relay-log.000002
Relay_Log_Pos: 254
Relay_Master_Log_File: master-bin.000002
Slave_IO_Running: Yes # io线程运行起来了
Slave_SQL_Running: Yes # sql线程运行起来了
Replicate_Do_DB:
Replicate_Ignore_DB:
Replicate_Do_Table:
Replicate_Ignore_Table:
Replicate_Wild_Do_Table:
Replicate_Wild_Ignore_Table:
Last_Errno: 0
Last_Error:
Skip_Counter: 0
Exec_Master_Log_Pos: 340
Relay_Log_Space: 404
Until_Condition: None
Until_Log_File:
Until_Log_Pos: 0
Master_SSL_Allowed: No
Master_SSL_CA_File:
Master_SSL_CA_Path:
Master_SSL_Cert:
Master_SSL_Cipher:
Master_SSL_Key:
Seconds_Behind_Master: 0
Master_SSL_Verify_Server_Cert: No
Last_IO_Errno: 0
Last_IO_Error:
Last_SQL_Errno: 0
Last_SQL_Error:
Replicate_Ignore_Server_Ids:
Master_Server_Id: 1
1 row in set (0.00 sec)
mysql>
在第一个节点node1 192.168.0.46 上 主服务器
mysql> show databases;
+--------------------+
| Database |
+--------------------+
| information_schema |
| mysql |
| performance_schema |
| test |
+--------------------+
4 rows in set (0.02 sec)
mysql>
mysql> CREATE database magedudb;
Query OK, 1 row affected (0.00 sec)
mysql>
在第二个节点node2 192.168.0.56 上 从服务器
mysql> show slave status\G
*************************** 1. row ***************************
Slave_IO_State: Waiting for master to send event
Master_Host: 192.168.0.46
Master_User: repluser
Master_Port: 3306
Connect_Retry: 60
Master_Log_File: master-bin.000002
Read_Master_Log_Pos: 431 #这里这时主日志位置改了为431
Relay_Log_File: relay-log.000002
Relay_Log_Pos: 345
Relay_Master_Log_File: master-bin.000002
Slave_IO_Running: Yes
Slave_SQL_Running: Yes
Replicate_Do_DB:
Replicate_Ignore_DB:
Replicate_Do_Table:
Replicate_Ignore_Table:
Replicate_Wild_Do_Table:
Replicate_Wild_Ignore_Table:
Last_Errno: 0
Last_Error:
Skip_Counter: 0
Exec_Master_Log_Pos: 431 #执行到 431 这一步了,比上一次数字大(上一次是360),说明事件已经复制过来,在本地应用了,意味着本地有这个数据库了
Relay_Log_Space: 495
Until_Condition: None
Until_Log_File:
Until_Log_Pos: 0
Master_SSL_Allowed: No
Master_SSL_CA_File:
Master_SSL_CA_Path:
Master_SSL_Cert:
Master_SSL_Cipher:
Master_SSL_Key:
Seconds_Behind_Master: 0
Master_SSL_Verify_Server_Cert: No
Last_IO_Errno: 0
Last_IO_Error:
Last_SQL_Errno: 0
Last_SQL_Error:
Replicate_Ignore_Server_Ids:
Master_Server_Id: 1
1 row in set (0.00 sec)
mysql> show databases;
+--------------------+
| Database |
+--------------------+
| information_schema |
| magedudb | #本地有这个数据库了
| mysql |
| performance_schema |
| test |
+--------------------+
5 rows in set (0.00 sec)
mysql>
从服务器上创建一个数据库,在主服务器上是不会有的,所以从服务器上一定不能允许写操作的,
如何让它不能写操作?打开一个线程连接,执行 flush tables with read lock,刷新所有表并且读锁定,,,,,,这并不影响sql thread往里面写数据,但是其它用户就不能写数据了,,,,,,这种方法不理想,每次打开一个连接,手动锁定,很麻烦
mysql> show global variables like 'read%';
+----------------------+---------+
| Variable_name | Value |
+----------------------+---------+
| read_buffer_size | 1048576 |
| read_only | OFF | #只读 关闭,,改为ON就可以让数据库不能写了 (只有管理员才有权限改全局变量,改当前用户,当前会话与其它用户是没有关系的,其它用户连进来,照样能写,想全局禁止,只有改global的,此时只有管理员才有权限)(这里改,从服务器重启后就失效了,,所以只能改配置文件了)
| read_rnd_buffer_size | 4194304 |
+----------------------+---------+
3 rows in set (0.00 sec)
mysql>
[root@node2 mysql]# vim /etc/my.cnf #修改配置文件
........................................................................
[mysqld] #在这个下面
........................................................................
relay-log = relay-log
relay-log-index = relay-log.index
read-only = ON #加上这一行 (这里read_only 下划线,中短横都行, ON,YES,1,TRUE都可以)
[root@node2 mysql]# service mysqld restart # 重启生效
Shutting down MySQL. [确定]
Starting MySQL.. [确定]
[root@node2 mysql]#
[root@node2 mysql]# mysql
Welcome to the MySQL monitor. Commands end with ; or \g.
Your MySQL connection id is 3
Server version: 5.5.28 MySQL Community Server (GPL)
Copyright (c) 2000, 2012, Oracle and/or its affiliates. All rights reserved.
Oracle is a registered trademark of Oracle Corporation and/or its
affiliates. Other names may be trademarks of their respective
owners.
Type 'help;' or '\h' for help. Type '\c' to clear the current input statement.
mysql> show global variables like 'read_only%'
-> ;
+---------------+-------+
| Variable_name | Value |
+---------------+-------+
| read_only | ON | # 这是是ON了
+---------------+-------+
1 row in set (0.00 sec)
mysql>
mysql> show slave status\G
*************************** 1. row ***************************
Slave_IO_State: Waiting for master to send event
Master_Host: 192.168.0.46
Master_User: repluser
Master_Port: 3306
Connect_Retry: 60
Master_Log_File: master-bin.000002
Read_Master_Log_Pos: 431
Relay_Log_File: relay-log.000004
Relay_Log_Pos: 254
Relay_Master_Log_File: master-bin.000002
Slave_IO_Running: Yes #它启动了 当使用 change master to 之后,就算重启了mysql服务器,复制线程 (这两个线程)也会自动启动的 连主服务器是需要帐号密码的,重启后自动连的时候,如何知道的?
Slave_SQL_Running: Yes #它启动了
Replicate_Do_DB:
Replicate_Ignore_DB:
Replicate_Do_Table:
Replicate_Ignore_Table:
Replicate_Wild_Do_Table:
Replicate_Wild_Ignore_Table:
Last_Errno: 0
Last_Error:
Skip_Counter: 0
Exec_Master_Log_Pos: 431
Relay_Log_Space: 404
Until_Condition: None
Until_Log_File:
Until_Log_Pos: 0
Master_SSL_Allowed: No
Master_SSL_CA_File:
Master_SSL_CA_Path:
Master_SSL_Cert:
Master_SSL_Cipher:
Master_SSL_Key:
Seconds_Behind_Master: 0
Master_SSL_Verify_Server_Cert: No
Last_IO_Errno: 0
Last_IO_Error:
Last_SQL_Errno: 0
Last_SQL_Error:
Replicate_Ignore_Server_Ids:
Master_Server_Id: 1
1 row in set (0.00 sec)
mysql>
[root@node2 mysql]# cd /mydata/data/
[root@node2 data]# ls
ibdata1 master-bin.000001 mysql relay-log.000003 test
ib_logfile0 master-bin.000002 node2.magedu.com.err relay-log.000004
ib_logfile1 master-bin.index node2.magedu.com.pid relay-log.index
magedudb master.info performance_schema relay-log.info
[root@node2 data]#
[root@node2 data]# file master.info
master.info: ASCII text
[root@node2 data]#
[root@node2 data]# cat master.info #每一次更新了相关信息之后
18
master-bin.000002 #现在读的文件
431 #现在读的文件的位置
192.168.0.46 #主服务器
repluser #帐号
replpass #密码
3306 #端口号
60 #重试时间
0
0
1800.000
0
[root@node2 data]#
[root@node2 data]# ll
总计 29888
-rw-rw---- 1 mysql mysql 18874368 03-13 15:39 ibdata1
-rw-rw---- 1 mysql mysql 5242880 03-13 15:39 ib_logfile0
-rw-rw---- 1 mysql mysql 5242880 03-13 13:13 ib_logfile1
drwx------ 2 mysql mysql 4096 03-13 15:22 magedudb
-rw-rw---- 1 mysql mysql 27323 03-13 12:59 master-bin.000001
-rw-rw---- 1 mysql mysql 1038693 03-13 12:59 master-bin.000002
-rw-rw---- 1 mysql mysql 40 03-13 12:59 master-bin.index
-rw-rw---- 1 mysql mysql 85 03-13 15:39 master.info #允许mysql读写,其它用户没有访问权限
drwx------ 2 mysql root 4096 03-13 12:59 mysql
-rw-rw---- 1 mysql root 4861 03-13 15:39 node2.magedu.com.err
-rw-rw---- 1 mysql mysql 6 03-13 15:39 node2.magedu.com.pid
drwx------ 2 mysql mysql 4096 03-13 12:59 performance_schema
-rw-rw---- 1 mysql mysql 150 03-13 15:39 relay-log.000003
-rw-rw---- 1 mysql mysql 254 03-13 15:39 relay-log.000004
-rw-rw---- 1 mysql mysql 38 03-13 15:39 relay-log.index
-rw-rw---- 1 mysql mysql 45 03-13 15:39 relay-log.info
drwx------ 2 mysql root 4096 03-13 12:59 test
[root@node2 data]#
[root@node2 data]#
[root@node2 data]# file relay-log.info
relay-log.info: ASCII text
[root@node2 data]#
[root@node2 data]# cat relay-log.info
./relay-log.000004 #当前使用的 relay-log 文件
254 #当前使用的 relay-log 文件的事件位置
master-bin.000002 #正在读取的主服务器上的二进制日志文件
431 #正在读取的主服务器上的二进制日志文件的事件位置
[root@node2 data]#
结合maser-log.info 和 relay-log.info 来获取相关的信息,并决定下一次自动启动从服务器线程的时候,从什么地方启动,,读取哪一个主服务的二进制日志文件及位置,本地的中继日志文件是哪一个文件,以及位置
maser-log.info 和 relay-log.info是实现复制数据库的重要的基础和前提
read-only = YES,
在从服务器上设定,为了保持主从一致性,让从服务器不能写,,但对具有SUPER权限的用户没有限定,是不生效的,管理员照样能写,
主服务器上,某个事务已经提交了,二进制事件写到二进制日志文件里面去,二进制日志有缓冲区,(可能此时有些内容未写到二进制日志中去,万一此时,主服务器崩溃了),,,,从服务器不能得到相关的事件,不能将事务完整的结束(跟这个事务相关的某些操作没有复制过来,因为还未保存在主服务器的二进制日志文件中,所以从服务器的中继日志文件中也没有),,,,,,所以主服务器上完成的事务,从服务器上可能完成不了,,,,,,,,,,,如果让主服务器事务一提交,必须立即写到二进制日志文件里面去,别在缓冲区中作任何停留,这就降低了主从不一致的可能性了,
sync-binlog = ON
在主服务器上设定,用于事务安全
配置主服务器同步二进制日志
在第一个节点node1 192.168.0.46 上 主服务器
mysql> show global variables like '%log%';
+-----------------------------------------+-----------------------------------+
| Variable_name | Value |
+-----------------------------------------+-----------------------------------+
| back_log | 50 |
| binlog_cache_size | 32768 |
| binlog_direct_non_transactional_updates | OFF |
| binlog_format | MIXED |
| binlog_stmt_cache_size | 32768 |
| expire_logs_days | 0 |
| general_log | OFF |
| general_log_file | /mydata/data/node1.log |
| innodb_flush_log_at_trx_commit | 1 |
| innodb_locks_unsafe_for_binlog | OFF |
| innodb_log_buffer_size | 8388608 |
| innodb_log_file_size | 5242880 |
| innodb_log_files_in_group | 2 |
| innodb_log_group_home_dir | ./ |
| innodb_mirrored_log_groups | 1 |
| log | OFF |
| log_bin | ON |
| log_bin_trust_function_creators | OFF |
| log_error | /mydata/data/node1.magedu.com.err |
| log_output | FILE |
| log_queries_not_using_indexes | OFF |
| log_slave_updates | OFF |
| log_slow_queries | OFF |
| log_warnings | 1 |
| max_binlog_cache_size | 18446744073709547520 |
| max_binlog_size | 1073741824 |
| max_binlog_stmt_cache_size | 18446744073709547520 |
| max_relay_log_size | 0 |
| relay_log | |
| relay_log_index | |
| relay_log_info_file | relay-log.info |
| relay_log_purge | ON |
| relay_log_recovery | OFF |
| relay_log_space_limit | 0 |
| slow_query_log | OFF |
| slow_query_log_file | /mydata/data/node1-slow.log |
| sql_log_bin | ON |
| sql_log_off | OFF |
| sync_binlog | 0 | #是不是同步二进制日志的 在主从复制架构中,为了事务的安全,应该启用起来
| sync_relay_log | 0 |
| sync_relay_log_info | 0 |
+-----------------------------------------+-----------------------------------+
41 rows in set (0.00 sec)
mysql>
从服务器启动后,自动连接主服务获取数据的,万一从服务器崩溃了,下次一启动,会自动连接主服务器复制数据,而有些数据我们在主服务器上想跳过去的,因为我们主服务器上也错了,,,,所以此时我们不应该让从服务器重启自动复制数据
如下图,主服务器,不小心,删了表magedudb.tb1,我们赶紧停掉从服务器
然后准备启动从服务器把magedudb tb1表手动复制到主服务器.
假如从服务器启动,立马连上主服务器进行复制主服务器上的删除事件
也会把从服务器上的相应的表删除掉的,,,,,,,,,,,
所以一般我们不应该让从服务器上的复制线程自动启动的

在第二个节点 node2 192.168.0.56 上 从服务器
mysql> show global variables like '%slave%';
+---------------------------+------------+
| Variable_name | Value |
+---------------------------+------------+
| init_slave | |
| log_slave_updates | OFF |
| slave_compressed_protocol | OFF |
| slave_exec_mode | STRICT |
| slave_load_tmpdir | /tmp |
| slave_max_allowed_packet | 1073741824 |
| slave_net_timeout | 3600 |
| slave_skip_errors | OFF |
| slave_transaction_retries | 10 |
| slave_type_conversions | |
| sql_slave_skip_counter | 0 |
+---------------------------+------------+
11 rows in set (0.00 sec)
mysql>
mysql> show global variables like '%skip%';
+------------------------+-------+
| Variable_name | Value |
+------------------------+-------+
| skip_external_locking | ON |
| skip_name_resolve | OFF |
| skip_networking | OFF |
| skip_show_database | OFF |
| slave_skip_errors | OFF |
| sql_slave_skip_counter | 0 |
+------------------------+-------+
6 rows in set (0.00 sec)
mysql>
马哥也不清楚,有个 skip-slave-start 参数,这里为什么看不到了
在从服务器上
skip-slave-start=1
当然若不支持 skip-slave-start 这个变量了,有其它办法,让从服务器重启时不自动连主服务器,
把 从服务器mysqld 停止后 ,从服务器中的 master.info 和 relay-log.info 剪切一下,放到别处就可以了,,再启动从服务器的mysqld,(然后把magedudb.tb1复制到主服务器)再手动使用 change master to ,再手动指一遍就可以了(如果想彻底的,重新来定义mysql从服务器的话)
因为从服务器之所以开机自动启动两个线程(io线程,sql线程), 主要依赖于 master.info 和 relay-log.info
在第二个节点node2 192.168.0.56 上 从服务器
[root@node2 data]# pwd
/mydata/data
[root@node2 data]# ls
ibdata1 master-bin.000001 mysql relay-log.000003 test
ib_logfile0 master-bin.000002 node2.magedu.com.err relay-log.000004
ib_logfile1 master-bin.index node2.magedu.com.pid relay-log.index
magedudb master.info performance_schema relay-log.info
[root@node2 data]#
mysql> stop slave; #停掉从服务器的两个线程(io线程,sql线程),
Query OK, 0 rows affected (0.01 sec)
mysql>
mysql> show slave status\G
*************************** 1. row ***************************
Slave_IO_State:
Master_Host: 192.168.0.46
Master_User: repluser
Master_Port: 3306
Connect_Retry: 60
Master_Log_File: master-bin.000002
Read_Master_Log_Pos: 431
Relay_Log_File: relay-log.000004
Relay_Log_Pos: 254
Relay_Master_Log_File: master-bin.000002
Slave_IO_Running: No #为No了
Slave_SQL_Running: No #为No了
Replicate_Do_DB:
Replicate_Ignore_DB:
Replicate_Do_Table:
Replicate_Ignore_Table:
Replicate_Wild_Do_Table:
Replicate_Wild_Ignore_Table:
Last_Errno: 0
Last_Error:
Skip_Counter: 0
Exec_Master_Log_Pos: 431
Relay_Log_Space: 404
Until_Condition: None
Until_Log_File:
Until_Log_Pos: 0
Master_SSL_Allowed: No
Master_SSL_CA_File:
Master_SSL_CA_Path:
Master_SSL_Cert:
Master_SSL_Cipher:
Master_SSL_Key:
Seconds_Behind_Master: NULL
Master_SSL_Verify_Server_Cert: No
Last_IO_Errno: 0
Last_IO_Error:
Last_SQL_Errno: 0
Last_SQL_Error:
Replicate_Ignore_Server_Ids:
Master_Server_Id: 1
1 row in set (0.00 sec)
mysql>
mysql> start slave io_thread; #启动IO线程
Query OK, 0 rows affected (0.00 sec)
mysql>
mysql> show slave status\G
*************************** 1. row ***************************
Slave_IO_State: Waiting for master to send event
Master_Host: 192.168.0.46
Master_User: repluser
Master_Port: 3306
Connect_Retry: 60
Master_Log_File: master-bin.000002
Read_Master_Log_Pos: 431
Relay_Log_File: relay-log.000004
Relay_Log_Pos: 254
Relay_Master_Log_File: master-bin.000002
Slave_IO_Running: Yes #此时IO线程已经启动了
Slave_SQL_Running: No
Replicate_Do_DB:
Replicate_Ignore_DB:
Replicate_Do_Table:
Replicate_Ignore_Table:
Replicate_Wild_Do_Table:
Replicate_Wild_Ignore_Table:
Last_Errno: 0
Last_Error:
Skip_Counter: 0
Exec_Master_Log_Pos: 431
Relay_Log_Space: 701
Until_Condition: None
Until_Log_File:
Until_Log_Pos: 0
Master_SSL_Allowed: No
Master_SSL_CA_File:
Master_SSL_CA_Path:
Master_SSL_Cert:
Master_SSL_Cipher:
Master_SSL_Key:
Seconds_Behind_Master: NULL
Master_SSL_Verify_Server_Cert: No
Last_IO_Errno: 0
Last_IO_Error:
Last_SQL_Errno: 0
Last_SQL_Error:
Replicate_Ignore_Server_Ids:
Master_Server_Id: 1
1 row in set (0.00 sec)
mysql>
mysql> start slave sql_thread; #启动SQL线程
Query OK, 0 rows affected (0.00 sec)
mysql>
mysql> show slave status\G
*************************** 1. row **************************
Slave_IO_State: Waiting for master to send eve
Master_Host: 192.168.0.46
Master_User: repluser
Master_Port: 3306
Connect_Retry: 60
Master_Log_File: master-bin.000002
Read_Master_Log_Pos: 431
Relay_Log_File: relay-log.000005
Relay_Log_Pos: 254
Relay_Master_Log_File: master-bin.000002
Slave_IO_Running: Yes
Slave_SQL_Running: Yes #此时SQL线程已经启动了
Replicate_Do_DB:
Replicate_Ignore_DB:
Replicate_Do_Table:
Replicate_Ignore_Table:
Replicate_Wild_Do_Table:
Replicate_Wild_Ignore_Table:
Last_Errno: 0
Last_Error:
Skip_Counter: 0
Exec_Master_Log_Pos: 431
Relay_Log_Space: 551
Until_Condition: None
Until_Log_File:
Until_Log_Pos: 0
Master_SSL_Allowed: No
Master_SSL_CA_File:
Master_SSL_CA_Path:
Master_SSL_Cert:
Master_SSL_Cipher:
Master_SSL_Key:
Seconds_Behind_Master: 0
Master_SSL_Verify_Server_Cert: No
Last_IO_Errno: 0
Last_IO_Error:
Last_SQL_Errno: 0
Last_SQL_Error:
Replicate_Ignore_Server_Ids:
Master_Server_Id: 1
1 row in set (0.00 sec)
mysql>
mysql> stop slave io_thread; #停止io线程
Query OK, 0 rows affected (0.00 sec)
mysql>
mysql> show slave status\G
*************************** 1. row ***************************
Slave_IO_State:
Master_Host: 192.168.0.46
Master_User: repluser
Master_Port: 3306
Connect_Retry: 60
Master_Log_File: master-bin.000002
Read_Master_Log_Pos: 431
Relay_Log_File: relay-log.000005
Relay_Log_Pos: 254
Relay_Master_Log_File: master-bin.000002
Slave_IO_Running: No #IO线程已经停掉了
Slave_SQL_Running: Yes
Replicate_Do_DB:
Replicate_Ignore_DB:
Replicate_Do_Table:
Replicate_Ignore_Table:
Replicate_Wild_Do_Table:
Replicate_Wild_Ignore_Table:
Last_Errno: 0
Last_Error:
Skip_Counter: 0
Exec_Master_Log_Pos: 431
Relay_Log_Space: 551
Until_Condition: None
Until_Log_File:
Until_Log_Pos: 0
Master_SSL_Allowed: No
Master_SSL_CA_File:
Master_SSL_CA_Path:
Master_SSL_Cert:
Master_SSL_Cipher:
Master_SSL_Key:
Seconds_Behind_Master: NULL
Master_SSL_Verify_Server_Cert: No
Last_IO_Errno: 0
Last_IO_Error:
Last_SQL_Errno: 0
Last_SQL_Error:
Replicate_Ignore_Server_Ids:
Master_Server_Id: 1
1 row in set (0.00 sec)
mysql> start slave io_thread; #启动 io 线程
Query OK, 0 rows affected (0.00 sec)
mysql> show slave status\G
*************************** 1. row ***************************
Slave_IO_State: Waiting for master to send event
Master_Host: 192.168.0.46
Master_User: repluser
Master_Port: 3306
Connect_Retry: 60
Master_Log_File: master-bin.000002
Read_Master_Log_Pos: 431
Relay_Log_File: relay-log.000006
Relay_Log_Pos: 254
Relay_Master_Log_File: master-bin.000002
Slave_IO_Running: Yes #IO线程已经启动了
Slave_SQL_Running: Yes
Replicate_Do_DB:
Replicate_Ignore_DB:
Replicate_Do_Table:
Replicate_Ignore_Table:
Replicate_Wild_Do_Table:
Replicate_Wild_Ignore_Table:
Last_Errno: 0
Last_Error:
Skip_Counter: 0
Exec_Master_Log_Pos: 431
Relay_Log_Space: 551
Until_Condition: None
Until_Log_File:
Until_Log_Pos: 0
Master_SSL_Allowed: No
Master_SSL_CA_File:
Master_SSL_CA_Path:
Master_SSL_Cert:
Master_SSL_Cipher:
Master_SSL_Key:
Seconds_Behind_Master: 0
Master_SSL_Verify_Server_Cert: No
Last_IO_Errno: 0
Last_IO_Error:
Last_SQL_Errno: 0
Last_SQL_Error:
Replicate_Ignore_Server_Ids:
Master_Server_Id: 1
1 row in set (0.00 sec)
mysql>
往往有的时候我们只需要停止IO线程,再启动IO线程
跟从服务器相关的启动的内容都会保存在数据库服务当中数据目录下的错误日志当中,
[root@node2 data]# tail /mydata/data/node2.magedu.com.err
210313 16:37:17 [Note] Error reading relay log event: slave SQL thread was killed
210313 16:37:17 [ERROR] Error reading packet from server: Lost connection to MySQL server during query ( server_errno=2013)
210313 16:37:17 [Note] Slave I/O thread killed while reading event #杀死IO线程
210313 16:37:17 [Note] Slave I/O thread exiting, read up to log 'master-bin.000002', position 431
210313 16:39:29 [Note] Slave I/O thread: connected to master 'repluser@192.168.0.46:3306',replication started in log 'master-bin.000002' at position 431
210313 16:40:58 [Note] Slave SQL thread initialized, starting replication in log 'master-bin.000002' at position 431, relay log './relay-log.000004' position: 254 # IO 线程初始化,开始复制了
210313 16:42:35 [ERROR] Error reading packet from server: Lost connection to MySQL server during query ( server_errno=2013)
210313 16:42:35 [Note] Slave I/O thread killed while reading event
210313 16:42:35 [Note] Slave I/O thread exiting, read up to log 'master-bin.000002', position 431
210313 16:44:14 [Note] Slave I/O thread: connected to master 'repluser@192.168.0.46:3306',replication started in log 'master-bin.000002' at position 431
[root@node2 data]#
mysql支持半同步复制
在主服务器和从服务器上各自安装一个插件 google提供的,
设置半同步步骤:
在Master和Slave的mysql命令行运行如下代码:
# On Master
mysql> INSTALL PLUGIN rpl_semi_sync_master SONAME 'semisync_master.so'; #rpl_semi_sync_master是模块插件名 SONAME指的是so文件名 semisync_master.so是模块插件的文件名称
mysql> SET GLOBAL rpl_semi_sync_master_enabled = 1; #启用
mysql> SET GLOBAL rpl_semi_sync_master_timeout = 1000; #超时时间为1000毫秒,,1秒钟联系不到从服务器,就退出了,,,,( 1秒钟是不是有点短了 )
# On Slave
mysql> INSTALL PLUGIN rpl_semi_sync_slave SONAME 'semisync_slave.so';
mysql> SET GLOBAL rpl_semi_sync_slave_enabled = 1;
mysql> STOP SLAVE IO_THREAD; START SLAVE IO_THREAD;
在Master和Slave的my.cnf中编辑:
# On Master #里面的设置永久有效
[mysqld]
rpl_semi_sync_master_enabled=1
rpl_semi_sync_master_timeout=1000 # 1 second
# On Slave
[mysqld]
rpl_semi_sync_slave_enabled=1
# 也可通过设置全局变量的方式来设置,如下:
set global rpl_semi_sync_master_enabled=1
# 取消加载插件
mysql> UNINSTALL PLUGIN rpl_semi_sync_master;
==============================================
查看从服务器上的semi_sync是否开启:
mysql> SHOW GLOBAL STATUS LIKE 'rpl_semi%';
查看主服务器上的 rpl_semi_sync_master_enabled 是否开启,注意 Rpl_semi_sync_master_clients 变为1 ,证明主从半同步复制连接成功:
mysql> SHOW GLOBAL STATUS LIKE 'rpl_semi%';

在第二个节点node2 192.168.0.56 上 从服务器
[root@node2 data]# cd /usr/local/mysql
[root@node2 mysql]# ls
bin docs lib README sql-bench
COPYING include man scripts support-files
data INSTALL-BINARY mysql-test share
[root@node2 mysql]# cd lib/plugin/
[root@node2 plugin]# pwd
/usr/local/mysql/lib/plugin
[root@node2 plugin]# ls
adt_null.so auth_test_plugin.so libdaemon_example.so qa_auth_interface.so semisync_slave.so (半同步复制的插件,从服务器上的)
auth.so daemon_example.ini mypluglib.so qa_auth_server.so
auth_socket.so debug qa_auth_client.so semisync_master.so(半同步复制的插件,主服务器上的)
[root@node2 plugin]#
在第一个节点node1 192.168.0.46 上 主服务器
mysql> install plugin rpl_semi_sync_master soname 'semisync_master.so'; #安装成功 装半同步复制插件主模块
Query OK, 0 rows affected (0.02 sec)
mysql> show global variables like '%rpl%';
+------------------------------------+-------+
| Variable_name | Value |
+------------------------------------+-------+
| rpl_recovery_rank | 0 |
| rpl_semi_sync_master_enabled | OFF | # 未启用半同步复制的主节点
| rpl_semi_sync_master_timeout | 10000 | # 超时时间 10000毫秒 (从服务器一直不响应,主服务器不可能一直等着) 10秒钟其实有点长了
| rpl_semi_sync_master_trace_level | 32 | #追踪级别
| rpl_semi_sync_master_wait_no_slave | ON | #没有slave的时候,要等待,非要等待一个slave上来
+------------------------------------+-------+
5 rows in set (0.00 sec)
mysql>
在第二个节点node2 192.168.0.56 上 从服务器
mysql> install plugin rpl_semi_sync_slave soname 'semisync_slave.so'; #安装成功 装半同步复制插件从模块
Query OK, 0 rows affected (0.02 sec)
mysql>
mysql> show variables like '%rpl%'; #写不写global 没关系
+---------------------------------+-------+
| Variable_name | Value |
+---------------------------------+-------+
| rpl_recovery_rank | 0 |
| rpl_semi_sync_slave_enabled | OFF | #没有启动从服务器半同步复制模块
| rpl_semi_sync_slave_trace_level | 32 |
+---------------------------------+-------+
3 rows in set (0.00 sec)
mysql> show global variables like '%rpl%';
+---------------------------------+-------+
| Variable_name | Value |
+---------------------------------+-------+
| rpl_recovery_rank | 0 |
| rpl_semi_sync_slave_enabled | OFF |
| rpl_semi_sync_slave_trace_level | 32 |
+---------------------------------+-------+
3 rows in set (0.00 sec)
先启动主的 半同步复制模块
在第一个节点node1 192.168.0.46 上 主服务器
mysql> set global rpl_semi_sync_master_enabled=1; #主服务器上启动半同步复制模块
Query OK, 0 rows affected (0.00 sec)
mysql> show global variables like '%rpl%';
+------------------------------------+-------+
| Variable_name | Value |
+------------------------------------+-------+
| rpl_recovery_rank | 0 |
| rpl_semi_sync_master_enabled | ON | # 启用了
| rpl_semi_sync_master_timeout | 10000 | #这个10秒就不改了
| rpl_semi_sync_master_trace_level | 32 |
| rpl_semi_sync_master_wait_no_slave | ON |
+------------------------------------+-------+
5 rows in set (0.00 sec)
mysql>
在第二个节点node2 192.168.0.56 上 从服务器
mysql> set global rpl_semi_sync_slave_enabled=1; #从服务器上启动半同步复制模块
Query OK, 0 rows affected (0.00 sec)
mysql> show global variables like '%rpl%';
+---------------------------------+-------+
| Variable_name | Value |
+---------------------------------+-------+
| rpl_recovery_rank | 0 |
| rpl_semi_sync_slave_enabled | ON | # 为ON了
| rpl_semi_sync_slave_trace_level | 32 |
+---------------------------------+-------+
3 rows in set (0.00 sec)
mysql>
在第一个节点node1 192.168.0.46 上 主服务器
mysql> show global status like 'rpl%';
+--------------------------------------------+---------
| Variable_name | Value
+--------------------------------------------+---------
| Rpl_semi_sync_master_clients | 0 #半同步客户端是0个,说明半同步复制功能未启用,是把从服务器线程关掉,再连下才能生效的
| Rpl_semi_sync_master_net_avg_wait_time | 0
| Rpl_semi_sync_master_net_wait_time | 0
| Rpl_semi_sync_master_net_waits | 0
| Rpl_semi_sync_master_no_times | 0
| Rpl_semi_sync_master_no_tx | 0
| Rpl_semi_sync_master_status | ON
| Rpl_semi_sync_master_timefunc_failures | 0
| Rpl_semi_sync_master_tx_avg_wait_time | 0
| Rpl_semi_sync_master_tx_wait_time | 0
| Rpl_semi_sync_master_tx_waits | 0
| Rpl_semi_sync_master_wait_pos_backtraverse | 0
| Rpl_semi_sync_master_wait_sessions | 0
| Rpl_semi_sync_master_yes_tx | 0
| Rpl_status | AUTH_MAS
+--------------------------------------------+---------
15 rows in set (0.00 sec)
mysql>
在第二个节点node2 192.168.0.56 上 从服务器
mysql> stop slave io_thread; #只需停止io_thread,再启动就行了
Query OK, 0 rows affected (0.00 sec)
mysql> start slave io_thread;
Query OK, 0 rows affected (0.00 sec)
mysql>
在第一个节点node1 192.168.0.46 上 主服务器
mysql> show global status like '%rpl%';
+--------------------------------------------+-------------+
| Variable_name | Value |
+--------------------------------------------+-------------+
| Rpl_semi_sync_master_clients | 1 | #此时为1了,说明已经启用了半同步复制功能了
| Rpl_semi_sync_master_net_avg_wait_time | 0 |
| Rpl_semi_sync_master_net_wait_time | 0 |
| Rpl_semi_sync_master_net_waits | 0 |
| Rpl_semi_sync_master_no_times | 0 |
| Rpl_semi_sync_master_no_tx | 0 |
| Rpl_semi_sync_master_status | ON |
| Rpl_semi_sync_master_timefunc_failures | 0 |
| Rpl_semi_sync_master_tx_avg_wait_time | 0 |
| Rpl_semi_sync_master_tx_wait_time | 0 |
| Rpl_semi_sync_master_tx_waits | 0 |
| Rpl_semi_sync_master_wait_pos_backtraverse | 0 |
| Rpl_semi_sync_master_wait_sessions | 0 |
| Rpl_semi_sync_master_yes_tx | 0 |
| Rpl_status | AUTH_MASTER |
+--------------------------------------------+-------------+
15 rows in set (0.00 sec)
mysql>
我们需要经常观察主服务器或从服务器状态变量里面的半同步相关的内容,一旦超时,我们的服务器不联系的话,会自动降级为半同步的????感觉应该为异步????,,,把从服务器关掉,,在主服务器上创建一个数据库(或数据表的话),可能会卡10秒钟的(设定为10秒的话),
在第一个节点node1 192.168.0.46 上 主服务器
mysql> use magedudb;
Database changed
mysql> create table tb1(id int); #创建表,时间很长,为0.12秒(因为半同步要依赖网络通信才能结束的),如果是异步模式的话,表应该瞬间创建完成
Query OK, 0 rows affected (0.12 sec)
mysql>
在第二个节点node2 192.168.0.56 上 从服务器
mysql> stop slave io_thread; #停掉从服务器的io线程
Query OK, 0 rows affected (0.01 sec)
mysql>
在第一个节点node1 192.168.0.46 上 主服务器
mysql> create table tb2 (id int); #卡住了 因为定义的10秒,所以等了10秒
Query OK, 0 rows affected (10.01 sec)
mysql> show global status like '%rpl%';
+--------------------------------------------+-------------+
| Variable_name | Value |
+--------------------------------------------+-------------+
| Rpl_semi_sync_master_clients | 1 | #clients为1,没错
| Rpl_semi_sync_master_net_avg_wait_time | 299 | #主服务器网络等待的平均时间
| Rpl_semi_sync_master_net_wait_time | 599 | #主服务器网络等待的这一次的时间
| Rpl_semi_sync_master_net_waits | 2 | #主服务器网络等待了几次,因为两次复制等待了2次???
| Rpl_semi_sync_master_no_times | 1 |
| Rpl_semi_sync_master_no_tx | 1 |
| Rpl_semi_sync_master_status | OFF |
| Rpl_semi_sync_master_timefunc_failures | 0 |
| Rpl_semi_sync_master_tx_avg_wait_time | 618 |
| Rpl_semi_sync_master_tx_wait_time | 618 |
| Rpl_semi_sync_master_tx_waits | 1 |
| Rpl_semi_sync_master_wait_pos_backtraverse | 0 |
| Rpl_semi_sync_master_wait_sessions | 0 |
| Rpl_semi_sync_master_yes_tx | 1 |
| Rpl_status | AUTH_MASTER |
+--------------------------------------------+-------------+
15 rows in set (0.02 sec)
mysql> show global status like '%rpl%'; #过一段时间,再执行一次, 一般来讲,等待一段时间超时以后,它会自动降级为半同步的???感觉是异步吧
+--------------------------------------------+-------------+
| Variable_name | Value |
+--------------------------------------------+-------------+
| Rpl_semi_sync_master_clients | 1 |
| Rpl_semi_sync_master_net_avg_wait_time | 299 |
| Rpl_semi_sync_master_net_wait_time | 599 |
| Rpl_semi_sync_master_net_waits | 2 |
| Rpl_semi_sync_master_no_times | 1 |
| Rpl_semi_sync_master_no_tx | 1 |
| Rpl_semi_sync_master_status | OFF |
| Rpl_semi_sync_master_timefunc_failures | 0 |
| Rpl_semi_sync_master_tx_avg_wait_time | 618 |
| Rpl_semi_sync_master_tx_wait_time | 618 |
| Rpl_semi_sync_master_tx_waits | 1 |
| Rpl_semi_sync_master_wait_pos_backtraverse | 0 |
| Rpl_semi_sync_master_wait_sessions | 0 |
| Rpl_semi_sync_master_yes_tx | 1 |
| Rpl_status | AUTH_MASTER |
+--------------------------------------------+-------------+
15 rows in set (0.00 sec)
mysql> create table tb3 (id int); #现在为 0.01秒,很快,所以一旦有一次超时,从服务器连不上,会自动降级为异步,
Query OK, 0 rows affected (0.01 sec)
mysql>
在第二个节点node2 192.168.0.56 上 从服务器
mysql> start slave io_thread; #重新启动一下io线程,,,,,,,它会重新跟上去同步的,
Query OK, 0 rows affected (0.00 sec)
mysql> show slave status\G
*************************** 1. row ***************************
Slave_IO_State: Waiting for master to send event
Master_Host: 192.168.0.46
Master_User: repluser
Master_Port: 3306
Connect_Retry: 60
Master_Log_File: master-bin.000002
Read_Master_Log_Pos: 706 #当前复制的起点位置,这里可能显示的并不准确,因为如果没有读到信息,可能比主服务器落后???,,,,,,,不能观察这个认为它是不是落后?????应该是不是半同步吧,,,,,,,,,,,,
Relay_Log_File: relay-log.000008
Relay_Log_Pos: 438
Relay_Master_Log_File: master-bin.000002
Slave_IO_Running: Yes
Slave_SQL_Running: Yes
Replicate_Do_DB:
Replicate_Ignore_DB:
Replicate_Do_Table:
Replicate_Ignore_Table:
Replicate_Wild_Do_Table:
Replicate_Wild_Ignore_Table:
Last_Errno: 0
Last_Error:
Skip_Counter: 0
Exec_Master_Log_Pos: 706
Relay_Log_Space: 826
Until_Condition: None
Until_Log_File:
Until_Log_Pos: 0
Master_SSL_Allowed: No
Master_SSL_CA_File:
Master_SSL_CA_Path:
Master_SSL_Cert:
Master_SSL_Cipher:
Master_SSL_Key:
Seconds_Behind_Master: 0 #比主服务器慢了多少秒
Master_SSL_Verify_Server_Cert: No
Last_IO_Errno: 0
Last_IO_Error:
Last_SQL_Errno: 0
Last_SQL_Error:
Replicate_Ignore_Server_Ids:
Master_Server_Id: 1
1 row in set (0.00 sec)
mysql>
在第一个节点node1 192.168.0.46 上 主服务器
mysql> show master status\G
*************************** 1. row ***************************
File: master-bin.000002
Position: 706 #这里位置也是 706
Binlog_Do_DB:
Binlog_Ignore_DB:
1 row in set (0.00 sec)
mysql>
在第二个节点 node2 192.168.0.56 上 从服务器
怎么知道从服务器是不是落后,主从同步的配置是很繁杂的,所以percona给我们提供了一些工具,专门用来实理管理主从复制的
比如看看从服务器是不是比主服务器慢等相关情况的,
percona-tools,,早期叫 mattkit-tools,是一个叫mattkit的人研发的,后来这个项目被贡献给了 percona组织,所以改名叫 percona-tools ,,,,早期命令叫 mk-开头的命令,比如 mk-slave......mk-replication.现在以pt-开头了,
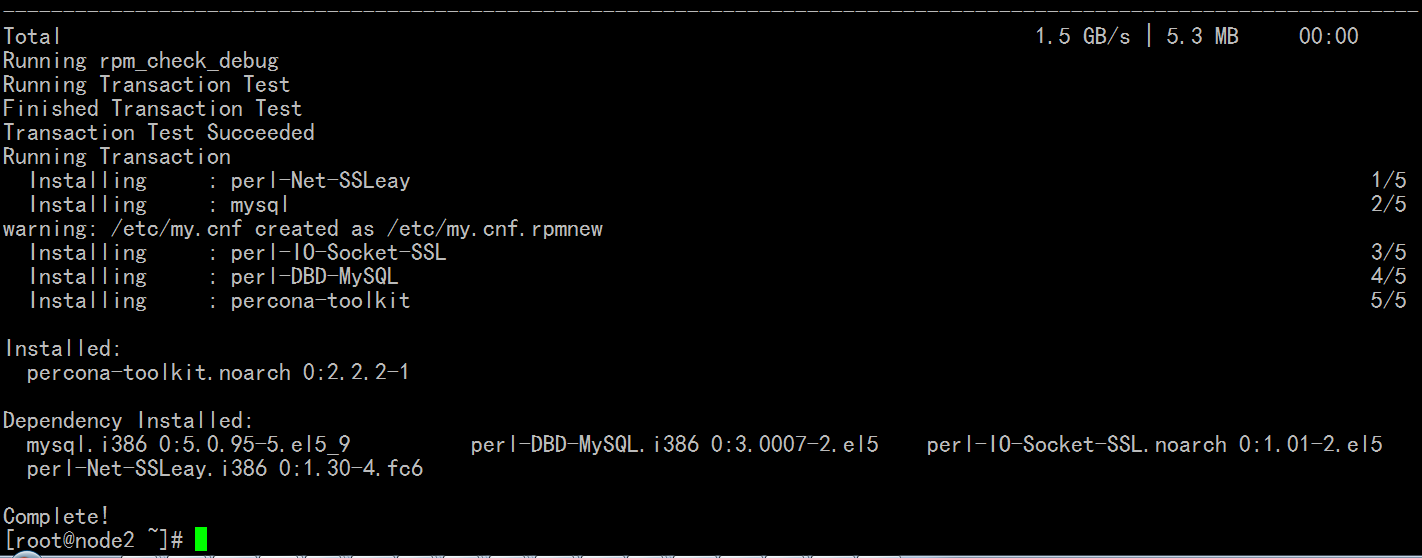
noarch 表示不分平台的,没有架构的,32位,64位都可以同时用,,一般的这种包依赖于mysql库,依赖于rpm格式的mysql库,所以使用 rpm 来安装 percona-tools 可能会报错,因为我们安装的mysql不是 rpm 包格式提供的,库导给它也不行,percona-tools依赖的是几个perl模块,所以percona-tools是一堆的perl脚本,这就是为什么它是noarch的原因,,,通过yum 安装 percona-tools,它把mysql客户端(rpm格式的)也装上去了,不过没关系,跟我们用的并不冲突
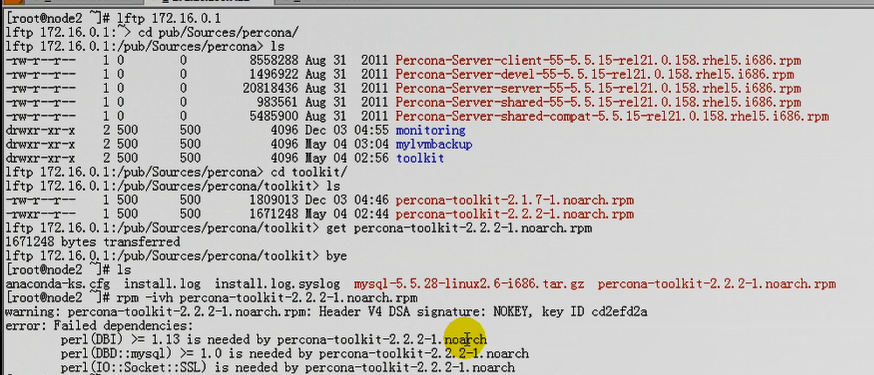
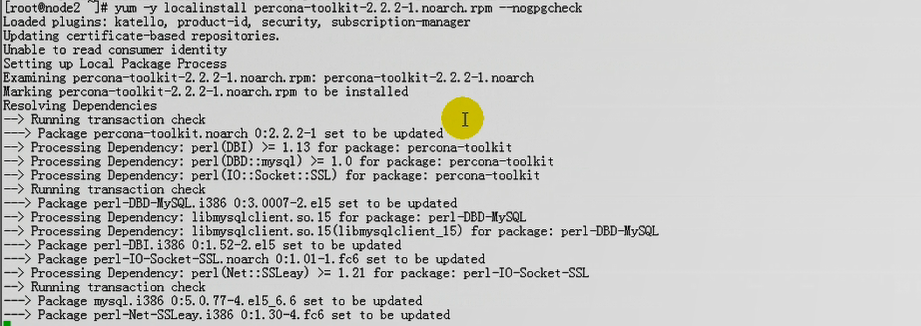
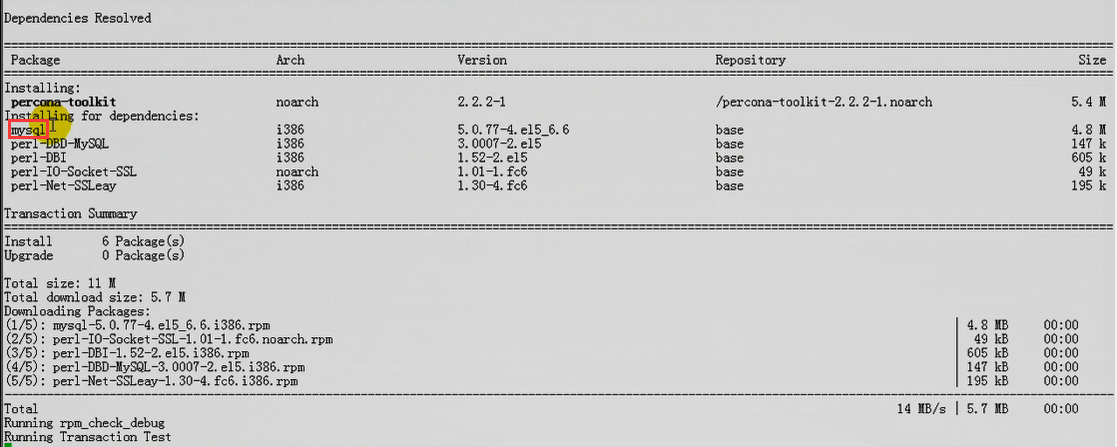
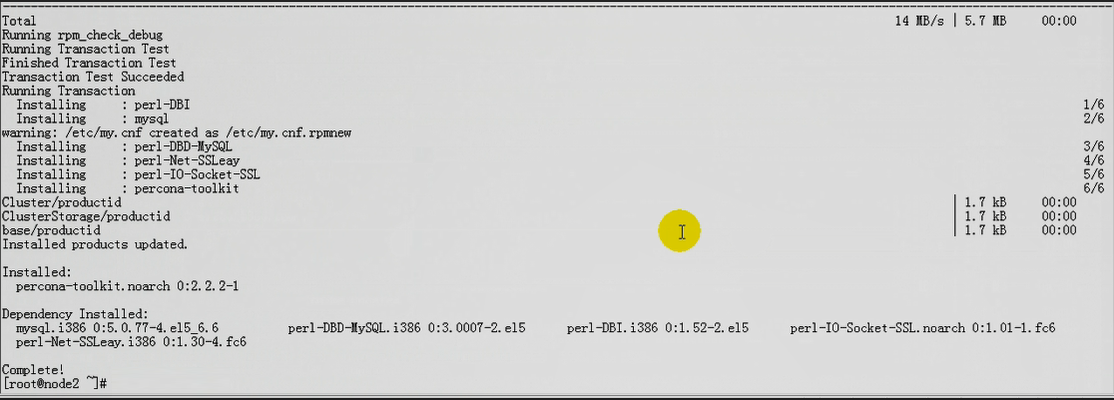
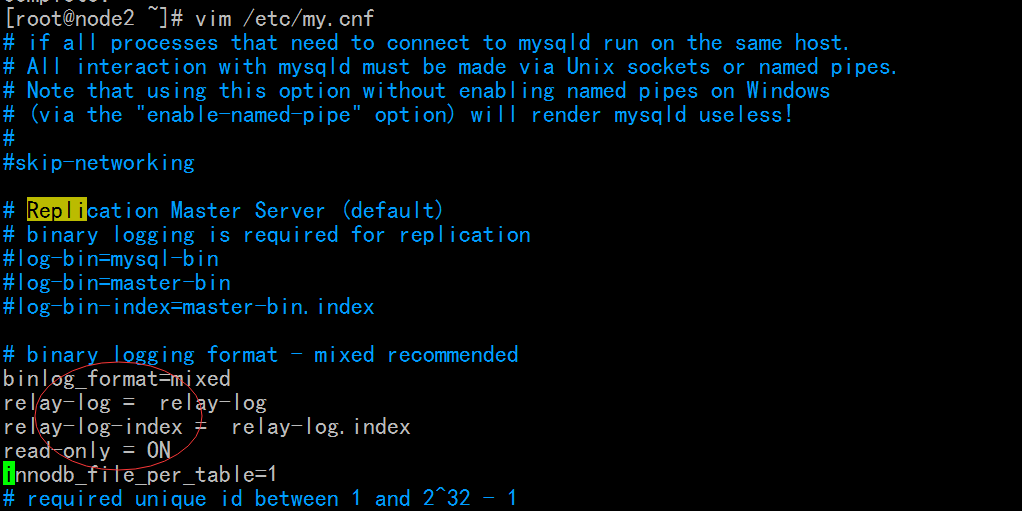
(percona-tools依赖于rpm的mysql客户端)这个mysql客户端装上去以后,也会创建 /etc/my.cnf文件的,,确保 我们以前的/etc/my.cnf没有被修改
在第二个节点node2 192.168.0.56 上 从服务器
在 https://www.percona.com/downloads/percona-toolkit/LATEST/ 我找 percona-toolkit-2.2.2-1.noarch.rpm
[root@node2 ~]# wget https://downloads.percona.com/downloads/percona-toolkit/2.2.2/RPM/percona-toolkit-2.2.2-1.noarch.rpm --secure-protocol=tlsv1
--2021-03-15 14:29:16-- https://downloads.percona.com/downloads/percona-toolkit/2.2.2/RPM/percona-toolkit-2.2.2-1.noarch.rpm
正在解析主机 downloads.percona.com... 74.121.199.235
Connecting to downloads.percona.com|74.121.199.235|:443... 已连接。
OpenSSL: error:1409442E:SSL routines:SSL3_READ_BYTES:tlsv1 alert protocol version
无法建立 SSL 连接。
[root@node2 ~]#
既然报错 ,我把这个文件下载移到我的任意一个网站里,然后
[root@node2 ~]# wget http://www.aaaaa.cn/percona-toolkit-2.2.2-1.noarch.rpm 这个文件
[root@node2 ~]# rpm -ivh percona-toolkit-2.2.2-1.noarch.rpm #无法安装
warning: percona-toolkit-2.2.2-1.noarch.rpm: Header V4 DSA signature: NOKEY, key ID cd2efd2a
error: Failed dependencies:
perl(DBD::mysql) >= 1.0 is needed by percona-toolkit-2.2.2-1.noarch
perl(IO::Socket::SSL) is needed by percona-toolkit-2.2.2-1.noarch
[root@node2 ~]#
[root@node2 ~]# yum -y --nogpgcheck localinstall percona-toolkit-2.2.2-1.noarch.rpm
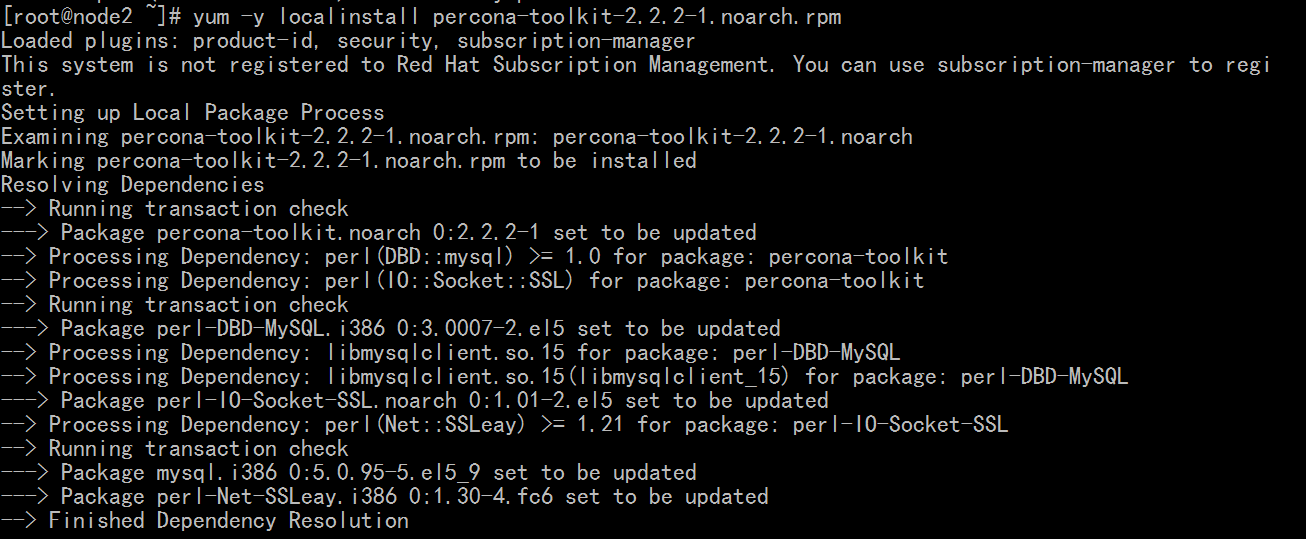
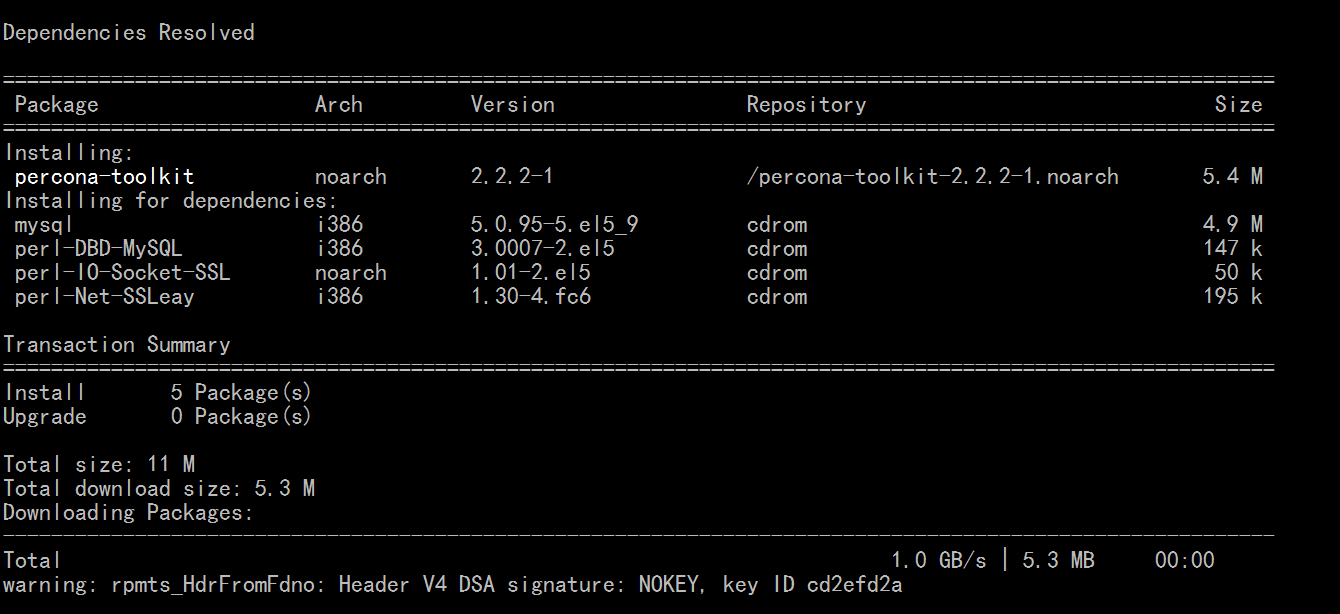
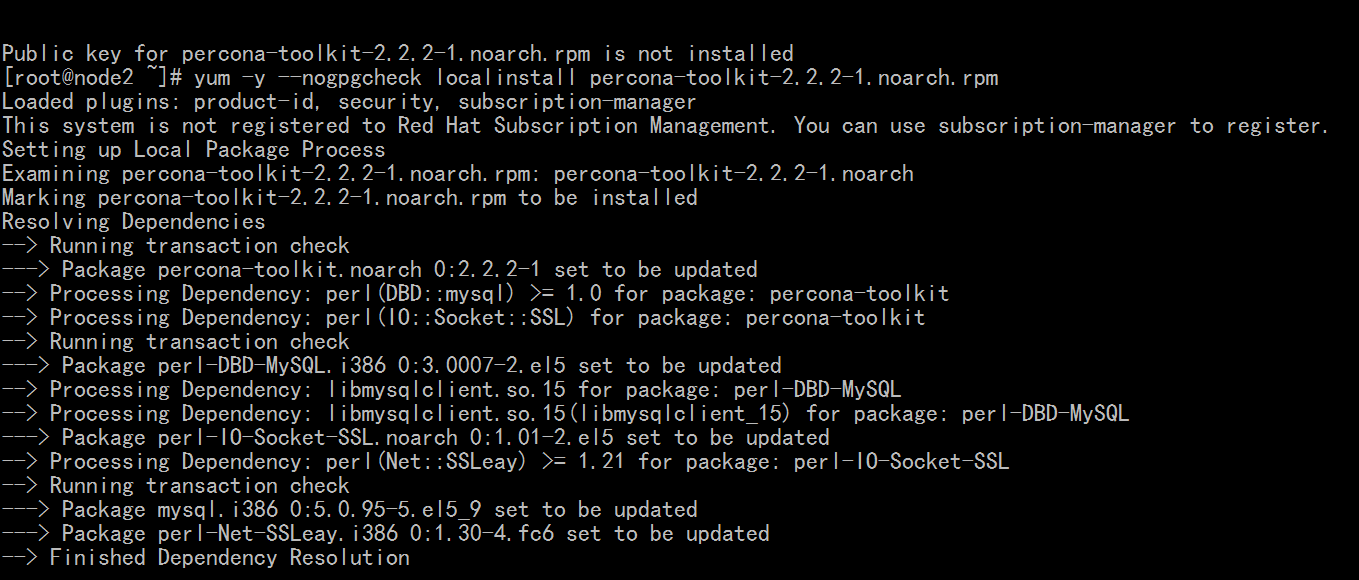

[root@node2 ~]# vim /etc/my.cnf #确保装了percona-tools后自动依赖安装的mysql没有改我们的配置文件
在第二个节点node2 192.168.0.56 上 从服务器
[root@node2 ~]# pt #我们看 pt开头的命令
pt-align pt-fk-error-logger pt-query-digest pt-table-sync
pt-archiver pt-heartbeat pt-show-grants pt-table-usage
pt-config-diff pt-index-usage pt-sift pt-upgrade
pt-deadlock-logger pt-ioprofile pt-slave-delay pt-variable-advisor
pt-diskstats pt-kill pt-slave-find pt-visual-explain
pt-duplicate-key-checker pt-mext pt-slave-restart ptx
pt-fifo-split pt-mysql-summary pt-stalk
pt-find pt-online-schema-change pt-summary
pt-fingerprint pt-pmp pt-table-checksum
[root@node2 ~]# pt
[root@node2 ~]# pt-slave-delay -h # delay 表示延迟,专门让从服务器比主服务器慢一点时间的,可以指定慢多长时间,这样子,在主服务器上执行了一些误操作,从服务器上不会立即得到的,,,,,但是我们不能依赖于它吧
Option h requires an argument
Usage: pt-slave-delay [OPTIONS] SLAVE_DSN [MASTER_DSN]
Errors in command-line arguments:
* Error parsing options
* Missing or invalid slave host
pt-slave-delay starts and stops a slave server as needed to make it lag behind
the master. The SLAVE_DSN and MASTER_DSN use DSN syntax, and values are copied
from the SLAVE_DSN to the MASTER_DSN if omitted. For more details, please use
the --help option, or try 'perldoc /usr/bin/pt-slave-delay' for complete
documentation.
[root@node2 ~]#
pt-summary #搜集一下当前服务器的cpu类型,内存大小等信息
pt-diskstats #显示一下磁盘IO的相关统计数据的
pt-index-usage #显示一下当前的索引使用情况的
pt-visual-explain #可视化explain的,后面讲到查询分析的时候,会用到这个工具
pt-table-checksum #这是跟复制相关的,
[root@node2 ~]# pt-table-checksum --help #检查的时候,应该指定检查哪张表
pt-table-checksum performs an online replication consistency check by executing
#(执行一个在线的复制一性检查) 它能够在从服务器上检查从服务器的表与主服务器的表,两个数据是否一致的
#(使用单向加密算法,只要两个数据一样,结果也就一样了)(如果主从服务器两边数据不一样,checksum校验码也会不一样)
checksum queries on the master, which produces different results on replicas
that are inconsistent with the master. The optional DSN specifies the master
host. The tool's exit status is nonzero if any differences are found, or if any
warnings or errors occur. For more details, please use the --help option, or
try 'perldoc /usr/bin/pt-table-checksum' for complete documentation.
Usage: pt-table-checksum [OPTIONS] [DSN] # [DSN] 指定一下主服务器是谁
Options:
--[no]check-binlog-format Check that the binlog_format is the same on
all servers (default yes)
--[no]check-plan Check query execution plans for safety (
default yes)
--chunk-index=s Prefer this index for chunking tables
--chunk-index-columns=i Use only this many left-most columns of a --
chunk-index
--chunk-size=z Number of rows to select for each checksum
query (default 1000)
--chunk-time=f Adjust the chunk size dynamically so each
checksum query takes this long to execute (
default 0.5)
--[no]create-replicate-table Create the --replicate database and table if
they do not exist (default yes)
--[no]empty-replicate-table Delete previous checksums for each table
before checksumming the table (default yes)
--float-precision=i Precision for FLOAT and DOUBLE number-to-
string conversion
--function=s Hash function for checksums (FNV1A_64,
MURMUR_HASH, SHA1, MD5, CRC32, etc)
--pid=s Create the given PID file
--progress=a Print progress reports to STDERR (default
time,30)
--quiet -q Print only the most important information (
disables --progress) (default 0)
--recurse=i Number of levels to recurse in the hierarchy
when discovering replicas
--recursion-method=a Preferred recursion method for discovering
replicas. pt-table-checksum performs several
REPLICA CHECKS before and while running (
default processlist,hosts)
--replicate=s Write checksum results to this table (
default percona.checksums)
--[no]replicate-check Check replicas for data differences after
finishing each table (default yes)
--replicate-check-only Check replicas for consistency without
executing checksum queries
--replicate-database=s USE only this database
--resume Resume checksumming from the last completed
chunk (disables --[no]empty-replicate-table)
--retries=i Retry a chunk this many times when there is
a nonfatal error (default 2)
--run-time=m How long to run. Optional suffix s=seconds,
m=minutes, h=hours, d=days; if no suffix, s
is used.
--separator=s The separator character used for
CONCAT_WS() (default #)
--trim Add TRIM() to VARCHAR columns (helps when
comparing 4.1 to >= 5.0)
--[no]version-check Check for the latest version of Percona
Toolkit, MySQL, and other programs (default
yes)
--where=s Do only rows matching this WHERE clause
Config:
--config=A Read this comma-separated list of config
files; if specified, this must be the first
option on the command line
Connection:
--ask-pass Prompt for a password when connecting to
MySQL
--defaults-file=s -F Only read mysql options from the given file
--host=s -h Host to connect to (default localhost)
--password=s -p Password to use when connecting
--port=i -P Port number to use for connection
--set-vars=A Set the MySQL variables in this comma-
separated list of variable=value pairs
--socket=s -S Socket file to use for connection
--user=s -u User for login if not current user
Filter:
--columns=a -c Checksum only this comma-separated list of
columns
--databases=h -d Only checksum this comma-separated list of
databases
--databases-regex=s Only checksum databases whose names match
this Perl regex
--engines=h -e Only checksum tables which use these storage
engines
--ignore-columns=H Ignore this comma-separated list of columns
when calculating the checksum
--ignore-databases=H Ignore this comma-separated list of databases
--ignore-databases-regex=s Ignore databases whose names match this Perl
regex
--ignore-engines=H Ignore this comma-separated list of storage
engines (default FEDERATED,MRG_MyISAM)
--ignore-tables=H Ignore this comma-separated list of tables
--ignore-tables-regex=s Ignore tables whose names match the Perl
regex
--tables=h -t Checksum only this comma-separated list of
tables
--tables-regex=s Checksum only tables whose names match this
Perl regex
Help:
--help Show help and exit
--version Show version and exit
Output:
--explain Show, but do not execute, checksum queries (
disables --[no]empty-replicate-table) (
default 0)
Safety:
--[no]check-replication-filters Do not checksum if any replication filters
are set on any replicas (default yes)
--[no]check-slave-tables Checks that tables on slaves exist and have
all the checksum --columns (default yes)
--chunk-size-limit=f Do not checksum chunks this much larger than
the desired chunk size (default 2.0)
Throttle:
--check-interval=m Sleep time between checks for --max-lag (
default 1). Optional suffix s=seconds, m=
minutes, h=hours, d=days; if no suffix, s is
used.
--check-slave-lag=s Pause checksumming until this replica's lag
is less than --max-lag
--max-lag=m Pause checksumming until all replicas' lag
is less than this value (default 1s).
Optional suffix s=seconds, m=minutes, h=
hours, d=days; if no suffix, s is used.
--max-load=A Examine SHOW GLOBAL STATUS after every
chunk, and pause if any status variables are
higher than the threshold (default
Threads_running=25)
Option types: s=string, i=integer, f=float, h/H/a/A=comma-separated list, d=DSN, z=size, m=time
Rules:
This tool accepts additional command-line arguments. Refer to the SYNOPSIS and usage information for details.
DSN syntax is key=value[,key=value...] Allowable DSN keys:
KEY COPY MEANING
=== ==== =============================================
A yes Default character set
D no DSN table database
F yes Defaults file for connection values
P yes Port number to use for connection
S no Socket file to use for connection
h yes Connect to host
p yes Password to use when connecting
t no DSN table table
u yes User for login if not current user
If the DSN is a bareword, the word is treated as the 'h' key.
Options and values after processing arguments:
--ask-pass FALSE
--check-binlog-format TRUE
--check-interval 1
--check-plan TRUE
--check-replication-filters TRUE
--check-slave-lag (No value)
--check-slave-tables TRUE
--chunk-index (No value)
--chunk-index-columns (No value)
--chunk-size 1000
--chunk-size-limit 2.0
--chunk-time 0.5
--columns (No value)
--config /etc/percona-toolkit/percona-toolkit.conf,/etc/percona-toolkit/pt-table -checksum.conf,/root/.percona-toolkit.conf,/root/.pt-table-checksum.conf
--create-replicate-table TRUE
--databases (No value)
--databases-regex (No value)
--defaults-file (No value)
--empty-replicate-table TRUE
--engines (No value)
--explain 0
--float-precision (No value)
--function (No value)
--help TRUE
--host localhost
--ignore-columns
--ignore-databases
--ignore-databases-regex (No value)
--ignore-engines FEDERATED,MRG_MyISAM
--ignore-tables percona.checksums
--ignore-tables-regex (No value)
--max-lag 1
--max-load Threads_running=25
--password (No value)
--pid (No value)
--port (No value)
--progress time,30
--quiet 0
--recurse (No value)
--recursion-method processlist,hosts
--replicate percona.checksums
--replicate-check TRUE
--replicate-check-only FALSE
--replicate-database (No value)
--resume FALSE
--retries 2
--run-time (No value)
--separator #
--set-vars
--socket (No value)
--tables (No value)
--tables-regex (No value)
--trim FALSE
--user (No value)
--version FALSE
--version-check TRUE
--where (No value)
[root@node2 ~]#
pt-ioprofile #可以评估一下服务器的io能力的,当前硬盘的io能力
SSL: 加密传输 只要启用ssl功能,配置证书,就行了
Dual MASTER: 双主模型
设置主-主复制:
1、在两台服务器上各自建立一个具有复制权限的用户;
2、修改配置文件:
# 主服务器上
[mysqld]
server-id = 10
log-bin = mysql-bin #每个节点都要启用二进制日志
relay-log = relay-mysql #每个节点都要启用中继日志文件
relay-log-index = relay-mysql.index #每个节点都要启用中继日志文件索引
#自动增长时,为了避免两个服务器数据库将来合并时发生冲突,一个库中的表应该使用奇数,另一个库中的表应该使用偶数,offset=1表示从1开始,increment 表示每次跳2个,
auto-increment-increment = 2
auto-increment-offset = 1
# 第二个主服务器上
[mysqld]
server-id = 20
log-bin = mysql-bin
relay-log = relay-mysql
relay-log-index = relay-mysql.index
auto-increment-increment = 2
auto-increment-offset = 2
3、如果此时两台服务器均为新建立,且无其它写入操作,各服务器只需记录当前自己二进制日志文件及事件位置,以之作为另外的服务器复制起始位置即可
# 两台服务器启动,两台服务器启动以后,分别记录下来每一个节点的MASTER状态,当前的二进制日志文件以及日志位置,
server1|mysql> SHOW MASTER STATUS\G
************************** 1. row ***************************
File: mysql-bin.000001
Position: 710
Binlog_Do_DB:
Binlog_Ignore_DB:
1 row in set (0.00 sec)
#另外一个节点的二进制日志文件以及日志位置
server2|mysql> SHOW MASTER STATUS\G
mysql> SHOW MASTER STATUS\G
*************************** 1. row ***************************
File: mysql-bin.000003
Position: 811
Binlog_Do_DB:
Binlog_Ignore_DB:
1 row in set (0.00 sec)
4、各服务器接下来指定对另一台服务器为自己的主服务器即可:
#分别以对方的 > SHOW MASTER STATUS 显示的文件及位置作为自己复制的时候所处的位置
server1|mysql> CHANGE MASTER TO ...,MASTER_LOG_FILE='mysql-bin.000003', MASTER_LOG_POS=811
server2|mysql> CHANGE MASTER TO ...,MASTER_LOG_FILE='mysql-bin.000001', MASTER_LOG_POS=710
A: 查看B的二进制日志文件及位置,并以此作为自己的复制起点;
B:与A类似,一个道理 查看A的二进制日志文件及位置,并以此作为自己的复制起点;
主服务器所有操作都复制到从服务器上了,事实上我们可以实现复制过滤,让从服务器只复制主服务器上的某个数据库(某些数据库),,甚至可以只复制某个表(某些表)
自动完成ssl的复制,当然要mysql支持ssl的功能,
在第一个节点node1 192.168.0.46 上 主服务器
mysql> show global variables like '%ssl%'; #跟ssl相关的全局变量 要想让它们永久有效,必须要写在配置文件当中
+---------------+----------+
| Variable_name | Value |
+---------------+----------+
| have_openssl | DISABLED | #有openssl ,禁用了,,使用ssl,要启用,,,前提是要使用ssl的功能,改成ENABLED 或 ON
| have_ssl | DISABLED | #有ssl ,禁用了,,使用ssl,要启用,,,前提是要使用ssl的功能,改成ENABLED 或 ON
| ssl_ca | |
| ssl_capath | |
| ssl_cert | | #mysql自己的证书
| ssl_cipher | | #加密算法
| ssl_key | | #自己的私钥
+---------------+----------+
7 rows in set (0.00 sec)
服务器端要向客户端联系的时候,要向客户端提供证书的话,服务器端要配置ca(配置服务器端所使用的ca的证书文件),ca的路径(如果服务器端要使用n个ca,在某个目录下放上ca的证书,然后把目录指向这个路径,这个路径下的每一个证书都可以使用了)
mysql>
在第一个节点node1 192.168.0.46 上 主服务器
从服务器到主服务器复制是使用了一个用户来授权的
mysql> help grant
Name: 'GRANT'
Description:
Syntax:
GRANT
priv_type [(column_list)]
[, priv_type [(column_list)]] ...
ON [object_type] priv_level
TO user_specification [, user_specification] ...
[REQUIRE {NONE | ssl_option [[AND] ssl_option] ...}] #REQUIRE 后面可以跟 ssl_option
# grant replication slave on *.* to 'repluser'@'192.168.%.%' identified by 'replpass' require ssl;表示这个ssl,从服务器过来复制的时候,使用这个帐号密码,如果从服务器不使用ssl的话,不予响应 ( 如果不加 require ssl,我们虽然启用了ssl功能,但是从服务器复制时,可以使用ssl,也可以不不使用ssl );;;;;(当然我们使用ssl,可能会带来许我额外的开销的)
[WITH with_option ...]
GRANT PROXY ON user_specification
TO user_specification [, user_specification] ...
[WITH GRANT OPTION]
object_type:
TABLE
| FUNCTION
| PROCEDURE
priv_level:
*
| *.*
| db_name.*
| db_name.tbl_name
| tbl_name
| db_name.routine_name
user_specification:
user
[
IDENTIFIED BY [PASSWORD] 'password'
| IDENTIFIED WITH auth_plugin [AS 'auth_string']
]
ssl_option:
SSL #授权时这个选项,表示使用ssl
| X509
| CIPHER 'cipher'
| ISSUER 'issuer'
| SUBJECT 'subject'
with_option:
GRANT OPTION
| MAX_QUERIES_PER_HOUR count
| MAX_UPDATES_PER_HOUR count
| MAX_CONNECTIONS_PER_HOUR count
| MAX_USER_CONNECTIONS count
The GRANT statement grants privileges to MySQL user accounts. GRANT
also serves to specify other account characteristics such as use of
secure connections and limits on access to server resources. To use
GRANT, you must have the GRANT OPTION privilege, and you must have the
privileges that you are granting.
Normally, a database administrator first uses CREATE USER to create an
account, then GRANT to define its privileges and characteristics. For
example:
CREATE USER 'jeffrey'@'localhost' IDENTIFIED BY 'mypass';
GRANT ALL ON db1.* TO 'jeffrey'@'localhost';
GRANT SELECT ON db2.invoice TO 'jeffrey'@'localhost';
GRANT USAGE ON *.* TO 'jeffrey'@'localhost' WITH MAX_QUERIES_PER_HOUR 90;
However, if an account named in a GRANT statement does not already
exist, GRANT may create it under the conditions described later in the
discussion of the NO_AUTO_CREATE_USER SQL mode.
The REVOKE statement is related to GRANT and enables administrators to
remove account privileges. See [HELP REVOKE].
When successfully executed from the mysql program, GRANT responds with
Query OK, 0 rows affected. To determine what privileges result from the
operation, use SHOW GRANTS. See [HELP SHOW GRANTS].
URL: http://dev.mysql.com/doc/refman/5.5/en/grant.html
mysql>
