欢迎各位兄弟 发布技术文章

这里的技术是共享的

You are here

asp.net mvc 两表联查 asp.net 实现两表联查 有大用 有大大用 有大大大用

How to Join tables and return result into view using Asp .net mvc (tutorial)

In this asp .net tutorial we will learn about how to Join multiple tables and return result into view using Asp .net mvc. We will also explore concept of ViewModel to pass multiple models to view in asp .net mvc.We will also see how to get data from multiple models in a view using asp .net.You can also download sample code attached with this example.

Step1 Create Classes:

In this example I have not used any database so I will create Classes manually to store and reterieve data. If you are using entity framework you can use classes generated by entity framework.

1234567891011121314151617namespace JoinAndViewModel.Models{    public class Student    {        public int Id { get; set; }        public string StudentName { get; set; }        public string StudentStream { get; set; }    }     public class StudentAdditionalInfo    {        public int Id { get; set; }        public int StudentId { get; set; }        public string FavourateFruit { get; set; }        public string Hobby { get; set; }    }}

Step2 Create a ViewModel Class :

In this step we will create ViewModel class. This will be used to store and reterive data built by joining two tables (Student and StudentAdditionalInfo).

12345678namespace JoinAndViewModel.Models{    public class StudentViewModel    {        public Student studentVm { get; set; }        public StudentAdditionalInfo studentAdditionalInfoVm { get; set; }    }}

Step3 Create a Controller:

In this step we will create controller, Insert dummy data, Join data and pass data to view.

12345678910111213141516171819202122232425262728293031323334public class HomeController : Controller{    List<Student> student = new List<Student>();    List<StudentAdditionalInfo> studentAdditionalInfo = new List<StudentAdditionalInfo>();     public ActionResult Index()    {        insertDummyData();        var studentViewModel = from s in student                               join st in studentAdditionalInfo on s.Id equals st.StudentId into st2                               from st in st2.DefaultIfEmpty()                               select new StudentViewModel { studentVm = s, studentAdditionalInfoVm = st };        return View(studentViewModel);    }     public void insertDummyData()    {        //--- Insert Dummy data into Student        student.Add(new Student { Id = 1, StudentName = "Max", StudentStream = "Computer Science" });        student.Add(new Student { Id = 2, StudentName = "Tony", StudentStream = "Life Sciences" });        student.Add(new Student { Id = 3, StudentName = "Jhon", StudentStream = "Robotics" });        student.Add(new Student { Id = 4, StudentName = "Jack", StudentStream = "Computer Science" });        student.Add(new Student { Id = 5, StudentName = "Dominic", StudentStream = "Avaiation" });         //---- Insert Dummy data into StudentAdditionalInfo        studentAdditionalInfo.Add(new StudentAdditionalInfo { Id = 100, StudentId = 1, FavourateFruit = "Apple", Hobby = "Driving" });        studentAdditionalInfo.Add(new StudentAdditionalInfo { Id = 101, StudentId = 2, FavourateFruit = "Mango", Hobby = "Hunting" });        studentAdditionalInfo.Add(new StudentAdditionalInfo { Id = 102, StudentId = 3, FavourateFruit = "Bannana", Hobby = "Fishing" });        studentAdditionalInfo.Add(new StudentAdditionalInfo { Id = 103, StudentId = 4, FavourateFruit = "Pine Apple", Hobby = "Sailing" });        studentAdditionalInfo.Add(new StudentAdditionalInfo { Id = 104, StudentId = 5, FavourateFruit = "Grapes", Hobby = "Street Racing" });     } }

Code Explanation:

  1. Here we have created insertDummyData() method to insert dummy data

  2. In Index() mehtod we are joining data of multiple tables (Student and StudentAdditionalInfo) and returning to view.

Step4 Create view to display data:

In this step we will create view to display data.

123456789101112131415161718@model IEnumerable<JoinAndViewModel.Models.StudentViewModel><table class="table table-striped">    <tr>        <td>Student Name</td>        <td>Student Stream</td>        <td>Favourate Fruite</td>        <td>Hobby</td>    </tr>    @foreach (var item in Model)    {        <tr>            <td>@item.studentVm.StudentName</td>            <td>@item.studentVm.StudentStream</td>            <td>@item.studentAdditionalInfoVm.FavourateFruit</td>            <td>@item.studentAdditionalInfoVm.Hobby</td>        </tr>    }</table>

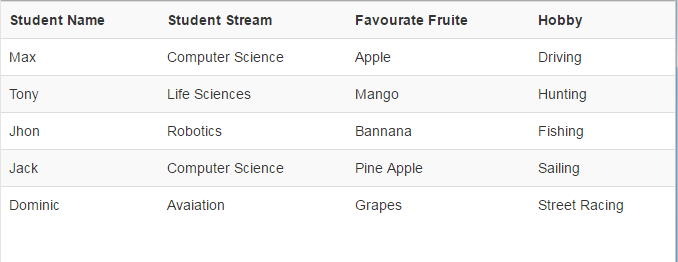
Join tables and return result into view using Asp .net mvc output:

How to Join tables and return result into view using Asp .net mvc


We are nothing without our users ! You can help us offer even more high quality content. Please share our page !

Share27

You might also like:
1)  .Net MVC Html.ActionLink tutorial with examples
2)  FileUpload in ASP.Net MVC
3)  How to Join tables and return result into view using Asp .net mvc (tutorial)
4)  Dynamically add meta tags in Asp .Net MVC
5)  Jquery AutoComplete TextBox with database In Asp .Net MVC

Best quality Asp .Net Ajax Control Toolkit tutorials.

Give your valuable comments.


来自  http://www.codingfusion.com/Post/How-to-Join-tables-and-return-result-into-view-usi


Introduction
 
In every MVC project, the controller plays a very important role. It handles all the user requests. If required, it wakes up the model, tells the model to do its job and when the job is done, the controller passes the data to the view and the view then renders the data and displays it to the front-end user as a respons in HTML format. This article shows something like that. Today we will see how to retrieve the records from multiple tables. For the demo we will be using these two tables.
 
 
In the tables above, we have StudentId as a primary key column for tblStudent and CourseId as a primary key column for tblCourse. There is also a foreign key relationship between these two tables. Course_Id in the tblStudent is the foreign key column pointing to the CourseId column of the tblCourse table. So, we have our table. Now let's switch to Visual Studio and create a new project.
 
Step 1
 
Click File -> New -> Project.


Step 2
 
Expand the Installed templates then expand Visual C# then expand Web then select Visual Studio 2012 then select ASP.NET MVC 4 Web Application as a new project. The provide a meaningful name then click OK.


Step 3
 
Select the Empty project template then select the Razor View engine then click Ok.


Step 4
 
A project with an empty template will be created with these directories and files in the Solution Explorer.


Step 5
 
As we know, we will be retrieving the records from the database tables using Entity Framework and to use Entity Framework, first we need to install it. Select Tools -> NuGet Package Manager -> Manage NuGet packages for solution.


Step 6
 
A manage NuGet packages window will pop-up. Expand the online packages then select NuGet.org. Then look for EntityFramework then click Install.


Select the project. Click OK. The License acceptance window will pop-up. Click I Accept in the bottom right.


Wait a few seconds while it's installing.


In the Manage NuGet packages, it will give us a Green marked sign on the top-right section on the EntityFramework which means this package is installed.


Click close. Go to the Solution Explorer and expand references, you will see we have a reference to the EntityFramework.


Step 7
 
The next step is to add a class file in the Models folder. We will add two class files. One with a class name “Student” in which we will add four auto-implemented properties and all the property names will match the names of the column in the tblStudent table and another class with a name “Course” in which we will add two auto-implemented properties and all the property names will match the names of the column in the tblCourse table. To add a class file in Models folder, right-click on the Models folder then select add then select class.


After adding both classes and properties it will look like this. Student.cs


Course.cs


Step 8
 
In the models folder we will add another class file and we will name that class StudentCourseContext. First let's add this class and then we will understand the purpose of this class.


The purpose of this class is to establish a connection between our applications and the database and to establish a connection and to retrieve all the records from the table we need to use two classes present in the System.Data.Entity namespace.

  • DbContext

  • DbSet

The DbContext class will do all the hard work for us. It will establish a connection to the database. The only thing we need to do here is inherit our StudentCourseContext from the DbContenxt class and add a connection string in the root web.config file.  

  1. <connectionStrings>  

  2.     <add name="StudentCourseContext" connectionString="server = .; database= db_StudentEntity; integrated security = sspi" providerName="System.Data.SqlClient"/>  

  3. </connectionStrings>  

We have created a connectionstring with the name “StudentContextCourse” that matches the name of our StundentCourseContext.cs. So, when we create an instance of this class, using DbContext it will look for a connection string with that name within the web.config file and if the match is found, it will use the connection string and establish the connection. DbSet We will add two properties in this class out of which one will return us DbSet<Student> and another will return us the DbSet<Course> object back. Using these two properties we will get all the records present in the database tables.


Step 9

By default, Entity Framework will look for or create a table in a database with the same name as that of the class and here the class names are Student and Course. But in SQL Server the table name is tblStudent and tblCourse. So, in order to map these classes with the database tables we can use the Table attribute in which we will pass the database table name. This Table attribute is present in the System.ComponentModel.DataAnnotations.Schema namespace.


And in the global.asax file, we will add the following code:


Since we are not creating a new database we need to pass null. We have created our Model. Build the solution.

The next step is to add a controller to the Controllers folder and to do that right-click on the Controllers folder then click Add -> Controller.
 
Step 10
 
Add a controller.


Provide the Controller the name StudentController.


Click Add.

Step 11
 
Create an instance of the StudentCourseContext class in the Index action method.


But when we say StudentCourseContext, we don't get any intellisense and if we hardcode the class name we get a compile time error.


But we have a class with that name in our project. So, why are we getting this error? If you look at the StudentController class, it is present in the StudentEntities.Controllers namespace but if you look at the StudentCourseContext class, it is present in the StudentEntitse.Models namespace.


So, in order to use this class we need to import that namespace first.


In this StudentCourseContext class we have a property Courses and to invoke this property we can say cs.Courses.


Look at the return type of this property. It is returning us the DbSet<Course> but we want to return a list of Courses back and for that we can convert this course property to a list using the ToList() extension method present in the System.Linq namespace.


After initializing the records in the List object, pass the object to the view.

But you might be wondering why we are able to convert the Courses property to a list since it returns a DbSet<Course> object back. Because this DbSet class implements the IEnumerable interface.


Step 12
 
The next step is to add a view and for that right-click on the Index method and click add view.


The View name should be Index. The View engine should be Razor. Check, create a strongly typed view and select Course class as a model. Select List as the scaffold template then click Add. In the Index.cshtml, you will see much auto-generated code. But don't worry about it. We will discuss it in just a bit but before let's run our application.
 
 
When we run the application, we get the preceding error stating “The resource cannot be found”. We have written our code in a simple and best possible way, so what went wrong? If you recap from the previous article of this series, we have discussed MVC is all about convention and all the route information that is stored in routeconfig.cs states how every MVC should work. This file is present in the App_start directory. To learn more click here.


Above here, look at the default name of the controller. It is Home, but our controller name is Student. So, to override the default convention we must replace Home with Student.
 
 
If we run the application we will now get the output as expected which is all the course names.


Look at the preceding output, we have all the course names. But there is a slight problem with our Index view.

  1. We don't want Create, Edit, Details and Delete hyperlinks.

  2. We want all the course names as hyperlinks that when clicked will redirect to the details of the students that opted for the course that we clicked.

Remove this highlighted code.


Run the application.
 
 
Now, let's look at the code that generated the read-only text for us.


@Html.DisplayFor is nothing but a HTML helper that generates controls like TextBox, checkbox, dropdownlist and so on. But let's see which HTML helper generates a hyperlink?


The code that we removed from the Index view that created a Create hyperlink. The ActionLink HTML helper generates a hyperlink for us.


The first parameter is the link text and the second parameter is the action method name to which this Index view will be redirected to. Run the application.
 
Currently if we click on any of the links, we will get an exception.


It is trying to navigate to the StudentName action method but currently in our Student controller we don't have any action method with that name.

Step 13
 
The next step is to add a StudentName action method in the StudentController class.


We have created a new object for the StudentCourseContext class and then we invoked the Students property that contains all the student records.

But by just converting the Students property and initializing it into a list object will not give us the student records specific to a course back. It will give us all the student records, no matter what course name link we click. So, to overcome this problem, we will add a parameter in this StudentName action method and we will also add a new object routeValue in the action link we created in Index view.
 
In Index view


We have created a new RouteValue object Id in which we have passed the courseId. So, when we click any of the links then the courseId with that specific course name will be assigned to the course link.

We will use this same Id object and pass it in as a parameter in the StudentName action method and when we click the link in the Index view then CourseId from the action link will be passed here.


Now the next step is to filter the records based on a condition that will check if the CourseId of the Course and the course id of the student matches and if the match is found, it will display the student records. To filter a record, we can use the Where extension method present in the System.Linq namespace.


Step 14
 
The next step is to create a StudentName view and for that right-click on the StudentName action method and click Add view.


The View name should be StudentName. The View engine should be Razor. The Model class should be Student. The Scaffold template should be List. Click Add. Remove these codes from the StudentName view.


Run the application.


Click on the C# link.


It gave us the Student records who opted for C#. Click on ASP.Net.


Click on PHP.


Click on Java.


So, in this article we saw how easy it is to work with multiple tables in MVC. I hope you like it. Thank you.


来自  https://www.c-sharpcorner.com/UploadFile/219d4d/working-with-multiple-tables-in-mvc-using-entity-framework/


普通分类: