Mac os 自带的终端,用起来不太方便,界面也不友好,iterm2是一款程序员哥哥推荐的较好的终端工具,常用配置操作包括主题选择、声明高亮、自动填充建议、隐藏用户名和主机名、分屏效果等。
一、iTerm2安装
官网下载包安装:http://iterm2.com/
使用Homwbrew安装:
brew install iterm2
( 很多教程这么写:brew cask install iterm2, homebrew 从 2.5.11 后,cask 就取消了,不加cask 重新执行)
二、iTerm2配置
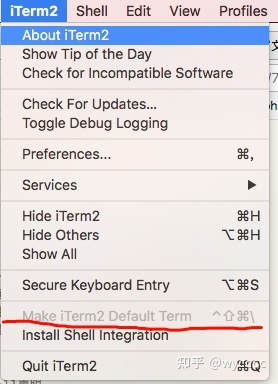
设置iTerm2为默认终端
2. 配置iTerm2主题
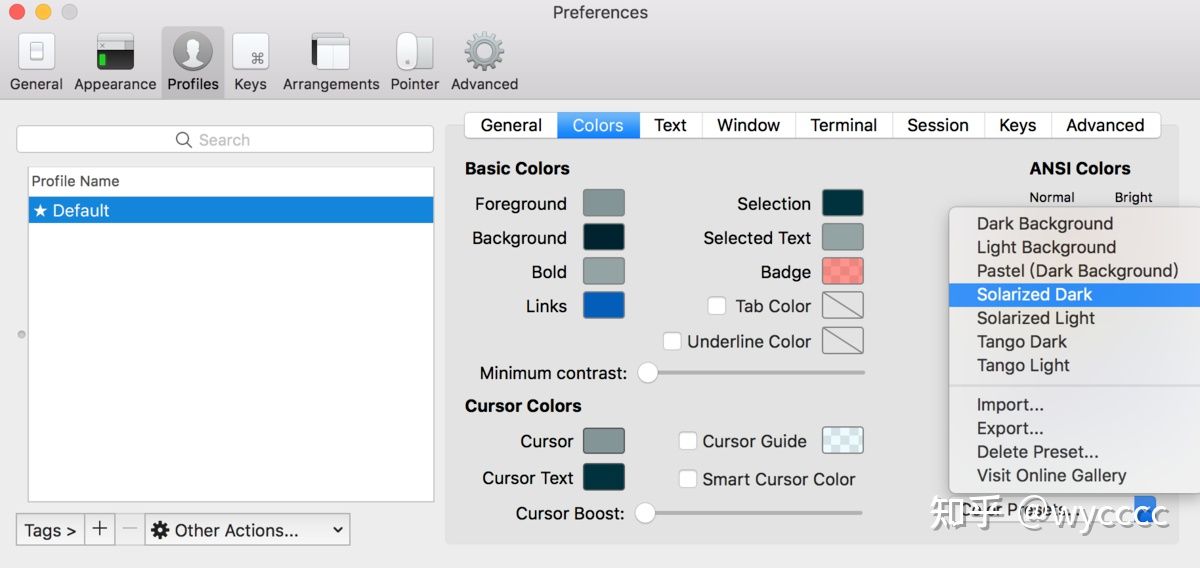
iTerm2最常用的主题是Solarized Dark theme,下载地址:http://ethanschoonover.com/solarized,解压。
打开iTerm2 -> Preferences,然后Profiles ---> Colors -> Color Presets -> Import ,选择刚刚解压的solarized->iterm2-colors-solarized->Solarized Dark.itermcolors文件,导入成功,最后选择Solarized Dark。
三、安装oh-my-zsh
oh-my-zsh是对主题的进一步扩展
官网地址:https://ohmyz.sh/
github地址:https://github.com/robbyrussell/oh-my-zsh
sh -c "$(curl -fsSL https://raw.githubusercontent.com/robbyrussell/oh-my-zsh/master/tools/install.sh)"
sh -c "$(wget -O- https://raw.githubusercontent.com/robbyrussell/oh-my-zsh/master/tools/install.sh)"
chsh -s /bin/zsh
四、配置oh-my-zsh主题
oh-my-zsh是对主题的进一步扩展
github主题下载地址:https://github.com/robbyrussell/oh-my-zsh/wiki/Themes
zsh主题列表:https://github.com/robbyrussell/oh-my-zsh/tree/master/themes/
将主题修改为ZSH_THEME="agnoster"
vim ~/.zshrc
输入i进入编辑模式,将ZSH_THEME=""编辑为 ZSH_THEME="agnoster",按下esc键,退出编辑,:wq保存退出,修改成功!
ZSH_THEME="agnoster"
五、Powerline字体下载安装
iTerm2 改为主题之后,会出现乱码的情况。需要安装Meslo字体来解决。
下载地址:Meslo LG M Regular for Powerline.ttf,下载后直接安装。
然后打开iTerm2,打开Preferences配置界面,然后Profiles -> Text -> Font -> Chanage Font,选择 Meslo LG M Regular for Powerline 字体。
六、声明高亮
brew install zsh-syntax-highlighting
source /usr/local/share/zsh-syntax-highlighting/zsh-syntax-highlighting.zsh
执行 source ~/.zshrc 使生效
另外一种方法,执行下面指令自动安装:
git clone https://github.com/zsh-users/zsh-syntax-highlighting.git $ZSH_CUSTOM/plugins/zsh-syntax-highlighting
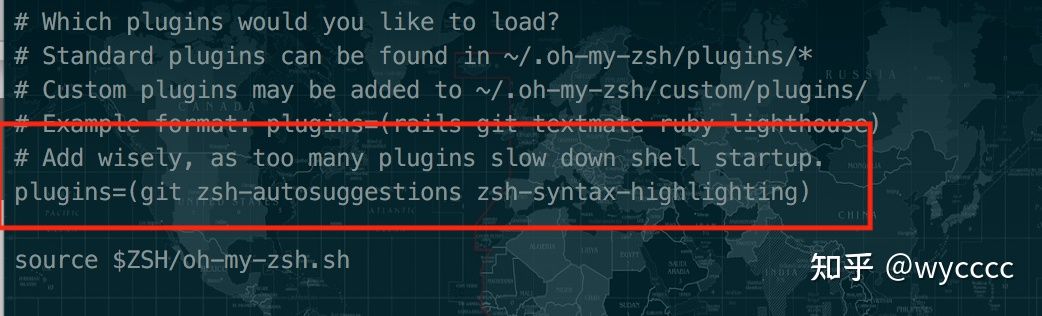
七、 自动填充建议
这个功能是非常实用的,可以方便我们快速的敲命令。
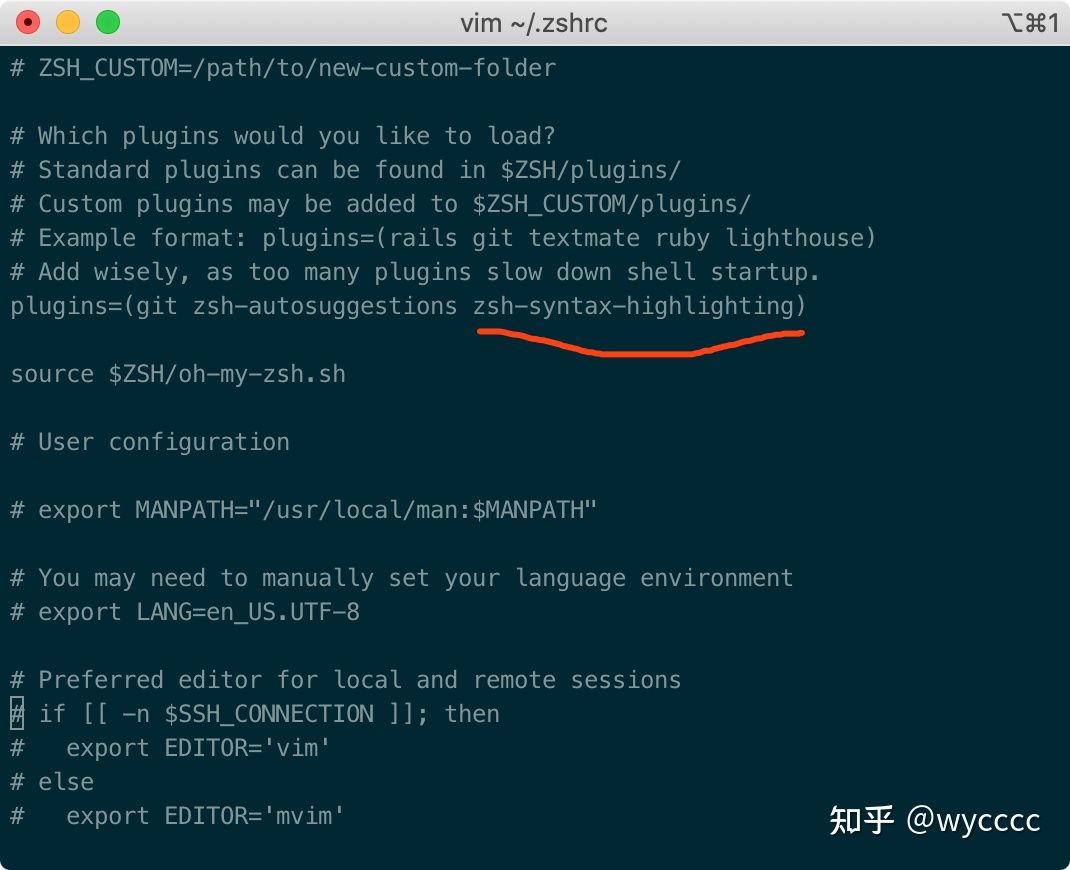
配置步骤,先克隆zsh-autosuggestions项目,到指定目录:
git clone https://github.com/zsh-users/zsh-autosuggestions ~/.oh-my-zsh/custom/plugins/zsh-autosuggestions
然后编辑vim ~/.zshrc文件,找到plugins配置,增加zsh-autosuggestions插件。
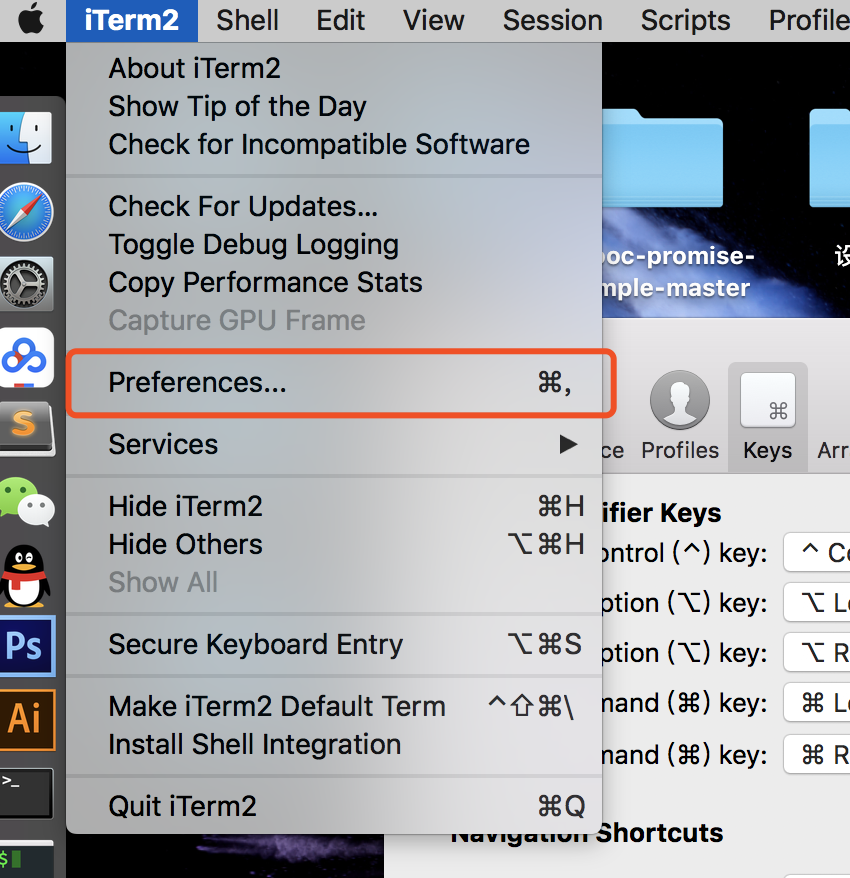
八、 iTerm2快速隐藏和显示窗体
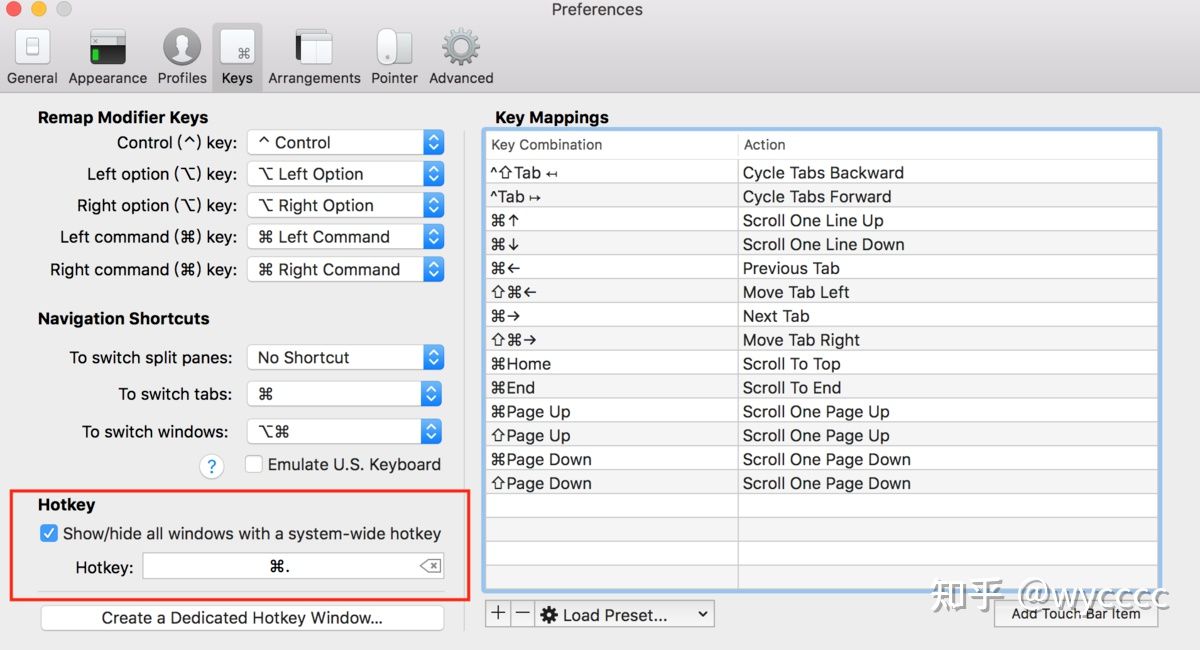
打开iterm2,打开Preferences配置界面,然后Profiles → Keys →Hotkey,自定义一个快捷键就可以了。
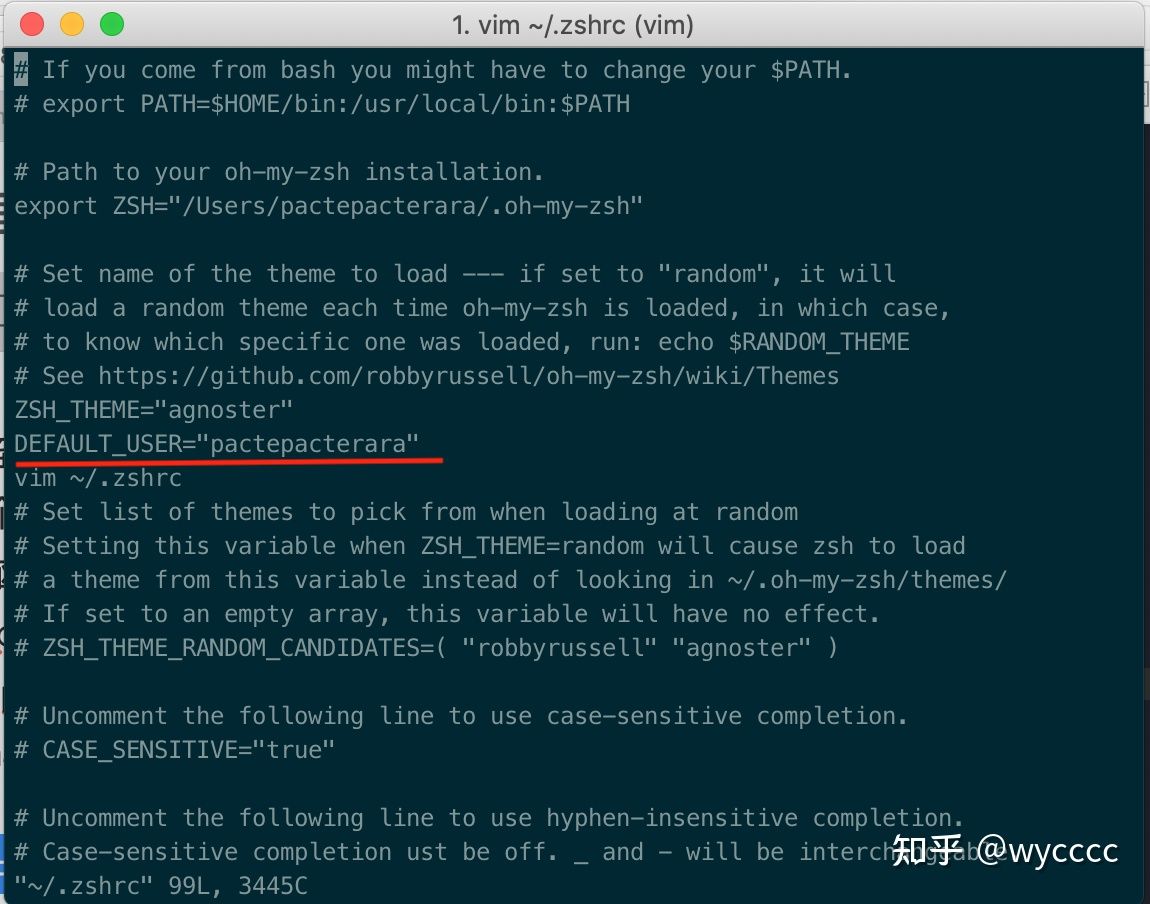
九、 iTerm2隐藏用户名和主机名
有时候我们的用户名和主机名太长,比如我的xishuai@xishuaideMacBook-Pro,终端显示的时候会很不好看,我们可以手动去除。
编辑 vim ~/.zshrc 文件,增加 DEFAULT_USER="xishuai" 配置,可在文本最好追加
我们可以通过whoami 命令,查看当前用户
十、iTerm2 快捷命令
command + enter 进入与返回全屏模式
command + 数字 command + 左右方向键 切换标签
command + option + 方向键 command + [ 或 command + ] 切换屏幕
command + shift + h 查看剪贴板历史
1、去官网安装item2:
https://www.iterm2.com/downloads.html
2、打开preferences
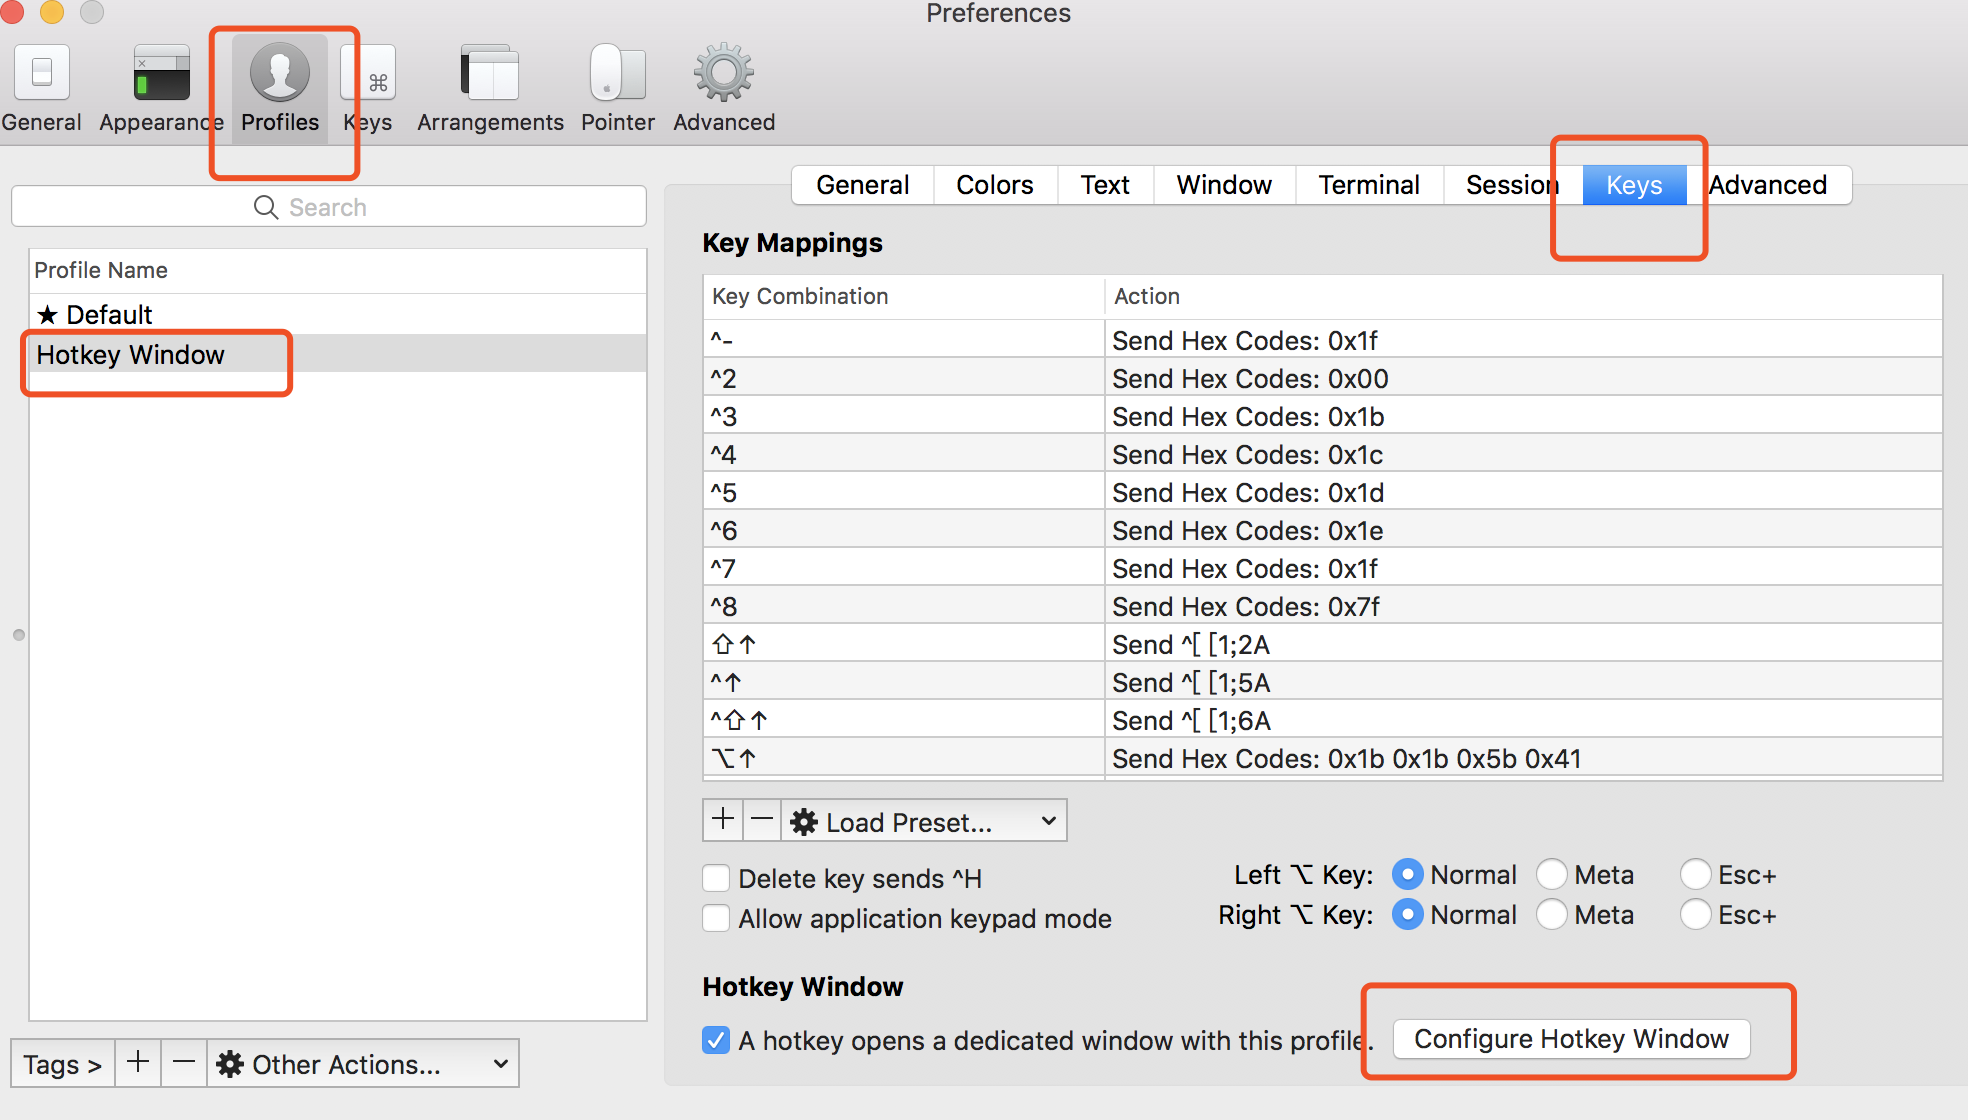
3、到keys配置:
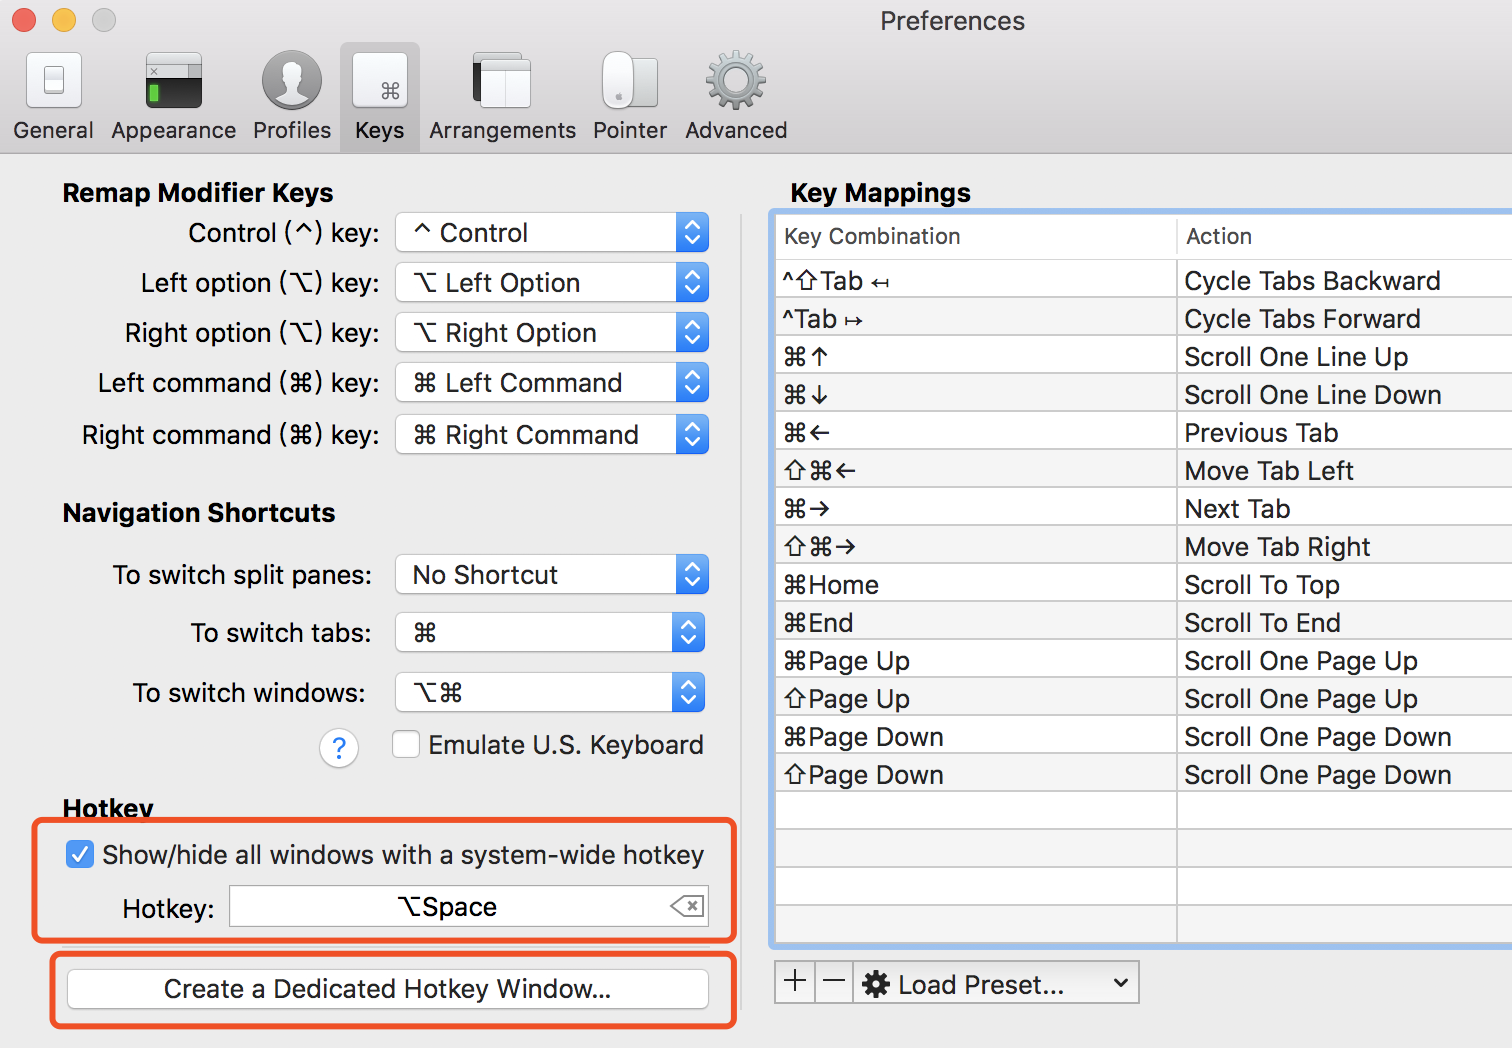
4、点击上图展示的Create a Dedicated .. 会创建一个Hotkey Window(我已经创建了一个所以弹出提示框)
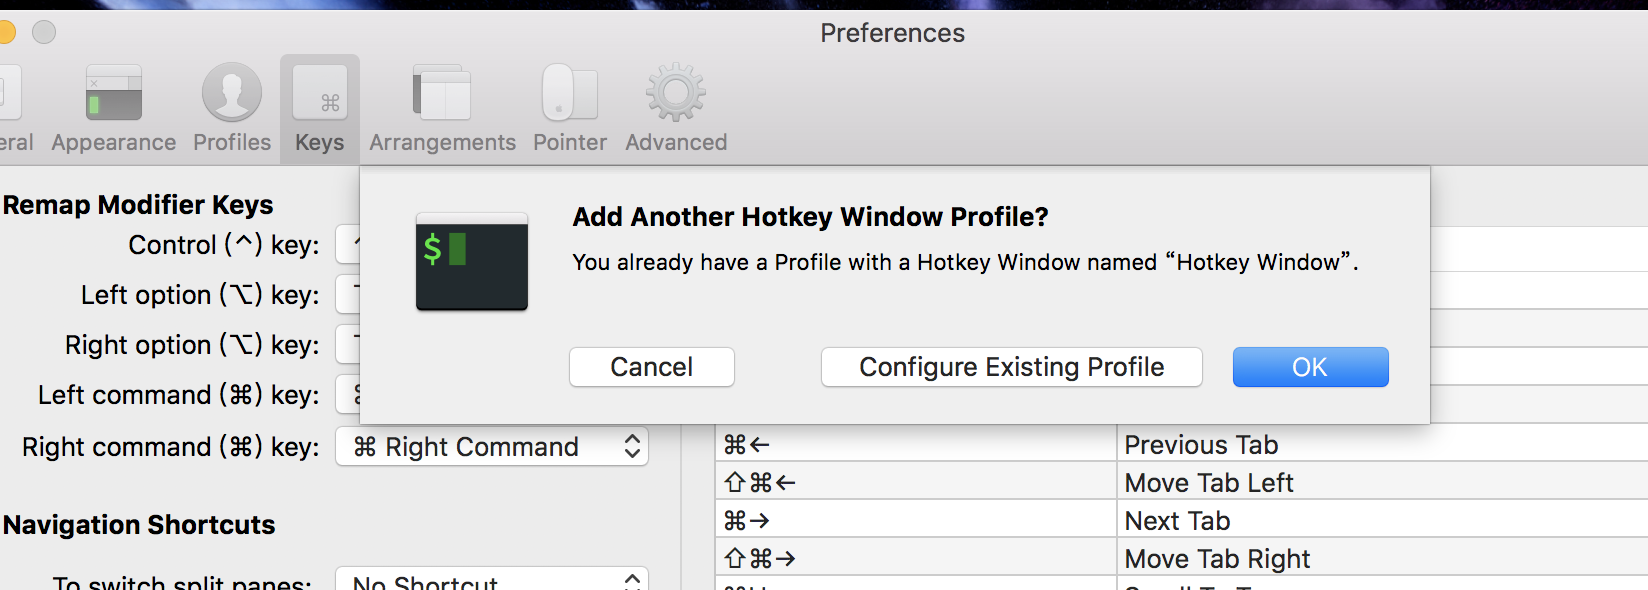
5、回到Profiles, 点击右下角配置按钮:
6、在弹出的配置框中做如下的配置:
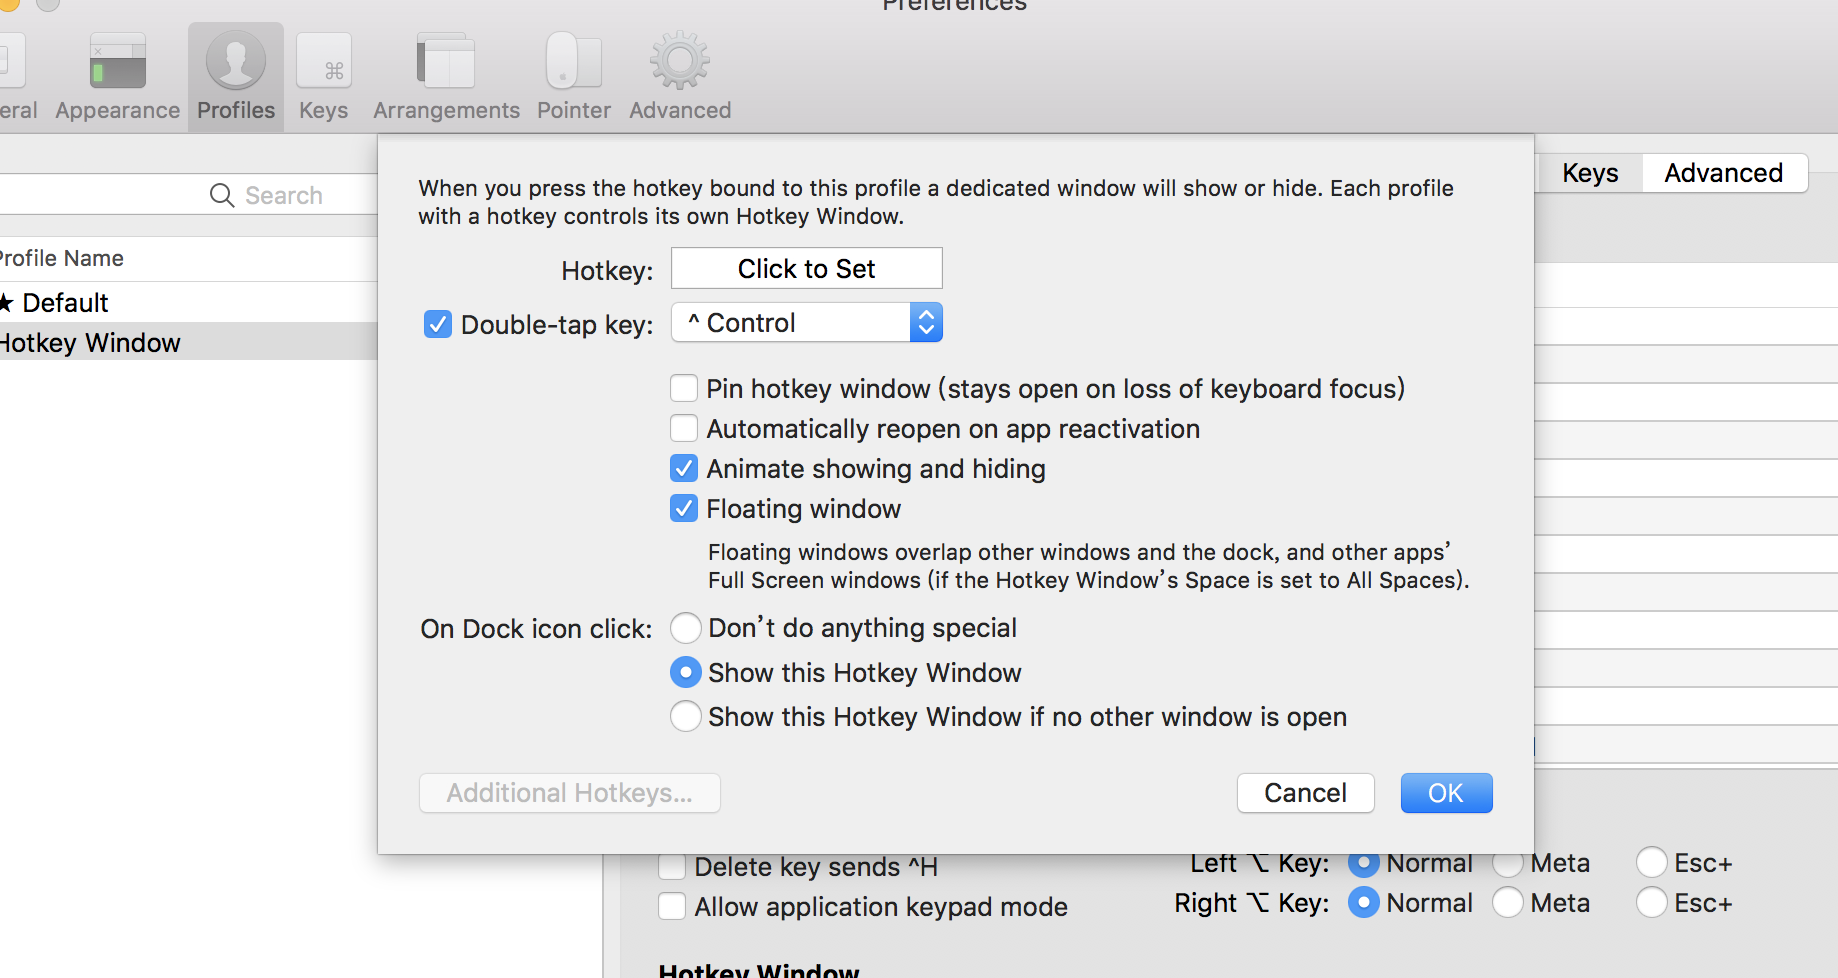
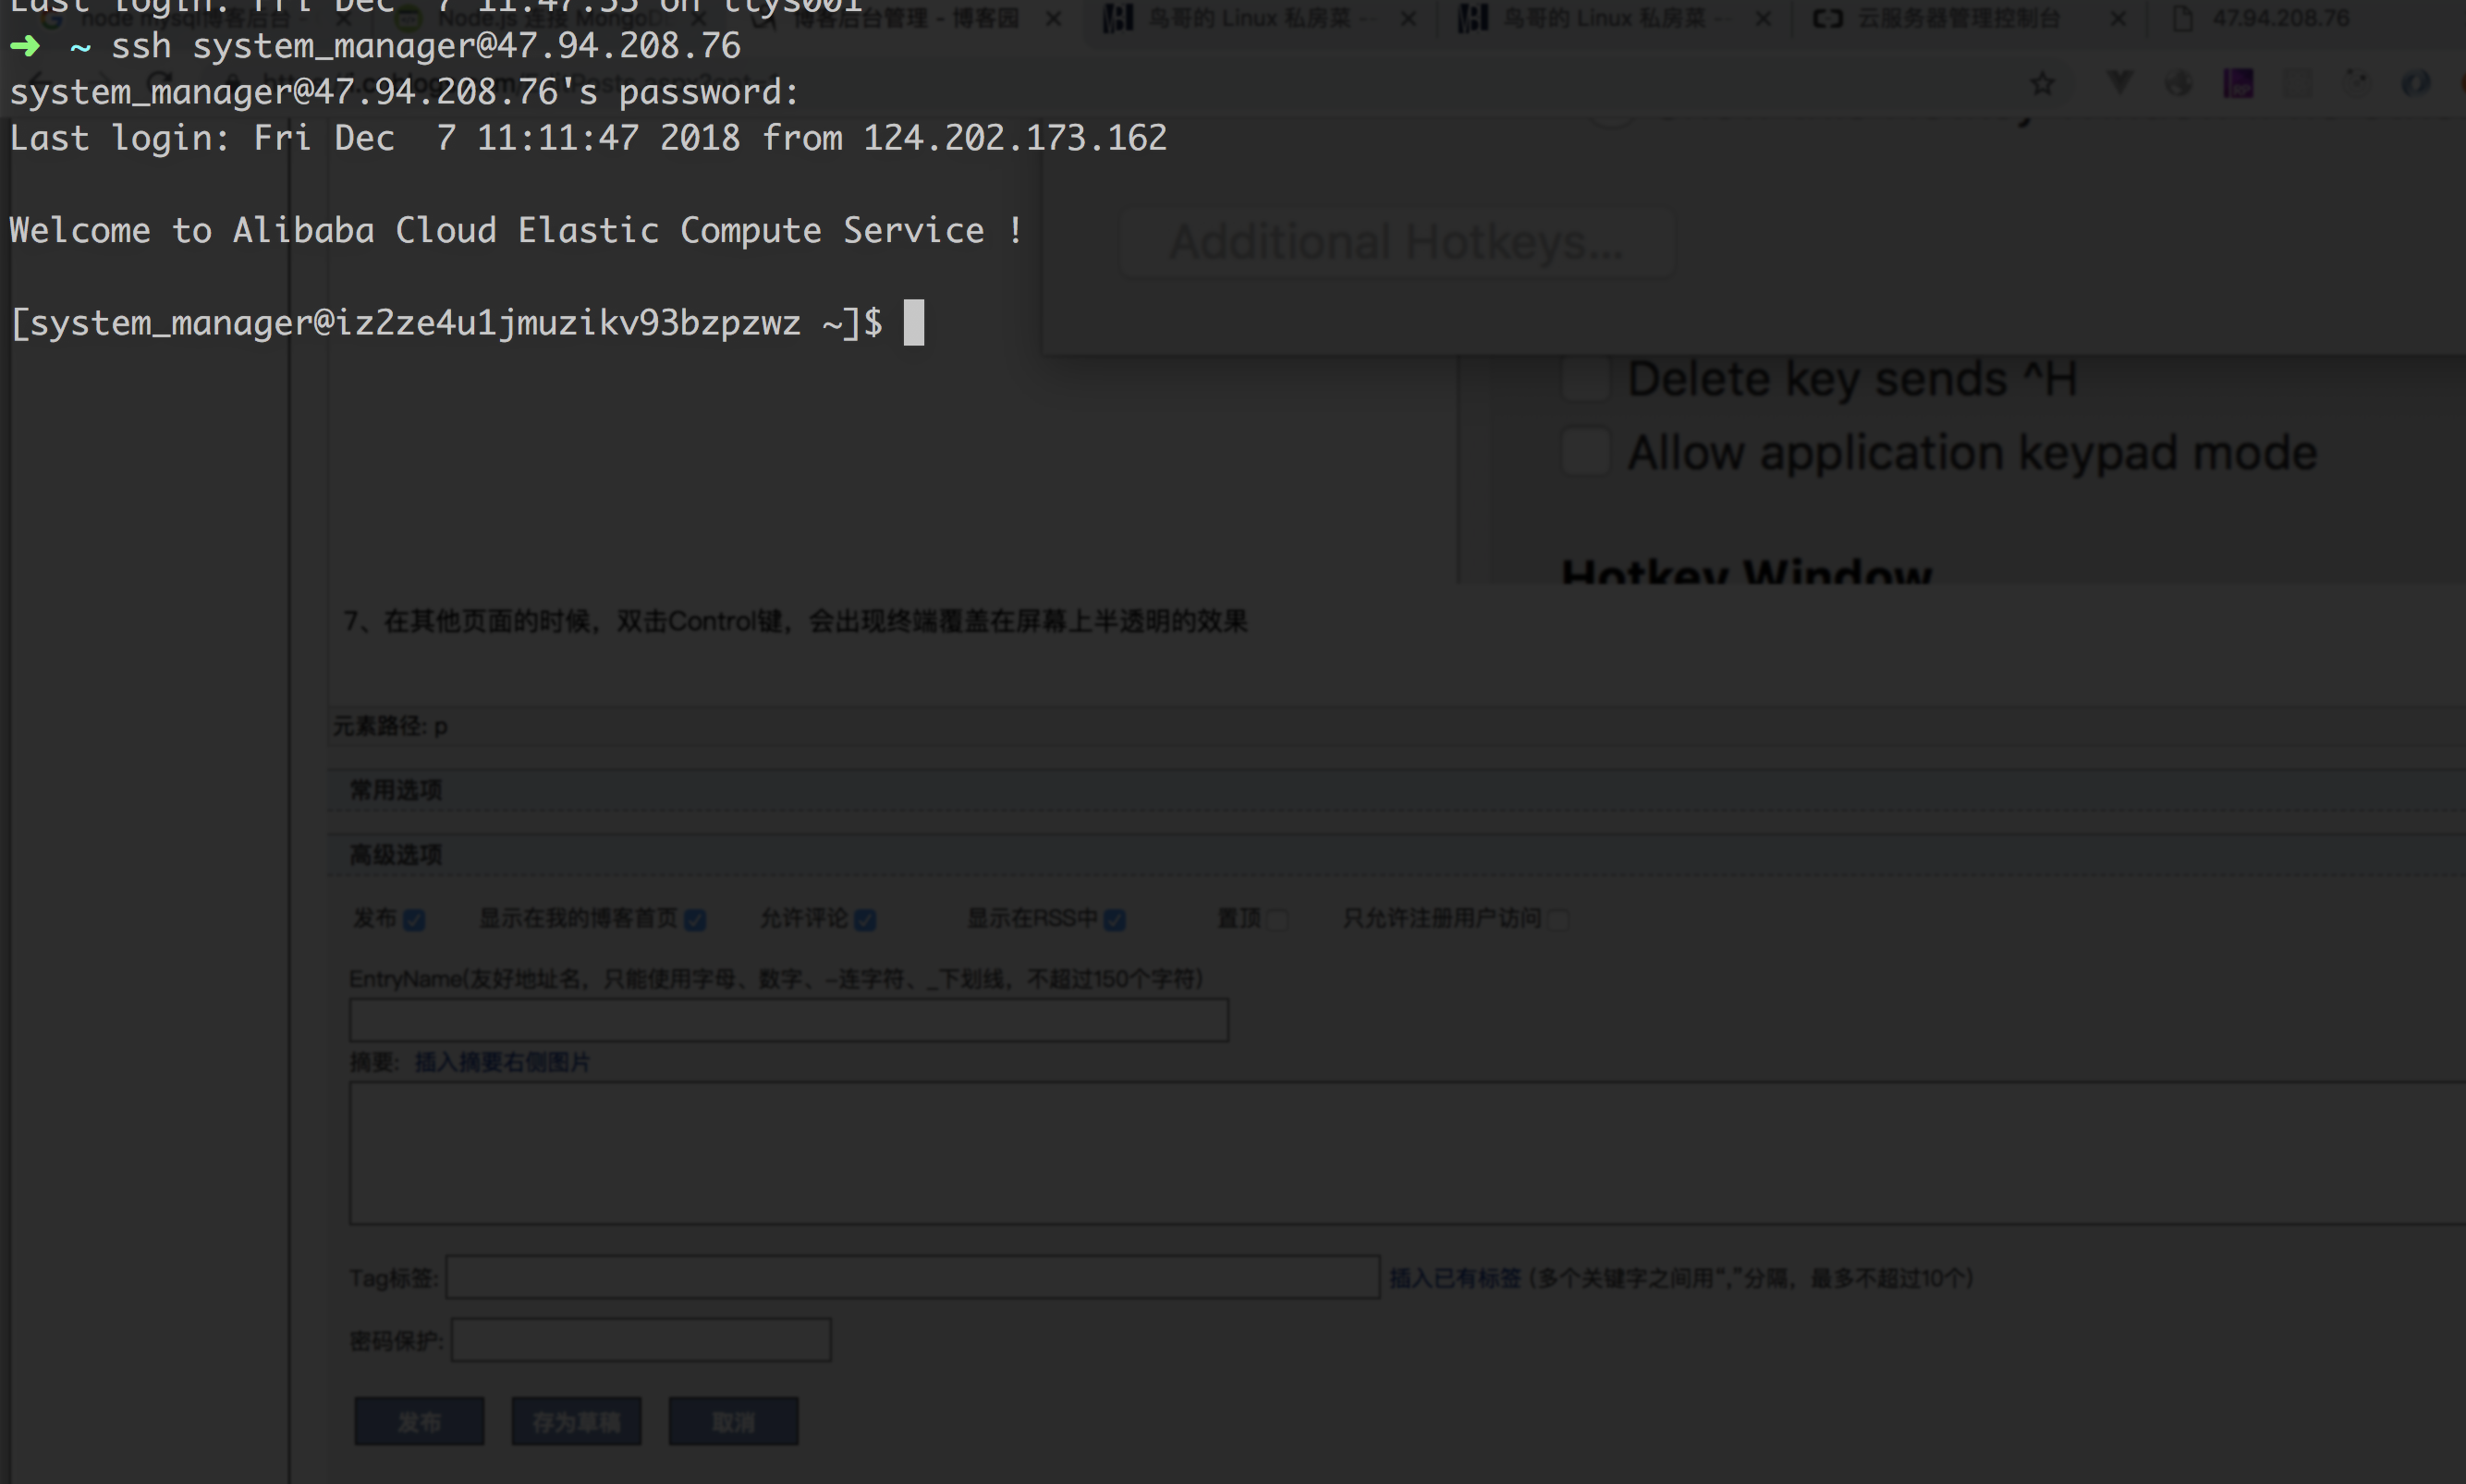
7、在其他页面的时候,双击Control键,会出现终端覆盖在屏幕上半透明的效果
8、按cmd+enter之后直接在当前space全屏
参考链接:
Mac下终端工具iTerm2安装、iTerm2安装、配置和使用
Mac终端工具item2实现覆盖在屏幕上透明效果 - 雨水一盒~ - 博客园
来自 https://blog.csdn.net/THMAIL/article/details/126571892