You are here
django south 使用教程(1) django south 使用教程(2)

south安装包下载地址:https://bitbucket.org/andrewgodwin/south/
south文档:http://south.readthedocs.org/en/latest/
二、south简介
Django 的第三方 app South 就是专门做数据库表结构自动迁移工作,Jacob Kaplan-Moss 曾做过一次调查,South 名列最受欢迎的第三方 app。事实上,它现在已经俨然成为 Django 事实上的数据库表迁移标准,很多第三方 app 都会带 South migrations 脚本。
三、回顾syncdb
syncdb是db synchronization的缩写,意思是数据库同步。
syncdb 命令是同步你的模型到数据库的一个简单方法。 它会根据 INSTALLED_APPS 里设置的app来检查数据库, 如果表不存在,它就会创建它。 需要注意的是, syncdb 并不能将模型的修改或删除同步到数据库;如果你修改或删除了一个模型,并想把它提交到数据库,syncdb并不会做出任何处理。
如果你再次运行 python manage.py syncdb ,什么也没发生,因为你没有添加新的模型或者添加新的app。因此,运行python manage.py syncdb总是安全的,因为它不会重复执行SQL语句。
知识总结:迁移( migrations?)
四、为什么用south
对于二、三两点,可知syncdb的不足,如果更改了models,如添加一列等此时syncdb就没有用武之地了,如果硬手工修改表结构不仅容易出错,又不安全,并非权宜之计,而south却能很好的解决该问题。
south特性:
(1)、自动迁移:south可自动检测你的Models.py文件的改变,自动写入migrations去匹配你所做的改变。
(2)、数据库独立性:完全与数据库无关的,支持五个不同的数据库后端。这样就无需再关注于数据库方向,而专注与django。
(3)、app艺术:south依赖app,south本身也是django的第三方app,再在使用的时候单独作用于每个app下,进行迁移,同步。
(4)、VCS处理:south也能处理如果别人提交迁移到相同的应用程序作为你和他们冲突。
你写的迁移(migrations),它告诉south如何从一个版本升级到下一个,和通过串接在一起你可以移动这些迁移向前(或向后)通过历史数据库的模式。south也能创建新的model
五、快速指南
1、安装完South之后,要在django项目中使用South,先要将South作为一个App导入项目,所以设置INSTALL_APP添加south 第一次使用South。
2、manage.py syncdb 用来创建south_migrationhistory表。
3、manage.py convert_to_south youappname #在youappname目录下面创建migrations目录以及第一次迁移需要的0001_initial.py文件
4、如果改变了model里的内容,./manage.py schemamigration youappname --auto #检测对models的更改
manage.py migrate youappnam #将更改反应到数据库(如果出现表已存在的错误,后面加 --fake)
如果第一次使用:
1、./manage.py schemamigration youappname --initial # youappname目录下面创建一个migrations的子目录(注意!!就算有多个app,也只要initial一个就可以)
2、./manage.py syncdb #初始化数据表等#以后每次对models更改后,可以运行以下两条命令同步到数据库
3、./manage.py schemamigration youappname --auto #检测对models的更改
4、./manage.py migrate youappnam #将更改反应到数据库(如果出现表已存在的错误,后面加 --fake)
推荐教程:
http://codinn.com/people/brant/notes/110932/
http://a280606790.iteye.com/blog/1107657
六、深入基础教程(首度使用)
1、新建models
新建southtut app,然后定义models如下:
class Knight(models.Model):
    name = models.CharField(max_length=100)
    of_the_round_table = models.BooleanField()
然后使用 syncdb 为它创建一个迁移。
2、第一个迁移
south创建迁移有以下两种方式:自动和手动,对于新手来说推荐两种自动方式:--auto和--initial.
我们使用manage.py schemamigration app_name时候:(schema migration:模式 迁移,简化为schemamigration)
--auto:作用于旧的(已经存在)的迁移(migration),对一些改变做出迁移工作,如增加字段等。
--initial:针对新的(尚未存在)的迁移,将创建表和索引对应到app 的models下。这是当你定义好model后的初步使用,如同syncdb一样。
接下来开始创建第一个迁移

E:\project\demo>manage.py schemamigration southtut --initial
Creating migrations directory at 'E:\project\demo\southtut\migrations'...#创建迁移目录migrations
Creating __init__.py in 'E:\project\demo\southtut\migrations'...#创建__init__.py
 + Added model southtut.Knight                                  #增加model
Created 0001_initial.py. You can now apply this migration with: ./manage.py migrate southtut#创建版本控制
完了之后,在项目目录结构中可见以下改变:
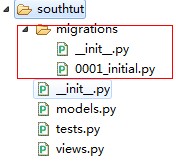
当然也创建了该model:southtut.Knight
那么接下来就应用新的迁移,注意如果已经存在该model则使用 --fake
E:\project\demo>manage.py migrate southtut --fake  #启动
Running migrations for southtut:                   #启动该app下的migrations
 - Migrating forwards to 0001_initial.             #正向前迁移
 > southtut:0001_initial
   (faked)
3、应用改变
这里添加一个字段,要把给字段给同步上去。
class Knight(models.Model):
    name = models.CharField(max_length=100)
    of_the_round_table = models.BooleanField()
    dances_whenever_able = models.BooleanField()  #新增
那么接下来就是同步了,此时分两个步骤:
(1)、创建迁移:manage.py schemamigration southtut --auto
E:\project\demo>manage.py schemamigration southtut --auto  #此时用 --auto
 + Added field dances_whenever_able on southtut.Knight     #做出的改变
Created 0002_auto__add_field_knight_dances_whenever_able.py. #创建迁移版本
You can now apply this migration with: ./manage.py migrate southtut
(2)、应用:manage.py migrate southtut
E:\project\demo>manage.py migrate southtut
Running migrations for southtut:
 - Migrating forwards to 0002_auto__add_field_knight_dances_whenever_able.
 > southtut:0002_auto__add_field_knight_dances_whenever_able
 - Loading initial data for southtut.
No fixtures found.
完成之后,则发现已经添加了该字段

七、深入基础教程(迁移使用)
1、基本流程
对于已经之前已经存在的model,如果我们使用south则不能使用上面的步骤。比如说,我有一个名为other的app下model早已建立并且同步至数据库,那么我想要用south,那么就要作如下处理了。
#已存在的model且里面存有数据
class Contact(models.Model):
    name = models.CharField(max_length=30)
    email = models.EmailField()
    comment = models.CharField(max_length=100)
    def __unicode__(self):
        return self.name
    class Meta:
        db_table='contact'
ok,我要用这个,且在model里动了手脚。
#Contact
...
age = models.IntegerField()  #添加
那么使用south如下:
(1)、创建迁移:(--auto)
manage.py schemamigration other --auto
.....#省略
(2)、应用:
manage.py migrate other
#...省略
流程给出了,但是为什么省略输出的部分呢,因为这里涉及到一个知识点,就是Defaults:
2、defaults
对于上面southtut app model存在BooleanField,则该字段默认的default=False,然而对于其他字段,可能没有定义默认字段,如果列为空,既null=True,那么新生成的列就没有威胁了,否则就必须给出默认值,因为对于已经存在数据的model,新的字段不可能没有值。一些数据库后端将让你添加列,如果表是空的,而有些会拒绝彻底。
针对这种情况,south将会给出选择并执行
#Contact
...
website = models.CharField(max_length=100,null=False)  #新增
..
E:\project\demo>manage.py schemamigration other --auto
 ? The field 'Contact.website' does not have a default specified, yet is NOT NULL.   #问题
 ? Since you are adding this field, you MUST specify a default value to use for existing rows. Would you like to:
 ?  1. Quit now, and add a default to the field in models.py    #退出,在models手动添加默认值
 ?  2. Specify a one-off value to use for existing columns now  #指定默认值
 ? Please select a choice:
.....
 ? Please select a choice: 2             #我的选择
 ? Please enter Python code for your one-off default value.
 ? The datetime module is available, so you can do e.g. datetime.date.today()
 >>> 'http://www.google.com'             #指定的默认值
 + Added field website on other.Contact  #添加成功
Created 0006_auto__add_field_contact_website.py. You can now apply this migration with: ./manage.py migrate other
#应用
E:\project\demo>manage.py migrate other
Running migrations for other:
 - Migrating forwards to 0006_auto__add_field_contact_website.
 > other:0006_auto__add_field_contact_website
 - Loading initial data for other.No fixtures found.
3、Uniques
还有一点重要的是unique属性
class Contact(models.Model):
    name = models.CharField(max_length=30,unique=True)#更改了
    email = models.EmailField()
    comment = models.CharField(max_length=100)
    website = models.CharField(max_length=100,null=False)  #新增
    def __unicode__(self):
        return self.name
    class Meta:
        db_table='contact'
E:\project\demo>manage.py schemamigration other --auto
 + Added unique constraint for ['name'] on other.Contact
Created 0007_auto__add_unique_contact_name.py. You can now apply this migration
with: ./manage.py migrate other

#还可以这样:
E:\project\demo>manage.py schemamigration --auto other
然后再manage.py migrate southtut 就ok了。
4、ManyToMany fields
south能够检测多对多字段,South will create the table the ManyToMany represents, and when you remove the field, the table will be deleted.
来自 http://www.cnblogs.com/BeginMan/p/3324774.html
一、迁移清单
列出某个app下的迁移清单,或整个django项目的迁移清单,相当于列出其历史记录,这时要用到
#某个app下迁移清单
manage.py migrate app_name --list
#整个项目迁移清单
manage.py migrate --list
显示如下。注意带*的为已经应用到了 ,()表示尚未应用到的。
E:\project\demo>manage.py migrate other --list

 other
  (*) 0001_initial
  (*) 0002_auto__add_action__del_field_contact_age__add_field_contact_comment
  (*) 0003_initial
  (*) 0004_initial
  (*) 0005_initial
  (*) 0006_auto__add_field_contact_website
  (*) 0007_auto__add_unique_contact_name
  (*) 0008_auto__add_field_action_keys
  (*) 0009_auto__del_field_action_keys
  (*) 0010_auto__del_action
二、数据迁移
第一节所涉及的是模式迁移,涉及表、字段、索引的添加和删除;另一种迁移就是数据迁移。
数据迁移是用来改变你的数据库中存储的数据匹配一个新的模式,或特性。
例如,如果你一直以纯文本形式保存密码,现在你需要以利用salt对密码进行散列 的形式,这样就涉及到数据的迁移以适应新的模式。可能有以下三个步骤(每个步骤对应一个迁移):
(1)、创建两列:password_salt 和password_hash (a schema migration).
(2)、使用旧密码的列的内容,计算每个用户的密码后应用到新的列(a data migration)
(3)、移除旧的密码列(a schema migration).
class User(models.Model):
    username = models.CharField(max_length=255)
    password = models.CharField(max_length=60)
假设有用户:Jack,密码:admin123.如果以文本的形式肯定不安全了,那么现在就利用salt对密码进行散列。
import sha
class User(models.Model):
    username = models.CharField(max_length=255)
    password = models.CharField(max_length=60)
    password_salt = models.CharField(max_length=8, null=True)
    password_hash = models.CharField(max_length=40, null=True)

    def check_password(self, password):
        return sha.sha(self.password_salt+password).hexdigest() == self.password_hash

"""
用户注册的过程:
1)用户提供密码(以及其他用户信息);
2)系统为用户生成Salt值;
3)系统将Salt值和用户密码连接到一起;
4)对连接后的值进行散列,得到Hash值;
5)将Hash值和Salt值分别放到数据库中。

用户登录的过程:
1)用户提供用户名和密码;
2)系统通过用户名找到与之对应的Hash值和Salt值;
3)系统将Salt值和用户提供的密码连接到一起;
4)对连接后的值进行散列,得到Hash'(注意有个“撇”);
5)比较Hash和Hash'是否相等,相等则表示密码正确,否则表示密码错误。
"""
接下来就是创建模式迁移将会创建两列:
E:\project\demo>manage.py schemamigration other --auto
 + Added field password_salt on other.User
 + Added field password_hash on other.User
Created 0013_auto__add_field_user_password_salt__add_field_user_password_hash.py
. You can now apply this migration with: ./manage.py migrate other
那么接下来就是创建数据迁移了,
E:\project\demo>manage.py datamigration other hash_passwords
Created 0014_hash_passwords.py.
打开 0014_hash_passwords.py 文件 发现如下,我们还需要手写forwards、backwards方法
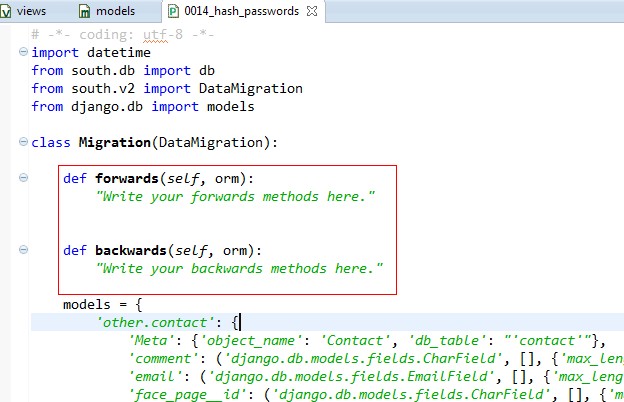
更改如下:
# -*- coding: utf-8 -*-
import datetime
from south.db import db
from south.v2 import DataMigration
from django.db import models

class Migration(DataMigration):

    def forwards(self, orm):
        import random,sha,string
        for user in orm.User.objects.all():
            #更新数据
            user.password_salt = "".join([random.choice(string.letters) for i in range(8)])
            user.password_hash = sha.sha(user.password_salt + user.password).hexdigest()
            user.save()

    def backwards(self, orm):
        raise RuntimeError("Cannot reverse this migration.")

    ......
注意这里的orm.User,对象关系映射(Object Relational Mapping) 这里关系到其迁移的model,如User model。如果用数据迁移中使用其他app的model则用orm['contenttypes.ContentType']. Models
If you want to access models from other apps in your data migration, use a syntax like orm['contenttypes.ContentType']. Models will be available if you can somehow get to them via ForeignKey or ManyToMany traversal from your app’s models; if you want to freeze other models, simply pass --freeze appname on the datamigration command line.
最后在backwards()方法中引发错误,因为这个过程本质上是不可逆转的。就是说只能向前迁移,不能向后。
最后步骤:删除password字段,启动迁移
E:\project\demo>manage.py schemamigration other --auto
 ? The field 'User.password' does not have a default specified, yet is NOT NULL.

 ? Since you are removing this field, you MUST specify a default
 ? value to use for existing rows. Would you like to:
 ?  1. Quit now.
 ?  2. Specify a one-off value to use for existing columns now
 ?  3. Disable the backwards migration by raising an exception; you can edit the
 migration to fix it later
 ? Please select a choice: 2
 ? Please enter Python code for your one-off default value.
 ? The datetime module is available, so you can do e.g. datetime.date.today()
 >>> ""
 - Deleted field password on other.User
Created 0015_auto__del_field_user_password.py. You can now apply this migration
with: ./manage.py migrate other
接下来就是应用这3个迁移:
E:\project\demo>manage.py migrate other
Running migrations for other:
 - Migrating forwards to 0004_auto__del_field_user_password.
 > southtut2:0002_auto__add_field_user_password_salt__add_field_user_password_hash
 > southtut2:0003_hash_passwords
 > southtut2:0004_auto__del_field_user_password
 - Loading initial data for other.
接下来验证一下:
>>> from other.models import User
>>> User.objects.get(id=1).check_password('admin123')
True
>>> User.objects.get(id=1).check_password('admin3')
False

博客搬家啦~:http://beginman.cn/
来自 http://www.cnblogs.com/BeginMan/p/3325897.html