You are here
[Laravel 5 教程学习笔记] 十五、简单的认证 Authentication 有大用

一、路由
安装 Laravel 5 的时候,默认的已经带了一套用户认证系统,我们可以在 routes.php 中看到下面的代码(如果你之前删除了,请添加上):
Route::controllers([
'auth' => 'Auth\AuthController',
'password' => 'Auth\PasswordController',
]);
上面使用了 Route::controllers() 方法来创建路由,但这种方法非常不推荐大家使用。上面两个分别是用于 认证(auth) 和 重置密码(password) 的。
两个文件分别为 app\Http\Controllers\Auth\AuthController.php和 app\Http\Controllers\Auth\PasswordController.php。详细代码自己查看文件内容,实现代码其实在文件vendor\laravel\framework\src\Illuminate\Foundation\Auth\AuthenticatesAndRegistersUsers.php中。
在命令行输入下面的命令查看所有路由:
D:\wamp\www\laravel5>php artisan route:list
可以看到现在多出了认证与密码重置的相关路由。
二、数据
由于前一节我们通过命令行 tinker 添加了一些数据,所有在进行今天的操作之前先把数据库重置一下:
D:\wamp\www\laravel5>php artisan migrate:refresh
现在数据库已经回复,我们来进行用户注册。浏览器打开 http://laravel.dev/auth/register ,可以看到,这个就是 Laravel 5 自带的用户注册界面。我们输入用户名、邮箱及密码注册第一个用户。
注册之后我们发现页面跳转到 http://laravel.dev/home ,如果你的 routes.php 中删除了Route::get('home', 'HomeController@index'); 请添加回去,否则会出现一个错误提示页面。
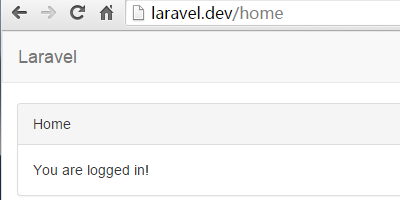
现在可以看到,Laravel 提示我们已经登录成功。退出系统可以使用右上角的退出链接,或者直接浏览器输入 http://laravel.dev/auth/logout。
在 ArticlesController.php 的 index() 方法中的第一行添加代码:return \Auth::user();,然后浏览器访问 http://laravel.dev/articles ,页面返回一个 JSON 格式的用回信息:
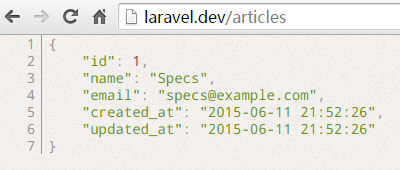
也可以使用 return \Auth::user()->name; 返回用户名,而当我们退出系统再访问的时候,会提示我们 “Trying to get property of non-object”,这是因为 \Auth::user() 的结果是 null,我们不能返回 null->name 的值。现在到页面 http://laravel.dev/auth/login 使用刚才注册的用户名密码进行登录,否则后面的操作会出错。
打开resources\views\articles\_form.blade.php 找到之前我们添加的代码 {!! Form::hidden('user_id', 1) !!} ,并把它去掉保存,因为这里我们不再需要通过表单隐藏域来设置关联用户了。
之后修改 Article 控制器中的 store() 方法:
public function store(ArticleRequest $request){
$article = new Article($request->all());
\Auth::user()->articles()->save($article);
return redirect('articles');
}
上面的方法会自动关联用户的ID,这是因为我们在 app\User.php 模型中定义了:
public function articles(){
return $this->hasMany('App\Article');
}
现在到浏览器访问 http://laravel.dev/articles/create,添加一篇新的文章。之后使用数据库管理工具如 phpmyadmin 查看 articles 表,可以看到文章已经成功的关联了当前登录用户的ID。也可以通过命令行使用 tinker 查看。
D:\wamp\www\laravel5>php artisan tinker
Psy Shell v0.4.1 (PHP 5.5.12 ΓÇö cli) by Justin Hileman
>>> App\Article::first()->toArray();
=> [
"id" => 1,
"user_id" => 1,
"title" => "New Article",
"body" => "New Body",
"created_at" => "2015-06-11 22:41:16",
"updated_at" => "2015-06-11 22:41:16",
"published_at" => "2015-06-11 00:00:00",
"excerpt" => null
]
>>> $user = App\User::where('name', 'Specs')->first();
=> <App\User #000000003d924d200000000031369784> {
id: 1,
name: "Specs",
email: "specs@example.com",
created_at: "2015-06-11 21:52:26",
updated_at: "2015-06-11 22:03:42"
}
>>> $user->articles->toArray();
=> [
[
"id" => 1,
"user_id" => 1,
"title" => "New Article",
"body" => "New Body",
"created_at" => "2015-06-11 22:41:16",
"updated_at" => "2015-06-11 22:41:16",
"published_at" => "2015-06-11 00:00:00",
"excerpt" => null
]
]
>>> $article = new App\Article(['title' => 'New', 'body' => 'new body', 'published_at' => Carbon\Carbon::now()]);
=> <App\Article #000000003d924d300000000031369784> {
title: "New",
body: "new body",
published_at: <Carbon\Carbon #000000003d924d330000000031366dc4> {
date: "2015-06-11 22:51:21",
timezone_type: 2,
timezone: "PRC"
}
}
>>> $user->articles()->save($article);
=> <App\Article #000000003d924d300000000031369784> {
title: "New",
body: "new body",
published_at: <Carbon\Carbon #000000003d924d330000000031366dc4> {
date: "2015-06-11 22:51:21",
timezone_type: 2,
timezone: "PRC"
},
user_id: 1,
updated_at: "2015-06-11 22:52:02",
created_at: "2015-06-11 22:52:02",
id: 2
}
本节就这些,下一节介绍中间件(Middleware)。