下面有自己亲自做的例子
drupal 7 render arrays详解
什么是渲染(rendering)?
drupal中rendering,简单来说就是把具有特定结构的关联数组转换为HTML页面的过程。从drupal 7开始,render arrays(中文翻译渲染数组)为drupal页面渲染的最基本元素,render arrays也叫rendable arrays,意为’可渲染的数据‘。
其实render array就是一个php关联数组,但符合drupal页面渲染过程中的标准和数据结构。
大多数情况下,用来渲染页面的数据一直保存在关联数组里,直到页面的最后渲染阶段才被调用,这种机制为页面的布局和内容显示提供了极大的灵活性,也有益于系统以后的性能提升。
注意:虽然render arrays和form api中使用的数组具有某些共同的元素,属性以及结构,但许多表单属性的意义仅限于FORM API,不能等同于render API.简单来说,form API的数组必须通过drupal_get_form这个函数的处理后才能变为标准的render arrays.如果直接把未经该函数处理的form api数组传递给render API,最后的效果可能不能如你所愿。
DRUPAL的页面的渲染都是根据render array中的各种数据来进行的,这些数据包括各类属性,如#type。下面就是一个用来渲染页面的render array例子:
<?php
$page = array(
  '#show_messages' => TRUE,
  '#theme' => 'page',
  '#type' => 'page',
  'content' => array(
    'system_main' => array(...),
    'another_block' => array(...),
    '#sorted' => TRUE,
  ),
  'sidebar_first' => array(
    ...
  ),
  'footer' => array(
    ...
  ),
  ...
);
?>
上面的关联数组中,我们看到的带‘#’的key即为render array中的属性,以‘#theme' = ’page'为例,它的值为page,就这是说render api看到这个属性后将使用theme_page的函数(即page.tpl.php)来渲染。
其中的content是它的子元素,具有自己的render array数据结构
为什么需要render arrays?
在drupal 7之前,修改drupal页面的渲染方式和内容一般通过hook_form_alter这些钩子来实现,但在渲染的这个阶段,大部分元素已经转换为为 HTML 代码,想要修改已经很难。
而drupal 7及以后的版本提供了诸如hook_page_alter的钩子,借助这些钩子,开发者可以轻松在页面的最后渲染阶段对页面进行处理,就是说,只需在主题中加一小段PHP代码就能改变页面的布局。
下面是使用hook_page_alter对页面进行更改的例子:
<?php
function mytheme_page_alter(&$page) {
  //把搜索栏移到底部.
  $page['footer']['search_form'] = $page['sidebar_first']['search_form'];
  unset($page['sidebar_first']['search_form']);
  // 去掉"powered by Drupal"区域显示
  unset($page['footer']['system_powered-by']);
}
?>
把这段代码添加到你主题目录中的template.php里,mytheme改成你主题相应的名字。
render array与元素(elements)之前的关系
这里的元素是指drupal系统中预先定义好的具有‘#type'及其它属性的render array,在system_element_info的函数里可以找到这些elements的原型。开发者也可在定制的模块中使用hook_element_info来定义自己的元素。
当render api处理render array时,会根据render array中的‘#type'属性值从预先定义好的元素中加载默认各类属性,如#theme,#method这些。
用render array来完成 HTML 代码的生成
与之前的drupal版本不一样,定制模块需要输出内容时都应以render array的形式来完成。使用hook_menu页面回调函数应该返回一个render array而不是drupal 6中的 HTML 代码。
hook_block_view()的$block['content']就是一个例子,这样做的一个优势就是在最后渲染之前,你的模块和其它drupal模块都能够轻松对数据进行处理
下面是使用hook_menu返回render array的例子(drupal 6中直接返回HTML代码)
<?php
function mymodule_menu() {
  $items['mypage-html'] = array(
    'title' => 'My page with HTML-style function',
    'page callback' => 'mymodule_html_page',
    'access callback' => TRUE,
  );
  $items['mypage-ra'] = array(
    'title' => 'My page with render array function',
    'page callback' => 'mymodule_ra_page',
    'access callback' => TRUE,
  );
  return $items;
}
// 之前的版本都是直接返回HTML,这些方法依然可行,但不推荐
function mymodule_html_page() {
  $output = '<p>A paragraph about some stuff...</p>';
  $output .= '<ul><li>first item</li><li>second item</li><li>third item</li></ul>';
  return $output;
}
// drupal 7的方法
function mymodule_ra_page() {
  $output =  array(
    'first_para' => array(
      '#type' => 'markup',
      '#markup' => '<p>A paragraph about some stuff...</p>',
    ),
    'second_para' => array(
      '#items' => array('first item', 'second item', 'third item'),
      '#theme' => 'item_list',
    ),
  );
  return $output;
}
?>
定义render array的例子
以下是定义一个render arrays的例子,来自于drupal官方的render array模块例子中的代码
<?php
  $demos= array(
      t('Super simple #markup')  => array(
          '#markup' => t('Some basic text in a #markup (shows basic markup and how it is rendered)'),
      ),
      'prefix_suffix' => array(
        '#markup' => t('This one adds a prefix and suffix, which put a div around the item'),
        '#prefix' => '<div><br/>(prefix)<br/>',
        '#suffix' => '<br/>(suffix)</div>',
      ),
      'theme for an element' => array(
            'child' => array(
                 t('This is some text that should be put together'),
                 t('This is some more text that we need'),
            ),
           '#separator' => ' | ',  // Made up for this theme function.
           '#theme' => 'render_example_aggregate',
      ),
);
?>
翻译自drupal官方文档
来自 http://www.zhetenger.com/drupal-7-render-arrays%E8%AF%A6%E8%A7%A3
实践理解drupal 7 render API
drupal render array实践学习
上篇文章介绍drupal 7中的render API,这篇通过实践来更好的理解drupal render api.
创建一个模块
下面通过一个小模块学习drupal render api。
按照开发drupal模块的惯例,首先在sites/all/modules下面创建两个文件:
render_array.info
render_array.module
render_array.info的内容如下:
name = render array
description = understanding drupal's render api
package = test modules
core = 7.x
然后在render_array.module添加如下代码,挂个hook menu钩子。
<?php
function render_array_menu() {
$items['testpage'] = array (
'title' => 'learning render array',
'page callback' => 'learning_render_array',
'access callback' => TRUE,
);
   return $items;
}
在上面的代码中我们把tesgpage的回调函数设为learning_render_array。这样我们访问testpage页面时,该函数会被调用来生成这个页面的HTML文件。
一个简单的回调函数:
function learning_render_array() { $render_array['myrender_array'] = array (
'#markup' =>'<p>this is a test</p>',
);
return $render_array;
}
下面我们多加几个render array的属性。
function learning_render_array() { $render_array['myrender_array'] array(
'output' => t('<p>this is the main content, outputted by #theme</p>'),
'#note' => t('<p style="background-color:green">this is generated by out custom render array property #note</p>'),
'#pre_render' => array('add_heading_to_output'),
'#theme' => 'output_render_array',//theme function
'#theme_wrappers' => array ('render_array_wrapper'),//theme wrapper function
'#post_render' => array('add_footnote_to_output'),
),);
return $render_array;
}
除了带#外,上面的数组跟普通的关联数组没什么不同,drupal的render api将根据数组里的数据来渲染页面。我们一个个来看每个属性的作用。
最外的myrender_array键只是随意一个名称,可以自定义,里面的output和#note也是一样。
主要来说说其它四个属性,即#theme, #theme_wrappers,#pre_render,#post_render.
#theme,
如果设了这个值后,drupal就会把渲染该render array的数据交给该函数来完成,这里将被调用的函数名是theme_output_render_array,注意前面要加上theme_,而且要先用hook theme建一个相应的主题
钩子才能使用。下面的代码创建了两个主题钩子,一个是上面的说到output_render_array即theme_render_array_theme,另外一个是下面需要用到的。
function render_array_theme() {
  $items = array(
    'output_render_array' => array(
      'render element' => 'element',
    ),

    'render_array_wrapper' => array(
      'render element' => 'element',
    ),
  );
  return $items;
}
theme_output_render_array通过$vars['element']变量得到该render array的数据。注意这里之所以用‘element'作为key是因为我们在创建主题钩子时设定的,即’render element‘ => 'element'.你也可以用其它名称。
下面是theme_output_render_array函数的代码:
function theme_output_render_array($variables) { $output = '';
$output .= $variables['element']['output'].$variables['element']['#note'];
return $output;
}
在函数中我们把output和#note元素合并为$output并返回给drupal render api作进一步的处理。
其实,如果其它几个属性是空的话,这就是最终的HTML输出
'#pre_render'
按照调用顺序的话,这个函数的调用还在#theme之前发生,但它的作用主要是对数组里的数据进行操作。该函数也是接收一个参数,即整个数组数据。具体看代码
function add_heading_to_output($element) { $element['output'] = t('<p style="background-color:yellow;">this heading is generated by #pre_render</p>').$element['output'];
return $element;
}
上面的函数对output元素进行修改,也可以修改其它元素。
#theme_wrappers
这个值是一组函数。在所有子元素完成渲染并且数据保存到#children这个元素后,它就会被调用。主要可以用来加div什么的。一般不与#theme一起用。
function theme_render_array_wrapper($variables) { $output = '<div style="border:1px solid red">';
$output .= $variables['element']['#children'];
$output .= '</div>';
return $output;
}
'#post_render'
与其它属性不一样,#post_render接收两个参数,已经生成的HTML字符和原本的render array.
function add_footnote_to_output($markup,$element) { $markup = $markup.t('<p style="background-color:blue;">this is added by #post_render element</p>');
return $markup;
}
完整代码在此,有兴趣的朋友可以启用这个模块试下
file:
来自 http://www.zhetenger.com/understanding-drupal-7-render-api
Drupal 7 Render elements
Render elements are new to Drupal 7's theme layer. They've existed since Drupal 4.7 as part of the Form API, but they've now been injected into the heart of the theme system. A Render element is a complex data structure passed as a single parameter to theme(), as one of its variables. Render elements are fundamentally nested arrays that can include: The data to be rendered
Other render elements which are considered "children" of the element
An array of structures such as CSS and JavaScript files, that should be attached to the page when it is rendered
A list of theme hooks that can be used to theme the data
A list of callback functions to run on the element before and after it is themed
In template files, render elements are handled slightly differently then normal variables, using the syntax we saw earlier in our typical-hook.tpl.php example:
1 | <?php print render($element); ?>
|
In theme functions, render elements are included with its output using the drupal_render() function:
1 | $output .= drupal_render($element);<span></span>
|
来看一个简单的例子:
1 2 3 4 5 | $element = array(
'#prefix' => '<div class="plain">',
'#markup' => '<p>' . t('There is no spoon.') . '</p>',
'#suffix' => '</div>',
);
|
In the preceding render element our main property is the #markup property which uses a string containing HTML markup as-is for the rendered element. The other properties do exactly what they hint at, prepending or appending HTML markup to the rendered element. If drupal_render($element) was called, it would simply return the three strings concatenated together.
Now, that was an extremely simple example, but when we start looking at more complex render elements, we'll see that each array key in a render element can be one of the following three things:
A render element property . These are prefixed by #.
所有没有#前缀的都表示子元素A child element
传递到theme函数的变量,渲染元素的过程中会查看变量的前缀,但是theme()函数在找到合适的主题接口之后会去掉#
Taking these slightly mush rules, we can examine the following render element:
1 2 3 4 5 6 7 8 9 10 11 12 13 14 15 16 | $element = array(
'#prefix' => '<div class="less-simple">',
'#suffix' => '!</div>',
'kitten' => array(
'#type' => 'link',
'#title' => t('Kill me'),
'#href' => 'admin/core/hack',
),
'separator' => array(
'#markup' => '<br />',
),
'domo' => array(
'#theme' => 'username',
'#account' => $account,
),
);
|
首先,我们可以非常直观的看到我们的渲染元素的子元素是kitten, separator, and domo。separator 子元素是一个简单的 #markup 渲染元素。
再来看看domo元素,我们可以看到#theme的属性是设置成username,drupal_render()会将它传递到username主题函数(也就是theme_username()),意味着theme('username',$element['domo'])会被调用theme()会在所有的变量传递到theme_username之前去掉#符号。
最后,kitten元素的#type属性设置为link,#type属性是告诉drupal_render()如何渲染元素。在我们学习了hook_element_info()之后我们会明白的,现在我们可以这样理解,drupal_render()会传递kitten元素到drupal_pre_render_link()函数,它将渲染元素使用l()函数,并且返回字符串。
Render properties渲染属性
Render element的属性在两个地方有定义:一个是在drupal_render()中直接定义,以及他的帮助函数,下面的属性都是drupal_render()使用的:
#access: 布尔值,用来指定当前用户是否有权限查看元素。
#cache: 缓存项 An array indicating whether the element should optionally be retrieved from cache or stored in cache after rendering. See drupal_render() for more information.
#markup: HTML标记符包裹的字符串,如果已经设置了这个属性,#type属性就不需要设置了
#type: 字符串,指明哪个元素会被渲染,A string indicating which element is being rendered. The default properties for this type of element are extracted from the data specified with hook_element_info() and merged with the render element.
#defaults_loaded: A Boolean indicating whether the element type's default properties have already been loaded. If this is false or not set, the default properties from element_info() are added before drupal_render() looks at any other render properties (except for #access and #cache).
#pre_render: 数组,应用于元素被主题化之前回调函数
#theme: 字符串:指明哪个主题hook应用于此元素
#theme_wrappers: 数组:应用于主题hook之后调用的函数.
#post_render: An array of callbacks to apply to the element after theming.
#children: The rendered element and its children. It is normally built up internally by drupal_render() as it renders the elements, but can also be set by a #pre_render callback.
#prefix: A string containing markup to be prepended to the
#children property.
#suffix: A string containing markup to be appended to the #children property.
#weight: A number used to sort child elements.
#sorted: A Boolean indicating if the child elements have already been sorted. Since sorting a render array is expensive, if you know the data is already sorted (for example, the data was sorted when retrieved from the database), you should set this property to TRUE.
#states: JavaScript state information.
#attached: An array of CSS, JavaScript, libraries, or other associated attachments related to the element. See drupal_process_attached() for more information.
#printed : 布尔值:指明元素是否准备渲染
hook_element_info
The second place properties are defined is inside hook_element_info(). Each #type of render element needs to be defined in an implementation of hook_element_info(). system_element_info() defines most of Drupal core's render elements, which include several useful elements such as the markup element, the link element, and all the form elements. The following is a short snippet from system_element_info():
1 2 3 4 5 6 7 8 9 10 11 12 13 14 15 16 17 18 19 20 21 22 23 | [ 80 ]
function system_element_info() {
$types['markup'] = array(
'#markup' => '',
'#pre_render' => array('drupal_pre_render_markup'),
);
$types['link'] = array(
'#pre_render' => array('drupal_pre_render_link',
'drupal_pre_render_markup'),
);
$types['hidden'] = array(
'#input' => TRUE,
'#process' => array('ajax_process_form'),
'#theme' => 'hidden',
);
return $types;
}
|
如你所见,#type为link的元素会被传递到两个#pre_render 函数,drupal_pre_render_link() 函数用于查找特殊的渲染元素的属性,在我们之前的例子中有 #title, #href, and #options 属性。 重申一遍,hook_element_info()为他的渲染元素类型定义了默认的属性,它也在自己的内部API指定特别的渲染回调 定义渲染元素的属性。 使用这个框架,模块可以自己创建复杂的渲染数组,调用drupal_render()会在hook_element_info()使用指定属性。
hook_page_alter()
什么是关键点呢? By creating these complex render elements, we delay rendering of the data and allow opportunities to alter that data before it is rendered into a string. Before render elements were used in Drupal's theme system, themers and module developers often had to completely re-render data after it had been rendered the default way. This was obviously inefficient. Now each of these render elements can be altered in preprocess functions or even directly in a template file with the show() and hide() functions.
如果模板文件抵用hide($element['child']),其实就是简单的设置它的#printed属性为true,所有当我们print render($element)时,它会延迟调用,子元素不会打印,我们可以在之后 print render($element['child']),render()会设置#printed为false,传递元素到drupal_render()。
在使用hook_block_view()这个钩子函数都会返回渲染好的元素,任意的menu callback会使用一个页面的主要内容,也会返回渲染元素。
当页面的主要内容恢复,drupal_render_page()会装饰$page元素使用hook_page_build()。通过block模块的
block_page_build(),所有页面的区域会添加到$page元素作为子元素。每个区域的子元素就是一个个blocks了。druapl_render_page()允许模块通过hook_page_alter修改$page渲染数组
hook_page_alter()两个非常重要的作用就是:
hook_page_alter()允许插入block到page的主要内容里面
或者反过来,移动一个字段到当前的页面区域。
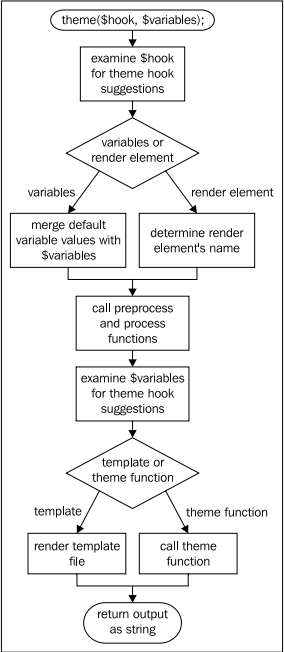
The power of theme()
It turns out that the theme() function has to do quite a bit of work once it's called. The following diagram should make its responsibilities and its order of operations clearer:
We've actually already discussed most of the work flow of theme(). There's only one aspect we haven't yet seen. So far, we've only called theme() with a simple string passed to its $hook parameter. However, we can actually pass more complex data to it and make use of the theme system's theme hook suggestions.
Theme hook suggestions
So re-using theme hooks in various places in our code is a good thing, of course. However, one problem you'll encounter is that theme functions lose context when a theme hook is re-used. For example, theme_links() has no idea if it's theming node links or comment links, which makes it difficult to style them differently. Fortunately, we can provide context to the theme system by providing a theme hook pattern as its first parameter:
The parts of the pattern are separated with a double underscore since some theme hooks (like user and user_profile) could be confusing if we were to use a single underscore to delineate the parts of the pattern. In fact, we can provide additional contexts if needed, as follows:
1 | [base hook]__[context]__[even more context]__[don't get crazy]
|
So how does this work and how does it help? In Drupal 7, we theme the node's links by calling theme('links__node', $vars). So theme() will use a theme_links__node() function if one has been provided. However, if one doesn't exist, it will use theme_links() . This allows us to know the context based on the theme function we are implementing. A more complex example is when Drupal 7 themes the node's contextual links; it calls theme('links__contextual__node', $vars). So, theme() will search for a theme_links__contextual__node(), then for theme_links__contextual(), and lastly theme_links() , shortening the pattern by one unit of context each time.
The theme hook pattern is an easy-to-use method of providing context, but some contributed modules need to provide more complex lists of context than the simple string pattern can provide. For this reason, an array of possible hook suggestions can also be passed to theme(). For example, both Views and the Menu block module use this method. While theming trees of menus, Menu block provides the following array to theme:
1 2 3 4 5 6 7 8 | $hook = array(
'menu_tree__menu_block__' . $delta,
'menu_tree__menu_block__' . $menu_name,
'menu_tree__menu_block',
'menu_tree__' . $menu_name,
'menu_tree',
);
theme($hook, $tree);
|
来自 http://www.programgo.com/article/44585446063/
见下面的红色部分,渲染 普通字符串文本数据加上表单
<?php
function custom_twelve_mac_transfor_menu()
{
$items['mac_transfor'] = array(
'title' => 'mac 地址转换',
'page callback' => 'custom_twelve_mac_transfor_mac_transfor',
'access arguments' => array('create wp_blog_clone_2 content'),
);
return $items;
}
function custom_twelve_mac_transfor_form()
{
$form['mac_address'] = array(
'#type' => 'textarea',
'#title' => t('mac address'),
'#cols' => 60,
'#rows' => 10,
'#default_value' => $_SESSION['transfor_form_textarea']
);
//提交按钮 //
$form['submit'] = array('#type' => 'submit', '#value' => t('submit'));
unset($_SESSION['transfor_form_textarea']);
unset($_SESSION['transform_arr']);
return $form;
}
function custom_twelve_mac_transfor_mac_transfor()
{
$table = '';
foreach($_SESSION['transform_arr'] as $key=>$value){
$table .='<table>';
foreach($value as $sonKey=>$mac){
$table .= '<tr><td>';
$table .= $mac;
$table .= '</td></tr>';
}
$table .='</table>';
}
$form = drupal_get_form('custom_twelve_mac_transfor_form');
// var_dump($form);
// exit;
$output = array(
'first_para' => $form,
'second_para' => array(
'#type' => 'markup',
'#markup' => $table,
),
);
// return $form;
return $output;
}