You are here
马哥 18_03 _OpenSSH服务及其相关应用 有大用
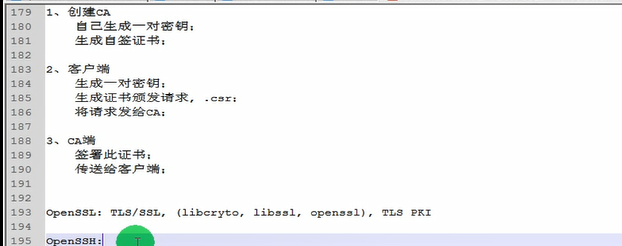
早期我们的主机实现远程登录的时候使用的协议叫 telnet
telnet TCP/23 远程登录协议
能够用到远程 需要用到远程登录的服务有很多
(sisql? )的服务,(sisql? )的路由器等,防火墙等等,有时也会用到远程服务
由于 telnet 天生设计的缺陷,
两大缺陷: 1)用户的认证过程是明文的,用户的账号密码传输完全是明文的,连握手认证协议都没有
2)数据传输也是明文的,
因此不安全
ssh: Secure SHell ( Secure 安全的 ),它也是一种远程登录协议,跟telnet一样,只不过.实现的机制不同而已,
TCP/22
ssh出现不久,就出现了ssh工具,它与telnet一样,是属于C/S架构的
C/S架构,服务器端需要一个服务器软件,监听到某个端口上(某个套接字上),
客户端发起连接请求,服务器接受到客户端的请求之后响应客户端的请求,双方通过认证,建立数据传输通道,并一直处于连接的活动状态,而用户一旦登录进来,所有的请求或所有的任务都已经完成之后,再退出
它需要一个专门的客户端软件和服务器端软件
ssh 刚刚诞生的时候,出现一个ssh软件,是欧洲的一家软件公司开发的,后来商业化了,没法用了,于是人们迫切需要能够运行在unix 和linux 之上的 SSH 软件,于是 OpenSSH 就诞生了
OpenSSH: 是 ssh 的开源实现版本,linux的很多软件项目都叫open,它指的是开源的意思
ssh 既是一种软件,又是一种协议
ssh 协议主要两个版本, v1 , v2
v1的版本,通过验证发现,在设计上有缺陷,无法有效拒绝中间人攻击,这种缺陷是非常致命的,所以到目前为止,v1处于废弃状态, 最好我们只使用v2,但是由于很多古老的网络设备上依然在使用v1的版本,因此我们也不得不让我们的客户端依然能够访问 sshv1 的服务 (那是因为网络设备更新的问题,但是一旦我们购置新设备,或者服务器,尽可能的拒绝v1版本的协议)
OpenSSH 对 sshv1 ,sshv2 都是支持的
客户端软件:
在 Linux 上, 有个命令叫 ssh
在 Windows 上, 本地安装一个远程连接工具即可
putty (我们要使用官方的英文版)(最简单的绿色软件,不用安装,直接使用,不到1M大小,功能很强大,但是国人汉化了,汉化的这个人在putty当中置了木马,所以导致很多管理员的root密码莫名其妙的丢失) (所以尽可能不要使用中文版,尤其是什么破解版,什么绿色版,这种软件一定不要用尤其在服务器不要用破解的,绿色的,直接解压就使用的软件包 ) (如果不想买的话,到官方下载试用版,然后找什么序列号什么的,它还是安全的,还可以用)
SecureCTR 很著名的远程连接工具,商业版,很多企业里面用的是 SecureCTR , 而且是企业自己定制的版本,比如说企业把服务器的许多密钥导进去SecureCTR ,把 SecureCTR 一压缩,然后到任何地方一解压,就可以直接使用的,
SSHSecureShellClient,它是免费版,也有商业版,它的强大在于,不但能提供SSH客户端工具,还能提供一个图形化的远程连接SSH服务器,实现文件传输的工具,就相当于Xshell一样的
(马哥的Xmanager,其中支持Xshell)
Xmanager(其中支持Xshell)
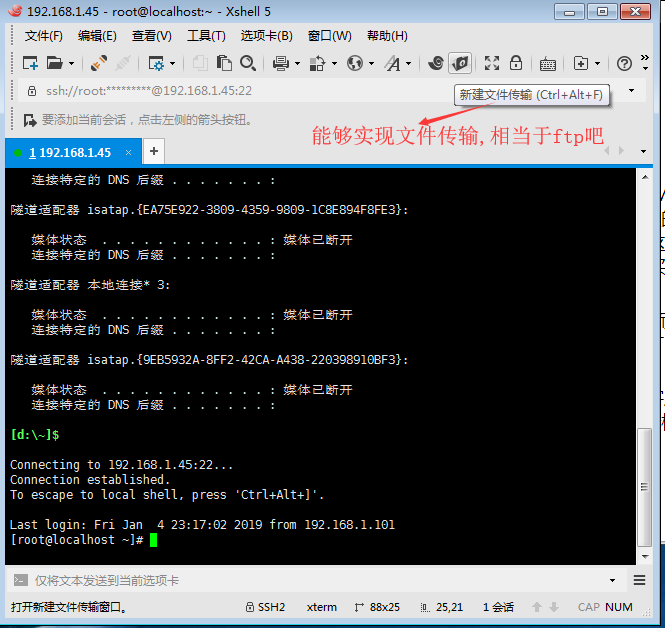
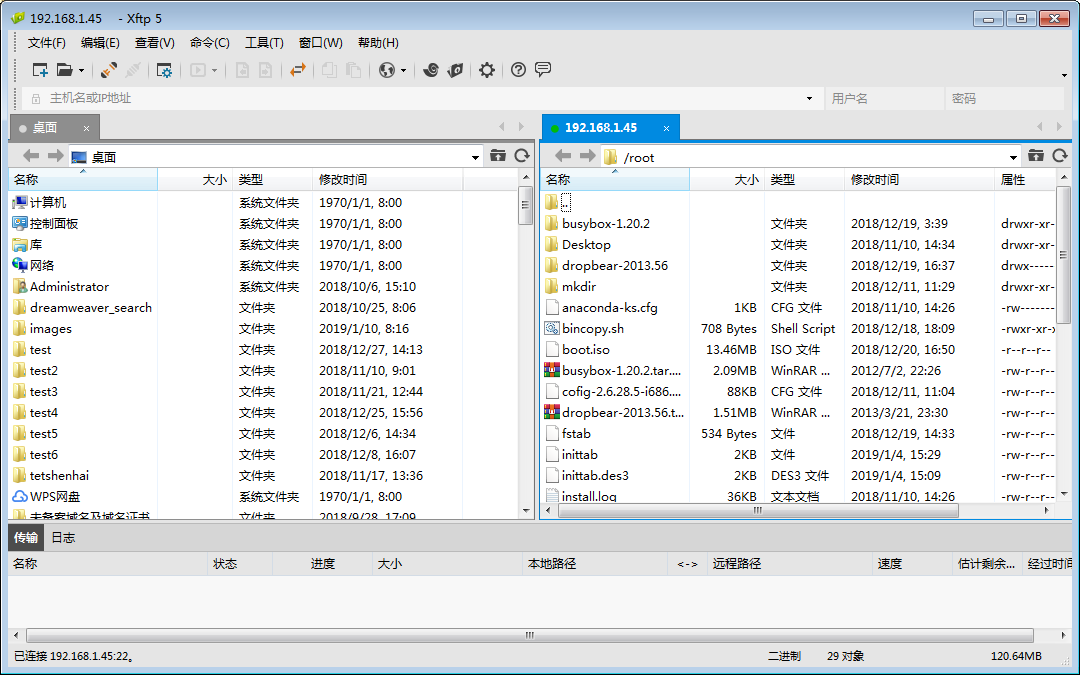
服务端: (ssh是无法实现 Windows 上的服务器端,因为这里的服务器端通常都是工作在Unix或Linux上的服务器端)
sshd (Openssh 提供的)
openssh (ssh,sshd) (d daemon 守护进程 )(sshd )(OpenSSH SSH daemon)
服务器端的sshd也是一个可执行程序,不过这个可执行程序默认是工作在后台,而且它不会退出(只要一退出,你的服务就中止了)
ssh认证的实现
ssh--> telnet 的主要目的就是让认证过程加密的
telnet 的账号和密码都是明文传送过去的
ssh 不是的
细节性的问题,听了也没用,也记不住,所以不说了,描述一下,ssh如何实现数据的加密传输的
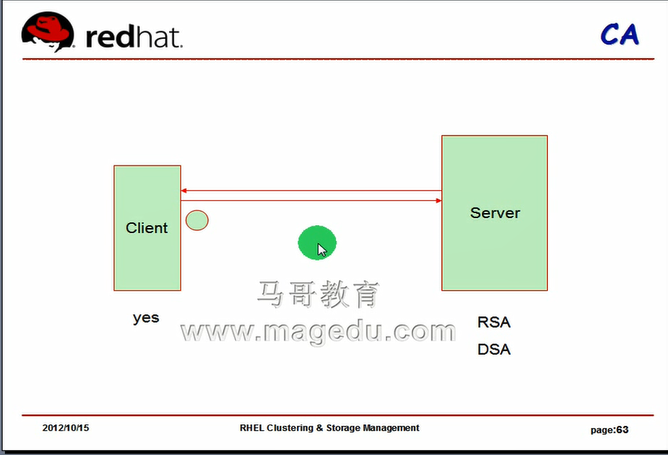
sshd: 主机密钥
马哥说这里第一次不使用CA,是客户端根据自己的经验确认
本地登录 用户名密码不需要在网上传输
远程登录 用户名密码会在网上传输

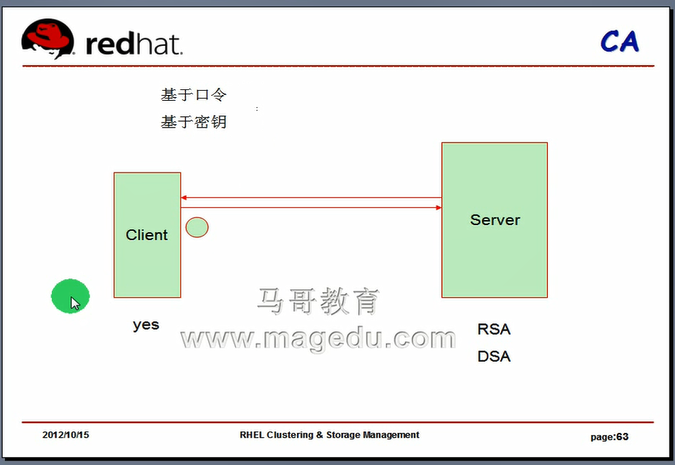
密钥认证:
不传密码,也不传加密的密码,更安全
口令认证:
一般情况下 用普通用户登录 然后 su - root 这样子是最安全的
否则 用root 登录,人家拿到开始的数据,可能进行暴力破解,得到root密码的
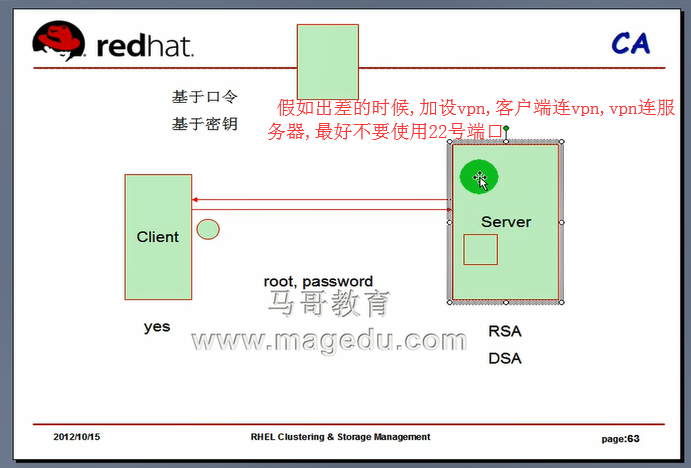
口令认证是最关键的也是唯一的一道关卡,将来真正在生产环境中使用的时候,要注意一点,通常要限定我们的服务器在互联网上任何主机都能登录的
就算是ssh服务,就算是普通用户,我们也要限定某些台有服主机能够远程登录的
假如出差的时候,加设vpn,客户端连vpn,vpn连服务器,最好不要使用22号端口,(因为大家都知道22端口是ssh服务端默认的,别人会扫描22端口,)换个22022,20022 什么之类的
密码(口令)要经常换(一般每个月换一次,最好是随机的,最好足够长)
最好拿一个u盘,带个一个客户端,带一个scret crt 里面有基于密钥的登录认证信息,
拿着自己的密钥,到任何地方登录的时候,就让它加载密钥进行登录
ssh 是由多个rpm包组成的
1)提供客户端
2)提供服务端
3)提供通用组件的
4)建立会话时用到的工具和库文件
客户端: ssh ( /etc/ssh/ssh_config )
服务器端: sshd ( /etc/ssh/sshd_config )
这两个程序都需要配置文件
都位于 /etc/ssh 目录下
几乎每一个服务都要用到配置文件,定义服务的工作特性也就是通过修改配置文件来完成的
linux的哲学思想之一就是使用文本文件保存程序的配置信息
[root@localhost ~]# rpm -qa | grep ssh
openssh-clients-4.3p2-82.el5 # 1)
openssh-4.3p2-82.el5 # 3)
openssh-askpass-4.3p2-82.el5 # 4)
openssh-server-4.3p2-82.el5 # 2)
[root@localhost ~]#
[root@localhost ~]# rpm -qi openssh
Name : openssh Relocations: (not relocatable)
Version : 4.3p2 Vendor: Red Hat, Inc.
Release : 82.el5 Build Date: 2012年01月04日 星期三 21时41分26秒
Install Date: 2018年11月10日 星期六 14时13分22秒 Build Host: x86-002.build.bos.redhat.com
Group : Applications/Internet Source RPM: openssh-4.3p2-82.el5.src.rpm
Size : 747178 License: BSD
Signature : DSA/SHA1, 2012年01月05日 星期四 23时55分32秒, Key ID 5326810137017186
Packager : Red Hat, Inc. <http://bugzilla.redhat.com/bugzilla>
URL : http://www.openssh.com/portable.html
Summary : The OpenSSH implementation of SSH protocol versions 1 and 2
Description :
SSH(Secure SHell)在远程机器上登录并执行命令的程序。
SSH 代替了 rlogin 和 rsh 来为两个非信任的主机间提供通过
不安全的网络进行安全加密通讯。X11 连接和任意 TCP/IP
端口能够在安全频道中被转发。
OpenSSH 是最新的免费 SSH 的 OpenBSD 的版本。
该软件包包括了最新的安全性和性能,并且删除了
所有独立库的专利。
这个软件包包括了 OpenSSH 客户端和服务器所需要的核心文件。
要使用这个软件包,您还需要安装 openssh-clients 或 openssh-server,
或者全部安装这两个软件。
红帽系列的系统上,服务器装上去之后 ssh (sshd)服务默认安装并且已经启动了的
,默认监听在22号端口上
netstat
-r (route)显示路由表
-t (tcp connetctions) 跟tcp协议相关的所有的会话或连接 跟tcp我们当前主机上跟tcp协议所建立的所有会话,
-u (udp connetctions)
-n (number)以数字方式来显示ip地址和端口号
-l (listen,listening)显示处于监听状态的服务 (监听表示服务已经启动起来,等待客户端连接的这种连接状态)
p:(program,programme )显示监听指定套接字的进程的进程号及进程名,哪个程序(进程)监听了当前这个服务
[root@localhost ~]# netstat -tnlp
Active Internet connections (only servers)
Proto Recv-Q Send-Q Local Address Foreign Address State PID/Program name
tcp 0 0 127.0.0.1:2208 0.0.0.0:* LISTEN 3839/./hpiod
tcp 0 0 0.0.0.0:708 0.0.0.0:* LISTEN 3494/rpc.statd
tcp 0 0 0.0.0.0:111 0.0.0.0:* LISTEN 3444/portmap
tcp 0 0 0.0.0.0:22 0.0.0.0:* LISTEN 3862/sshd
tcp 0 0 127.0.0.1:631 0.0.0.0:* LISTEN 3876/cupsd
tcp 0 0 127.0.0.1:25 0.0.0.0:* LISTEN 3917/sendmail
tcp 0 0 127.0.0.1:2207 0.0.0.0:* LISTEN 3844/python
tcp 0 0 :::22 :::* LISTEN 3862/sshd
[root@localhost ~]#
[root@localhost ~]# netstat -tu
如果不加 l 的话,显示的是处于连接状态的tcp或udp会话(连接),处于当前正在连接状态的会话(连接)
加上 l 表示处于监听状态,我这个服务已经启动了,等待别人访问,这叫服务
加个n 就不显示ssh了,就显示的是 22 了
其实我们任何时候都要加n的,不然的话,它会反解ip地址和端口名称的,会耽误时间,速度比较慢
( established 已建立的状态)
但是 udp的协议是不会listen的,因为udp是不需要三次握手的,它是没有状态的( 虽然可能处于listen?至少说没有 tcp的 listen 状态)
Active Internet connections (w/o servers)
Proto Recv-Q Send-Q Local Address Foreign Address State
tcp 0 0 192.168.1.45:ssh 192.168.1.101:lan900_remote ESTABLISHED
tcp 0 0 192.168.1.45:ssh 192.168.1.101:emsd-port ESTABLISHED
[root@localhost ~]#
[root@localhost ~]# netstat -tun
Active Internet connections (w/o servers)
Proto Recv-Q Send-Q Local Address Foreign Address State
tcp 0 0 192.168.1.45:22 192.168.1.101:2395 ESTABLISHED
tcp 0 0 192.168.1.45:22 192.168.1.101:1928 ESTABLISHED
[root@localhost ~]#
[root@localhost ~]# netstat -tunl
Active Internet connections (only servers)
Proto Recv-Q Send-Q Local Address Foreign Address State
tcp 0 0 127.0.0.1:2208 0.0.0.0:* LISTEN
tcp 0 0 0.0.0.0:708 0.0.0.0:* LISTEN
tcp 0 0 0.0.0.0:111 0.0.0.0:* LISTEN
tcp 0 0 0.0.0.0:22 0.0.0.0:* LISTEN
tcp 0 0 127.0.0.1:631 0.0.0.0:* LISTEN
tcp 0 0 127.0.0.1:25 0.0.0.0:* LISTEN
tcp 0 0 127.0.0.1:2207 0.0.0.0:* LISTEN
tcp 0 0 :::22 :::* LISTEN
udp 0 0 0.0.0.0:702 0.0.0.0:*
udp 0 0 0.0.0.0:705 0.0.0.0:*
udp 0 0 0.0.0.0:5353 0.0.0.0:*
udp 0 0 0.0.0.0:111 0.0.0.0:*
udp 0 0 0.0.0.0:631 0.0.0.0:*
udp 0 0 0.0.0.0:40062 0.0.0.0:*
udp 0 0 :::5353 :::*
udp 0 0 :::50299 :::*
[root@localhost ~]#
[root@localhost ~]# netstat -tunlp
Active Internet connections (only servers)
Proto Recv-Q Send-Q Local Address Foreign Address State PID/Program name
tcp 0 0 127.0.0.1:2208 0.0.0.0:* LISTEN 3839/./hpiod
tcp 0 0 0.0.0.0:708 0.0.0.0:* LISTEN 3494/rpc.statd
tcp 0 0 0.0.0.0:111 0.0.0.0:* LISTEN 3444/portmap
tcp 0 0 0.0.0.0:22 0.0.0.0:* LISTEN 3862/sshd
tcp 0 0 127.0.0.1:631 0.0.0.0:* LISTEN 3876/cupsd
tcp 0 0 127.0.0.1:25 0.0.0.0:* LISTEN 3917/sendmail
tcp 0 0 127.0.0.1:2207 0.0.0.0:* LISTEN 3844/python
tcp 0 0 :::22 :::* LISTEN 3862/sshd
udp 0 0 0.0.0.0:702 0.0.0.0:* 3494/rpc.statd
udp 0 0 0.0.0.0:705 0.0.0.0:* 3494/rpc.statd
udp 0 0 0.0.0.0:5353 0.0.0.0:* 4064/avahi-daemon
udp 0 0 0.0.0.0:111 0.0.0.0:* 3444/portmap
udp 0 0 0.0.0.0:631 0.0.0.0:* 3876/cupsd
udp 0 0 0.0.0.0:40062 0.0.0.0:* 4064/avahi-daemon
udp 0 0 :::5353 :::* 4064/avahi-daemon
udp 0 0 :::50299 :::* 4064/avahi-daemon
[root@localhost ~]#
下面的方法也可以获得它的运行状态
[root@localhost ~]# service sshd status
openssh-daemon (pid 3862) 正在运行...
[root@localhost ~]#
[root@localhost ~]# cd /etc/ssh
[root@localhost ssh]# ls
moduli ssh_host_dsa_key ssh_host_key.pub
ssh_config ssh_host_dsa_key.pub ssh_host_rsa_key
sshd_config ssh_host_key ssh_host_rsa_key.pub
moduli 是ssh会话中用到的密钥交换,认证过程等相关信息,不用管
ssh_host_dsa_key , ssh_host_dsa_key.pub
ssh_host_rsa_key , ssh_host_rsa_key.pub
上面四个是为sshv2版本使用的
ssh_host_key , ssh_host_key.pub 是为 sshv1算法使用的
看客户端连接请求,使用的是什么,就发哪个 pub
支持v1不用说了
支持v2的话,优先发 ssh_host_rsa_key 的 pub ,因为 rsa 比 dsa 更优先
主机密钥是 ssh 加密会话之所以得以建立的一个根本前提
[root@localhost ssh]#
私钥文件都是600权限,sshd_config 也是 600权限,因为它跟安全相关
[root@localhost ssh]# ll
总计 204
-rw------- 1 root root 132839 2012-01-04 moduli
-rw-r--r-- 1 root root 1836 2012-01-04 ssh_config
-rw------- 1 root root 3332 2012-01-04 sshd_config
-rw------- 1 root root 668 11-10 14:28 ssh_host_dsa_key
-rw-r--r-- 1 root root 590 11-10 14:28 ssh_host_dsa_key.pub
-rw------- 1 root root 963 11-10 14:28 ssh_host_key
-rw-r--r-- 1 root root 627 11-10 14:28 ssh_host_key.pub
-rw------- 1 root root 1675 11-10 14:28 ssh_host_rsa_key
-rw-r--r-- 1 root root 382 11-10 14:28 ssh_host_rsa_key.pub
[root@localhost ssh]#
ssh_config 客户端文件易理解,定义客户端的工作特性,马哥不作讲解
[root@localhost ssh]# export Lang=en
[root@localhost ssh]# pstree (processes true)
init-+-acpid
|-atd
|-auditd-+-audispd---{audispd}
| `-{auditd}
|-automount---4*[{automount}]
|-avahi-daemon---avahi-daemon
|-crond
|-cupsd
|-dbus-daemon
|-events/0
|-events/1
|-events/2
|-events/3
|-gam_server
|-gpm
|-hald---hald-runner-+-hald-addon-acpi
| |-hald-addon-keyb
| `-hald-addon-stor
|-hcid
|-hidd
|-hpiod
|-hpssd.py
|-irqbalance
|-2*[iscsid]
|-iscsiuio---2*[{iscsiuio}]
|-khelper
|-klogd
|-krfcommd
|-ksoftirqd/0
|-ksoftirqd/1
|-ksoftirqd/2
|-ksoftirqd/3
|-kthread-+-aio/0
| |-aio/1
| |-aio/2
| |-aio/3
| |-ata/0
| |-ata/1
| |-ata/2
| |-ata/3
| |-ata_aux
| |-bnx2i_thread/0
| |-bnx2i_thread/1
| |-bnx2i_thread/2
| |-bnx2i_thread/3
| |-cnic_wq
| |-cqueue/0
| |-cqueue/1
| |-cqueue/2
| |-cqueue/3
| |-ib_addr
| |-ib_cm/0
| |-ib_cm/1
| |-ib_cm/2
| |-ib_cm/3
| |-ib_inform
| |-ib_mcast
| |-iscsi_eh
| |-iw_cm_wq
| |-kacpid
| |-kauditd
| |-kblockd/0
| |-kblockd/1
| |-kblockd/2
| |-kblockd/3
| |-kgameportd
| |-khubd
| |-khungtaskd
| |-2*[kjournald]
| |-kmpath_handlerd
| |-kmpathd/0
| |-kmpathd/1
| |-kmpathd/2
| |-kmpathd/3
| |-kpsmoused
| |-kseriod
| |-ksnapd
| |-kstriped
| |-kswapd0
| |-local_sa
| |-mpt/0
| |-mpt_poll_0
| |-2*[pdflush]
| |-rdma_cm
| |-rpciod/0
| |-rpciod/1
| |-rpciod/2
| |-rpciod/3
| `-scsi_eh_0
|-migration/0
|-migration/1
|-migration/2
|-migration/3
|-6*[mingetty]
|-pcscd---{pcscd}
|-portmap
|-rhsmcertd
|-rpc.idmapd
|-rpc.statd
|-sdpd
|-2*[sendmail]
|-smartd
|-sshd-+-sshd---bash---pstree
| `-sshd---bash
|-syslogd
|-udevd
|-xfs
|-xinetd
`-yum-updatesd

多个 sshd进程, 几乎每个用户请求连进来以后,,,sshd服务启动起来以后,启动一个主进程,这个主进程监听用户的请求,一旦有用户请求进来了,就生成一个子进程来响应它的请求
看看 sshd_config 这个配置文件
[root@localhost ssh]# vim sshd_config
井号开头的都是注释, 井号开头后空格是纯注释,井号开头后面没空格的表示可以启用的选项(可以启用的参数)
这是不是使用 等于 = 的格式了,直接参数后面空格然后是值.
# $OpenBSD: sshd_config,v 1.73 2005/12/06 22:38:28 reyk Exp $
# This is the sshd server system-wide configuration file. See
# sshd_config(5) for more information.
# This sshd was compiled with PATH=/usr/local/bin:/bin:/usr/bin
# The strategy used for options in the default sshd_config shipped with
# OpenSSH is to specify options with their default value where
# possible, but leave them commented. Uncommented options change a
# default value.
#Port 22 #默认是22端口,可以注释掉, 我们可以改成 2222 端口,大多数参数都有默认值,没有默认值或不使用默认值
# 可以启用起来,修改一下值
#Port 2222
#Protocol 2,1 # (Protocol 协议)v2,v1都支持,并且优先使用v2
Protocol 2 # 协议版本 v2
#AddressFamily any # any表示 ipv4,ipv6 都可以,否则的话把 any改为 ipv4或ipv6
#ListenAddress 0.0.0.0 # 监听在哪个地址上,只有这一个地址提供ssh服务, 0.0.0.0 表示任意地址(假如有多个网卡的话)
#ListenAddress 192.168.1.45
#ListenAddress :: # 我的理解 全部省掉 即 ::也许是 ipv6的任何地址吧
# HostKey for protocol version 1 #用于指定协议1 用到的密钥
#HostKey /etc/ssh/ssh_host_key
# HostKeys for protocol version 2 #用于指定协议2 用到的密钥
#HostKey /etc/ssh/ssh_host_rsa_key
#HostKey /etc/ssh/ssh_host_dsa_key
# Lifetime and size of ephemeral version 1 server key
#KeyRegenerationInterval 1h #客户端临时的随机的对称加密密钥重新生成的时间间隔 1小时
#ServerKeyBits 768 #服务器端密钥长度,觉得嫌短,不够安全,可以改成 2048
# Logging
# obsoletes QuietMode and FascistLogging
#SyslogFacility AUTH #使用哪一个facility 来记录日志的
SyslogFacility AUTHPRIV
#LogLevel INFO #日志级别是info
# Authentication: #跟认证相关的,用户输入账号密码之后怎么去认证的这些属性相关的
#LoginGraceTime 2m #登录的宽容期 宽限期 建立了会话后,不输账号密码(只输账号,不输密码),此时服务器是有一个进程处于工作状态,浪费资源,因此,它表示最多等多长时间,不登录就强行退出了,默认是2m, 两分钟
#PermitRootLogin yes # ( Permit 权限 许可证 允许) 是否允许管理员直接登录的,不允许的话,会更安全,,,它不是不允许登录,而是不允许直接登录,使用一个普通用户,然后 su - root 就可以了
PermitRootLogin no
#StrictModes yes #是否使用严格限定模式,不太重要,就不释解了
#MaxAuthTries 6 #(Auth authentication 认证;身份验证;证明,鉴定;密押)最大登录尝试次数(验证次数),超过这个次数,就把终端锁定,告诉你,这一会儿不允许登录,就稍等一会,再重新尝试登录 (不限定的话,有可能暴力破解)
#RSAAuthentication yes #( authentication 认证;身份验证;证明,鉴定;密押)是不是支持使用RSA认证的 (rsa认证是一种基于密钥的认证,是基于密钥的一种机制,这个是不是说支持服务端的rsa?不懂)
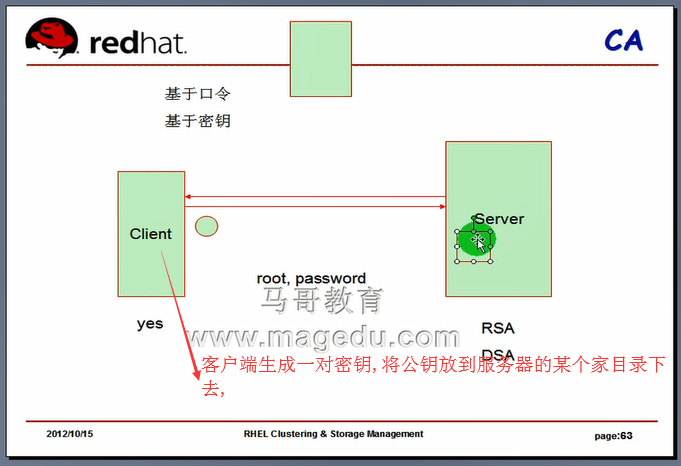
#PubkeyAuthentication yes # 这才是真正的基于密钥的认证,假如启用的话,客户端生成一对密钥,将公钥放到服务器的某个家目录下去,放到服务器的家目录下面的哪个文件里面呢? 见下一行 家目录下的.ssh/authorized_keys
#AuthorizedKeysFile .ssh/authorized_keys #( authorized 权威认可的,审定的,经授权的 )
# For this to work you will also need host keys in /etc/ssh/ssh_known_hosts
#RhostsRSAAuthentication no # 这是主机认证的,如何实现主机认证;如何信任对方的主机,接下来就不需要登录了(不需要输用户名密码),直接可以登录对方主机了,一般而言,这不安全,不允许,所以下面的就不用管它
# similar for protocol version 2
#HostbasedAuthentication no
# Change to yes if you don't trust ~/.ssh/known_hosts for
# RhostsRSAAuthentication and HostbasedAuthentication
#IgnoreUserKnownHosts no
# Don't read the user's ~/.rhosts and ~/.shosts files
#IgnoreRhosts yes
# To disable tunneled clear text passwords, change to no here!
#PasswordAuthentication yes
#PermitEmptyPasswords no
PasswordAuthentication yes # 是不是允许使用基于口令的认证,如果不允许的,我们此前从来有建立过基于密钥认证的用户,就远程登录不上去了,所以这一项应该是启用的
# Change to no to disable s/key passwords
#ChallengeResponseAuthentication yes
ChallengeResponseAuthentication no # ( Challenge 挑站模式 )是否启用挑站性握手认证协议,这个不安全,一般不允许使用,不用管它,不用了
# Kerberos options # Kerberos 是什么,很难理解,将来讲到的时候再说吧,不用管它了
#KerberosAuthentication no # 是否基于Kerberos论证的, 不用管它了
#KerberosOrLocalPasswd yes
#KerberosTicketCleanup yes
#KerberosGetAFSToken no
# GSSAPI options
#GSSAPIAuthentication no # 是否使用 GSSAPIAuthentication 认证机制的,认证机制有很多种,比如login,默认情况下用户登录的时候,使用login程序实现认证的,也有GSSAPI 还有md5的其它认证机制,回头再解释
GSSAPIAuthentication yes
#GSSAPICleanupCredentials yes
GSSAPICleanupCredentials yes
# Set this to 'yes' to enable PAM authentication, account processing,
# and session processing. If this is enabled, PAM authentication will
# be allowed through the ChallengeResponseAuthentication mechanism.
# Depending on your PAM configuration, this may bypass the setting of
# PasswordAuthentication, PermitEmptyPasswords, and
# "PermitRootLogin without-password". If you just want the PAM account and
# session checks to run without PAM authentication, then enable this but set
# ChallengeResponseAuthentication=no
#UsePAM no
UsePAM yes # ( PAM Pluggable Authentication Module 可插入式的认证模块 ) 认证是不是使用PAM来认证,一般而言,系统都应该使用PAM的,这是一种可插入式认证模块,将来在服务讲到最后的时候,会专门讲一次课,来讲PAM是怎么实现的,怎么去定制PAM的,现在我们明白,是应该使用PAM的,但是PAM是一种很复杂的机制,现在驾驭不了它,编译过的软件或者系统已经安装的软件,它自己的PAM已经完成了,不用管,但是,如果是我们自己编译软件的话,最好先不要使用PAM来认证
# Accept locale-related environment variables
AcceptEnv LANG LANGUAGE LC_CTYPE LC_NUMERIC LC_TIME LC_COLLATE LC_MONETARY LC_MESSAGES
AcceptEnv LC_PAPER LC_NAME LC_ADDRESS LC_TELEPHONE LC_MEASUREMENT
AcceptEnv LC_IDENTIFICATION LC_ALL
#AllowTcpForwarding yes
#GatewayPorts no
#X11Forwarding no # 是不是转发X11请求的
X11Forwarding yes
#X11DisplayOffset 10
#X11UseLocalhost yes
#PrintMotd yes # 在用户登录的时候,是否会显示Motd文件的内容 /etc/motd
#PrintLastLog yes #是不是显示上一次,通过哪个主机,在什么时间登录过,相当不应该,因为这些东西都叫信息泄露,这些信息都为别人提供破解你的主机提供一些珠丝马迹作为参考,至少别人可以看到通过哪些主机是可以登录了,而且登录的是哪个用户,所以不到万不得已,不要提供下面的banner,不要打印任何的信息,,,虽然看上去很友好,但是放到互联网上去,这种信息出现的越少越好,包括软件版本号都不要提供的 openssl 是不是也是个软件吧,如果人家知道你的软件版本,网上搜下这个版本的漏洞,就开始攻击你
在强调一下,在涉及到网络安全,主机安全,服务安全的时候,怎么强调如何隐藏信息都不为过,能不输出任何信息,最好不要输出任何信息
#TCPKeepAlive yes
#UseLogin no
#UsePrivilegeSeparation yes
#PermitUserEnvironment no
#Compression delayed
#ClientAliveInterval 0
#ClientAliveCountMax 3
#ShowPatchLevel no
#UseDNS yes
#PidFile /var/run/sshd.pid
#MaxStartups 10
#PermitTunnel no
#ChrootDirectory none
# no default banner path
#Banner /some/path # (Banner 横幅,横幅广告,欢迎标语) 如果用户登录ssh的时候,把/some/path文件的内容当作欢迎标语给用户打印一次,*(用户登录之前(登录的时候),都会显示这个内容信息的)
# override default of no subsystems
Subsystem sftp /usr/libexec/openssh/sftp-server #子系统,ssh服务有个子程序叫 sftp ,(ftp 是文件传输协议,是个明文的文件传输协议,)(把ftp基于ssh来实现,就叫sftp)(当然也可以把ftp基于ssl来实现,就ftps,它俩是不同的,不是一码事) 只要这一项指令在这儿,默认它就是启动的,所以我们可以基于ssh来使用 sftp 服务的
[root@localhost ssh]#
#KeyRegenerationInterval 1h #密钥重新生成的时间间隔 1小时
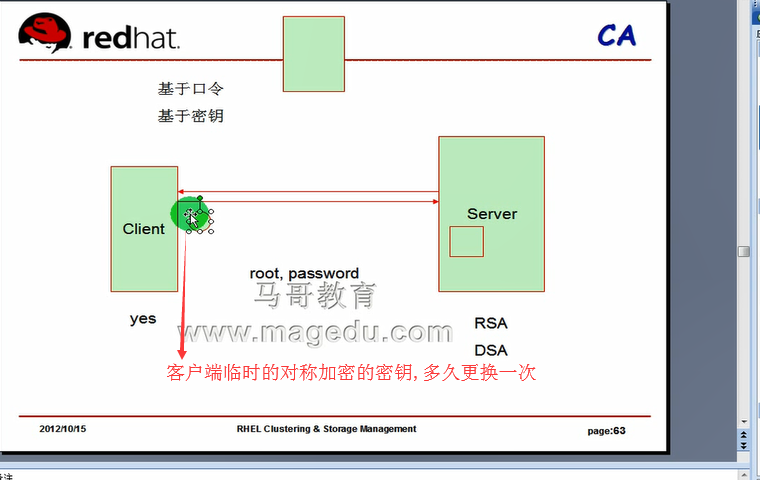
#PubkeyAuthentication yes #假如启用的话,客户端生成一对密钥,将公钥放到服务器的某个家目录下去 ( 家目录下的.ssh/authorized_keys )
[root@localhost ~]# cat /etc/motd
[root@localhost ~]#
man sshd_config 可以获取到 /etc/ssh/sshd_config 文件的帮助
[root@localhost ssh]# man sshd_config
AllowUsers 允许哪些用户通过 ssh 访问的,白名单

AllowGroups 白名单组

DenyUsers 拒绝哪些用户通过 ssh 访问的,黑名单

DenyGroups 黑名单组

一般来说,黑白名单同时出现的话,黑名单失效(一般来讲是这样子的)
我们将来限定仅允许某些用户登录的话,是可以的
白名单为空就是允许所有人
黑名单为空就是不允许所有人
白名单为空,黑名单也为空的话,就是允许所有人登录吧,因为白名单的优先级高啊
马哥的服务器本身是只允许管理员登录的,远程的任何其它用户尝试登录,都登录不进来
ssh服务的任何的改变配置,要想让它生效,必须重启服务的
服务脚本是 /etc/init.d/sshd
[root@localhost ~]# cd /etc/init.d/
[root@localhost init.d]# ls
acpid dund killall ntpd single
anacron firstboot krb524 pand smartd
apmd functions kudzu pcscd squid
atd gpm lvm2-monitor portmap sshd
auditd haldaemon mcstrans psacct svnserve
autofs halt mdmonitor rawdevices syslog
avahi-daemon hidd mdmpd rdisc tux
avahi-dnsconfd hplip messagebus readahead_early vncserver
bluetooth httpd microcode_ctl readahead_later wdaemon
capi ip6tables multipathd restorecond winbind
conman ipmi netconsole rhnsd wpa_supplicant
cpuspeed iptables netfs rhsmcertd xfs
crond irda netplugd rpcgssd xinetd
cups irqbalance network rpcidmapd ypbind
cups-config-daemon iscsi NetworkManager rpcsvcgssd yum-updatesd
dc_client iscsid nfs saslauthd
dc_server isdn nfslock sendmail
dnsmasq kdump nscd setroubleshoot
[root@localhost init.d]#
[root@localhost init.d]# service sshd aa (随便给个错的)
用法:/etc/init.d/sshd {start|stop|restart|reload|condrestart|status}
reload 就是让你不用重启服务也可以重新加载配置文件的
有个信号,传过来的时候可以让我们的应用程序不用重启也能够重读配置文件的,那个叫 1 号信号 (SIGHUB 或叫简写为 H)
[root@localhost init.d]#
[root@localhost init.d]# pwd
/etc/init.d
[root@localhost init.d]# vim sshd
#!/bin/bash
#
# Init file for OpenSSH server daemon
#
# chkconfig: 2345 55 25
# description: OpenSSH server daemon
#
# processname: sshd
# config: /etc/ssh/ssh_host_key
# config: /etc/ssh/ssh_host_key.pub
# config: /etc/ssh/ssh_random_seed
# config: /etc/ssh/sshd_config
# pidfile: /var/run/sshd.pid
# source function library
. /etc/rc.d/init.d/functions
# pull in sysconfig settings
[ -f /etc/sysconfig/sshd ] && . /etc/sysconfig/sshd
RETVAL=0
prog="sshd"
# Some functions to make the below more readable
KEYGEN=/usr/bin/ssh-keygen
SSHD=/usr/sbin/sshd
RSA1_KEY=/etc/ssh/ssh_host_key
RSA_KEY=/etc/ssh/ssh_host_rsa_key
DSA_KEY=/etc/ssh/ssh_host_dsa_key
PID_FILE=/var/run/sshd.pid
runlevel=$(set -- $(runlevel); eval "echo \$$#" )
do_rsa1_keygen() {
if [ ! -s $RSA1_KEY ]; then
echo -n $"Generating SSH1 RSA host key: "
rm -f $RSA1_KEY
if $KEYGEN -q -t rsa1 -f $RSA1_KEY -C '' -N '' >&/dev/null; then
chmod 600 $RSA1_KEY
chmod 644 $RSA1_KEY.pub
if [ -x /sbin/restorecon ]; then
/sbin/restorecon $RSA1_KEY.pub
fi
success $"RSA1 key generation"
echo
else
failure $"RSA1 key generation"
echo
exit 1
fi
fi
}
do_rsa_keygen() {
if [ ! -s $RSA_KEY ]; then
echo -n $"Generating SSH2 RSA host key: "
rm -f $RSA_KEY
if $KEYGEN -q -t rsa -f $RSA_KEY -C '' -N '' >&/dev/null; then
chmod 600 $RSA_KEY
chmod 644 $RSA_KEY.pub
if [ -x /sbin/restorecon ]; then
/sbin/restorecon $RSA_KEY.pub
fi
success $"RSA key generation"
echo
else
failure $"RSA key generation"
echo
exit 1
fi
fi
}
do_dsa_keygen() {
if [ ! -s $DSA_KEY ]; then
echo -n $"Generating SSH2 DSA host key: "
rm -f $DSA_KEY
if $KEYGEN -q -t dsa -f $DSA_KEY -C '' -N '' >&/dev/null; then
chmod 600 $DSA_KEY
chmod 644 $DSA_KEY.pub
if [ -x /sbin/restorecon ]; then
/sbin/restorecon $DSA_KEY.pub
fi
success $"DSA key generation"
echo
else
failure $"DSA key generation"
echo
exit 1
fi
fi
}
do_restart_sanity_check()
{
$SSHD -t
RETVAL=$?
if [ ! "$RETVAL" = 0 ]; then
failure $"Configuration file or keys are invalid"
echo
fi
}
start()
{
# Create keys if necessary
do_rsa1_keygen
do_rsa_keygen
do_dsa_keygen
cp -af /etc/localtime /var/empty/sshd/etc
echo -n $"Starting $prog: "
$SSHD $OPTIONS && success || failure
RETVAL=$?
[ "$RETVAL" = 0 ] && touch /var/lock/subsys/sshd
echo
}
stop()
{
echo -n $"Stopping $prog: "
if [ -n "`pidfileofproc $SSHD`" ] ; then
killproc $SSHD
else
failure $"Stopping $prog"
fi
RETVAL=$?
# if we are in halt or reboot runlevel kill all running sessions
# so the TCP connections are closed cleanly
if [ "x$runlevel" = x0 -o "x$runlevel" = x6 ] ; then
killall $prog 2>/dev/null
fi
[ "$RETVAL" = 0 ] && rm -f /var/lock/subsys/sshd
echo
}
reload()
{
echo -n $"Reloading $prog: "
if [ -n "`pidfileofproc $SSHD`" ] ; then
killproc $SSHD -HUP # HUP 传递1号信号到这个进程
else
failure $"Reloading $prog"
fi
RETVAL=$?
echo
}
case "$1" in
start)
start
;;
stop)
stop
;;
restart)
stop
start
;;
reload)
reload
;;
condrestart)
if [ -f /var/lock/subsys/sshd ] ; then
do_restart_sanity_check
if [ "$RETVAL" = 0 ] ; then
stop
# avoid race
sleep 3
start
fi
fi
;;
status)
status -p $PID_FILE openssh-daemon
RETVAL=$?
;;
*)
echo $"Usage: $0 {start|stop|restart|reload|condrestart|status}"
RETVAL=1
esac
exit $RETVAL
看看 1 号信号
[root@localhost ~]# kill -l
1) SIGHUP 2) SIGINT 3) SIGQUIT 4) SIGILL
5) SIGTRAP 6) SIGABRT 7) SIGBUS 8) SIGFPE
9) SIGKILL 10) SIGUSR1 11) SIGSEGV 12) SIGUSR2
13) SIGPIPE 14) SIGALRM 15) SIGTERM 16) SIGSTKFLT
17) SIGCHLD 18) SIGCONT 19) SIGSTOP 20) SIGTSTP
21) SIGTTIN 22) SIGTTOU 23) SIGURG 24) SIGXCPU
25) SIGXFSZ 26) SIGVTALRM 27) SIGPROF 28) SIGWINCH
29) SIGIO 30) SIGPWR 31) SIGSYS 34) SIGRTMIN
35) SIGRTMIN+1 36) SIGRTMIN+2 37) SIGRTMIN+3 38) SIGRTMIN+4
39) SIGRTMIN+5 40) SIGRTMIN+6 41) SIGRTMIN+7 42) SIGRTMIN+8
43) SIGRTMIN+9 44) SIGRTMIN+10 45) SIGRTMIN+11 46) SIGRTMIN+12
47) SIGRTMIN+13 48) SIGRTMIN+14 49) SIGRTMIN+15 50) SIGRTMAX-14
51) SIGRTMAX-13 52) SIGRTMAX-12 53) SIGRTMAX-11 54) SIGRTMAX-10
55) SIGRTMAX-9 56) SIGRTMAX-8 57) SIGRTMAX-7 58) SIGRTMAX-6
59) SIGRTMAX-5 60) SIGRTMAX-4 61) SIGRTMAX-3 62) SIGRTMAX-2
63) SIGRTMAX-1 64) SIGRTMAX
[root@localhost ~]#
kill 发过去 -SIGHUP(或 -HUP 或 -1) 都一个意思
上面这就是我们ssh服务端的基本配置机制
下面看看ssh的客户端怎么运用 # ssh
[root@localhost ~]# man ssh

自己连自己也是可以的(自己的 ip 192.168.1.45)
[root@localhost init.d]# ssh 192.168.1.45
The authenticity of host '192.168.1.45 (192.168.1.45)' can't be established.
RSA key fingerprint is cd:38:c5:f6:20:76:32:2d:d3:3a:1b:5c:18:76:e1:de.
Are you sure you want to continue connecting (yes/no)? no
Host key verification failed.
( permanently 永久性的 )
[root@localhost init.d]# ssh 192.168.1.45
The authenticity of host '192.168.1.45 (192.168.1.45)' can't be established.
RSA key fingerprint is cd:38:c5:f6:20:76:32:2d:d3:3a:1b:5c:18:76:e1:de.
Are you sure you want to continue connecting (yes/no)? yes
Warning: Permanently added '192.168.1.45' (RSA) to the list of known hosts.
root@192.168.1.45's password:
Connection closed by UNKNOWN
( Connection closed by UNKNOWN 应该是超时关闭 )
[root@localhost init.d]# ssh 192.168.1.45 (默认登录的用户是与本机的当前用户同名的( 这里是root ),即不指定用户的话,程序就以以为拿着当前主机上的用户( 这里为root ) 当作远程用户去登录了 )
root@192.168.1.45's password:
Last login: Sat Jan 5 22:23:48 2019 from 192.168.1.101
[root@localhost ~]#
[root@localhost ~]# exit (退出远程ssh登录)
logout
Connection to 192.168.1.45 closed.
[root@localhost init.d]#
如果远程的主机与当前的主机的用户名不同,怎么办呢
ssh: (下面的两种方法指定用户名都可以)
ssl -l USERNAME REMOTE_HOST (-l login_name )
ssl USERNAME@REMOTE_HOST
ssl -l USERNAME REMOTE_HOST ['commond'] 不要登录远程主机,直接执行远程主机上的命令,直接返回结果到本机的,这个功
-p 指定端口
能很好用,很常用
ssl USERNAME@REMOTE_HOST ['commond']
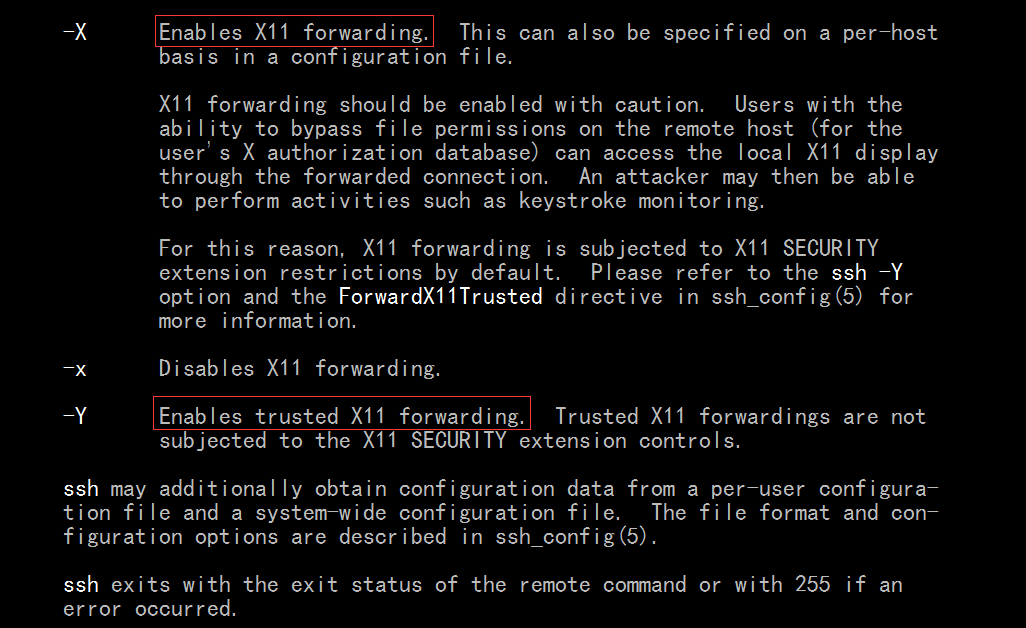
-X : Enables X11 forwarding.
-Y : Enables trusted X11 forwarding.
如何实现基于密钥的
一台主机为客户端 (基于某个用户):
1,客户端生成一对密钥 (公钥和私钥) (客户端所生成的密钥的公钥,事实上这个公钥,也应该是私密的,不能让别人看到的)
ssh-keygen (只使用-t的话就是需要交互式的,如果在脚本中使用的话,下面三个选项都要用到)
-t {rsa|dsa}
-f 保存的密钥文件
-N 'password' 指定密钥的
2,将公钥传输到服务器端某用户(可能跟当前客户端用户不是同一个用户)的家目录下的.ssh/authorized_keys文件中
使用文件传输工具传输 (命令 ssh-copy-id) (如果没有 ssh-copy-id命令,就使用 scp)
ssh-copy-id
ssh-copy-id -i /path/to/pubkey USERNAME@REMOTE_HOST 把公钥文件复制到哪台主机的哪个用户那边
-i ( input )指定公钥文件是什么 (默认使用的公钥文件不是 .ssh/id_rsa.pub,所以必须要指定)
ssh-copy-id 既能够复制,又能直接追加到 远程服务端器的 authorized_keys 的尾部 ( authorized 权威认可的,审定的,经授权的 )
scp 可以复制到远程服务端的临时文件 ,然后到远程服务器下 cat 临时文件追加到 authorized_keys 的底部
3,测试登录即可
cp : 复制
scp : 基于ssh的远程复制命令,能够实现在主机之间传输数据的,而且是基于ssh传递的,所以它的传输过程是加密的
scp [options] SRC DEST : (用法与cp一样)(只不过 源 SRC 可以为本地,也可以为远程)(目标 DESC 可以为本地,也可以为远程)
-r (r 表示递归 复制目录)(或者 -a archive 它表示的选项比r更多,相当于-pdr ,还要保存权限mode,链接属性等信息的)
(#man scp 为什么看不到-a呢?)
REMOTE_MACHINE
USERNAME@HOSTNAME:/path/to/somefile (用户名 阿尔特 主机名 冒号 路径) (USERNAME可以省略,省略的话,就以当前主机的用户名作为远程主机的用户名来使用,与ssh一个道理)
[root@localhost ~]# ssh -l root 192.168.1.45
root@192.168.1.45's password:
Last login: Sat Jan 5 22:44:15 2019 from 192.168.1.45
[root@localhost ~]#
第二次登录的时候,再也不需要我们确认这个主机密钥了
第一次确认接受主机密钥(公钥 public key)以后,一旦接受了,本地客户端就假设这是你已经认可的主机了,就会把这个主机的密钥信息(公钥信息)保存到可信主机当中去的 家目录下的 .ssh/known_hosts
每一个主机,只要登录过别人,就会在家目录下生成一个隐藏目录叫 .ssh
[root@localhost ~]# ls -a
. .gconfd .scim
.. .gnome server1024.key
anaconda-ks.cfg .gnome2 server2048.key
.bash_history .gnome2_private server.crt
.bash_logout .gstreamer-0.10 server.key
.bash_profile .gtkrc-1.2-gnome2 .ssh
.bashrc .ICEauthority .subversion
bincopy.sh inittab sysroot.gz
boot.iso inittab.des .systemtap
busybox-1.20.2 inittab.des3 .tcshrc
busybox-1.20.2.tar.bz2 install.log tiny.1.gz
.chewing install.log.syslog tiny.2.gz
cofig-2.6.28.5-i686.cfg ks.cfg tiny.3.gz
.config ks.cfg-bak tiny.4.gz
.cshrc .lesshst tiny.5.gz
Desktop linux-2.6.38.5.tar.gz tiny.8.gz
.dmrc mbr.backup .Trash
dropbear-2013.56 .metacity .viminfo
dropbear-2013.56.tar.bz2 mkdir .Xauthority
.eggcups .nautilus .xsession-errors
fstab .redhat
.gconf .rnd
[root@localhost ~]#
[root@localhost ~]# cd .ssh
[root@localhost .ssh]# ls
known_hosts
[root@localhost .ssh]#
任何时候,接受了一个远程主机,那个主机的公钥信息就会被 保存在 ~/.ssh/known_hosts 里面去
[root@localhost .ssh]# cat known_hosts
192.168.1.15 ssh-rsa AAAAB3NzaC1yc2EAAAABIwAAAQEA1l0raSHNdM91hq+uGWubyObAo2/giz3baU2+UKLN9dD3PtRYaAOdMBRbJOwW0nKKkQfUepjwR3SNwjr3ALQN3y2XD61tmqwxKu6R0+RCT0ZtxQUFwy26H2aOPSuqYIoQjEfBhPUdFry4W4dvK+/2UKbkOIeuQpH9ZfHX9wgy/dG4NKp4aTkWCv6He2UZ5sCcjbcnDTf0v4EQiK4eTIRX11VsJhYR9/Qai0gzhiybaZIesRfXPSRbJTw6EWlCnm2Ho4TQsT8rY9GWbHW8nyTT9T2q61gYOBXHfAfgTv8IB0R09QSivX3Q4L9DC30zN4WOtcmVXQd5GwbNe8YPPLaXqw==
192.168.1.45 ssh-rsa AAAAB3NzaC1yc2EAAAABIwAAAQEAwmzz+hXmFnm+zJ4zUFcV/dve09z+fyPXHfQiC0n1T39vX0err8gSl+WDYmI1otkjmbNVcgfUT5QbJuU4LMvnLYFTF0LyQ/4ACuWBx9f/mTmyxYE3PJbTCVmilqNZUxtb4RHc5V2D0WUUNyuePa85k39MxV3rrhwz/BR+eUb15F/Mx04pCJ6H8BP6bzRInFcilodYKGMtBgDsBq7MwGMLla/RcMcxK5Uh/wZIwTTVKWmWSINX7Owu/gi0JPF/LQTk3sxOakBi/5uDgm5YHZmcmX8B0Jwh2+77xfSwHha7WRTpDgKG6Z4qTZDkr8+YhihreYVqCGW8/G749bLdQVP9NQ==
[root@localhost .ssh]#
因此第二次登录的时候,这个主机的公钥和远程服务器的私钥,双方建立会话,看能不能配上对,如果能配上对,就表示已经认可以对方的主机,所以第二次登录,就不再需要认可了
想重新认可下远程主机,把~/.ssh/known_hosts 文件中的这一行给删了,就可以了 我这里 known_hosts 就为空了

再连接一次 ,又要让我确认了
[root@localhost ~]# ssh -l root 192.168.1.45
The authenticity of host '192.168.1.45 (192.168.1.45)' can't be established.
RSA key fingerprint is cd:38:c5:f6:20:76:32:2d:d3:3a:1b:5c:18:76:e1:de.
Are you sure you want to continue connecting (yes/no)? yes
Warning: Permanently added '192.168.1.45' (RSA) to the list of known hosts.
root@192.168.1.45's password:
Last login: Sat Jan 5 22:57:35 2019 from 192.168.1.101
[root@localhost ~]#
[root@localhost ~]# exit
logout
Connection to 192.168.1.45 closed.
[root@localhost ~]#
ssh 不但可以登录远程主机,还可以执行远程主机上的命令(把远程主机上的执行的命令结果给返回到本地来),只需要输一下密码就可以
客户端 192.168.4.15 服务器端 192.168.1.15
[root@localhost ~]# ssh root@192.168.1.15 'ifconfig' (只是执行了远程主机上的命令,直接返回来了)
The authenticity of host '192.168.1.15 (192.168.1.15)' can't be established.
RSA key fingerprint is fb:3e:1f:30:d7:b2:45:b0:dc:00:06:d0:df:31:28:86.
Are you sure you want to continue connecting (yes/no)? yes
Warning: Permanently added '192.168.1.15' (RSA) to the list of known hosts.
root@192.168.1.15's password:
eth0 Link encap:Ethernet HWaddr 00:0C:29:0F:3A:5D
inet addr:192.168.1.15 Bcast:192.168.1.255 Mask:255.255.255.0
inet6 addr: fe80::20c:29ff:fe0f:3a5d/64 Scope:Link
UP BROADCAST RUNNING MULTICAST MTU:1500 Metric:1
RX packets:404 errors:0 dropped:0 overruns:0 frame:0
TX packets:50 errors:0 dropped:0 overruns:0 carrier:0
collisions:0 txqueuelen:1000
RX bytes:38649 (37.7 KiB) TX bytes:7652 (7.4 KiB)
lo Link encap:Local Loopback
inet addr:127.0.0.1 Mask:255.0.0.0
inet6 addr: ::1/128 Scope:Host
UP LOOPBACK RUNNING MTU:16436 Metric:1
RX packets:10 errors:0 dropped:0 overruns:0 frame:0
TX packets:10 errors:0 dropped:0 overruns:0 carrier:0
collisions:0 txqueuelen:0
RX bytes:660 (660.0 b) TX bytes:660 (660.0 b)
此时还在本地 没有登录到远程主机上
[root@localhost ~]# ifconfig
eth0 Link encap:Ethernet HWaddr 00:0C:29:81:DB:A1
inet addr:192.168.1.45 Bcast:192.168.1.255 Mask:255.255.255.0
inet6 addr: fe80::20c:29ff:fe81:dba1/64 Scope:Link
UP BROADCAST RUNNING MULTICAST MTU:1500 Metric:1
RX packets:29813 errors:0 dropped:0 overruns:0 frame:0
TX packets:19107 errors:0 dropped:0 overruns:0 carrier:0
collisions:0 txqueuelen:1000
RX bytes:2595508 (2.4 MiB) TX bytes:3010749 (2.8 MiB)
Interrupt:67 Base address:0x2000
lo Link encap:Local Loopback
inet addr:127.0.0.1 Mask:255.0.0.0
inet6 addr: ::1/128 Scope:Host
UP LOOPBACK RUNNING MTU:16436 Metric:1
RX packets:282 errors:0 dropped:0 overruns:0 frame:0
TX packets:282 errors:0 dropped:0 overruns:0 carrier:0
collisions:0 txqueuelen:0
RX bytes:40082 (39.1 KiB) TX bytes:40082 (39.1 KiB)
[root@localhost ~]#
[root@localhost ~]# man ssh
-X(大X)(Enables X11 forwarding.) -Y(大Y)(Enables trusted X11 forwarding.) 意思是一样的,只不过Y比X的设定更强, Y比X更安全一点,
这表示我们登录到远程主机上,而且还能够执行远程主机上的窗口命令的
窗口本身要显示在本地,很显然本地必须要启动图形客户端(图形端),所以本地必须要是图形客户端才可以,远程可以没有图形
直接执行远程上的图形命令(需要打开窗口的命令),它能够在本地直接显示出来的
# shutdown -h now 关闭虚拟机 (-h halt)
克隆一下虚拟机
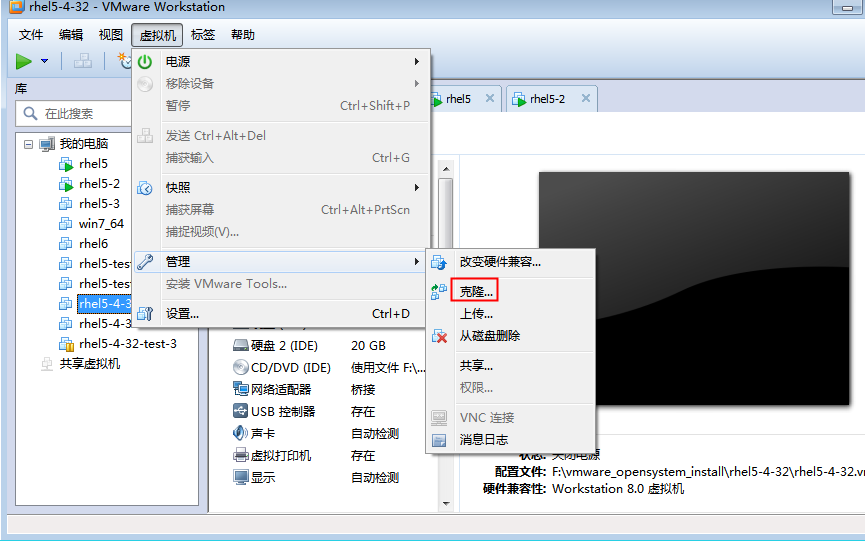

当前状态克隆
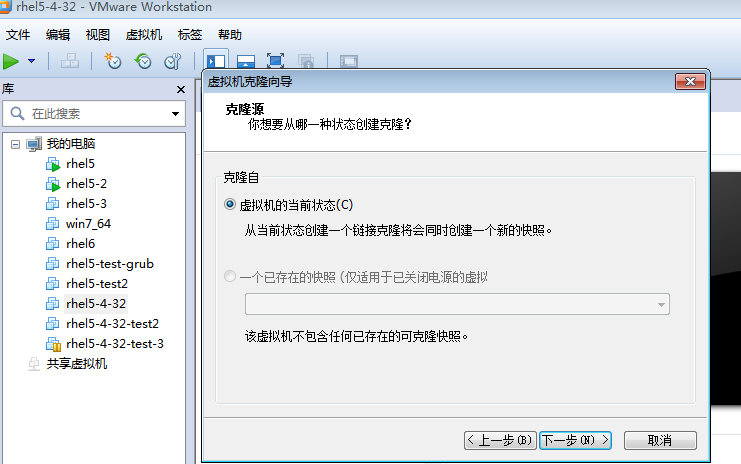
创建一个链接克隆,这样可以尽可能的减少它的体积
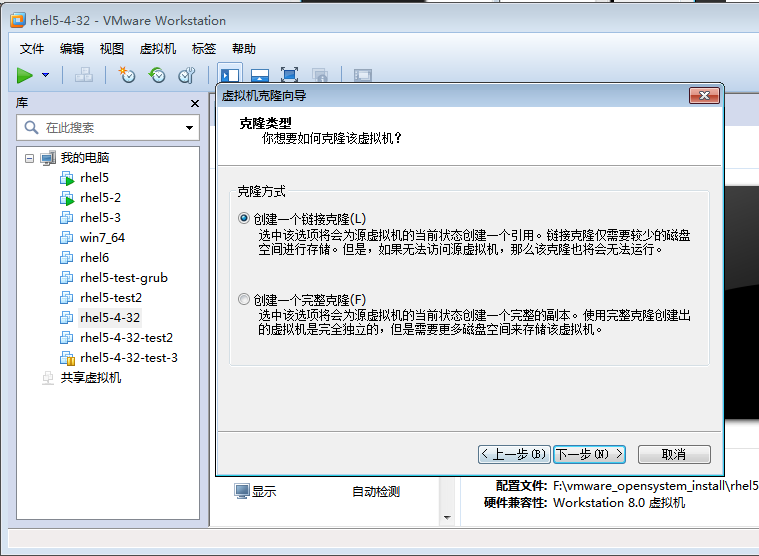
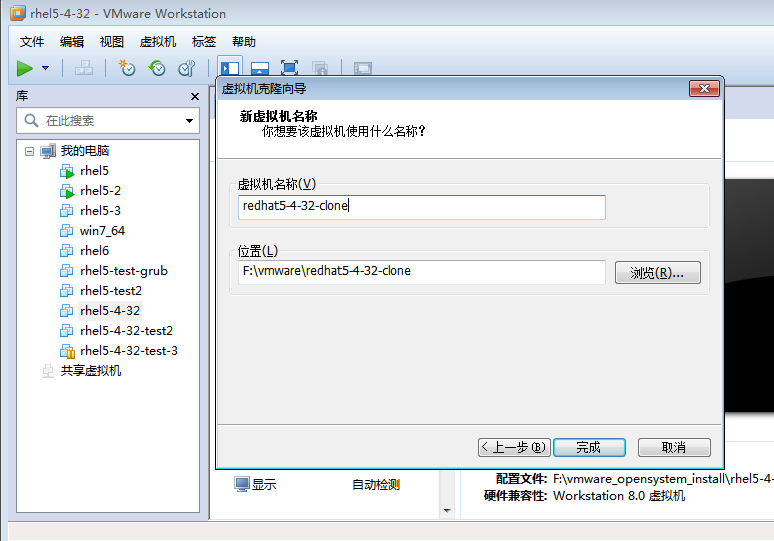
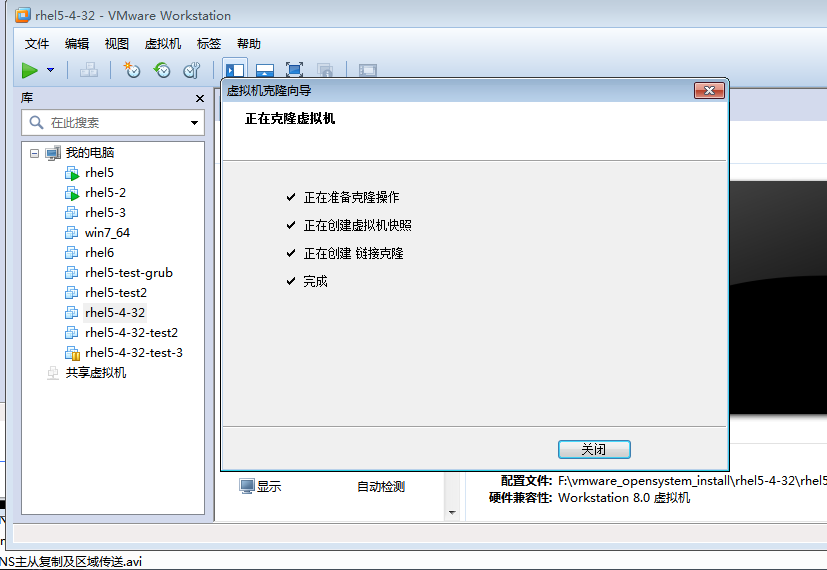
这样克隆了一个虚拟机,就跟源虚拟机一样了
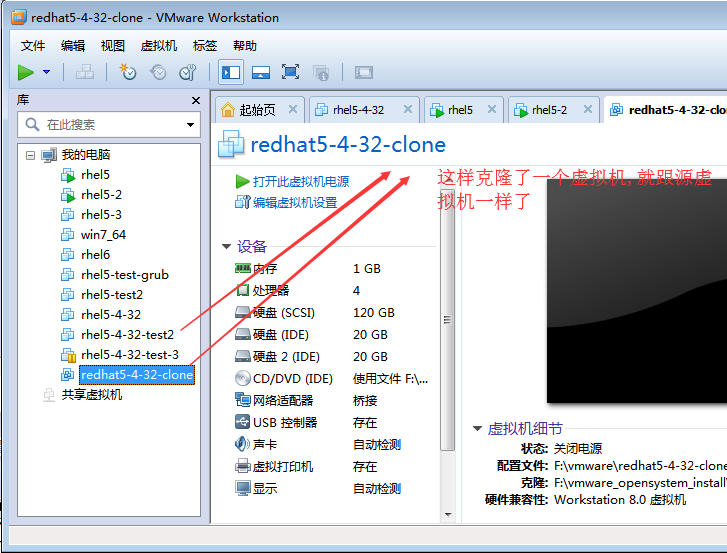
马哥改ip地址
# ifconfig eth0 172.16.100.2/16
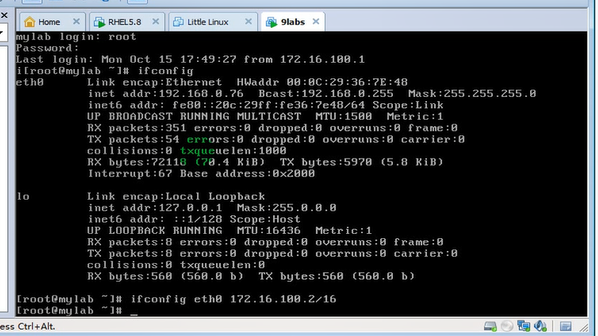
马哥 还确定它是桥接
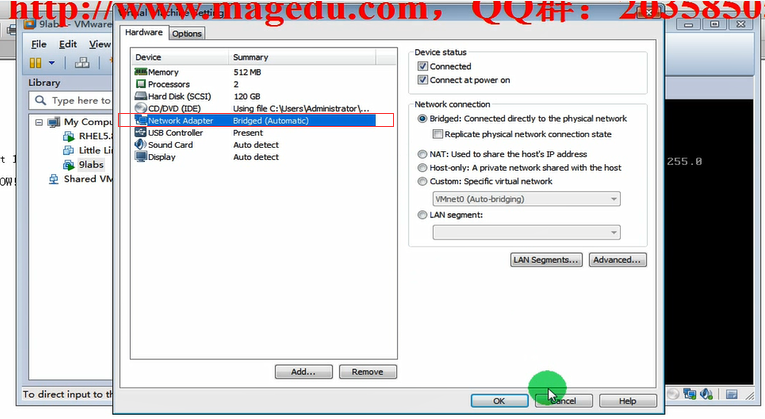
我这边 192.168.1.45 作为客户端 ,,,,192.168.1.15 作为服务端
[root@localhost ~]# ping 192.168.1.15 可以ping通

客户端(192.168.1.45) 连 服务端(192.168.1.15)
[root@localhost ~]# ssh 192.168.1.15
root@192.168.1.15's password:
Last login: Sat Jan 12 16:37:55 2019 from www
[root@localhost ~]# ifconfig
eth0 Link encap:Ethernet HWaddr 00:0C:29:0F:3A:5D
inet addr:192.168.1.15 Bcast:192.168.1.255 Mask:255.255.255.0
inet6 addr: fe80::20c:29ff:fe0f:3a5d/64 Scope:Link
UP BROADCAST RUNNING MULTICAST MTU:1500 Metric:1
RX packets:943 errors:0 dropped:0 overruns:0 frame:0
TX packets:129 errors:0 dropped:0 overruns:0 carrier:0
collisions:0 txqueuelen:1000
RX bytes:89176 (87.0 KiB) TX bytes:20614 (20.1 KiB)
lo Link encap:Local Loopback
inet addr:127.0.0.1 Mask:255.0.0.0
inet6 addr: ::1/128 Scope:Host
UP LOOPBACK RUNNING MTU:16436 Metric:1
RX packets:34 errors:0 dropped:0 overruns:0 frame:0
TX packets:34 errors:0 dropped:0 overruns:0 carrier:0
collisions:0 txqueuelen:0
RX bytes:3950 (3.8 KiB) TX bytes:3950 (3.8 KiB)
[root@localhost ~]#
[root@localhost ~]# hostname mylab2.magedu.com (主机名是一样的,改下主机名吧)
[root@localhost ~]# exit (登出来)
logout
Connection to 192.168.1.15 closed.
[root@localhost ~]#
[root@localhost ~]# ssh 192.168.1.15 (再登过去,发现主机名改了)
root@192.168.1.15's password:
Last login: Sat Jan 12 16:40:24 2019 from 192.168.1.45
[root@mylab2 ~]#
[root@mylab2 ~]# exit (再登出)
logout
Connection to 192.168.1.15 closed.
[root@localhost ~]#
[root@localhost ~]# scp root@192.168.1.15:/etc/fstab ./
root@192.168.1.15's password:
fstab 100% 534 0.5KB/s 00:00
[root@localhost ~]#
本地有fstab 文件了
[root@localhost ~]# ls
anaconda-ks.cfg inittab.des server.crt
bincopy.sh inittab.des3 server.key
boot.iso install.log sysroot.gz
busybox-1.20.2 install.log.syslog tiny.1.gz
busybox-1.20.2.tar.bz2 ks.cfg tiny.2.gz
cofig-2.6.28.5-i686.cfg ks.cfg-bak tiny.3.gz
Desktop linux-2.6.38.5.tar.gz tiny.4.gz
dropbear-2013.56 mbr.backup tiny.5.gz
dropbear-2013.56.tar.bz2 mkdir tiny.8.gz
fstab server1024.key
inittab server2048.key
[root@localhost ~]#
[root@localhost ~]# vim fstab
/dev/VolGroup00/LogVol00 / ext3 defaults 1 1
LABEL=/boot /boot ext3 defaults 1 2
tmpfs /dev/shm tmpfs defaults 0 0
devpts /dev/pts devpts gid=5,mode=620 0 0
sysfs /sys sysfs defaults 0 0
proc /proc proc defaults 0 0
/dev/VolGroup00/LogVol01 swap swap defaults 0 0
改下 fstab 删除 最后三行 ,准备复制到远程服务端的主机上
[root@localhost ~]# vim fstab
/dev/VolGroup00/LogVol00 / ext3 defaults 1 1
LABEL=/boot /boot ext3 defaults 1 2
tmpfs /dev/shm tmpfs defaults 0 0
devpts /dev/pts devpts gid=5,mode=620 0 0
~
[root@localhost ~]# scp fstab root@192.168.1.15:~/ (把本地文件复制到远程主机上了)
root@192.168.1.15's password:
fstab 100% 305 0.3KB/s 00:00
[root@localhost ~]#
远程服务端上 (192.168.1.15)
[root@localhost ~]# ls (已经有了fstab文件)
100.sh php-mysql-5.1.6-44.el5_10.x86_64.rpm
aaa.txt set nu
aa.txt sysroot.2.gz
account sysroot.3.gz
anaconda-ks.cfg test
bb.txt test1
bincopy.sh test1.txt
cdr test2
checkhadoop2.sh test2.txt
checkhadoop.sh test3.txt
et: test4.txt
fstab testequatl.sh
httpd-devel-2.2.3-91.el5.x86_64.rpm test.sh
initrd-2.6.18-398.el5.img test.txt
install.log text.txt
install.log.syslog util.sh
iso while.sh
linux-2.6.28.10.tar.gz zsh-4.2.6-9.el5.x86_64.rpm
nano-1.3.12-1.1.x86_64.rpm
远程服务端上 (192.168.1.15)
[root@localhost ~]# vim fstab (这就是从本地客户端机复制过来的)
/dev/VolGroup00/LogVol00 / ext3 defaults 1 1
LABEL=/boot /boot ext3 defaults 1 2
tmpfs /dev/shm tmpfs defaults 0 0
devpts /dev/pts devpts gid=5,mode=620 0 0
客户端主机 (192.168.4.15)
使用hadoop吧
[root@localhost ~]# su - hadoop
[hadoop@localhost ~]$
本地客户端用户名和远程服务端用户名 可以不一样
# 客户端主机 (192.168.4.15) 生成一对密钥
[hadoop@localhost ~]$ ssh-keygen -t rsa #ssh-keygen -t ( -t type )指定加密算法,回车后,会把密钥保存在用户家目录下的 .ssh 目录中,并且 默认命名为 id_rsa id_rsa.pub,可以手动修改
(私钥要加密码 不然别人拿着我们的私钥,照样可以登录了)
(私钥加了密码后,每一次都要提供密码,所以我们不要用密码好了)
Generating public/private rsa key pair.
Enter file in which to save the key (/root/.ssh/id_rsa):
Enter passphrase (empty for no passphrase):
Enter same passphrase again:
Your identification has been saved in /root/.ssh/id_rsa.
Your public key has been saved in /root/.ssh/id_rsa.pub.
The key fingerprint is:
60:b3:cd:cc:96:08:5b:3e:73:33:b9:4e:d4:61:46:87 root@localhost.localdomain
[root@localhost ~]#
# 客户端主机 (192.168.4.15)
[root@localhost ~]# man ssh-keygen
-t 不可省的
-f 明确指定保存在什么文件里面
-N (new passphrase)指定密码
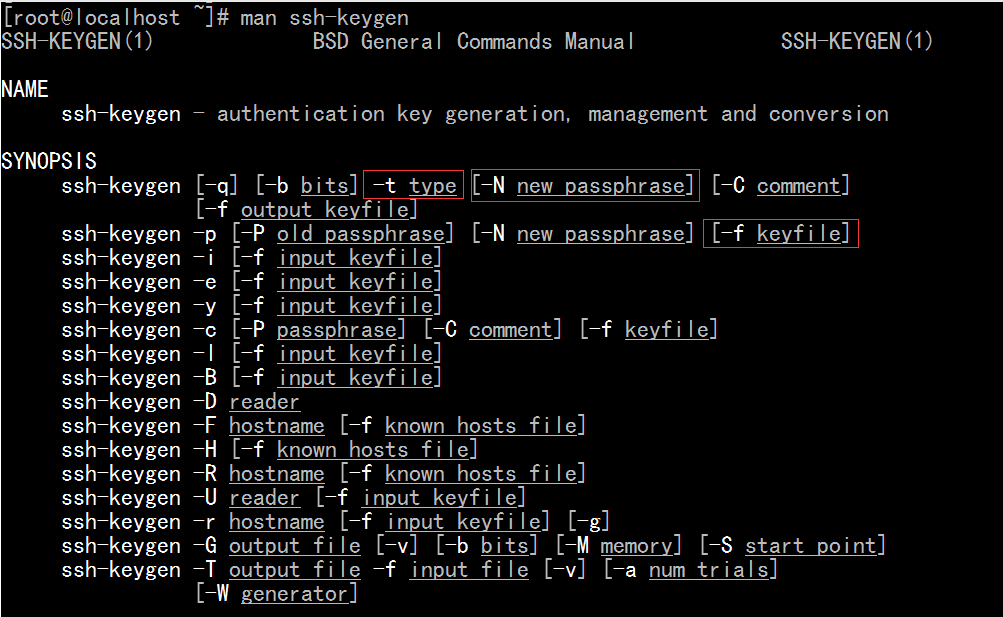
删掉 .ssh/ 目录 重新生成公私钥看看
# 客户端主机 (192.168.4.15)
[root@localhost ~]# rm -rf .ssh/
[root@localhost ~]#
注意 .ssh 的权限是 700的,一旦权限多了的话,ssh服务在客户端是无法使用的

所以 删了 .ssh 后,重建 .ssh目录的话,改目录权限为700
# 客户端主机 (192.168.4.15)
[root@localhost ~]# chmod 700 .ssh
# 客户端主机 (192.168.4.15)
[root@localhost ~]# ls -lad .ssh
drwx------ 2 root root 4096 01-10 15:07 .ssh
[root@localhost ~]#
# 客户端主机 (192.168.4.15)
[root@localhost ~]# ssh-keygen -t rsa -f .ssh/id_rsa
Generating public/private rsa key pair.
Enter passphrase (empty for no passphrase):
Enter same passphrase again:
Your identification has been saved in .ssh/id_rsa.
Your public key has been saved in .ssh/id_rsa.pub.
The key fingerprint is:
0d:df:9b:6f:77:20:79:09:e7:b8:7a:1f:48:fa:9a:bb root@localhost.localdomain
[root@localhost ~]#
[root@localhost ~]# rm -f .ssh/*
[root@localhost ~]# rm -f .ssh/*
[root@localhost ~]# ssh-keygen -t rsa -f .ssh/id_rsa -N ''
Generating public/private rsa key pair.
Your identification has been saved in .ssh/id_rsa.
Your public key has been saved in .ssh/id_rsa.pub.
The key fingerprint is:
70:82:47:2a:9f:d3:0f:75:1d:6f:27:29:76:83:69:28 root@localhost.localdomain
# 客户端主机 (192.168.4.15)
[root@localhost ~]#
再生成一次的话,提示密钥是否要覆盖

# 客户端主机 (192.168.4.15)
[root@localhost ~]# ssh-copy-id -i .ssh/id_rsa.pub root@192.168.1.15
15
The authenticity of host '192.168.1.15 (192.168.1.15)' can't be established.
RSA key fingerprint is fb:3e:1f:30:d7:b2:45:b0:dc:00:06:d0:df:31:28:86.
Are you sure you want to continue connecting (yes/no)? yes # 第一次为yes,如果客户端换了用户(比如为hadoop,这里还是出现出现这个识别标识,要求输yes 或 no的)(所以不同的用户,都是要求重新识别主机名的)( 这里是因为已经删除了known_hosts ,所以这里要求重新识别主机名 )
Warning: Permanently added '192.168.1.15' (RSA) to the list of known hosts.
root@192.168.1.15's password:
Now try logging into the machine, with "ssh 'root@192.168.1.15'", and check in:
.ssh/authorized_keys
to make sure we haven't added extra keys that you weren't expecting.
[root@localhost ~]#
此时直接登录,不需要输密码了
[root@localhost ~]# ssh -l root 192.168.1.15
Last login: Mon Jan 14 09:02:47 2019 from 192.168.1.45
[root@lab2 ~]#
这种信任是单向的,反过来服务器端 192.168.1.15是不能直接登录到客户端 192.168.1.45 的
[root@lab2 ~]# cd .ssh
[root@lab2 .ssh]# cat authorized_keys
ssh-rsa AAAAB3NzaC1yc2EAAAABIwAAAQEA4Oa36Lnn3d5cYGNp+kw6QudwgLTvOCzk5d4X34TfJzD16M91P7fLhqlnPdcLr27jKvTnfdURvYLKxlWiBEmgNIwkpHKz0TGCzkvzqCu7GiX0hY6HxjeTfpUZzwVH/mgW1Lb8RyV1kRMZ+2Q+wPUgFlp3pUarBhG0hwgxc+ZGSYTlN9JMWHfic1EoBZ8fcxCjv1HGbNHIFG26cUi5QZGn6LSzlFWXYdsGq4x97LQzBwCgsvjyO8Xg4QlqQjhrJYDvnVBQVOJRGz0TBsq0vDm4y6ci3i7F8YgmzkHSSHuPfIqa5EYhumCV6E73uHW62PyhPeeZapn3TRP8i1kjQpzoiw== root@localhost.localdomain
ssh-rsa AAAAB3NzaC1yc2EAAAABIwAAAQEA4Oa36Lnn3d5cYGNp+kw6QudwgLTvOCzk5d4X34TfJzD16M91P7fLhqlnPdcLr27jKvTnfdURvYLKxlWiBEmgNIwkpHKz0TGCzkvzqCu7GiX0hY6HxjeTfpUZzwVH/mgW1Lb8RyV1kRMZ+2Q+wPUgFlp3pUarBhG0hwgxc+ZGSYTlN9JMWHfic1EoBZ8fcxCjv1HGbNHIFG26cUi5QZGn6LSzlFWXYdsGq4x97LQzBwCgsvjyO8Xg4QlqQjhrJYDvnVBQVOJRGz0TBsq0vDm4y6ci3i7F8YgmzkHSSHuPfIqa5EYhumCV6E73uHW62PyhPeeZapn3TRP8i1kjQpzoiw== root@localhost.localdomain
[root@lab2 .ssh]#
好像我这里多了一份,两份一模一样的
双机互信? 双向集群
A主机不需要密码登录到B主机,同时B主机不需要密码登录到A主机,都是管理员
(当然也可以使用 ftp , 如果两个主机都装了ftp软件的话)
[root@localhost ~]# sftp root@192.168.1.15 (如果已经配置主机互信的话,连密钥都不需要输了)
Connecting to 192.168.1.15...
sftp>
sftp> ls
100.sh aa.txt
aaa.txt account
anaconda-ks.cfg bb.txt
bincopy.sh cdr
checkhadoop.sh checkhadoop2.sh
et: fstab
httpd-devel-2.2.3-91.el5.x86_64.rpm initrd-2.6.18-398.el5.img
install.log install.log.syslog
iso linux-2.6.28.10.tar.gz
nano-1.3.12-1.1.x86_64.rpm php-mysql-5.1.6-44.el5_10.x86_64.rpm
set nu sysroot.2.gz
sysroot.3.gz test
test.sh test.txt
test1 test1.txt
test2 test2.txt
test3.txt test4.txt
testequatl.sh text.txt
util.sh while.sh
zsh-4.2.6-9.el5.x86_64.rpm
sftp> cd /etc
sftp> ls
DIR_COLORS DIR_COLORS.xterm Muttrc
Muttrc.local NetworkManager X11
a2ps-site.cfg a2ps.cfg acpi
adjtime aliases aliases.db
alsa alternatives anacrontab
at.deny audisp audit
auto.master auto.misc auto.net
auto.smb autofs_ldap_auth.conf avahi
bash_completion.d bashrc blkid
bluetooth bonobo-activation capi.conf
cipe conman.conf cron.d
cron.daily cron.deny cron.hourly
cron.monthly cron.weekly crontab
csh.cshrc csh.login cups
dbus-1 default depmod.d
dev.d dhcp6c.conf dnsmasq.conf
dnsmasq.d dumpdates enscript.cfg
environment esd.conf exports
fb.modes filesystems fonts
foomatic fstab gconf
gcrypt ghostscript gnome-vfs-2.0
gnome-vfs-mime-magic gpm-root.conf group
group- grub.conf gshadow
gshadow- gssapi_mech.conf gtk-2.0
hal host.conf hosts
hosts.allow hosts.deny hp
httpd idmapd.conf init.d
initlog.conf inittab inputrc
iproute2 iscsi isdn
issue issue.net java
jvm jvm-commmon jwhois.conf
krb5.conf ld.so.cache ld.so.conf
ld.so.conf.d ldap.conf lftp.conf
libaudit.conf libuser.conf localtime
login.defs logrotate.conf logrotate.d
logwatch lsb-release.d ltrace.conf
lvm mail mail.rc
mailcap makedev.d man.config
maven mcelog.conf mgetty+sendfax
mime.types minicom.users mke2fs.conf
modprobe.conf modprobe.conf~ modprobe.d
motd mtab mtools.conf
multipath.conf my.cnf netplug
netplug.d nscd.conf nsswitch.conf
openldap opt pam.d
pam_pkcs11 pam_smb.conf pango
passwd passwd- pcmcia
php.d php.ini pinforc
pki pm ppp
prelink.cache prelink.conf prelink.conf.d
printcap profile profile.d
protocols quotagrpadmins quotatab
racoon rc rc.d
rc.local rc.sysinit rc0.d
rc1.d rc2.d rc3.d
rc4.d rc5.d rc6.d
readahead.d reader.conf reader.conf.d
redhat-lsb redhat-release resolv.conf
rhsm rmt rpc
rpm rwtab rwtab.d
samba sasl2 scim
scl screenrc scrollkeeper.conf
scsi_id.config securetty security
selinux services sestatus.conf
setuptool.d sgml shadow
shadow- shells skel
slrn.rc smartd.conf smrsh
sound ssh stunnel
subversion sudoers sysconfig
sysctl.conf syslog.conf termcap
tpvmlp.conf udev updatedb.conf
vimrc virc vmware-tools
vsftpd warnquota.conf wgetrc
wpa_supplicant wvdial.conf xdg
xinetd.conf xinetd.d xml
yp.conf yum yum.conf
yum.repos.d zlogin zlogout
zprofile zshenv zshrc
sftp>
sftp> get (get下载文件 这里未执行) (传输过程是加密的)
sftp> mget (multi get )(mget下载多个文件 这里未执行) (传输过程是加密的)
sftp> exit
想从远程主机的复制文件,只要对方主机支持ssh,支持 sftp ,也不用创建什么ftp服务器,直接使用sftp连上去就可以了,能访问,能下载
总结一下:
1,密码要经常换且足够复杂 ( 1个月换一次 , 2个月换一次都行)
2,使用非默认端口,自己指定端口 -p

3,限制登录客户端地址 可以见 /node-admin/13061
4,禁止管理员直接登录
5,仅允许有限制用户登录 (allowUsers,allowGroups)
6,使用基于密钥的论证
7,禁止使有 sshv1 (协议版本一)
本地客户端 Xshell 使用密钥登录(不需要输入密码登录)
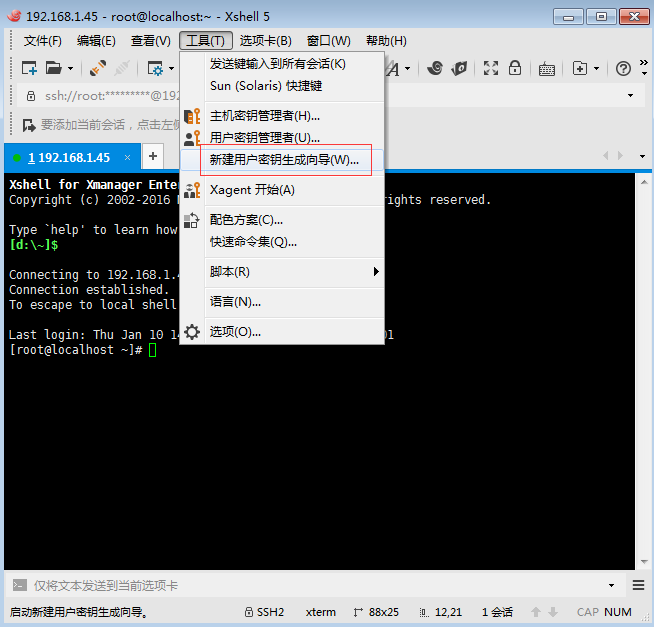
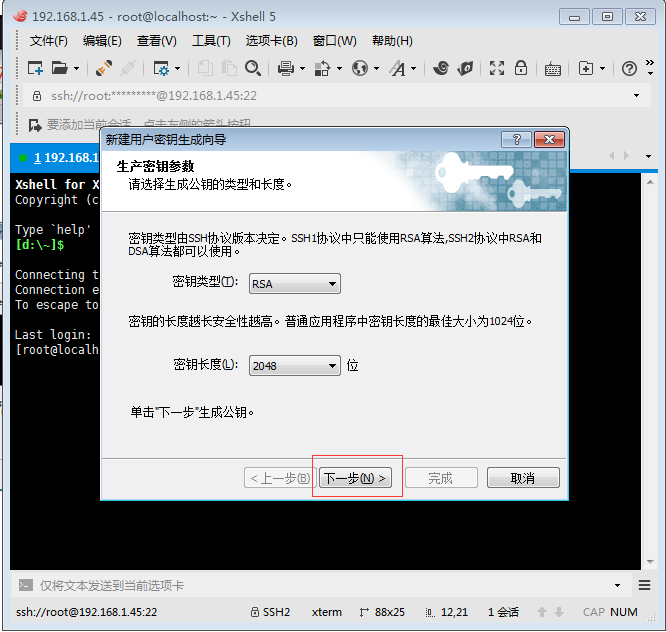
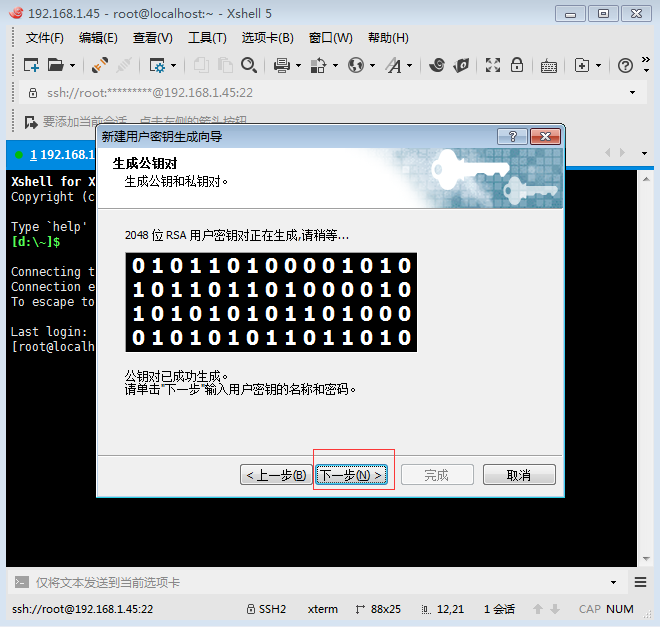
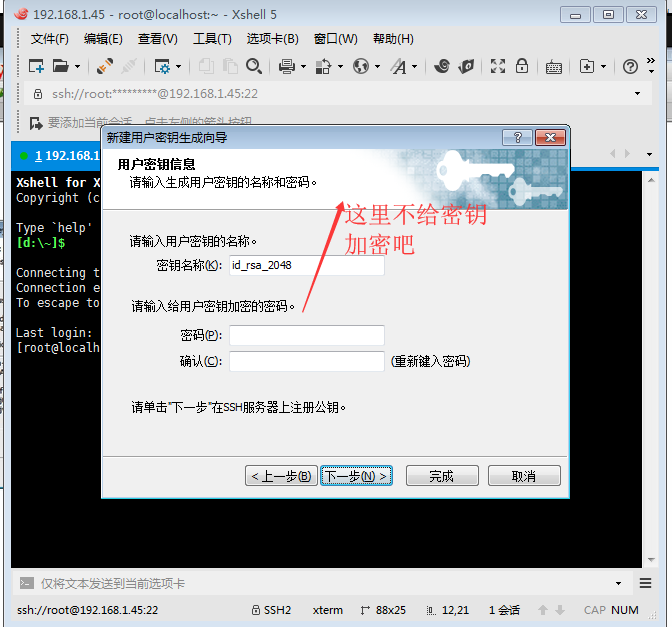
问不加密保存私钥,是否继续
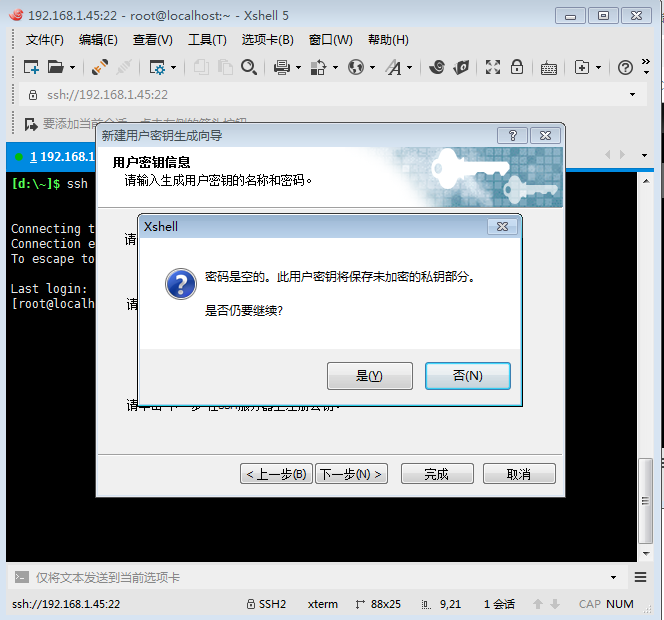

这个公钥文件要保存到linux 里面去

保存后 ,点完成
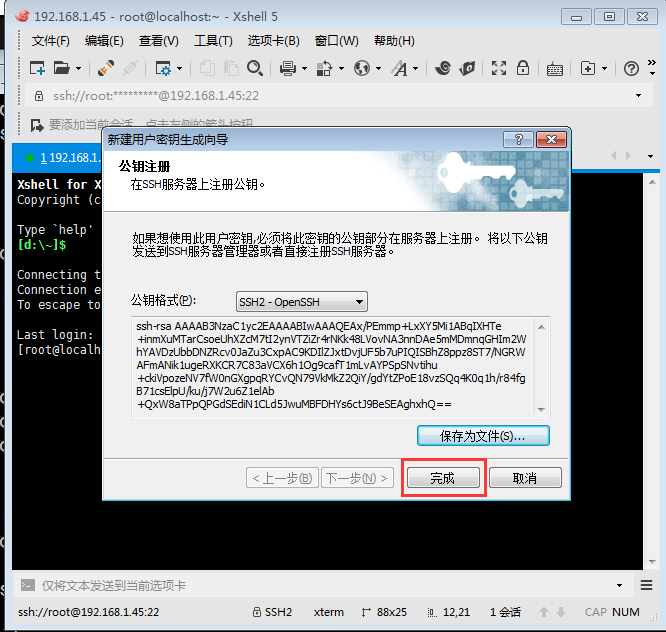
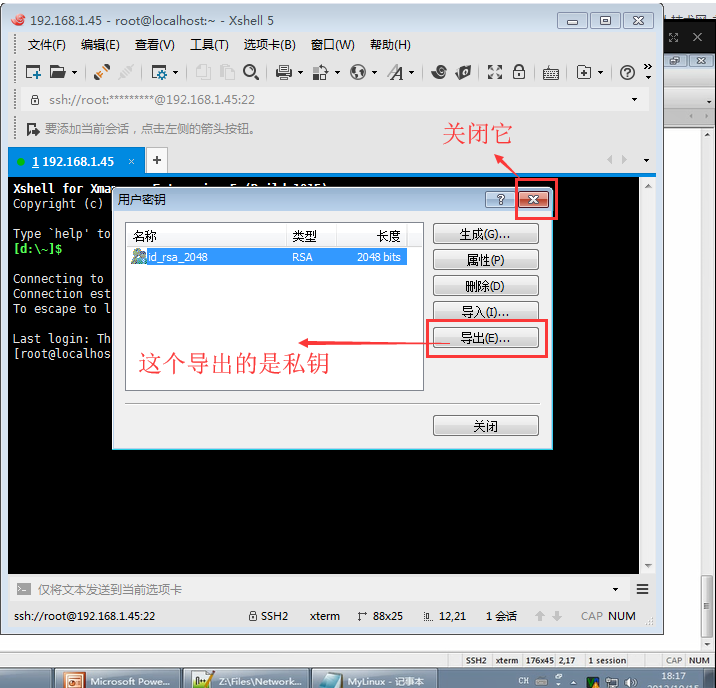
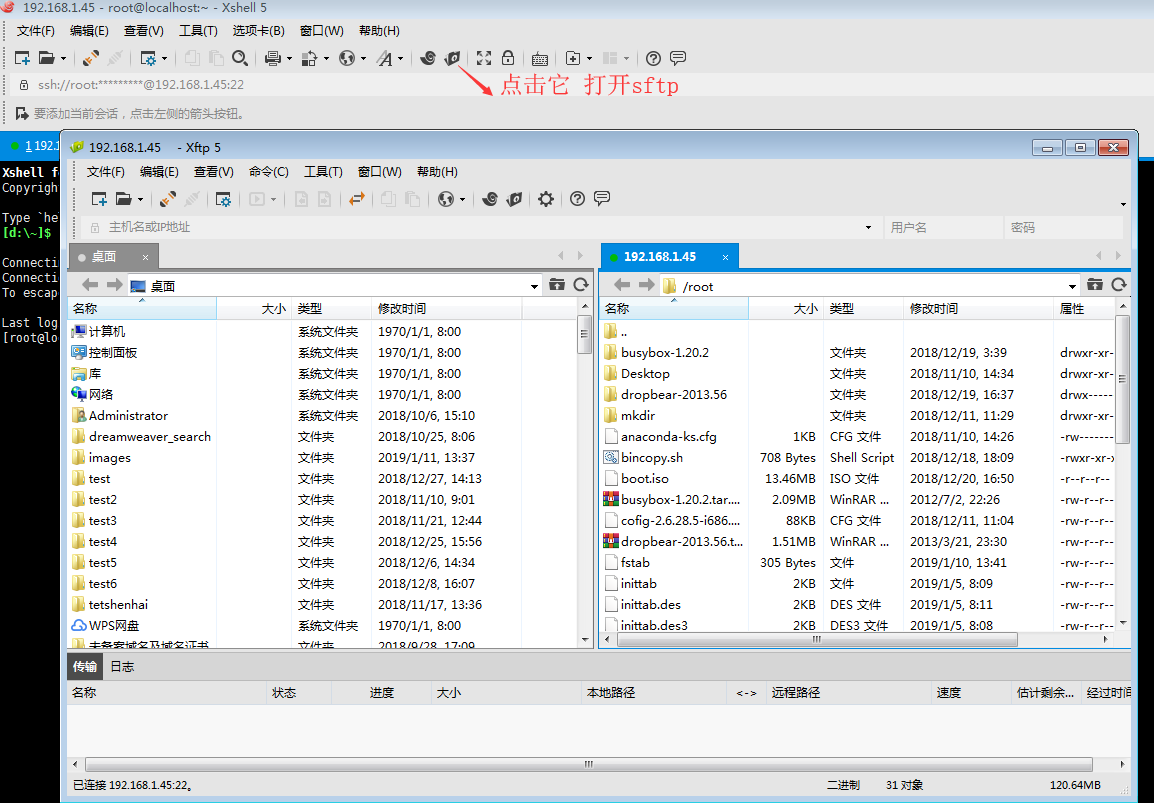

然后把 id_rsa_2048.pub 追加到 (要注意对应用户) .ssh/authorized_keys 里面
[root@localhost ~]# cat id_rsa_2048.pub >> .ssh/authorized_keys (有就追加,没有就创建)
[root@localhost ~]#
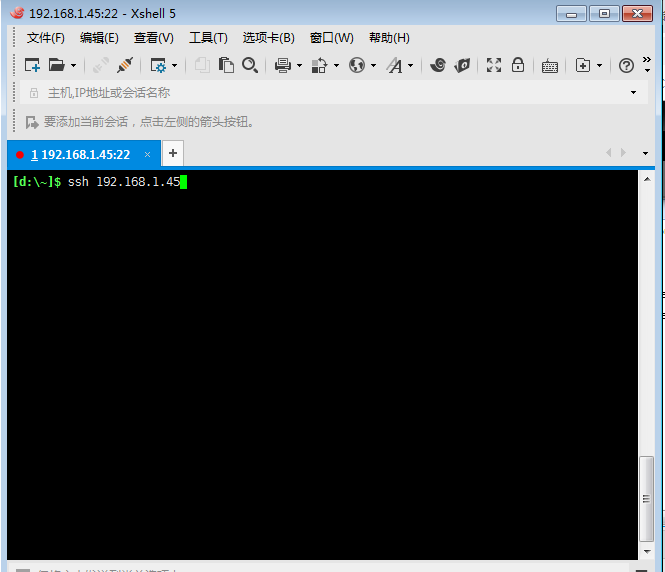
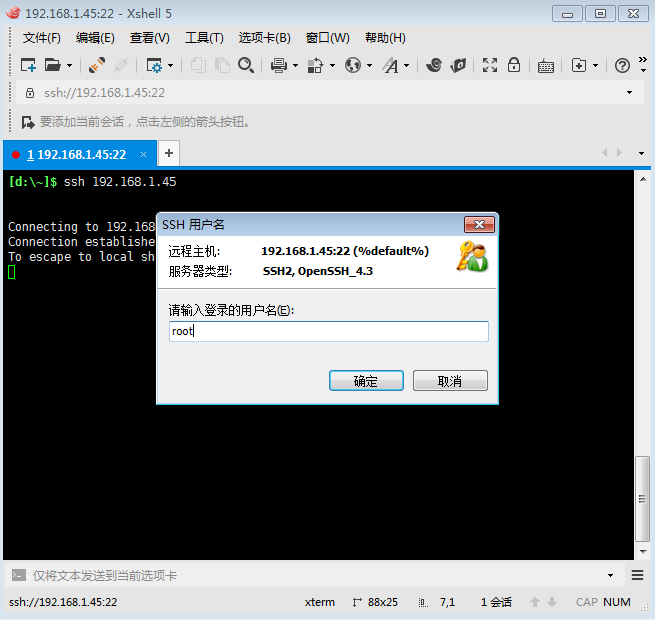
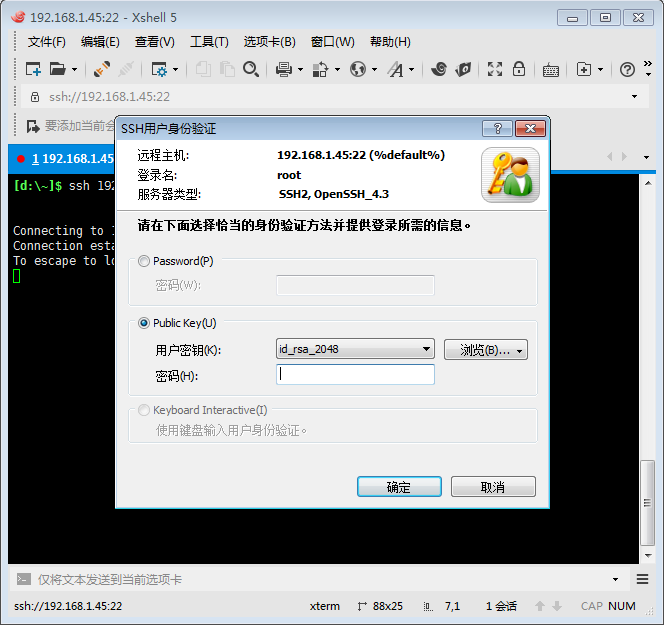
[root@localhost ~]# vim /etc/ssh/sshd_config
改端口为 2233 了
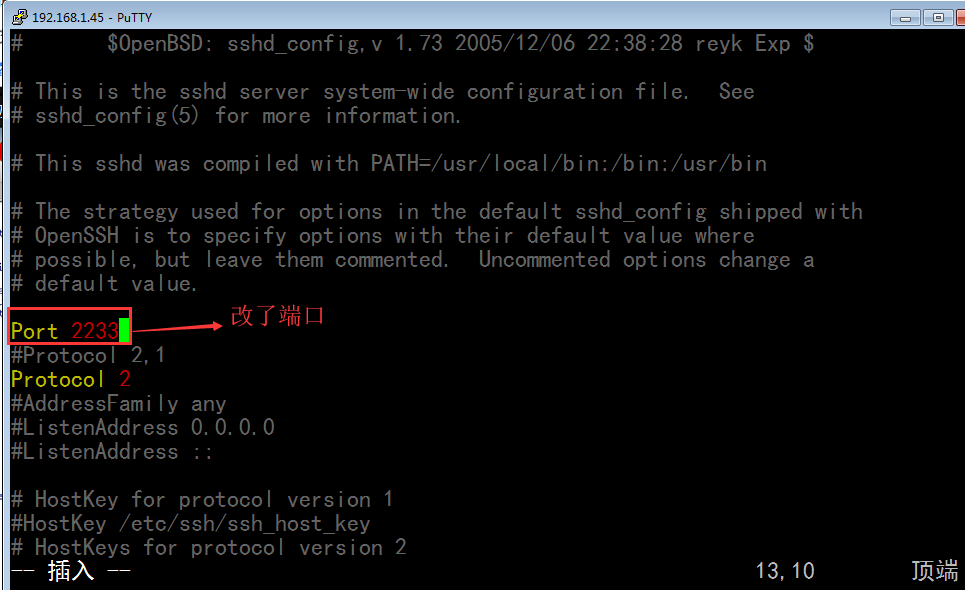
一重启服务的话,应该就连不上去了
[root@localhost ~]# service sshd restart
停止 sshd: [确定]
启动 sshd: [确定]
[root@localhost ~]#
[root@localhost ~]#
[root@localhost ~]#
[root@localhost ~]#
服务始终处于连接状态,如果 logout 就连不上去了 (因为22端口没打开,需要连接的时候改成 2233端口)
(2233端口必须防火墙通过)
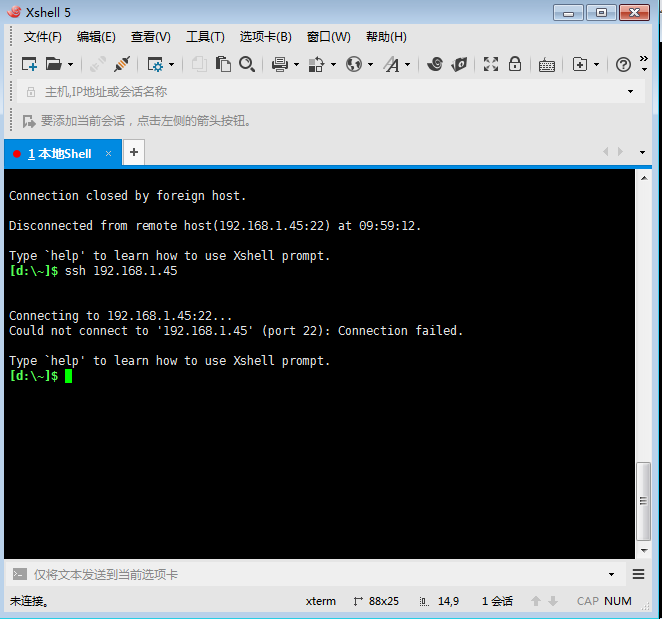
(但是 这里 基于 xshell 指定端口 不用加 -p)
# ssh root@192.168.1.45 2233
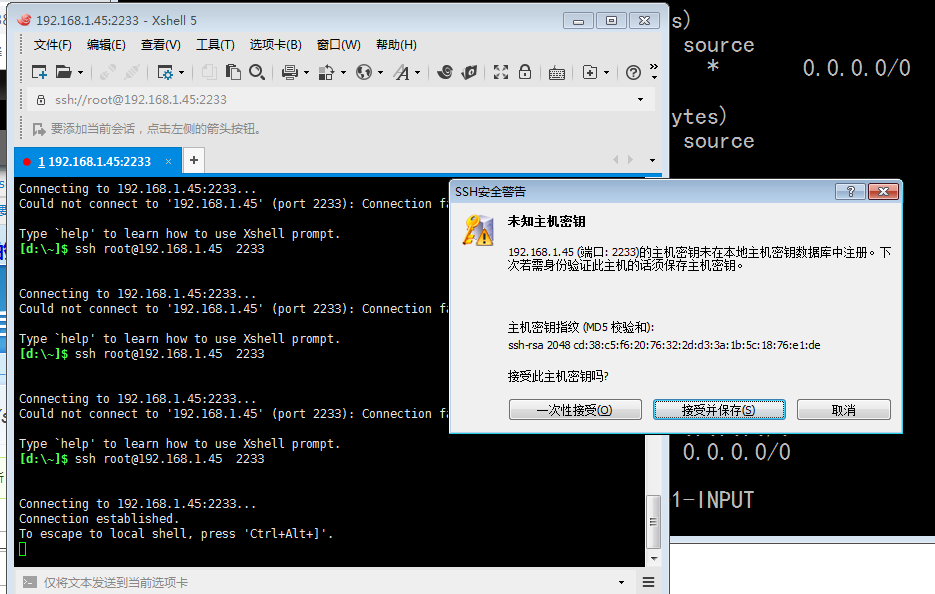
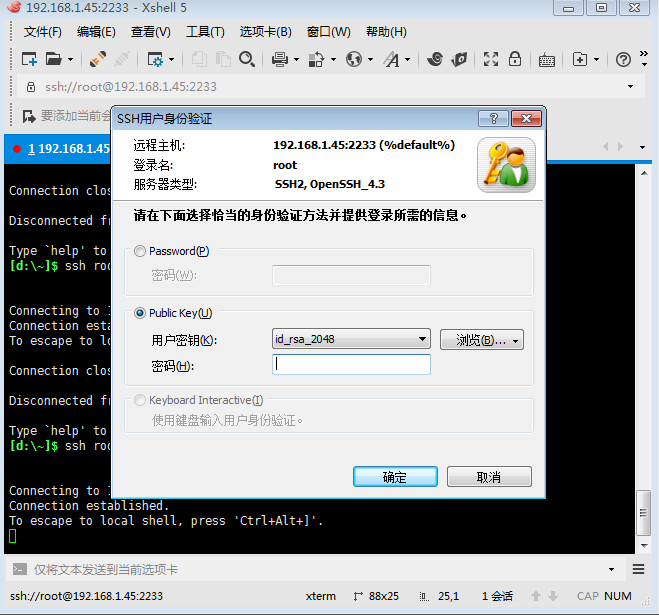
端口还是改为 22 吧
[root@localhost log]# vim /etc/ssh/sshd_config

重启 sshd 服务器
[root@localhost log]# service sshd restart
还有一个微型版本的专门用在嵌入式系统上的专用的ssh软件 dropbear ,
编译 安装 dropbear 并移植到 小 linux 上, 小linux也可以接受远程连接的
