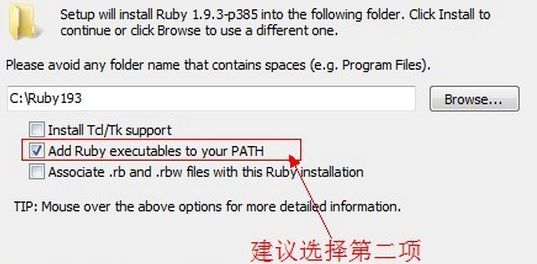
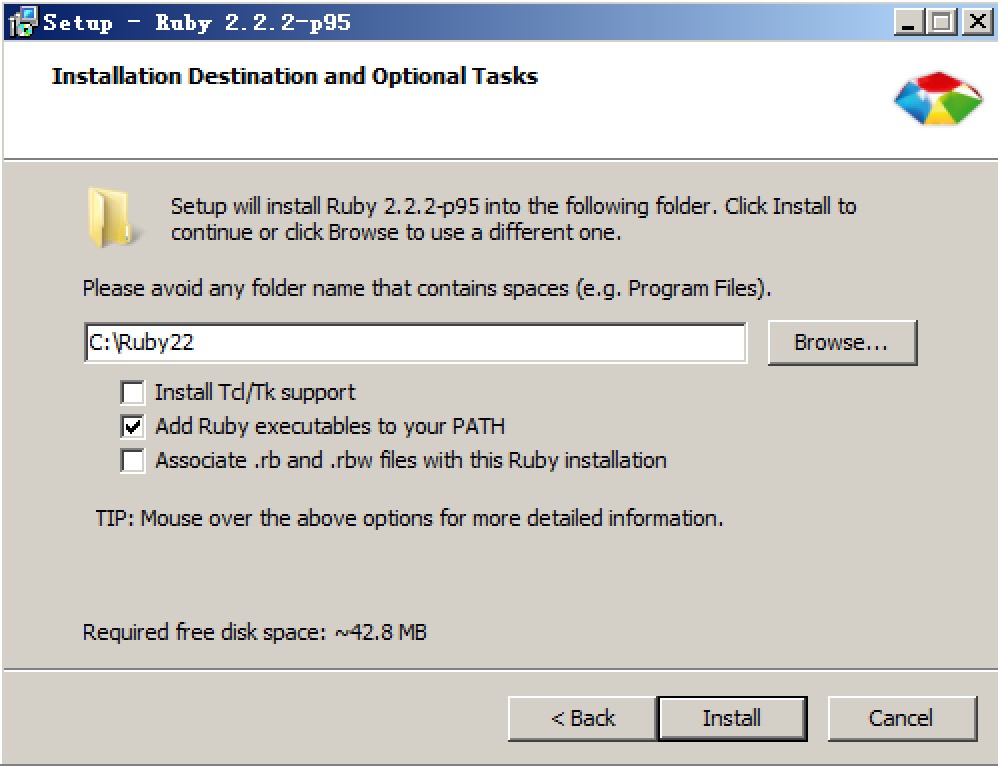
因为sass依赖于ruby环境,所以装sass之前先确认装了ruby。先导官网下载个ruby
在安装的时候,请勾选Add Ruby executables to your PATH这个选项,添加环境变量,不然以后使用编译软件的时候会提示找不到ruby环境

然后直接在命令行中输入
1 | gem install sass |
按回车键确认,等待一段时间就会提示你sass安装成功。最近因为墙的比较厉害,如果你没有安装成功,那么请参考下面的淘宝的RubyGems镜像安装sass,如果成功则忽略。
如果要安装beta版本的,可以在命令行中输入
1 | gem install sass --pre |
你还可以从sass的Git repository来安装,git的命令行为
1 2 3 | git clone git://github.com/nex3/sass.gitcd sassrake install |
升级sass版本的命令行为
1 | gem update sass |
查看sass版本的命令行为
1 | sass -v |
你也可以运行帮助命令行来查看你需要的命令
1 | sass -h |
gem sources命令来配置源,先移除默认的https://rubygems.org源,然后添加淘宝的源https://ruby.taobao.org/,然后查看下当前使用的源是哪个,如果是淘宝的,则表示可以输入sass安装命令gem install sass了,关于常用gem source命令可参看:常用的gem source1 2 3 4 | $ gem sources --remove https://rubygems.org/$ gem sources -a https://ruby.taobao.org/$ gem sources -l*** CURRENT SOURCES *** |
1 2 3 | https://ruby.taobao.org# 请确保只有 ruby.taobao.org$ gem install sass |
1 2 3 | gem sources --remove https://rubygems.org/gem sources -a http://gems.ruby-china.org/gem sources -l |
1 | sass test.scss |
1 | sass --watch test.scss:test.css |
1 | sass --watch sassFileDirectory:cssFileDirectory |
1 2 | $blue:#1875e7; div{color:$blue;} |
1 2 | $left:left;.rounded {border-#{$left}-radius:5px;} |
!default即可。 sass的默认变量一般是用来设置默认值,然后根据需求来覆盖的,覆盖的方式也很简单,只需要在默认变量之前重新声明下变量即可nth($var,$index)取值1 2 3 4 5 6 7 8 9 10 11 12 13 | $px: 5px 6px 8px 10px;//一维数组$pxT: 10px 20px , 30px 40px;//二维数组$trpx:(1px solid #eee ) (16px solid #aaa);//二维数组 .class8 { font-size: nth($px,3);}.class9 { border: nth($trpx,1);}.class10 { margin: nth($pxT,2);} |
$map: (key1: value1, key2: value2, key3: value3);。可通过map-get($map,$key)取值。1 2 3 4 5 6 7 8 9 10 11 | $headings:(h1:2em,h2:1.5em,h3:1em);.class11 { font-size: map-get($headings,h2);} @each $heade , $size in $headings { #{$heade} { font-size: $size; }} |
1 2 | $var:10;body{margin:(14px/2);top:50px+100px;right:$var*10%;} |
1 2 3 4 5 6 | div{ color:$blue; h1 { color:red; } } |
1 2 3 4 5 6 | p { border:{ color:red; } } } |
1 2 3 4 | a { &:hover {color:red;} }#content aside { color: red;body.ie & { color: green }} |
1 2 | .container { h1, h2, h3 {margin-bottom: .8em} }nav, aside { a {color: blue} } |
require 'sass/supports'这一行,在下面一行添加Encoding.default_external = Encoding.find('utf-8')标准的CSS注释 /* comment */ ,会保留到编译后的文件。
单行注释 // comment,只保留在SASS源文件中,编译后被省略。
在/*后面加一个感叹号,表示这是"重要注释"。即使是压缩模式编译,也会保留这行注释,通常可以用于声明版权信息。
1 2 3 | /*! 重要注释! */ |
1 2 3 4 5 6 7 | .class1 { border: 1px solid #ddd; }.calss2 { @extend .class1; font-size: 20px; } |

1 2 3 4 | @mixin left { float: left; margin-left: 10px; } |
1 2 3 | .class3 { @include left; } |
1 2 3 4 | @mixin right($value:10px) { float: right; margin-right: $value; } |
1 2 3 | .class5 { @include right()} |
1 2 3 | .class4 { @include right(40px)} |
1 2 3 4 5 6 7 8 9 10 11 | @mixin rounded ($vert,$horz,$radius:10px) { border-#{$vert}-#{$horz}-radius:$radius; -moz-border-#{$vert}-#{$horz}-radius:$radius; -webkit-border-#{$vert}-#{$horz}-radius:$radius;}.nav { @include rounded(top,left)}.footer { @include rounded(top,left,5px)} |
多组值参数mixin
$variables...。1 2 3 4 | @mixin box-shadow ($shadow...) { -webkit-box-shadow:$shadow; box-shadow: $shadow;} |
1 2 3 4 5 6 7 8 9 10 | @mixin max-screen ($res) { @media only screen and (max-width: $res) { @content; }}@include max-screen(480px) { body {color:red;}} |
1 2 3 4 | lighten(#cc3, 10%) // #d6d65cdarken(#cc3, 10%) // #a3a329grayscale(#cc3) // #808080complement(#cc3) // #33c |
1 2 3 4 5 6 | .class6 { @if 1+1 == 2 {color:red} @if 5 < 3 {color:blue}@else { background-color: #FFF }} |
@for $var from <start> through <end>和@for $var from <start> to <end>。$i表示变量,start表示起始值,end表示结束值,这两个的区别是关键字through表示包括end这个数,而to则不包括end这个数。1 2 3 4 5 | @for $i from 1 to 10 { .border-#{$i} { border: #{$i}px solid red; }} |
1 2 3 4 5 | $i:6;@while $i > 0 { .item-#{$i} {width:20px;} $i:$i - 2;} |
1 2 3 4 5 6 | @each $member in a,b,c,d { .#{$member} { background-image: url("/image/#{$member}.jpg"); }} |
1 2 3 4 5 6 | @function double($n) { @return $n * 2;}.class7 { width: double(5px);} |
1 2 3 4 5 6 7 8 9 10 11 12 13 14 15 | //单个选择器跳出.parent { color:red; @at-root .child { width: 100px; }}//多个选择器跳出.parent2 { color:blue; @at-root { .child1 {width: 100px;} .child2 {width: 200px;} }} |
@at-root只会跳出选择器嵌套,而不能跳出@media或@support,如果要跳出这两种,则需使用@at-root (without: media),@at-root (without: support)1 2 3 4 5 6 7 8 9 10 11 12 13 14 15 16 17 18 19 20 21 22 23 24 25 26 27 28 29 30 31 | //跳出父级元素嵌套@media print { .parent2 { color: red; @at-root .child3 { color: blue; } }} //跳出media嵌套 父级有效@media print4 { .parent4 { color: red; @at-root (without: media) { .child4 { width: 200px; } } }} //跳出media和父级@media print5 { .parent5 { color:red; @at-root (without:all) { .child5{height: 200px;} } }} |
1 2 3 4 5 | .child6 { @at-root .parent6 & { height: 300px; }} |
%%。这种选择器的优势在于:如果不调用则不会有任何多余的css文件,避免了以前在一些基础的文件中预定义了很多基础的样式,然后实际应用中不管是否使用了@extend去继承相应的样式,都会解析出来所有的样式。占位选择器以%标识定义,通过@extend调用。1 2 3 4 5 6 7 8 9 10 11 12 13 14 15 16 17 18 19 20 21 22 23 24 25 26 27 28 | %ir { color:transparent; text-shadow:none; background-color: transparent; border:0;}%clearfix { @if $ie7 { *zoom :1; } &:before, &:after { content: ""; display: table; font: 0/0; } &:after { clear: both; }}#header { width: 2100px; @extend %ir;}.ir { @extend %ir;} |


