You are here
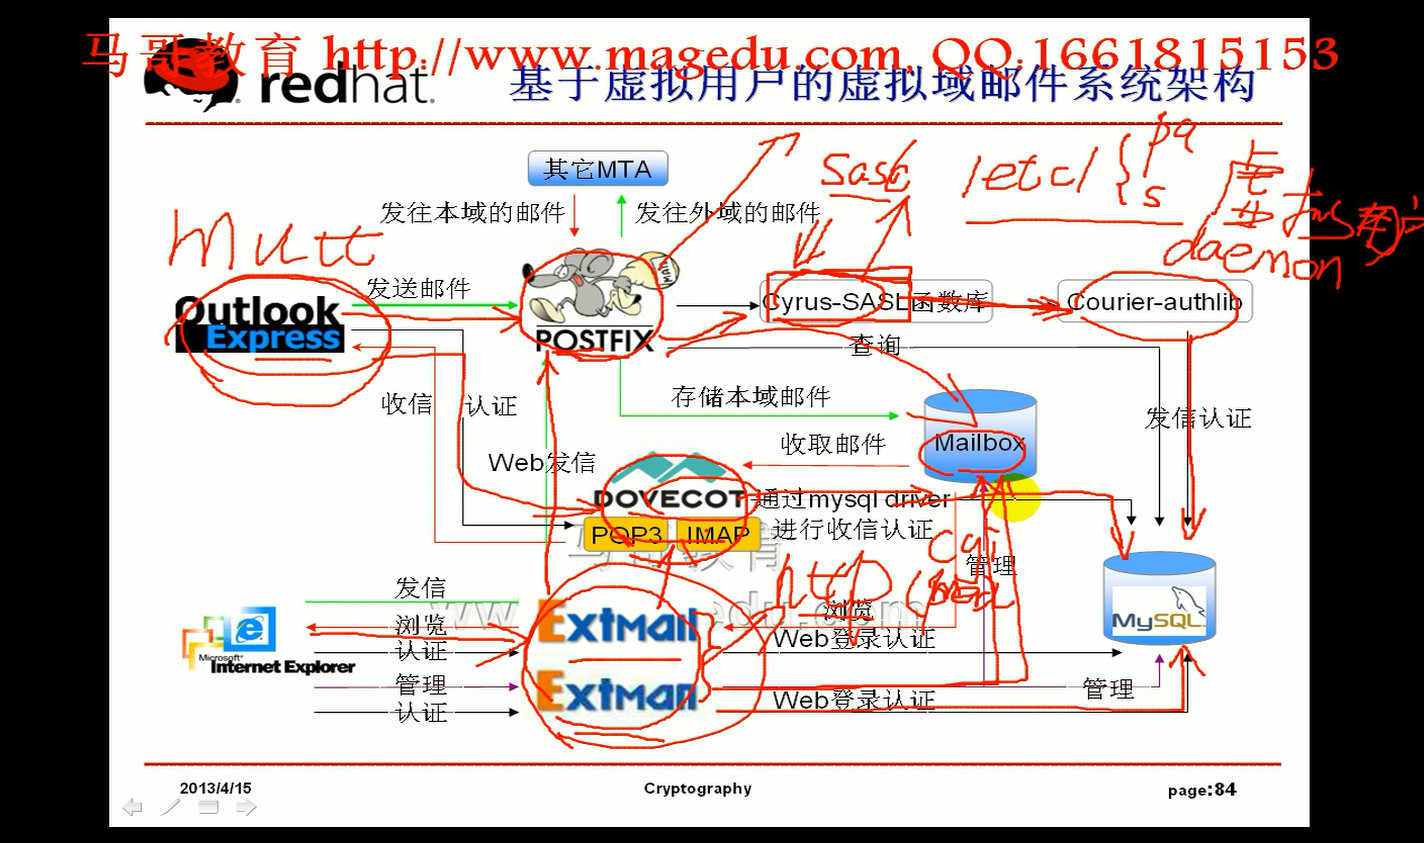
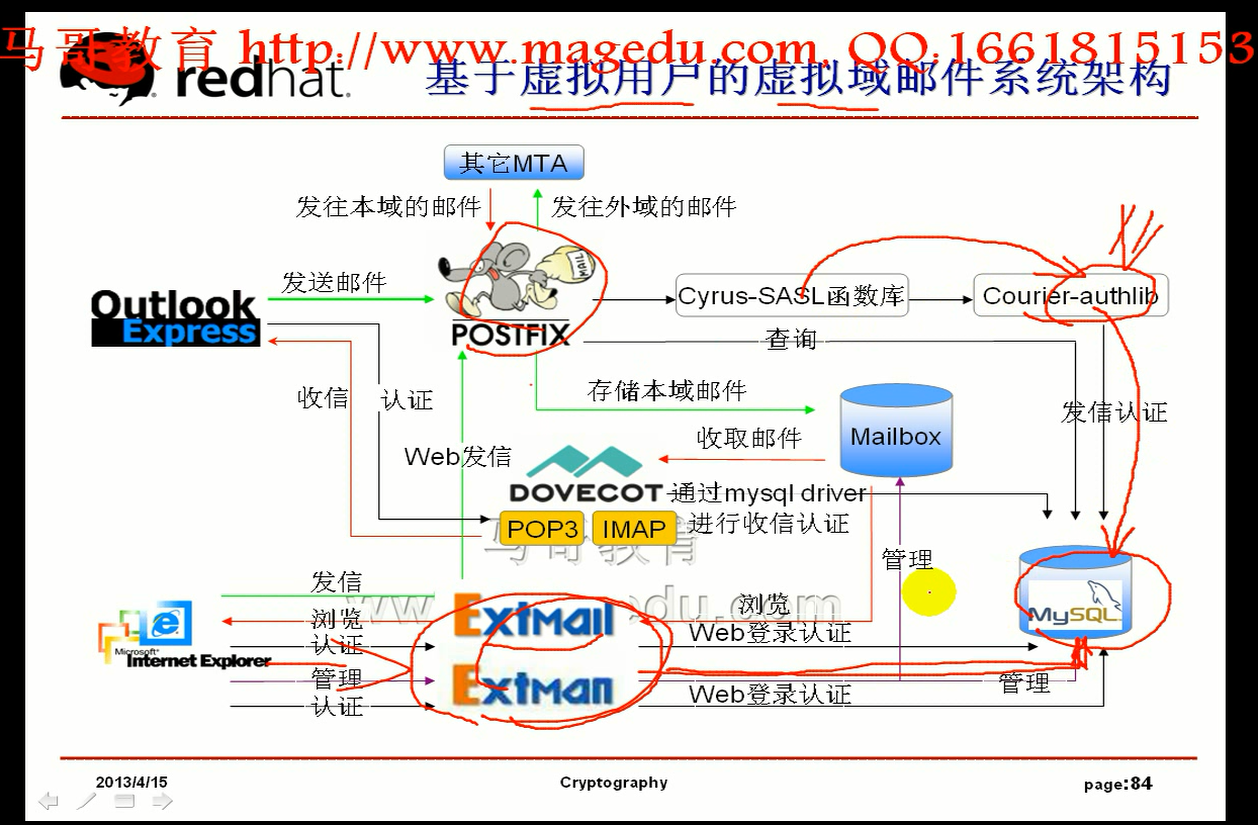
马哥 26_01 _邮件服务系列之 postifx+sasl+dovecot及虚拟域相关概念 最后的图要敲文字理解理解 有大用
postfix 安装
/etc/aliases -> /etc/aliases.db (hash形式查找速度快,mysql表里面索引也有hash?也是hash?)
/etc/postfix/main.cf <-- /etc/postfix/master.cf(默认启动进程,以及启动额外的进程)
(两个文件都必须顶格写,如果前面有空白,那么下一行就是接着上一行的内容)
/etc/postfix/main.cf 对于我们来说重要
postconf -e 直接修改 main.cf
-a
-n
-d
-m
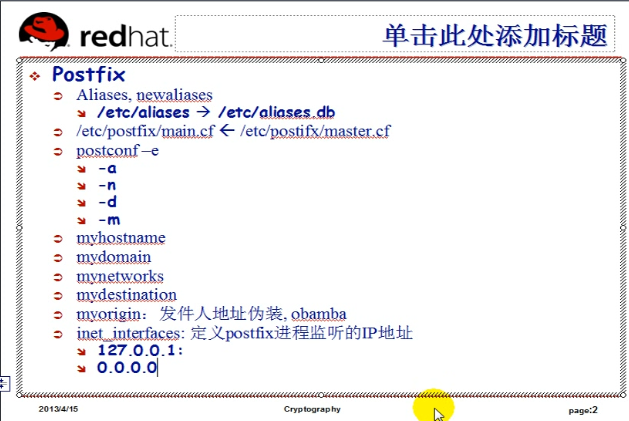
myhostname 定义主机名,判断当前主机工作的位置,要配置成跟mx记录的主机名称一致
mydomain 一定要自己所处的核心域
mynetworks 定义本地网络,允许给其做中继的网络或地址
mydestination 自己负责为哪些主机或者发往哪些目标的用户收取邮件的,但凡目标不是mydestination所定义的域的,那么它就是中继,允不允许中继,取决于 mynetworks
myorigin 发件人地址伪装, 地址是 obama 自动补上myorigin 的值 ,通常就是本地域的域名
inet_interfaces: (inet 就是 listen net 吧)定义 postfix 进程所监听的IP地址 (一个电脑可能有多个ip地址,可以只监听其中一个ip地址,也可监听全部的)
如果只监听 127.0.0.1,说明只能为本地作为客户端的时候访问
如果指定 0.0.0.0 意味着本地所有的可用的ip地址
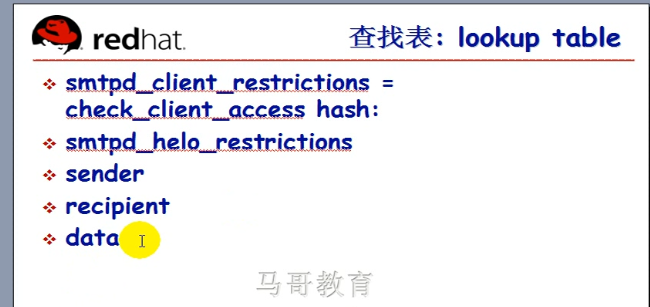
查找表 lookup table 它们并不是一一对应的
smtpd_client_restrictions = check_client_access hash:
smptd_helo_restrictions = check_helo_access hash:
smptd_sender_restrictions = check_sender_access hash:
smptd_recipient_restrictions = check_recipient_access hash:
smptd_data_restrictions = check_data_access hash:
# postconf -m
列出所有查找表类型
查询 bind
[root@www ~]# rpm -qa | grep bind
bind-libs-9.3.6-20.P1.el5_8.6
bind-utils-9.3.6-20.P1.el5_8.6
ypbind-1.19-12.el5_6.1
卸载 bind
[root@www ~]# rpm -e bind-utils bind-libs
.....................挂载光盘.......................
[root@www ~]# mount /dev/cdrom /media/cdrom/
mount: block device /dev/cdrom is write-protected, mounting read-only
写下 cdrom.repo文件
[root@www ~]# vim /etc/yum.repos.d/cdrom.repo
[cdrom]
name=RHEL5 CDROM Server
baseurl=file:///media/cdrom/Server
enabled=1
gpgcheck=0
[root@www ~]# yum install bind97 bind97-utils -y
[root@www ~]# vim /etc/named.conf
...........................
options {
# listen-on port 53 { 127.0.0.1; };
# listen-on-v6 port 53 { ::1; };
directory "/var/named";
dump-file "/var/named/data/cache_dump.db";
statistics-file "/var/named/data/named_stats.txt";
memstatistics-file "/var/named/data/named_mem_stats.txt";
# allow-query { localhost; };
recursion yes;
# dnssec-enable yes;
# dnssec-validation yes;
# dnssec-lookaside auto;
/* Path to ISC DLV key */
bindkeys-file "/etc/named.iscdlv.key";
};
...........................
include "/etc/named.rfc1912.zones";
;
[root@www ~]# vim /etc/named.rfc1912.zones
........................
zone "magedu.com" IN{
type master;
file "magedu.com.zone";
};
zone "1.168.192.in-addr.arpa" IN{
type master;
file "192.168.1.zone";
}
检查配置文件
[root@www ~]# named-checkconf
可以指一下配置文件
[root@www ~]# named-checkconf /etc/named.conf
[root@www ~]# cd /var/named
[root@www named]# vim magedu.com.zone
$TTL 86400
@ IN SOA ns.magedu.com. admin.magedu.com. (
2013041501
2H
10M
3D
1D )
IN NS ns
IN MX 10 mail
ns IN A 192.168.1.85
mail IN A 192.168.1.85
www IN A 192.168.1.85
[root@www named]# vim 192.168.1.zone
$TTL 86400
@ IN SOA ns.magedu.com. admin.magedu.com. (
2013041501
2H
10M
3D
1D )
IN NS ns.magedu.com.
1 IN PTR ns.magedu.com.
1 IN PTR mail.magedu.com.
1 IN PTR www.magedu.com.
检查区域文件
[root@www named]# named-checkzone "magedu.com" magedu.com.zone
zone magedu.com/IN: loaded serial 2013041501
OK
检查区域文件
[root@www named]# named-checkzone "1.168.192.in-addr.arpa" 192.168.1.zone
zone 1.168.192.in-addr.arpa/IN: loaded serial 2013041501
OK
[root@www named]#
[root@www named]# getenforce
Permissive
[root@www named]# setenforce 0
[root@www named]# getenforce
Permissive
[root@www named]#
[root@www named]# vim /etc/sysconfig/selinux #它是指向 /etc/selinux/config 的链接
# This file controls the state of SELinux on the system.
# SELINUX= can take one of these three values:
# enforcing - SELinux security policy is enforced.
# permissive - SELinux prints warnings instead of enforcing.
# disabled - SELinux is fully disabled.
#SELINUX=enforcing
SELINUX=permissive
# SELINUXTYPE= type of policy in use. Possible values are:
# targeted - Only targeted network daemons are protected.
# strict - Full SELinux protection.
SELINUXTYPE=targeted
~
[root@www named]# vim /etc/selinux/config #它有一个软链接 /etc/sysconfig/selinux 吧
[root@www named]# ll
总计 72
-rw-r--r-- 1 root root 422 05-06 03:55 192.168.1.zone
drwxrwx--- 2 named named 4096 2013-07-29 data
drwxrwx--- 2 named named 4096 2013-07-29 dynamic
-rw-r--r-- 1 root root 207 05-06 03:51 magedu.com.zone
-rw-r----- 1 root named 1892 2008-02-18 named.ca
-rw-r----- 1 root named 152 2009-12-15 named.empty
-rw-r----- 1 root named 152 2007-06-21 named.localhost
-rw-r----- 1 root named 168 2009-12-15 named.loopback
drwxrwx--- 2 named named 4096 2013-07-29 slaves
You have new mail in /var/spool/mail/root
[root@www named]#
改组吧
改权限吧
[root@www named]# chgrp named magedu.com.zone 192.168.1.zone
[root@mail named]# pwd
/var/named
[root@mail named]#
[root@www named]# ll
总计 72
-rw-r--r-- 1 root named 422 05-06 03:55 192.168.1.zone
drwxrwx--- 2 named named 4096 2013-07-29 data
drwxrwx--- 2 named named 4096 2013-07-29 dynamic
-rw-r--r-- 1 root named 207 05-06 03:51 magedu.com.zone
-rw-r----- 1 root named 1892 2008-02-18 named.ca
-rw-r----- 1 root named 152 2009-12-15 named.empty
-rw-r----- 1 root named 152 2007-06-21 named.localhost
-rw-r----- 1 root named 168 2009-12-15 named.loopback
drwxrwx--- 2 named named 4096 2013-07-29 slaves
[root@www named]#
[root@www named]# chmod 640 magedu.com.zone 192.168.1.zone
[root@www named]# ll
总计 72
-rw-r----- 1 root named 422 05-06 03:55 192.168.1.zone
drwxrwx--- 2 named named 4096 2013-07-29 data
drwxrwx--- 2 named named 4096 2013-07-29 dynamic
-rw-r----- 1 root named 207 05-06 03:51 magedu.com.zone
-rw-r----- 1 root named 1892 2008-02-18 named.ca
-rw-r----- 1 root named 152 2009-12-15 named.empty
-rw-r----- 1 root named 152 2007-06-21 named.localhost
-rw-r----- 1 root named 168 2009-12-15 named.loopback
drwxrwx--- 2 named named 4096 2013-07-29 slaves
[root@www named]#
启动 dns服务器
[root@www named]# service named start
Starting named: [确定]
[root@www named]#
看看 53端口
[root@www named]# netstat -tunlp
Active Internet connections (only servers)
Proto Recv-Q Send-Q Local Address Foreign Address State PID/Program name
tcp 0 0 127.0.0.1:2208 0.0.0.0:* LISTEN 3815/./hpiod
tcp 0 0 127.0.0.1:9000 0.0.0.0:* LISTEN 3828/php-fpm
tcp 0 0 0.0.0.0:683 0.0.0.0:* LISTEN 3469/rpc.statd
tcp 0 0 0.0.0.0:111 0.0.0.0:* LISTEN 3419/portmap
tcp 0 0 192.168.1.85:53 0.0.0.0:* LISTEN 15323/named
tcp 0 0 127.0.0.1:53 0.0.0.0:* LISTEN 15323/named
tcp 0 0 0.0.0.0:22 0.0.0.0:* LISTEN 3849/sshd
tcp 0 0 127.0.0.1:631 0.0.0.0:* LISTEN 3863/cupsd
tcp 0 0 127.0.0.1:953 0.0.0.0:* LISTEN 15323/named
tcp 0 0 127.0.0.1:25 0.0.0.0:* LISTEN 3944/sendmail
tcp 0 0 127.0.0.1:2207 0.0.0.0:* LISTEN 3820/python
tcp 0 0 :::3306 :::* LISTEN 4087/mysqld
tcp 0 0 :::80 :::* LISTEN 4106/httpd
tcp 0 0 :::22 :::* LISTEN 3849/sshd
tcp 0 0 ::1:953 :::* LISTEN 15323/named
udp 0 0 0.0.0.0:677 0.0.0.0:* 3469/rpc.statd
udp 0 0 0.0.0.0:36135 0.0.0.0:* 4331/avahi-daemon
udp 0 0 0.0.0.0:680 0.0.0.0:* 3469/rpc.statd
udp 0 0 192.168.1.85:53 0.0.0.0:* 15323/named
udp 0 0 127.0.0.1:53 0.0.0.0:* 15323/named
udp 0 0 0.0.0.0:5353 0.0.0.0:* 4331/avahi-daemon
udp 0 0 0.0.0.0:111 0.0.0.0:* 3419/portmap
udp 0 0 0.0.0.0:631 0.0.0.0:* 3863/cupsd
udp 0 0 :::44179 :::* 4331/avahi-daemon
udp 0 0 :::5353 :::* 4331/avahi-daemon
[root@www named]#
加入服务
[root@www named]# chkconfig named on #开机启动
测试 MX 记录 (好像不正常)
[root@www named]# dig -t MX magedu.com
; <<>> DiG 9.7.0-P2-RedHat-9.7.0-17.P2.el5_9.2 <<>> -t MX magedu.com
;; global options: +cmd
;; Got answer:
;; ->>HEADER<<- opcode: QUERY, status: NOERROR, id: 14475
;; flags: qr rd ra; QUERY: 1, ANSWER: 2, AUTHORITY: 0, ADDITIONAL: 0
;; QUESTION SECTION:
;magedu.com. IN MX
;; ANSWER SECTION:
magedu.com. 60 IN MX 5 mxbiz1.qq.com.
magedu.com. 60 IN MX 10 mxbiz2.qq.com.
;; Query time: 13 msec
;; SERVER: 192.168.1.11#53(192.168.1.11)
;; WHEN: Wed May 6 04:26:04 2020
;; MSG SIZE rcvd: 77
[root@www named]#
配置 dns 服务器吧?
[root@www named]# vim /etc/resolv.conf
nameserver 192.168.1.85
nameserver 114.114.114.114
search localdomain
测试 MX 记录 (正常了)
[root@www named]# dig -t MX magedu.com
; <<>> DiG 9.7.0-P2-RedHat-9.7.0-17.P2.el5_9.2 <<>> -t MX magedu.com
;; global options: +cmd
;; Got answer:
;; ->>HEADER<<- opcode: QUERY, status: NOERROR, id: 43540
;; flags: qr aa rd ra; QUERY: 1, ANSWER: 1, AUTHORITY: 1, ADDITIONAL: 2
;; QUESTION SECTION:
;magedu.com. IN MX
;; ANSWER SECTION:
magedu.com. 86400 IN MX 10 mail.magedu.com.
;; AUTHORITY SECTION:
magedu.com. 86400 IN NS ns.magedu.com.
;; ADDITIONAL SECTION:
mail.magedu.com. 86400 IN A 192.168.1.85
ns.magedu.com. 86400 IN A 192.168.1.85
;; Query time: 0 msec
;; SERVER: 192.168.1.85#53(192.168.1.85)
;; WHEN: Wed May 6 04:28:37 2020
;; MSG SIZE rcvd: 98
[root@www named]#
测A记录
[root@www named]# dig -t A mail.magedu.com
; <<>> DiG 9.7.0-P2-RedHat-9.7.0-17.P2.el5_9.2 <<>> -t A mail.magedu.com
;; global options: +cmd
;; Got answer:
;; ->>HEADER<<- opcode: QUERY, status: NOERROR, id: 18187
;; flags: qr aa rd ra; QUERY: 1, ANSWER: 1, AUTHORITY: 1, ADDITIONAL: 1
;; QUESTION SECTION:
;mail.magedu.com. IN A
;; ANSWER SECTION:
mail.magedu.com. 86400 IN A 192.168.1.85
;; AUTHORITY SECTION:
magedu.com. 86400 IN NS ns.magedu.com.
;; ADDITIONAL SECTION:
ns.magedu.com. 86400 IN A 192.168.1.85
;; Query time: 1 msec
;; SERVER: 192.168.1.85#53(192.168.1.85)
;; WHEN: Wed May 6 04:31:11 2020
;; MSG SIZE rcvd: 82
[root@www named]#
改主机名,重启时生效
[root@www named]# vim /etc/sysconfig/network
NETWORKING=yes
NETWORKING_IPV6=yes
#HOSTNAME=localhost.localdomain
HOSTNAME=mail.magedu.com #要与mail记录 (mx 记录) 保持一致
GATEWAY=192.168.1.11
改主机名,当场生效
[root@www named]# hostname mail.magedu.com #要与mail记录 (mx 记录) 保持一致
[root@www named]#
确保开发库 开发工具都安装好了
[root@www named]# yum grouplist
Loaded plugins: product-id, security, subscription-manager
This system is not registered to Red Hat Subscription Management. You can use subscription-manager to register.
Setting up Group Process
Installed Groups:
GNOME 桌面环境
GNOME 软件开发
X 窗口系统
X 软件开发
万维网服务器
办公/生产率
图形
图形化互联网
基于文本的互联网
开发工具
开发库
打印支持
授权和出版
服务器配置工具
游戏和娱乐
管理工具
系统工具
编辑器
网络服务器
老的网络服务器
老的软件开发
老的软件支持
视频和音频
邮件服务器
Available Groups:
DNS 名称服务器
Dspam 垃圾邮件过滤
EMOS 自动安装程序
Extmail邮件服务器
FTP 服务器
Java开发
KDE 软件开发
KDE (K 桌面环境)
LDAP活动目录服务器
MySQL 数据库
OpenFabrics 企业版发行
PostgreSQL 数据库
Windows 文件服务器
工程和科学
新闻服务器
核心
病毒防护
编译工具
网站服务器
邮件过滤网关
Done
[root@www named]#
红帽6上 RHEL 6.3
Development Tools 开发工具名称不变
Server Platform Development 开发库 (服务器端)
Desktop Platform Development 同样是开发库(桌面端)
马哥那么开发库没有安装
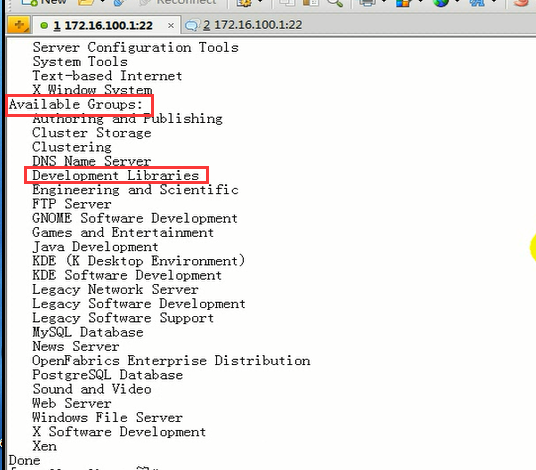
马哥安装了一下
# yum groupinstall "Development Libraries"

安装 Mysql
rpm包:
mysql-server
mysql-devel
(任何一个软件,任何一个rpm包,当我们以rpm包的格式给别人提供一个被我们要编译安装所依赖的包的时候,一定要装被依赖的devel包)(因为在编译安装一个程序的时候,它要找的是这个程序的开发库和头文件,而开发库和头文件通常都是被它的devel所提供的,这是红帽在组织程序时候的办法;如果被依赖的软件也是编译安装的话,那么就不用装devel包了,所以说我们自己编译安装件的话,通常都是安装的完整的;;;;但是如果是使有rpm包装,通常分为核心程序(核心包)和几个子包,子包里面跟我们相关的,采用最大的就是devel包,,,,这里指的是编译依赖别人的软件的时候)
(比如 postfix,依赖于sasl,所以要装sasl的devel包)
(比如 httpd,依赖于openssl,所以要装openssl的devel包 即openssl-devel)
通用二进制格式包
红帽 RHEL自身所提供的rpm包
头文件: /usr/include
库文件: /lib, /usr/lib
第三方的rpm包,
安装路径 /usr/local /opt
头文件: /usr/include /usr/local/include
库文件: /usr/local/lib (这个目录,操作系统不会自己去查找)
( ld 就是 lib directory 的意思吧)
(在 /etc/ld.so.conf.d/local.conf 里面加进路径 /usr/local/lib
或者 在 /etc/ld.so.conf 里面加进路径 /usr/local/lib
加进来后 使用 ldconfig 命令
)
使用rpm来安装配置我们的mysql
[root@www named]# yum install mysql-server mysql-devel
............................
............................
[root@mail ~]# vim /etc/ld.so.conf
include ld.so.conf.d/*.conf
[root@mail ~]# ls /etc/ld.so.conf.d/
mysql.conf qt-i386.conf xulrunner-32.conf
# mysql.conf 说明我们使用 rpm 安装mysql的时候,默认就已经给我们建立好了mysql.conf
[root@mail ~]#
四种脚本: 安装前脚本,安装后脚本,卸载前脚本,卸载后脚本
#yum install mysql-server #这里未执行,,,
#ldconfig # 也许yum安装 mysql-server 后 会执行 安装后脚本的命令吧会自动执行 ldconfig 命令,就是我们使用rpm包安装,很多地方都能自动化的原因
下面会看到 有关 mysql-devel 一大堆的头文件和库文件
[root@www named]# rpm -ql mysql-devel
/usr/include/mysql
/usr/include/mysql/chardefs.h
/usr/include/mysql/decimal.h
/usr/include/mysql/errmsg.h
/usr/include/mysql/history.h
/usr/include/mysql/keycache.h
/usr/include/mysql/keymaps.h
/usr/include/mysql/m_ctype.h
/usr/include/mysql/m_string.h
/usr/include/mysql/my_alloc.h
/usr/include/mysql/my_attribute.h
/usr/include/mysql/my_config.h
/usr/include/mysql/my_config_i386.h
/usr/include/mysql/my_dbug.h
/usr/include/mysql/my_dir.h
/usr/include/mysql/my_getopt.h
/usr/include/mysql/my_global.h
/usr/include/mysql/my_list.h
/usr/include/mysql/my_net.h
/usr/include/mysql/my_no_pthread.h
/usr/include/mysql/my_pthread.h
/usr/include/mysql/my_sys.h
/usr/include/mysql/my_xml.h
/usr/include/mysql/mysql.h
/usr/include/mysql/mysql_com.h
/usr/include/mysql/mysql_embed.h
/usr/include/mysql/mysql_time.h
/usr/include/mysql/mysql_version.h
/usr/include/mysql/mysqld_ername.h
/usr/include/mysql/mysqld_error.h
/usr/include/mysql/raid.h
/usr/include/mysql/readline.h
/usr/include/mysql/rlmbutil.h
/usr/include/mysql/rlprivate.h
/usr/include/mysql/rlshell.h
/usr/include/mysql/rltypedefs.h
/usr/include/mysql/sql_common.h
/usr/include/mysql/sql_state.h
/usr/include/mysql/sslopt-case.h
/usr/include/mysql/sslopt-longopts.h
/usr/include/mysql/sslopt-vars.h
/usr/include/mysql/tilde.h
/usr/include/mysql/typelib.h
/usr/include/mysql/xmalloc.h
/usr/lib/mysql/libdbug.a
/usr/lib/mysql/libheap.a
/usr/lib/mysql/libmyisam.a
/usr/lib/mysql/libmyisammrg.a
/usr/lib/mysql/libmysqlclient.a
/usr/lib/mysql/libmysqlclient.so
/usr/lib/mysql/libmysqlclient_r.a
/usr/lib/mysql/libmysqlclient_r.so
/usr/lib/mysql/libmystrings.a
/usr/lib/mysql/libmysys.a
/usr/lib/mysql/libvio.a
[root@www named]#
其实 devel包就是开发库和头文件,这正好被编译的程序所依赖到的
[root@www named]# service mysqld start
MySQL Daemon failed to start.
启动 mysqld: [失败]
[root@www named]#
重启电脑后 才能够启动 mysqld? 不懂? 是不是已经启动了mysqld 还是啥原因?
[root@mail ~]# service mysqld start
启动 mysqld: [确定]
[root@mail ~]#
[root@mail ~]# chkconfig mysqld on #未执行,我这里怎么不需要执行
[root@mail ~]# chkconfig --list mysqld
mysqld 0:关闭 1:关闭 2:启用 3:启用 4:启用 5:启用 6:关闭
[root@mail ~]#

为什么我的mysql命令不能正常执行 大约是 默认为 local (localhost) ,但是我的电脑不认识 local (localhost)
[root@mail ~]# mysql
ERROR 2002 (HY000): Can't connect to local MySQL server through socket '/var/lib/mysql/mysql.sock' (2)
[root@mail ~]#
[root@mail ~]# mysql -h 127.0.0.1 #刚刚安装时,密码为空吧
Welcome to the MySQL monitor. Commands end with ; or \g.
Your MySQL connection id is 5
Server version: 5.0.95 Source distribution
Copyright (c) 2000, 2011, Oracle and/or its affiliates. All rights reserved.
Oracle is a registered trademark of Oracle Corporation and/or its
affiliates. Other names may be trademarks of their respective
owners.
Type 'help;' or '\h' for help. Type '\c' to clear the current input statement.
mysql>
因为 mysql 相当于 mysql -h localhost
[root@mail ~]# mysql -h localhost
ERROR 2002 (HY000): Can't connect to local MySQL server through socket '/var/lib/mysql/mysql.sock' (2)
[root@mail ~]#
[root@mail ~]# mysql -h 127.0.0.1
Welcome to the MySQL monitor. Commands end with ; or \g.
Your MySQL connection id is 6
Server version: 5.0.95 Source distribution
Copyright (c) 2000, 2011, Oracle and/or its affiliates. All rights reserved.
Oracle is a registered trademark of Oracle Corporation and/or its
affiliates. Other names may be trademarks of their respective
owners.
Type 'help;' or '\h' for help. Type '\c' to clear the current input statement.
mysql> \q
Bye
[root@mail ~]#
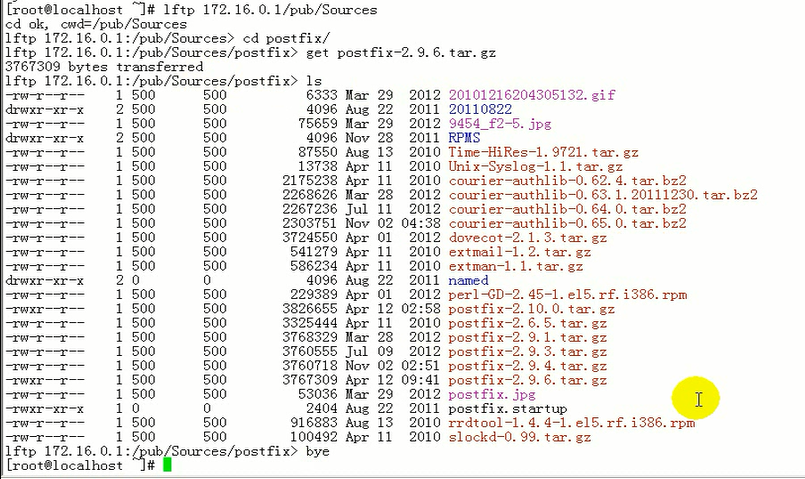
[root@mail ~]# scp @192.168.1.45:/root/postfix-2.10.10.tar.gz ./
root@192.168.1.45's password:
postfix-2.10.10.tar.gz 100% 3732KB 3.6MB/s 00:01
[root@mail ~]# date # 因为虚拟机,可能挂起,目的是如果包制作时间比系统当前时间还要靠后,
它会认为软件包是来自未来的,所以系统就会乱了
2020年 05月 06日 星期三 07:22:38 CST
[root@mail ~]#
[root@mail ~]# hwclock -s # 硬件时间写入
[root@mail ~]# date #
2020年 05月 06日 星期三 07:25:09 CST
[root@mail ~]#
[root@mail ~]# crontab -e #也可以编辑一下crontab ,每隔5分钟,同步
*/5 * * * * /sbin/hwclock -s
将来做集群的时候,要保持时间完全同步,所以硬件同步未必合适,所以要建一个时间服务器,后面会讲到
解压 postfix-2.10.10.tar.gz
[root@mail ~]# tar xf postfix-2.10.10.tar.gz
[root@mail ~]#
[root@mail ~]# cd postfix-2.10.10
[root@mail postfix-2.10.10]#
进行编译
[root@mail postfix-2.10.10]# ls /usr/include/mysql # mysql 头文件在这里
big_endian.h my_dbug.h plugin_audit.h
byte_order_generic.h my_dir.h plugin_ftparser.h
byte_order_generic_x86_64.h my_getopt.h plugin.h
byte_order_generic_x86.h my_global.h plugin_validate_password.h
chardefs.h my_list.h raid.h
decimal.h my_net.h readline.h
errmsg.h my_no_pthread.h rlmbutil.h
history.h my_pthread.h rlprivate.h
keycache.h mysql rlshell.h
keymaps.h mysql_com.h rltypedefs.h
little_endian.h mysql_com_server.h sql_common.h
m_ctype.h mysqld_ername.h sql_state.h
m_string.h mysqld_error.h sslopt-case.h
my_alloc.h mysql_embed.h sslopt-longopts.h
my_attribute.h mysql.h sslopt-vars.h
my_byteorder.h mysql_time.h tilde.h
my_compiler.h mysql_version.h typelib.h
my_config.h my_sys.h xmalloc.h
my_config_i386.h my_xml.h
[root@mail postfix-2.10.10]#
查查头文件和库文件的位置
/usr/include , /usr/lib 系统是可以自动找得着的
[root@mail postfix-2.10.10]# rpm -ql mysql-devel
/usr/include/mysql
/usr/include/mysql/chardefs.h
/usr/include/mysql/decimal.h
/usr/include/mysql/errmsg.h
/usr/include/mysql/history.h
/usr/include/mysql/keycache.h
/usr/include/mysql/keymaps.h
/usr/include/mysql/m_ctype.h
/usr/include/mysql/m_string.h
/usr/include/mysql/my_alloc.h
/usr/include/mysql/my_attribute.h
/usr/include/mysql/my_config.h
/usr/include/mysql/my_config_i386.h
/usr/include/mysql/my_dbug.h
/usr/include/mysql/my_dir.h
/usr/include/mysql/my_getopt.h
/usr/include/mysql/my_global.h
/usr/include/mysql/my_list.h
/usr/include/mysql/my_net.h
/usr/include/mysql/my_no_pthread.h
/usr/include/mysql/my_pthread.h
/usr/include/mysql/my_sys.h
/usr/include/mysql/my_xml.h
/usr/include/mysql/mysql.h
/usr/include/mysql/mysql_com.h
/usr/include/mysql/mysql_embed.h
/usr/include/mysql/mysql_time.h
/usr/include/mysql/mysql_version.h
/usr/include/mysql/mysqld_ername.h
/usr/include/mysql/mysqld_error.h
/usr/include/mysql/raid.h
/usr/include/mysql/readline.h
/usr/include/mysql/rlmbutil.h
/usr/include/mysql/rlprivate.h
/usr/include/mysql/rlshell.h
/usr/include/mysql/rltypedefs.h
/usr/include/mysql/sql_common.h
/usr/include/mysql/sql_state.h
/usr/include/mysql/sslopt-case.h
/usr/include/mysql/sslopt-longopts.h
/usr/include/mysql/sslopt-vars.h
/usr/include/mysql/tilde.h
/usr/include/mysql/typelib.h
/usr/include/mysql/xmalloc.h
/usr/lib/mysql/libdbug.a
/usr/lib/mysql/libheap.a
/usr/lib/mysql/libmyisam.a
/usr/lib/mysql/libmyisammrg.a
/usr/lib/mysql/libmysqlclient.a
/usr/lib/mysql/libmysqlclient.so
/usr/lib/mysql/libmysqlclient_r.a
/usr/lib/mysql/libmysqlclient_r.so
/usr/lib/mysql/libmystrings.a
/usr/lib/mysql/libmysys.a
/usr/lib/mysql/libvio.a
[root@mail postfix-2.10.10]#
还是先建个 postfix 和 postdrop 用户吧
[root@mail postfix-2.10.10]# groupadd -g 2525 postfix
[root@mail postfix-2.10.10]# useradd -g 2525 -u 2525 -M -s /sbin/nologin postfix
[root@mail postfix-2.10.10]# groupadd -g 2526 postdrop
[root@mail postfix-2.10.10]# useradd -g 2526 -u 2526 -M -s /sbin/nologin postdrop
[root@mail postfix-2.10.10]#
/usr/include , /usr/lib 系统是可以自动找得着的
如果不确认能不能找得着,可以指定(见下面的红框)

[root@mail postfix-2.10.10]# make makefiles 'CCARGS=-DHAS_MYSQL -I/usr/include/mysql -DUSE_SASL_AUTH -DUSE_CYRUS_SASL -I/usr/include/sasl -DUSE_TLS ' 'AUXLIBS=-L/usr/lib/mysql -lmysqlclient -lz -lm -L/usr/lib/sasl2 -lsasl2 -lssl -lcrypto'
[root@mail postfix-2.10.10]# make
[root@mail postfix-2.10.10]# make install # 一路回车
服务脚本 ls
[root@mail postfix-2.10.10]# vim /etc/init.d/postfix
#!/bin/bash
#
# postfix Postfix Mail Transfer Agent
#
# chkconfig: 2345 80 30
# description: Postfix is a Mail Transport Agent, which is the program \
# that moves mail from one machine to another.
# processname: master
# pidfile: /var/spool/postfix/pid/master.pid
# config: /etc/postfix/main.cf
# config: /etc/postfix/master.cf
# Source function library.
. /etc/rc.d/init.d/functions
# Source networking configuration.
. /etc/sysconfig/network
# Check that networking is up.
[ $NETWORKING = "no" ] && exit 3
[ -x /usr/sbin/postfix ] || exit 4
[ -d /etc/postfix ] || exit 5
[ -d /var/spool/postfix ] || exit 6
RETVAL=0
prog="postfix"
start() {
# Start daemons.
echo -n $"Starting postfix: "
/usr/bin/newaliases >/dev/null 2>&1
/usr/sbin/postfix start 2>/dev/null 1>&2 && success || failure $"$prog start"
RETVAL=$?
[ $RETVAL -eq 0 ] && touch /var/lock/subsys/postfix
echo
return $RETVAL
}
stop() {
# Stop daemons.
echo -n $"Shutting down postfix: "
/usr/sbin/postfix stop 2>/dev/null 1>&2 && success || failure $"$prog stop"
RETVAL=$?
[ $RETVAL -eq 0 ] && rm -f /var/lock/subsys/postfix
echo
return $RETVAL
}
reload() {
echo -n $"Reloading postfix: "
/usr/sbin/postfix reload 2>/dev/null 1>&2 && success || failure $"$prog reload"
RETVAL=$?
echo
return $RETVAL
}
abort() {
/usr/sbin/postfix abort 2>/dev/null 1>&2 && success || failure $"$prog abort"
return $?
}
flush() {
/usr/sbin/postfix flush 2>/dev/null 1>&2 && success || failure $"$prog flush"
return $?
}
check() {
/usr/sbin/postfix check 2>/dev/null 1>&2 && success || failure $"$prog check"
return $?
}
restart() {
stop
start
}
# See how we were called.
case "$1" in
start)
start
;;
stop)
stop
;;
restart)
stop
start
;;
reload)
reload
;;
abort)
abort
;;
flush)
flush
;;
check)
check
;;
status)
status master
;;
condrestart)
[ -f /var/lock/subsys/postfix ] && restart || :
;;
*)
echo $"Usage: $0 {start|stop|restart|reload|abort|flush|check|status|condrestart}"
exit 1
esac
exit $?
# END
给它执行权限
[root@mail postfix-2.10.10]# chmod +x /etc/init.d/postfix
加到服务列表
[root@mail postfix-2.10.10]# chkconfig --add postfix
验证启动与否
[root@mail postfix-2.10.10]# chkconfig --list postfix
postfix 0:关闭 1:关闭 2:启用 3:启用 4:启用 5:启用 6:关闭
[root@mail postfix-2.10.10]#
做一下配置吧 #这一步一定要做
[root@mail postfix-2.10.10]# newaliases
/etc/aliases: 76 aliases, longest 10 bytes, 765 bytes total
[root@mail postfix-2.10.10]#
可以看到 /etc/aliases.db 文件
[root@mail postfix-2.10.10]# ls /etc/aliases.db
/etc/aliases.db
[root@mail postfix-2.10.10]#
[root@mail postfix-2.10.10]# cd /etc/postfix/
[root@mail postfix]# vim main.cf
.................................
#myhostname = virtual.domain.tld
myhostname = mail.magedu.com
.................................
#mydomain = domain.tld
mydomain = magedu.com
.................................
#myorigin = $myhostname
myorigin = $mydomain
.................................
#inet_interfaces = all
inet_interfaces = all (inet 就是 listen net 监听网络)如果没有inet_interfaces 这一项,默认就是 0.0.0.0 也就是 all
.................................
#mydestination = $myhostname, localhost.$mydomain, localhost, $mydomain
mydestination = $myhostname, localhost.$mydomain, localhost, $mydomain,ns.$mydomain
.................................
#mynetworks = 168.100.189.0/28, 127.0.0.0/8
mynetworks = 192.168.1.0/8, 127.0.0.0/8
.................................
#alias_maps = dbm:/etc/aliases
#alias_maps = hash:/etc/aliases #别名映射表,别名查找表,默认就是它
#alias_maps = hash:/etc/aliases, nis:mail.aliases
#alias_maps = netinfo:/aliases
.................................
# 下面这个就不介绍了
#alias_database = dbm:/etc/aliases
#alias_database = dbm:/etc/mail/aliases
#alias_database = hash:/etc/aliases
#alias_database = hash:/etc/aliases, hash:/opt/majordomo/aliases
.................................
#邮箱格式类型
#home_mailbox = Mailbox #默认是它吧
#home_mailbox = Maildir/
.................................
# 用户收到邮件后不是先放在家目录,而是放在邮筒(邮箱)里面
#在某个目录下都有个同名的文件(Mailbox格式) 或 同名的文件夹(Maildir/格式)
#mail_spool_directory = /var/mail
#mail_spool_directory = /var/spool/mail
.................................
#邮件投递代理(MDA) 主要有两个 procmail maildrop
# postfix 自带有MDA,procmail更高级一点的MDA,maildrop还更高级一点
# maildrop是一个独立的服务
#这里可以配置 procmail 在 master.cf中配置maildrop
#mailbox_command = /some/where/procmail #procmail就是邮件投递代理
#mailbox_command = /some/where/procmail -a "$EXTENSION"
.................................
#maildrop是一个子模块,必须由master负责启动 , 在 /etc/postfix/master.cf中配置maildrop
看看新配置的
[root@mail postfix]# postconf -n # -n 指的是 new ,,即新的配置
command_directory = /usr/sbin
config_directory = /etc/postfix
daemon_directory = /usr/libexec/postfix
data_directory = /var/lib/postfix
debug_peer_level = 2
debugger_command = PATH=/bin:/usr/bin:/usr/local/bin:/usr/X11R6/bin ddd $daemon_directory/$process_name $process_id & sleep 5
html_directory = no
inet_interfaces = all
inet_protocols = ipv4
mail_owner = postfix
mailq_path = /usr/bin/mailq
manpage_directory = /usr/local/man
mydestination = $myhostname, localhost.$mydomain, localhost, $mydomain,ns.$mydomain
mydomain = magedu.com
myhostname = mail.magedu.com
mynetworks = 192.168.1.0/24,127.0.0.0/8
myorigin = $mydomain
newaliases_path = /usr/bin/newaliases
queue_directory = /var/spool/postfix
readme_directory = no
sample_directory = /etc/postfix
sendmail_path = /usr/sbin/sendmail
setgid_group = postdrop
unknown_local_recipient_reject_code = 550
[root@mail postfix]#
[root@mail postfix]# service postfix start
启动 postfix: [失败]
[root@mail postfix]#
可以看到 25 端口被占用
[root@mail postfix]# tail /var/log/maillog
May 6 09:46:13 mail postfix/postfix-script[11339]: fatal: mail system startup failed
May 6 09:46:15 mail postfix/postfix-script[11419]: starting the Postfix mail system
May 6 09:46:15 mail postfix/master[11421]: fatal: bind 0.0.0.0 port 25: Address already in use
May 6 09:46:16 mail postfix/master[11420]: fatal: daemon initialization failure
May 6 09:46:17 mail postfix/postfix-script[11422]: fatal: mail system startup failed
May 6 09:46:20 mail postfix/postfix-script[11439]: fatal: the Postfix mail system is not running
May 6 09:46:20 mail postfix/postfix-script[11511]: starting the Postfix mail system
May 6 09:46:20 mail postfix/master[11513]: fatal: bind 0.0.0.0 port 25: Address already in use
May 6 09:46:21 mail postfix/master[11512]: fatal: daemon initialization failure
May 6 09:46:22 mail postfix/postfix-script[11514]: fatal: mail system startup failed
[root@mail postfix]#
看看 25 端口
[root@mail postfix]# netstat -tnlp
Active Internet connections (only servers)
Proto Recv-Q Send-Q Local Address Foreign Address State PID/Program
tcp 0 0 127.0.0.1:2208 0.0.0.0:* LISTEN 3804/./hpiod
tcp 0 0 0.0.0.0:647 0.0.0.0:* LISTEN 3433/rpc.sta
tcp 0 0 127.0.0.1:9000 0.0.0.0:* LISTEN 3817/php-fpm
tcp 0 0 0.0.0.0:3306 0.0.0.0:* LISTEN 3982/mysqld
tcp 0 0 0.0.0.0:111 0.0.0.0:* LISTEN 3383/portmap
tcp 0 0 192.168.1.85:53 0.0.0.0:* LISTEN 3744/named
tcp 0 0 127.0.0.1:53 0.0.0.0:* LISTEN 3744/named
tcp 0 0 0.0.0.0:22 0.0.0.0:* LISTEN 3838/sshd
tcp 0 0 127.0.0.1:631 0.0.0.0:* LISTEN 3852/cupsd
tcp 0 0 127.0.0.1:25 0.0.0.0:* LISTEN 4028/sendmai
tcp 0 0 127.0.0.1:953 0.0.0.0:* LISTEN 3744/named
tcp 0 0 127.0.0.1:2207 0.0.0.0:* LISTEN 3809/python
tcp 0 0 :::80 :::* LISTEN 4117/httpd
tcp 0 0 :::22 :::* LISTEN 3838/sshd
tcp 0 0 ::1:953 :::* LISTEN 3744/named
[root@mail postfix]#
停掉 sendmail
[root@mail postfix]# service sendmail stop
关闭 sm-client: [确定]
关闭 sendmail: [确定]
[root@mail postfix]#
停用服务
[root@mail postfix]# chkconfig sendmail off
卸载sendmail
[root@www ~]# rpm -e sendmail
error: Failed dependencies:
/usr/sbin/sendmail is needed by (installed) redhat-lsb-4.0-2.1.4.el5.i386
smtpdaemon is needed by (installed) mdadm-2.6.9-5.el5.i386
smtpdaemon is needed by (installed) fetchmail-6.3.6-4.el5.i386
smtpdaemon is needed by (installed) mutt-1.4.2.2-6.el5.i386
[root@www ~]#
不考虑依赖,直接卸载
[root@www ~]# rpm -e sendmail --nodeps
此时 能重启 postfix 了
[root@mail postfix]# service postfix restart
关闭 postfix: [失败]
启动 postfix: [确定]
[root@mail postfix]#
马哥 虽然能启动 ,但是看 日志 也发现了跟我一样的错

(马哥)的操作

[root@mail postfix]# tail /var/log/maillog
May 6 09:46:20 mail postfix/master[11513]: fatal: bind 0.0.0.0 port 25: Address already in use
May 6 09:46:21 mail postfix/master[11512]: fatal: daemon initialization failure
May 6 09:46:22 mail postfix/postfix-script[11514]: fatal: mail system startup failed
May 6 09:52:03 mail postfix/postfix-script[11572]: fatal: the Postfix mail system is not running
May 6 09:52:03 mail postfix/postfix-script[11643]: starting the Postfix mail system
May 6 09:52:03 mail postfix/master[11645]: daemon started -- version 2.10.10, configuration /etc/postfix
May 6 09:52:04 mail postfix/postfix-script[11663]: stopping the Postfix mail system
May 6 09:52:04 mail postfix/master[11645]: terminating on signal 15
May 6 09:52:04 mail postfix/postfix-script[11736]: starting the Postfix mail system
May 6 09:52:04 mail postfix/master[11738]: daemon started -- version 2.10.10, configuration /etc/postfix
[root@mail postfix]#
[root@mail postfix]# netstat -tnlp
Active Internet connections (only servers)
Proto Recv-Q Send-Q Local Address Foreign Address State PID/Program name
tcp 0 0 127.0.0.1:2208 0.0.0.0:* LISTEN 3804/./hpiod
tcp 0 0 0.0.0.0:647 0.0.0.0:* LISTEN 3433/rpc.statd
tcp 0 0 127.0.0.1:9000 0.0.0.0:* LISTEN 3817/php-fpm
tcp 0 0 0.0.0.0:3306 0.0.0.0:* LISTEN 3982/mysqld
tcp 0 0 0.0.0.0:111 0.0.0.0:* LISTEN 3383/portmap
tcp 0 0 192.168.1.85:53 0.0.0.0:* LISTEN 3744/named
tcp 0 0 127.0.0.1:53 0.0.0.0:* LISTEN 3744/named
tcp 0 0 0.0.0.0:22 0.0.0.0:* LISTEN 3838/sshd
tcp 0 0 127.0.0.1:631 0.0.0.0:* LISTEN 3852/cupsd
tcp 0 0 0.0.0.0:25 0.0.0.0:* LISTEN 11738/master #master是postfix的核心进程
tcp 0 0 127.0.0.1:953 0.0.0.0:* LISTEN 3744/named
tcp 0 0 127.0.0.1:2207 0.0.0.0:* LISTEN 3809/python
tcp 0 0 :::80 :::* LISTEN 4117/httpd
tcp 0 0 :::22 :::* LISTEN 3838/sshd
tcp 0 0 ::1:953 :::* LISTEN 3744/named
[root@mail postfix]#
先建两个用户
[root@mail ~]# useradd hadoop
[root@mail ~]# useradd openstack
[root@mail ~]#
[root@mail postfix]# telnet mail.magedu.com 25 #有点卡,因为要做正解 反解等等
Trying 192.168.1.85...
Connected to mail.magedu.com (192.168.1.85).
Escape character is '^]'.
220 mail.magedu.com ESMTP Postfix
# 上面这个命令执行有错误 不是2XX开头的,,, 看日志 tail /var/log/maillog
发觉 找不到 /etc/newaliases.db
执行 newaliase了 命令不行 command not found ,,(也许是因为 卸载 sendmail 后出现 newaliase 命令不见了吧) 重装一下 postfix吧,重装后 能执行 newaliases 了
[root@mail ~]# telnet mail.magedu.com 25
Trying 192.168.1.85...
Connected to mail.magedu.com (192.168.1.85).
Escape character is '^]'.
220 mail.magedu.com ESMTP Postfix
ehlo mail.magedu.com
250-mail.magedu.com
250-PIPELINING
250-SIZE 10240000
250-VRFY
250-ETRN
250-ENHANCEDSTATUSCODES
250-8BITMIME
250 DSN
mail from:root@magedu.com
250 2.1.0 Ok
rcpt to:hadoop@magedu.com
250 2.1.5 Ok
data
354 End data with <CR><LF>.<CR><LF>
Subject:hello
hello
.
250 2.0.0 Ok: queued as 5D1C613857C
quit
221 2.0.0 Bye
Connection closed by foreign host.
[root@mail ~]#
[root@mail ~]# tail /var/log/maillog
May 6 10:42:28 mail postfix/smtpd[7637]: disconnect from www.a.org[192.168.1.85]
May 6 10:45:27 mail postfix/smtpd[7661]: warning: dict_nis_init: NIS domain name not set - NIS lookups disabled
May 6 10:45:27 mail postfix/smtpd[7661]: connect from www.a.org[192.168.1.85]
May 6 10:45:52 mail postfix/smtpd[7661]: 5D1C613857C: client=www.a.org[192.168.1.85]
May 6 10:46:27 mail postfix/cleanup[7664]: 5D1C613857C: message-id=<20200506024552.5D1C613857C@mail.magedu.com>
May 6 10:46:27 mail postfix/qmgr[7626]: 5D1C613857C: from=<root@magedu.com>, size=331, nrcpt=1 (queue active)
May 6 10:46:27 mail postfix/local[7666]: warning: dict_nis_init: NIS domain name not set - NIS lookups disabled
May 6 10:46:27 mail postfix/local[7666]: 5D1C613857C: to=<hadoop@magedu.com>, relay=local, delay=44, delays=43/0.01/0/0.06, dsn=2.0.0, status=sent (delivered to mailbox) #status=sent表示正常了
May 6 10:46:27 mail postfix/qmgr[7626]: 5D1C613857C: removed
May 6 10:46:39 mail postfix/smtpd[7661]: disconnect from www.a.org[192.168.1.85]
[root@mail ~]#
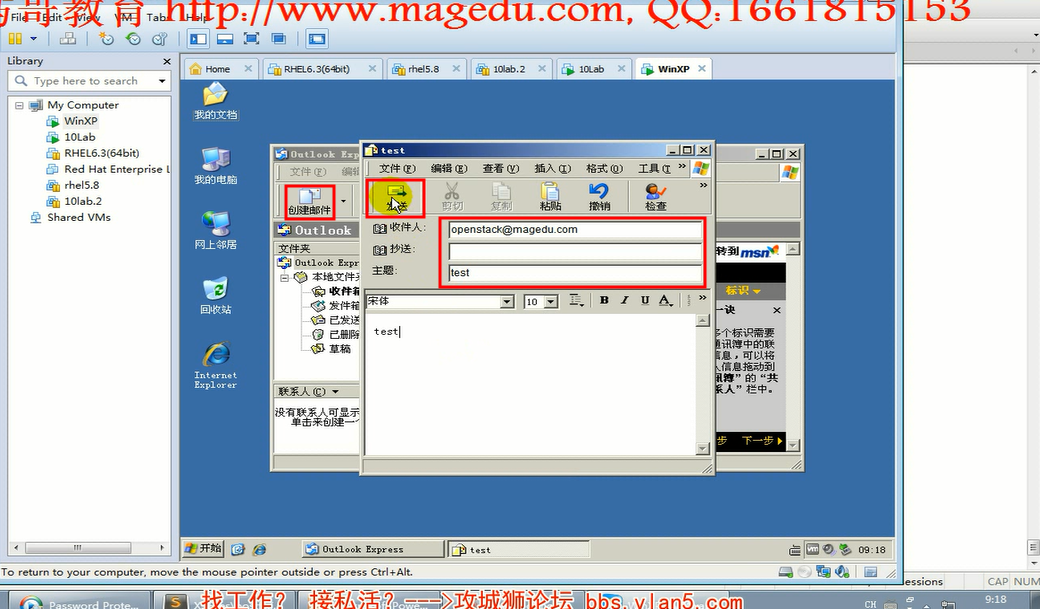
用 windows 来收发邮件看看
1)

2)
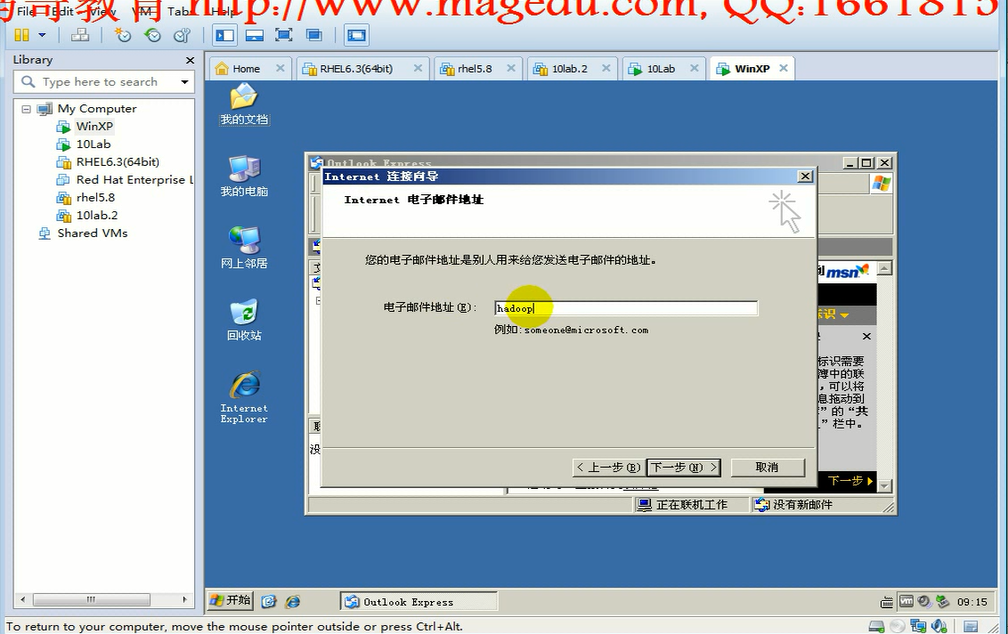
3)

4)
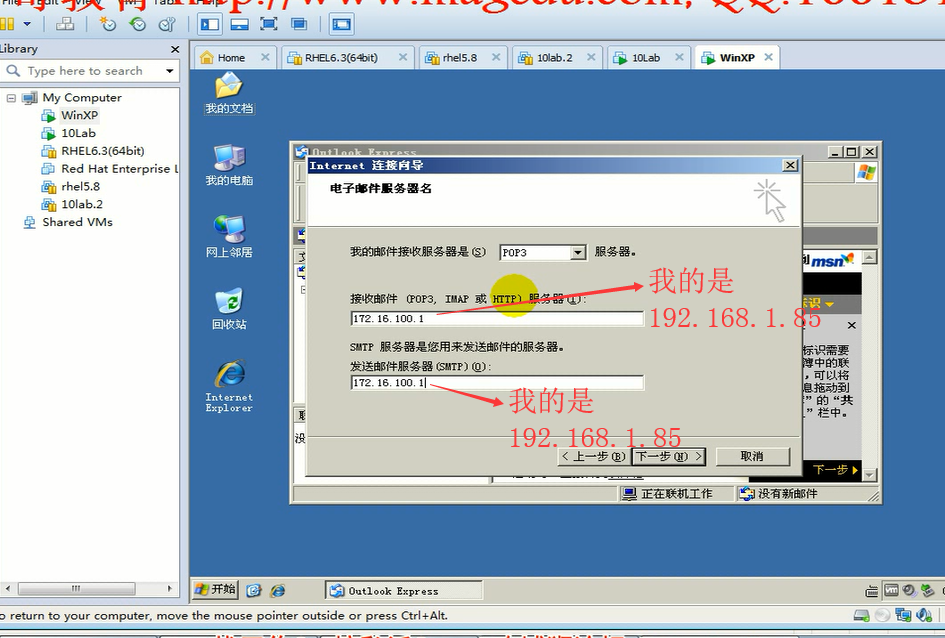
[root@mail postfix]# passwd hadoop
Changing password for user hadoop.
New UNIX password:
Retype new UNIX password:
passwd: all authentication tokens updated successfully.
[root@mail ~]# passwd openstack
Changing password for user openstack.
New UNIX password:
Retype new UNIX password:
passwd: all authentication tokens updated successfully.
[root@mail ~]#
[root@mail postfix]#
或者可以执行 # echo "hadoop" | passwd --stdin hadoop

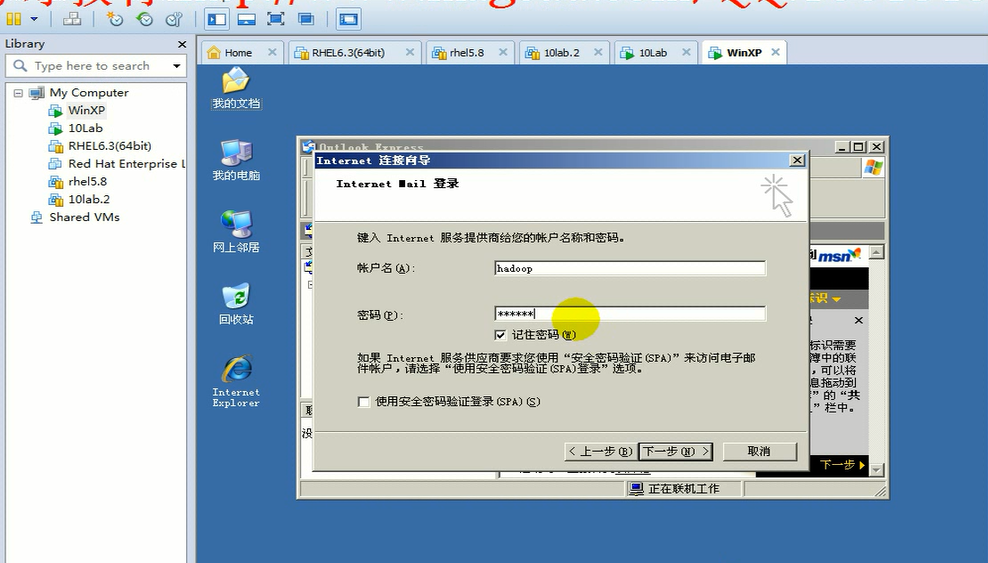
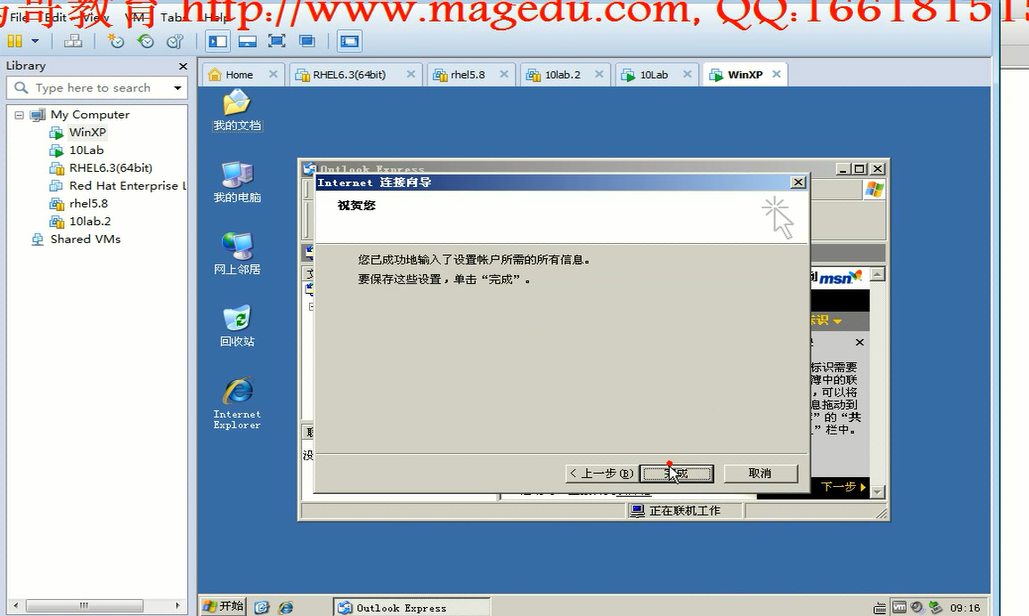
下面五个图的目的是去掉smtp验证的
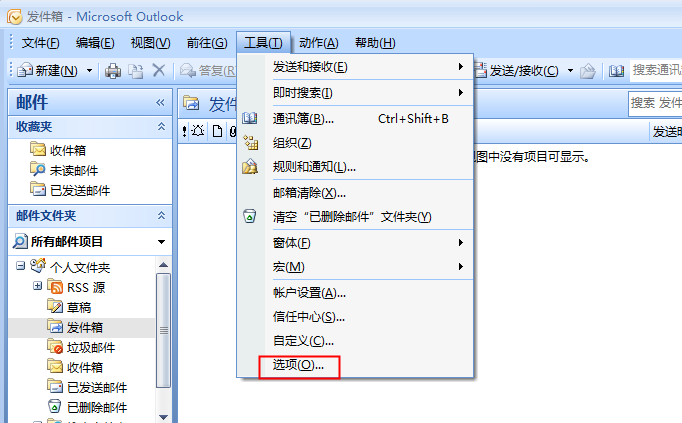
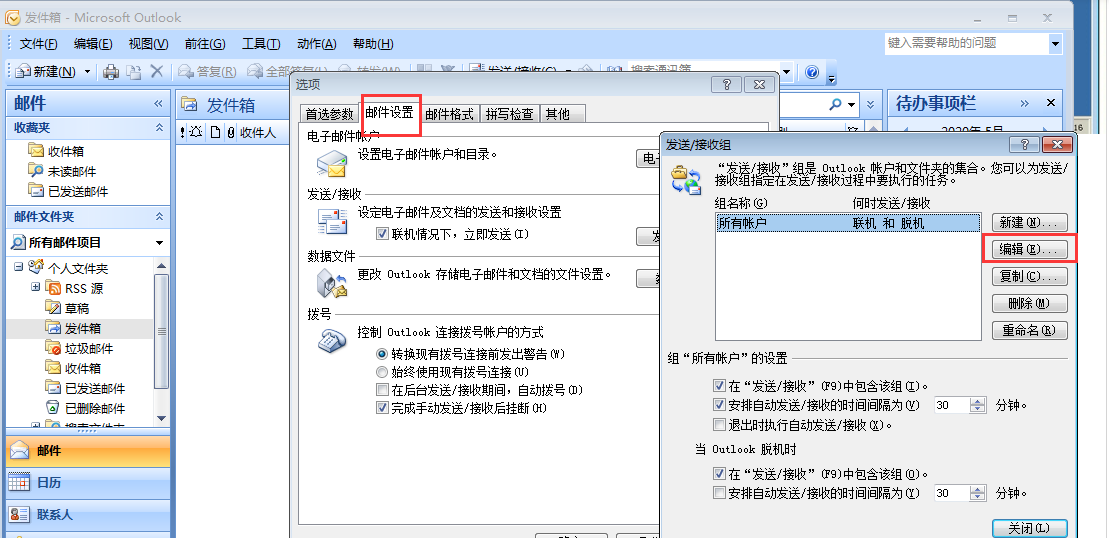
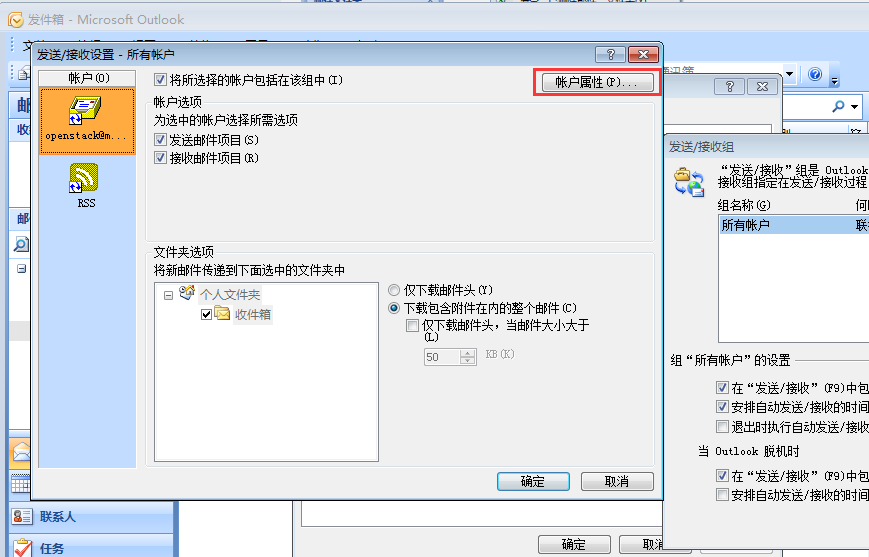
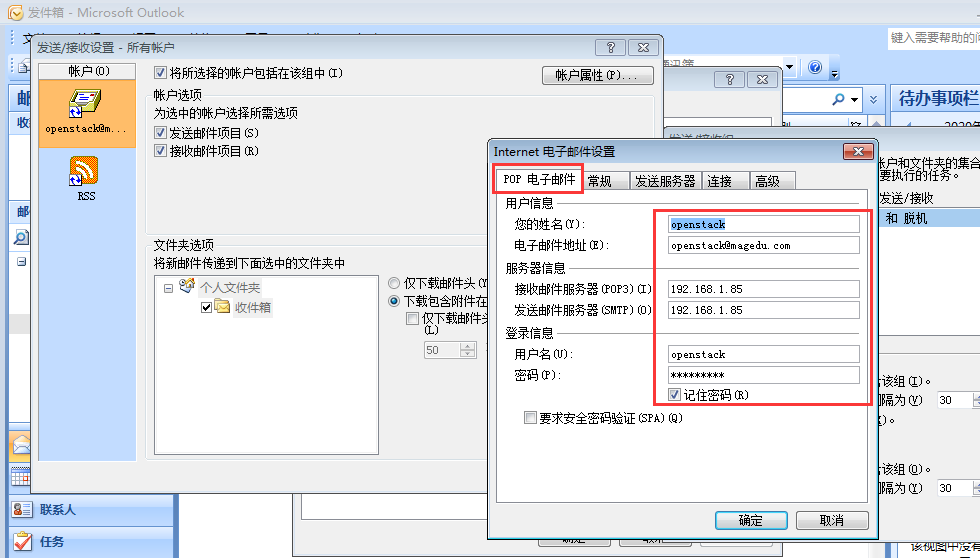
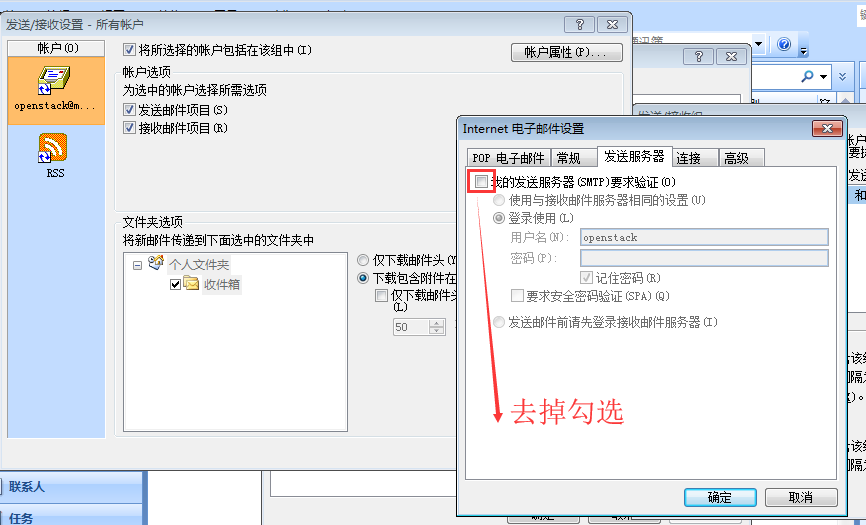
下面这个可以发出去

linux 上 切换过来 可以看到邮件了
[root@mail ~]# su - openstack
[openstack@mail ~]$ mail
Mail version 8.1 6/6/93. Type ? for help.
"/var/spool/mail/openstack": 1 message 1 new
>N 1 openstack@magedu.com Sun May 10 04:08 113/2967 "test"
& 1
Message 1:
From openstack@magedu.com Sun May 10 04:08:45 2020
X-Original-To: openstack@magedu.com
Delivered-To: openstack@magedu.com
From: "openstack" <openstack@magedu.com>
To: <openstack@magedu.com>
Subject: test
Date: Mon, 11 May 2020 10:42:14 +0800
MIME-Version: 1.0
Content-Type: multipart/alternative;
boundary="----=_NextPart_000_0001_01D62780.D5CA9950"
X-Mailer: Microsoft Office Outlook 12.0
Thread-Index: AdYnPcd0iGXnlw95TiG+xfH3F/YhIg==
Content-Language: zh-cn
▒▒▒▒һ▒▒ MIME ▒▒ʽ▒Ķಿ▒▒▒ʼ▒▒▒
------=_NextPart_000_0001_01D62780.D5CA9950
Content-Type: text/plain;
charset="us-ascii"
Content-Transfer-Encoding: 7bit
test
--More--
mutt命令 mutt 可以进行 收邮件 发邮件
[root@mail ~]# man mutt
Cannot open the message catalog "man" for locale "zh_CN.UTF-8"
(NLSPATH="<none>")
Formatting page, please wait...
mutt(1) User Manuals mutt(1)
NAME
mutt - The Mutt Mail User Agent
SYNOPSIS
mutt [-nRyzZ] [-e cmd] [-F file] [-m type] [-f file]
mutt [-nx] [-e cmd] [-a file] [-F file] [-H file] [-i file] [-s subj]
[-b addr] [-c addr] addr [...]
mutt [-n] [-e cmd] [-F file] -p
mutt -v[v]
DESCRIPTION
Mutt is a small but very powerful text based program for reading elec-
tronic mail under unix operating systems, including support color ter-
minals, MIME, and a threaded sorting mode.
OPTIONS
-a file
Attach a file to your message using MIME.
:
安装收邮件的服务器 使用 rpm安装包来安装dovecot
[root@mail ~]# yum install dovecot -y
Loaded plugins: product-id, security, subscription-manager
This system is not registered to Red Hat Subscription Management. You can use subscription-manager to register.
Setting up Install Process
Resolving Dependencies
--> Running transaction check
---> Package dovecot.i386 0:1.0.7-8.el5_9.1 set to be updated
--> Finished Dependency Resolution
Dependencies Resolved
================================================================================
Package Arch Version Repository Size
================================================================================
Installing:
dovecot i386 1.0.7-8.el5_9.1 cdrom 1.6 M
Transaction Summary
================================================================================
Install 1 Package(s)
Upgrade 0 Package(s)
Total download size: 1.6 M
Downloading Packages:
Running rpm_check_debug
Running Transaction Test
Finished Transaction Test
Transaction Test Succeeded
Running Transaction
Installing : dovecot 1/1
Installed:
dovecot.i386 0:1.0.7-8.el5_9.1
Complete!
[root@mail ~]# vim /etc/dovecot.conf
......................................................
#protocols = imap imaps pop3 pop3s
protocols = pop3
......................................................
启动 dovecot
[root@mail ~]# service dovecot start
启动 Dovecot Imap: [确定]
[root@mail ~]#
设定dovecot的开关 (设定 dovecot 开机运行服务 默认是在init.d下的配置文件里吧,一般是2 3 4 5 ,on表示启动,off表示关闭)
[root@mail ~]# chkconfig dovecot on
[root@mail ~]#
由下 110 端口已监听
[root@mail ~]# netstat -tnlp
Active Internet connections (only servers)
Proto Recv-Q Send-Q Local Address Foreign Address State PID/Program name
tcp 0 0 127.0.0.1:2208 0.0.0.0:* LISTEN 3803/./hpiod
tcp 0 0 0.0.0.0:646 0.0.0.0:* LISTEN 3432/rpc.statd
tcp 0 0 127.0.0.1:9000 0.0.0.0:* LISTEN 3816/php-fpm
tcp 0 0 0.0.0.0:3306 0.0.0.0:* LISTEN 3981/mysqld
tcp 0 0 0.0.0.0:111 0.0.0.0:* LISTEN 3381/portmap
tcp 0 0 192.168.1.85:53 0.0.0.0:* LISTEN 3743/named
tcp 0 0 127.0.0.1:53 0.0.0.0:* LISTEN 3743/named
tcp 0 0 0.0.0.0:22 0.0.0.0:* LISTEN 3837/sshd
tcp 0 0 127.0.0.1:631 0.0.0.0:* LISTEN 3851/cupsd
tcp 0 0 0.0.0.0:25 0.0.0.0:* LISTEN 7625/master
tcp 0 0 127.0.0.1:953 0.0.0.0:* LISTEN 3743/named
tcp 0 0 127.0.0.1:2207 0.0.0.0:* LISTEN 3808/python
tcp 0 0 :::110 :::* LISTEN 17403/dovecot
tcp 0 0 :::80 :::* LISTEN 4172/httpd
tcp 0 0 :::22 :::* LISTEN 3837/sshd
tcp 0 0 ::1:953 :::* LISTEN 3743/named
[root@mail ~]#
给 openstack 一个密码
[root@mail ~]# echo "111111" | passwd --stdin openstack
Changing password for user openstack.
passwd: all authentication tokens updated successfully.
[root@mail ~]#
[root@mail ~]# ping mail.magedu.com
PING mail.magedu.com (192.168.1.85) 56(84) bytes of data.
64 bytes from www.a.org (192.168.1.85): icmp_seq=1 ttl=64 time=0.124 ms
64 bytes from www.a.org (192.168.1.85): icmp_seq=2 ttl=64 time=0.052 ms
64 bytes from www.a.org (192.168.1.85): icmp_seq=3 ttl=64 time=0.048 ms
--- mail.magedu.com ping statistics ---
3 packets transmitted, 3 received, 0% packet loss, time 2001ms
rtt min/avg/max/mdev = 0.048/0.074/0.124/0.036 ms
使用 telnet 来收邮件
[root@mail ~]# telnet mail.magedu.com 110
Trying 192.168.1.85...
Connected to mail.magedu.com (192.168.1.85).
Escape character is '^]'.
+OK Dovecot ready.
USER openstack
+OK
PASS 111111
+OK Logged in.
LIST
+OK 1 messages:
1 3025
.
RETR 1
+OK 3025 octets
Return-Path: <openstack@magedu.com>
X-Original-To: openstack@magedu.com
Delivered-To: openstack@magedu.com
Received: from Carl (unknown [192.168.1.251])
by mail.magedu.com (Postfix) with ESMTP id 7C47513858E
for <openstack@magedu.com>; Mon, 11 May 2020 06:58:01 +0800 (CST)
From: "openstack" <openstack@magedu.com>
To: <openstack@magedu.com>
Subject: test
Date: Tue, 12 May 2020 13:31:30 +0800
Message-ID: <000001d6281e$97466030$c5d32090$@com>
MIME-Version: 1.0
Content-Type: multipart/alternative;
boundary="----=_NextPart_000_0001_01D62861.A569A030"
X-Mailer: Microsoft Office Outlook 12.0
Thread-Index: AdYoHpb+hkbLMUB0R2KbEL0aX1wImA==
Content-Language: zh-cn
▒▒▒▒һ▒▒ MIME ▒▒ʽ▒Ķಿ▒▒▒ʼ▒▒▒
------=_NextPart_000_0001_01D62861.A569A030
Content-Type: text/plain;
charset="us-ascii"
Content-Transfer-Encoding: 7bit
test
------=_NextPart_000_0001_01D62861.A569A030
Content-Type: text/html;
charset="us-ascii"
Content-Transfer-Encoding: quoted-printable
<html xmlns:v=3D"urn:schemas-microsoft-com:vml" =
xmlns:o=3D"urn:schemas-microsoft-com:office:office" =
xmlns:w=3D"urn:schemas-microsoft-com:office:word" =
xmlns:m=3D"http://schemas.microsoft.com/office/2004/12/omml" =
xmlns=3D"http://www.w3.org/TR/REC-html40">
<head>
<META HTTP-EQUIV=3D"Content-Type" CONTENT=3D"text/html; =
charset=3Dus-ascii">
<meta name=3DGenerator content=3D"Microsoft Word 12 (filtered medium)">
<style>
<!--
/* Font Definitions */
@font-face
{font-family:\5B8B\4F53;
panose-1:2 1 6 0 3 1 1 1 1 1;}
@font-face
{font-family:"Cambria Math";
panose-1:0 0 0 0 0 0 0 0 0 0;}
@font-face
{font-family:Calibri;
panose-1:2 15 5 2 2 2 4 3 2 4;}
@font-face
{font-family:"\@\5B8B\4F53";
panose-1:2 1 6 0 3 1 1 1 1 1;}
/* Style Definitions */
p.MsoNormal, li.MsoNormal, div.MsoNormal
{margin:0cm;
margin-bottom:.0001pt;
text-align:justify;
text-justify:inter-ideograph;
font-size:10.5pt;
font-family:"Calibri","sans-serif";}
a:link, span.MsoHyperlink
{mso-style-priority:99;
color:blue;
text-decoration:underline;}
a:visited, span.MsoHyperlinkFollowed
{mso-style-priority:99;
color:purple;
text-decoration:underline;}
span.EmailStyle17
{mso-style-type:personal-compose;
font-family:"Calibri","sans-serif";
color:windowtext;}
..MsoChpDefault
{mso-style-type:export-only;}
/* Page Definitions */
@page Section1
{size:612.0pt 792.0pt;
margin:72.0pt 90.0pt 72.0pt 90.0pt;}
div.Section1
{page:Section1;}
-->
</style>
<!--[if gte mso 9]><xml>
<o:shapedefaults "edit" spidmax=3D"1026" />
</xml><![endif]--><!--[if gte mso 9]><xml>
<o:shapelayout "edit">
<o:idmap "edit" data=3D"1" />
</o:shapelayout></xml><![endif]-->
</head>
<body link=3Dblue vlink=3Dpurple =
style=3D'text-justify-trim:punctuation'>
<div>
<p><span>test<o:p></o:p></span></p>
</div>
</body>
</html>
------=_NextPart_000_0001_01D62861.A569A030--
.
quit
+OK Logging out.
Connection closed by foreign host.
[root@mail ~]#
再发一封邮件
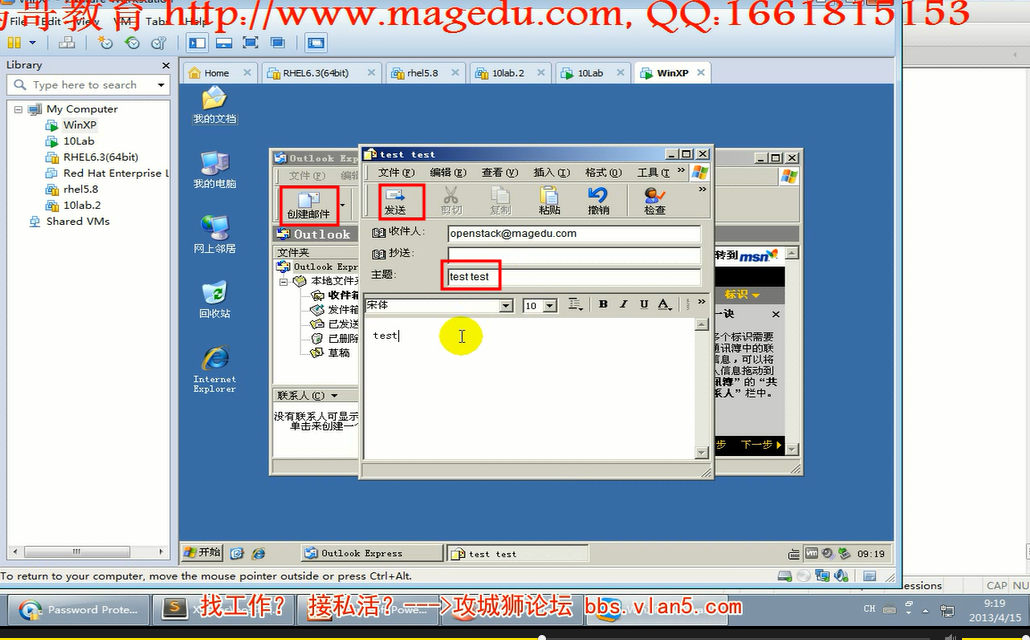
mutt 使用 root 或 openstack 用户都可以收邮件
[root@mail ~]# man mutt
mutt(1) User Manuals mutt(1)
NAME
mutt - The Mutt Mail User Agent
SYNOPSIS
mutt [-nRyzZ] [-e cmd] [-F file] [-m type] [-f file]
mutt [-nx] [-e cmd] [-a file] [-F file] [-H file] [-i file] [-s subj]
[-b addr] [-c addr] addr [...]
mutt [-n] [-e cmd] [-F file] -p
mutt -v[v]
..........................
mutt -f PROTOCOL://username@magedu.com@192.168.1.85
当我们使用虚拟域的时候,就会使用username@magedu.com@192.168.1.85 格式
或者 mutt -f PROTOCOL://username@192.168.1.85
# openstack 是用户名 @ (表示在哪个主机上) 后面对应的是主机名(服务器的地址 可以直接使用 192.168.1.85) mail.magedu.com -f 后面跟的是协议://用户名@主机名
[root@mail ~]# mutt -f pop://openstack@mail.magedu.com
( 也可以是 openstack@magedu.com@mail.magedu.com )
..........................
提示会创造邮件目录
..........................
提示输入openstack@mail.magedu.com的密码(即openstack用户的密码)
..........................
可以看到邮件

敲回车,可以看到内容

敲 i 键 可以回车主界面

回复邮件 r
删除邮件 d
已经标识为 d 了

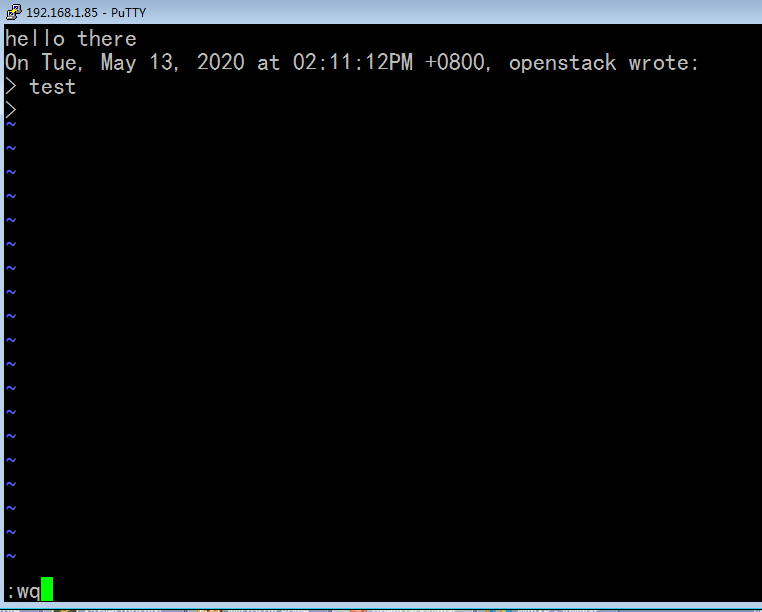
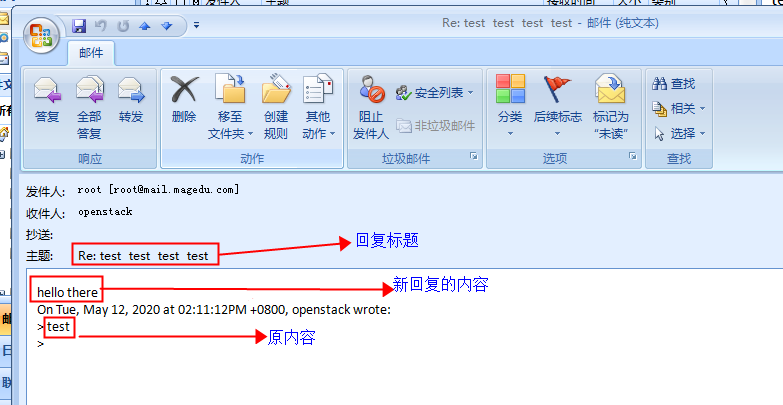
按 r 回复 几个回车(涉及到回复主题,是否包含原邮件内容), 按 i 可以进到 vim编辑器
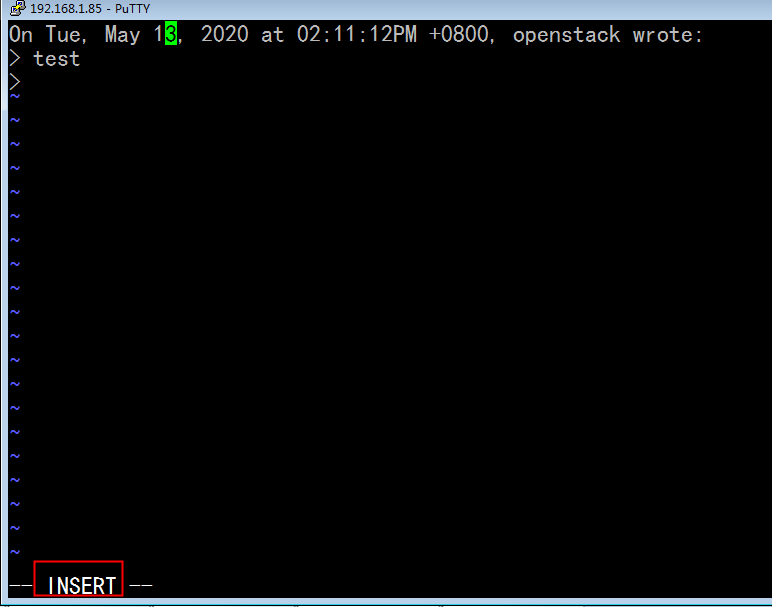
保存 退出 后 ,会将要自动发出邮件
y:寄出 q:中断
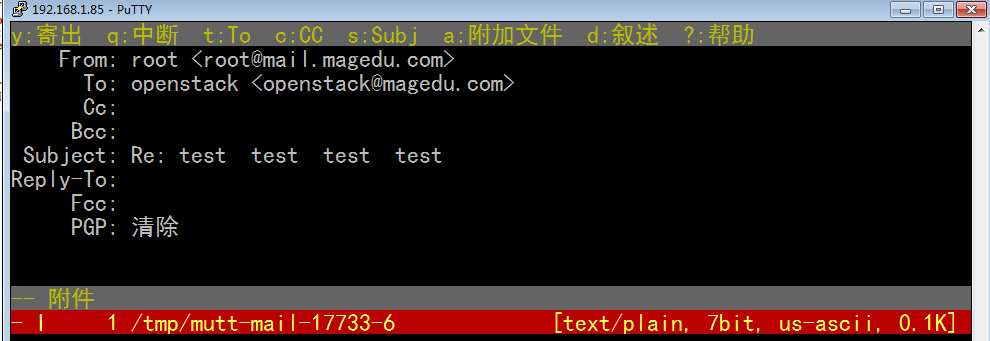
敲 y 键,,,会自动寄出
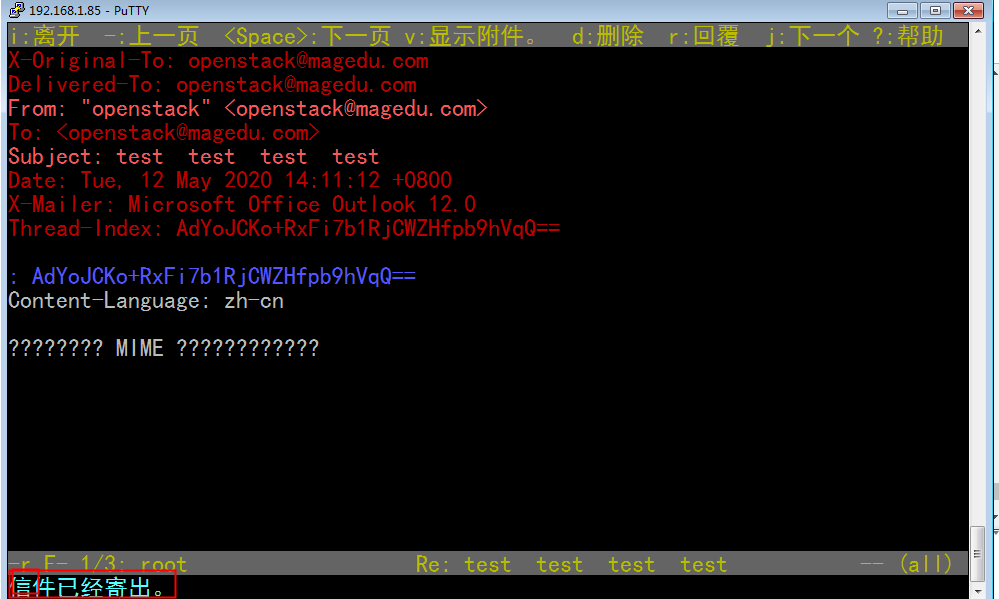
敲 q 键 ,退出邮箱 (q 相当于返回,多次 q 会最终退出邮箱?是吗) ( ctrl + c 也是退出吧 )
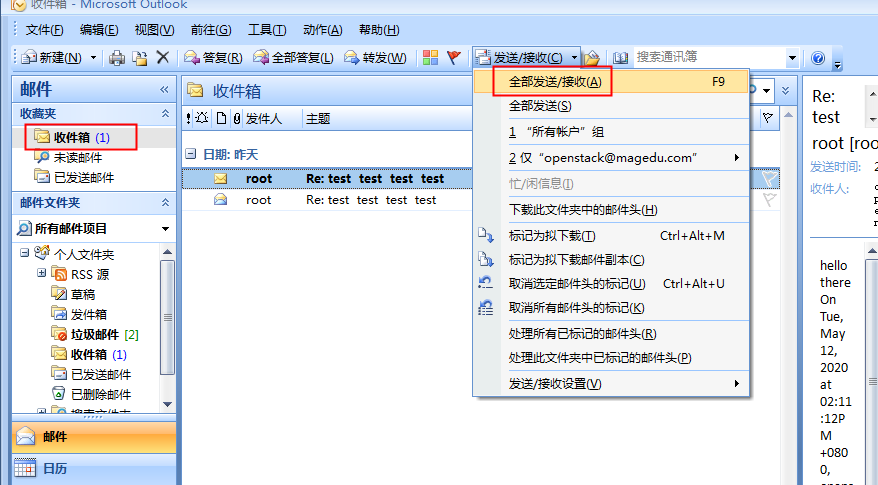
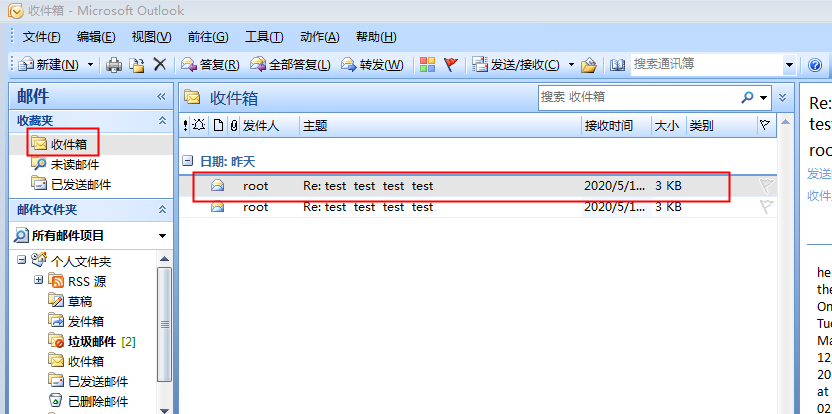
可以看到收到邮件了
如何启用用户认证
SMTP服务器没有认证的功能,要借助于 SASL
红帽系统上, 要借助于 cyrus-sasl
cyrus-sasl 本身是一个服务,服务脚本叫 saslauthd
Postfix 要想借助于 sasl 提供认证功能的话,要提供一个配置文件
( /usr/lib/sasl2/smtpd.conf ),这个配置文件是提供给SASL的,但是,可以给postfix使用
这个配置文件里面说明白了 到底是否使用sasl来进行认证的
pwcheck_method : saslauthd (使用谁来帮我们检查密码的) ( 告诉postfix,要使用 saslauthd 来实现用户认证 )
mech_list: PLAIN LOGIN (真正进行完成认证的功能)
配置sasl
[root@mail ~]# vim /etc/sysconfig/saslauthd
................................
#MECH=pam #对PAM支持不是特别的好,先改成shadow吧
MECH=shadow
................................
[root@mail ~]# service saslauthd start #启动 saslauthd
启动 saslauthd: [确定]
[root@mail ~]#
[root@mail ~]# chkconfig saslauthd on # on起来
[root@mail ~]#
测试 saslauthd
[root@mail ~]# testsaslauthd -u hadoop -p zhong1926
0: OK "Success."
[root@mail ~]# testsaslauthd -uhadoop -pzhong1926
0: OK "Success."
[root@mail ~]#
[root@mail sasl2]# vim /usr/lib/sasl2/smtpd.conf
log_level:3 #日志级别
pwcheck_method: saslauthd
mech_list: PLAIN LOGIN
[root@mail sasl2]# service saslauthd start
启动 saslauthd:saslauthd[18077] :detach_tty : Cannot start saslauthd
saslauthd[18077] :detach_tty : Another instance of saslauthd is currently running
[失败]
[root@mail sasl2]#
重启saslauthd ,确保能够读取我们刚才建立的 /usr/lib/sasl2/smtpd.conf 这个配置文件,
让 sasl (saslauthd) 知道基于这样的配置文件实现为我们的邮件提供服务了
[root@mail sasl2]# service saslauthd restart
停止 saslauthd: [确定]
启动 saslauthd: [确定]
[root@mail sasl2]#
配置postfix了
[root@mail sasl2]# cd /etc/postfix/
[root@mail postfix]# vim main.cf
...............................
#mynetworks = 168.100.189.0/28, 127.0.0.0/8
#mynetworks = 192.168.1.0/24,127.0.0.0/8
mynetworks = 127.0.0.0/8 (只给本机中继)
...............................
##############CYRUS-SASL##################
broken_sasl_auth_clients = yes
smtpd_recipient_restrictions=permit_mynetworks,permit_sasl_authenticated,reject_invalid_hostname,reject_non_fqdn_hostname,reject_unknown_sender_domain,reject_non_fqdn_sender,reject_non_fqdn_recipient,reject_unknown_recipient_domain,reject_unauth_pipelining,reject_unauth_destination #记住,红色三项最重要,,而且最后一项一定要放到最后
smtpd_sasl_auth_enable = yes
smtpd_sasl_local_domain = $myhostname
smtpd_sasl_security_options = noanonymous
smtpd_sasl_application_name = smtpd
smtpd_banner = Welcome to our $myhostname ESMTP,Warning: Version not Available!
...............................
改完配置文件后重启
[root@mail postfix]# service postfix restart
关闭 postfix: [确定]
启动 postfix: [确定]
[root@mail postfix]#
发一封邮件试试 (下面是马哥做的) (我也大概与马哥做的情况大同小异)

发不出邮件 (需要认证) (下面报的错的意思,无法理解,,,因为后面做的是进行认证?)
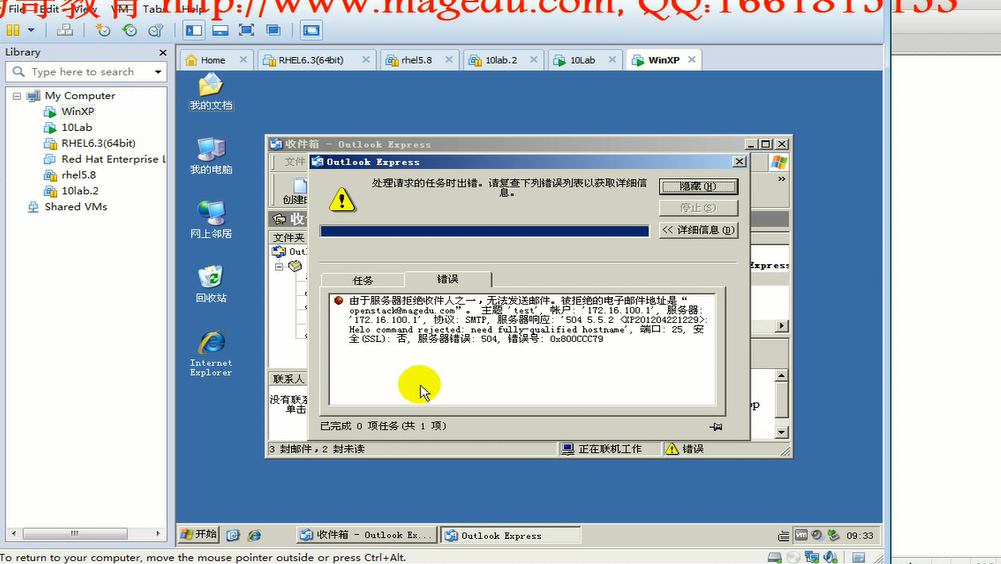
进行认证下
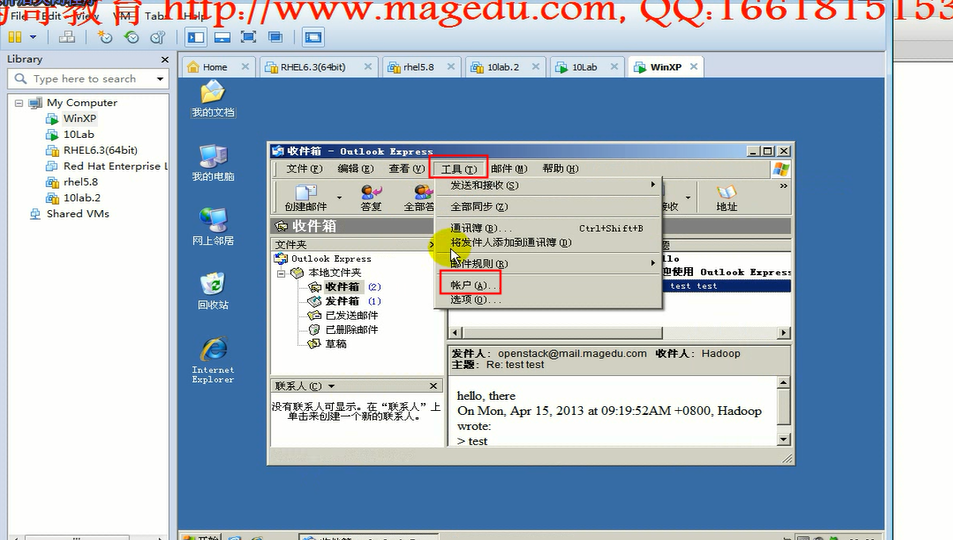
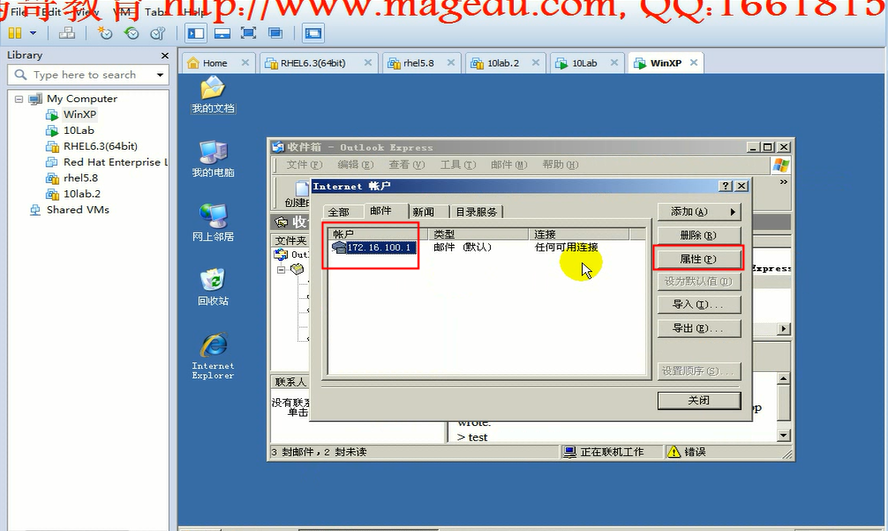
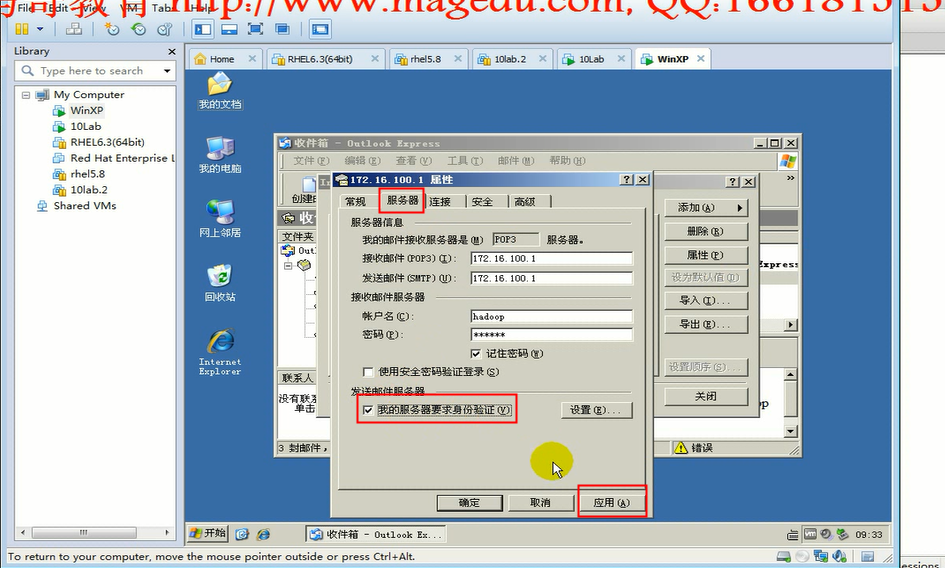
点下面的 发送全部邮件 就能发出去了
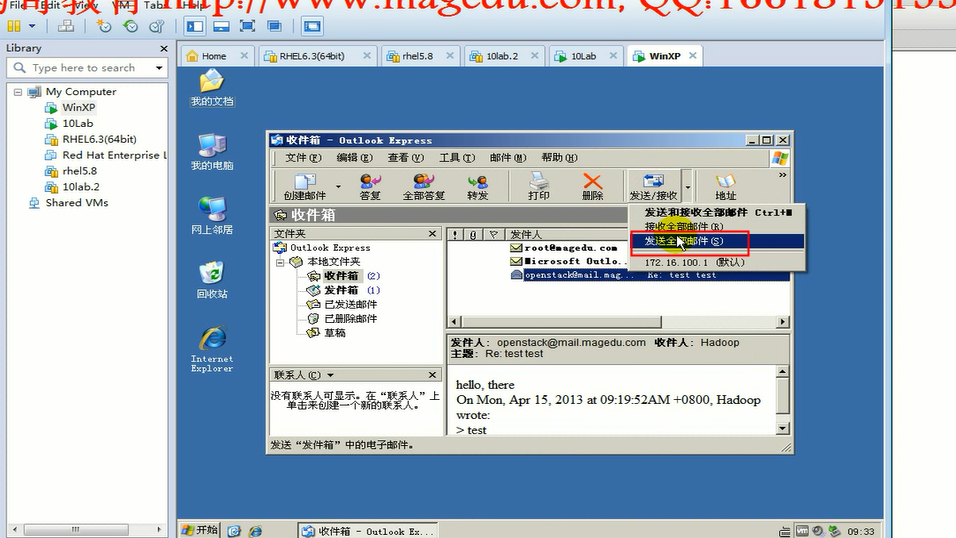


上图 /usr/lib/sasl2/smtpd.conf 中的 log_level=3 来决定信息的详细程度
当前 上面 log中的信息 不能输出的,只是为了测试才打开 log_level=3 的
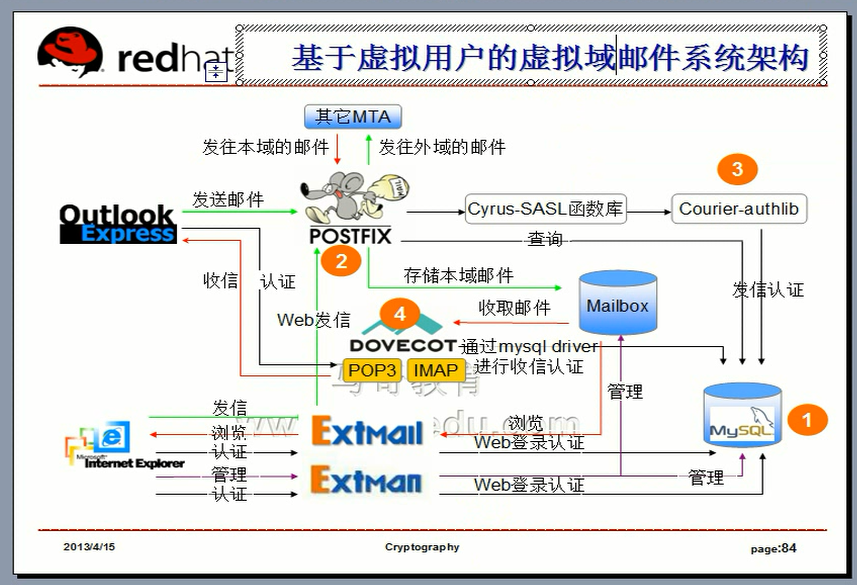
httpd:虚拟主机: 多个站点
中心主机: 只能提供一个站点
邮件服务器,域名,admin@magedu.com
邮件服务器也可以使用虚拟的
邮件服务器可以在一台物理服务器上,可以为多个域收发邮件
mydestination = 定义负责为哪个域收发邮件的,默认情况下,只有一个域,mydomain=? 可以定义多个域的,mydomain=? ,?,?,?
mydomain =
myorigin =
mydestination ,mydomain ,myorigin 相当于定义了中心主机的中心域,(邮件服务器的核心域 (中心域))
要想使用虚拟域,必须先要取消中心域 (跟web服务器一样)
至少要注释掉 mydomain=? (事实上就是添加多个),不然的话,只认为只负责这一个域的收发邮件(中心域)
同时 mydestination 还应该添加进来 负责收邮件的所有域,意味着 mydestination,mydomain 要提到的内容可能非常多,
mydomain = a.org,b.net,c.com,ab.com, (假如添加到100个,每一次查询起来很复杂,过程慢,查询起来效率低)
使用查找表,速度会变快,效率会提高
我们把域名建立在一个文本文件当中,使用postmap命令转换成 .db (点db)格式,
postmap 有一个缺陷 每一次新增或删除一个条目的时候,都得手动执行一下postmap命令,通过其它程序接口来操纵这个文件的话,更麻烦
所以我们可以使用mysql,把用户的账号密码,负责收发邮件的每一个域,统统放到mysql数据表里面,可以开发一个php程序,直接在php页面来操作里面用户的创建删除等功能
好多邮件服务器都是在线注册用户账号的,在线注册的结果提交到服务器端,然后保存到数据库中,(有可能是mysql数据库,有可能是LDAP (轻量级目录服务访问协议))
mysql数据库中可以存放下面东西
虚拟域:
用户别名:
用户账号: (把用户账号建立为一个简单的字符串,不保存在 /etc/passwd /etc/shadow 中,它仅能用来获取(邮件)服务,不能用来实现登录系统的 这样,linux会安全许多) 所以这叫虚拟用户账户 (虚拟账户 虚拟用户)
postfix的查找表类型
[root@mail postfix]# postconf -m
btree
cidr
environ
fail
hash #hash表速度很快
internal
memcache
mysql
nis
pcre
proxy
regexp
socketmap
static
tcp
texthash
unix
[root@mail postfix]#
postfix 不能认证,要借助于 Cyrus-sasl (要工作成一个服务) 才能认证, Cyrus-sasl默认到 /etc/passwd, /etc/shadow,
现在把账号放在mysql里面,要使用虚拟用户了, 现在不使用 Cyrus-sasl 这个服务了,postfix可以借助于 Cyrus-sasl 这个库,再借助于Courier-authlib到mysql中实现用户账号查找的,此时 courier-authlib 是一个服务,此时 sasl服务就不需要了,(只需要sasl的库文件),,,所以postfix要借助于 courier-authlib 才能实现虚拟用户
dovecot要想实现让用户能够收发邮件, (既然发邮件是虚拟用户了,那么收邮件也是虚拟用户),dovecot自己可以到mysql中实现用户认证 (装dovecot时,就装(依赖于)mysql客户端) dovecot 自己就支持虚拟用户,dovecot 收的邮件其实放在 /var/mail 或 /var/spool/mail (就叫mailbox(邮箱)) (postfix 最终发到 mailbox(邮箱),dovecot 到 mailbox(邮箱)去取 )
可以装http服务器 把别人开发好的 Extmail Extman 装在web服务器上, Extmail Extman 都是使用perl开发的,所以httpd要支持perl模块,所以httpd要基于cgi的方式工作,不需要用到php的
Extmail Extman很强大,可以收发邮件,发(联系postfix往外发邮件) 收(直接到mailbox中收邮件,或者基于dovecot到mailbox中收邮件)
Extmail 本身就扮演 dovecot的功能,它自己也能够到mysql完成用户认证,并且直接获取用户邮件
通过Extmail注册用户账号,有了用户账号,Extmail通过postfix认证发邮件,Extmail可以直接认证收邮件
接下来的事:安装 courier-authlib 和 Extmail Extman
