You are here
马哥 42_03 _MySQL主从复制——MySQL-5.6基于GTID及多线程的复制 有大用
MySQL:数据库复制过滤(可以只复制一个库,可以只复制一张表)
在第一个节点node1 192.168.0.46 上 主服务器
mysql> show global variables like 'binlog%';
+-----------------------------------------+-------+
| Variable_name | Value |
+-----------------------------------------+-------+
| binlog_cache_size | 32768 |
| binlog_direct_non_transactional_updates | OFF |
| binlog_format | MIXED |
| binlog_stmt_cache_size | 32768 |
+-----------------------------------------+-------+
4 rows in set (0.00 sec)
mysql>
上面没有看到 binlog-do-db,binlog-ignore-db,,,马哥说可能没有启用,啥意思??????????
主端:
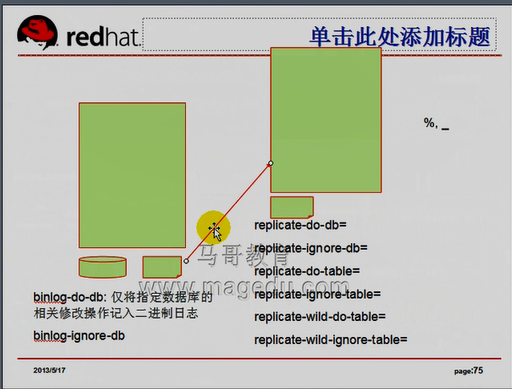
binlog-do-db: 白名单,仅将指定数据库的相关修改操作记入二进制日志的,可以是列表,可以指定多次 binlog-do-db=magedudb,binlog-do-db=testdb;;;;;;;客户只能复制相关数据库了(如果主服务器崩溃了,只能恢复指定数据库的内容,)
binlog-ignore-db: 黑名单
binlog-do-db,binlog-ignore-db其实不好,会导致主服务器端的二进制日志不完整,不建议
从端
建议在从端使用replicate-do-db或replicate-ignore-db
主服务器如果不使用binlog-do-db,binlog-ignore-db,所有相关数据库操作都记录入本地的二进制日志,所有都发送到从服务器上去,,,,,,,从服务器从自己的中继日志中读数据,读事件应用到本地的时候,根据replicate-do-db或replicate-ignore-db的定义,只复制或忽略相关的数据库
replicate-do-db: 白名单 库级别
replicate-do-db=testdb #这些指令可以使用多次
replicate-do-db=testdb1
replicate-ignore-db: 黑名单 库级别
replicate-do-table: 白名单 表级别
replicate-ignore-table: 黑名单 表级别
replicate-wild-do-table: 白名单 通配符方式表级别 replicate-wild-do-table=magedudb.tb% 表示以tb开头的所有表都复制 replicate-wild-do-table=magedudb.tb_ 表示以tb开头的后跟单个字符的所有表都复制
replicate-wild-ignore-table: 黑名单 通配符方式表级别
在从端使用replicate-do-db或replicate-ignore-db好处: 主端不用过滤,所以主端二进制日志完整
坏处:主端所有二进制日志发往从端,会造成多余的数据,当然还会多占用带宽
在第二个节点node2 192.168.0.56 上 从服务器
......................................
[mysqld]
port = 3306
socket = /tmp/mysql.sock
skip-external-locking
key_buffer_size = 256M
max_allowed_packet = 1M
table_open_cache = 256
sort_buffer_size = 1M
read_buffer_size = 1M
read_rnd_buffer_size = 4M
myisam_sort_buffer_size = 64M
thread_cache_size = 8
query_cache_size= 16M
# Try number of CPU's*2 for thread_concurrency
thread_concurrency = 8
datadir = /mydata/data
# Don't listen on a TCP/IP port at all. This can be a security enhancement,
# if all processes that need to connect to mysqld run on the same host.
# All interaction with mysqld must be made via Unix sockets or named pipes.
# Note that using this option without enabling named pipes on Windows
# (via the "enable-named-pipe" option) will render mysqld useless!
#
#skip-networking
# Replication Master Server (default)
# binary logging is required for replication
#log-bin=mysql-bin
#log-bin=master-bin
#log-bin-index=master-bin.index
# binary logging format - mixed recommended
binlog_format=mixed
relay-log = relay-log
relay-log-index = relay-log.index
replicate-do-db = discuz #增加这一行,表示只复制这个数据库 当然也包括里面的所有表
read-only = ON
innodb_file_per_table=1
# required unique id between 1 and 2^32 - 1
# defaults to 1 if master-host is not set
# but will not function as a master if omitted
server-id = 11
# Replication Slave (comment out master section to use this)
#
# To configure this host as a replication slave, you can choose between
# two methods :
#
# 1) Use the CHANGE MASTER TO command (fully described in our manual) -
# the syntax is:
#
# CHANGE MASTER TO MASTER_HOST=<host>, MASTER_PORT=<port>,
# MASTER_USER=<user>, MASTER_PASSWORD=<password> ;
#
# where you replace <host>, <user>, <password> by quoted strings and
# <port> by the master's port number (3306 by default).
#
# Example:
#
# CHANGE MASTER TO MASTER_HOST='125.564.12.1', MASTER_PORT=3306,
# MASTER_USER='joe', MASTER_PASSWORD='secret';
#
# OR
#
# 2) Set the variables below. However, in case you choose this method, then
# start replication for the first time (even unsuccessfully, for example
# if you mistyped the password in master-password and the slave fails to
# connect), the slave will create a master.info file, and any later
# change in this file to the variables' values below will be ignored and
# overridden by the content of the master.info file, unless you shutdown
# the slave server, delete master.info and restart the slaver server.
# For that reason, you may want to leave the lines below untouched
# (commented) and instead use CHANGE MASTER TO (see above)
#
# required unique id between 2 and 2^32 - 1
# (and different from the master)
# defaults to 2 if master-host is set
# but will not function as a slave if omitted
#server-id = 2
#
# The replication master for this slave - required
#master-host = <hostname>
#
# The username the slave will use for authentication when connecting
# to the master - required
#master-user = <username>
#
# The password the slave will authenticate with when connecting to
# the master - required
#master-password = <password>
#
# The port the master is listening on.
# optional - defaults to 3306
#master-port = <port>
#
# binary logging - not required for slaves, but recommended
#log-bin=mysql-bin
# Uncomment the following if you are using InnoDB tables
#innodb_data_home_dir = /usr/local/mysql/data
#innodb_data_file_path = ibdata1:10M:autoextend
#innodb_log_group_home_dir = /usr/local/mysql/data
# You can set .._buffer_pool_size up to 50 - 80 %
# of RAM but beware of setting memory usage too high
#innodb_buffer_pool_size = 256M
#innodb_additional_mem_pool_size = 20M
# Set .._log_file_size to 25 % of buffer pool size
#innodb_log_file_size = 64M
#innodb_log_buffer_size = 8M
#innodb_flush_log_at_trx_commit = 1
#innodb_lock_wait_timeout = 50
......................................
[root@node2 ~]# service mysqld restart
Shutting down MySQL. [确定]
Starting MySQL.. [确定]
[root@node2 ~]#
mysql> show variables like 'rep%'; #不在服务器变量里面显示,说明这个变量 replicate-do-db 是只读的,不允许在服务器运行时修改
+-----------------+-------+
| Variable_name | Value |
+-----------------+-------+
| report_host | |
| report_password | |
| report_port | 3306 |
| report_user | |
+-----------------+-------+
4 rows in set (0.00 sec)
mysql> show slave status\G
*************************** 1. row ***************************
Slave_IO_State: Waiting for master to send event
Master_Host: 192.168.0.46
Master_User: repluser
Master_Port: 3306
Connect_Retry: 60
Master_Log_File: master-bin.000004
Read_Master_Log_Pos: 107
Relay_Log_File: relay-log.000016
Relay_Log_Pos: 254
Relay_Master_Log_File: master-bin.000004
Slave_IO_Running: Yes
Slave_SQL_Running: Yes
Replicate_Do_DB: discuz #这里显示只复制discuz数据库
Replicate_Ignore_DB:
Replicate_Do_Table:
Replicate_Ignore_Table:
Replicate_Wild_Do_Table:
Replicate_Wild_Ignore_Table:
Last_Errno: 0
Last_Error:
Skip_Counter: 0
Exec_Master_Log_Pos: 107
Relay_Log_Space: 404
Until_Condition: None
Until_Log_File:
Until_Log_Pos: 0
Master_SSL_Allowed: No
Master_SSL_CA_File:
Master_SSL_CA_Path:
Master_SSL_Cert:
Master_SSL_Cipher:
Master_SSL_Key:
Seconds_Behind_Master: 0
Master_SSL_Verify_Server_Cert: No
Last_IO_Errno: 0
Last_IO_Error:
Last_SQL_Errno: 0
Last_SQL_Error:
Replicate_Ignore_Server_Ids:
Master_Server_Id: 1
1 row in set (0.00 sec)
mysql>
在第一个节点node1 192.168.0.46 上 主服务器
mysql> create database magedudb1;
Query OK, 1 row affected (0.00 sec)
#马哥这边太卡,有10秒钟,(从服务器不复制这个数据,所以不会有返回操作,,又因为马哥那边是半同步,所以等了10秒)

mysql> show databases;
+--------------------+
| Database |
+--------------------+
| information_schema |
| magedudb |
| magedudb1 |
| mysql |
| performance_schema |
| test |
+--------------------+
6 rows in set (0.02 sec)
mysql>
在第二个节点node2 192.168.0.56 上 从服务器
mysql> show databases; #没看到 magedudb1,是对的
+--------------------+
| Database |
+--------------------+
| information_schema |
| magedudb |
| mysql |
| performance_schema |
| test |
+--------------------+
5 rows in set (0.02 sec)
mysql>
在第一个节点node1 192.168.0.46 上 主服务器
mysql> create database discuz;
Query OK, 1 row affected (0.00 sec)
mysql>
在第二个节点node2 192.168.0.56 上 从服务器
mysql> show databases;
+--------------------+
| Database |
+--------------------+
| information_schema |
| discuz | #看到了discuz,对的
| magedudb |
| mysql |
| performance_schema |
| test |
+--------------------+
6 rows in set (0.00 sec)
mysql>
MySQ-5.6: GTID的机制,
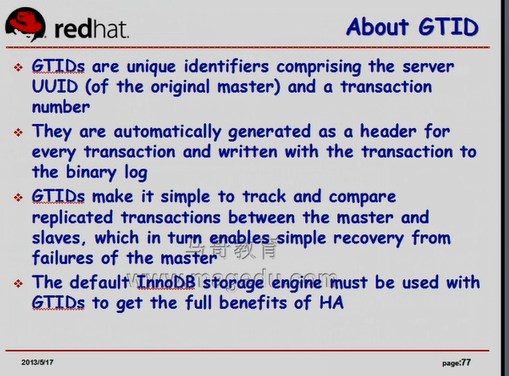
GTID是一个的唯一标志符 (global transaction identifier) ,由服务器的UUID(磁盘都有UUID的吧,Universally Unique Identifier 全局唯一标识,通常128位随机符),,,意味着mysql5.6不仅靠server-id来标识每一个主机,而且靠UUID来标识复制架构中的每一个主机,并结合事务id号来组合成一个唯一的标识某一个主机上某一个事务的标识码,,叫做GTID
MySQL5.6之后,引入GTID之后,每一个事务的首部都会写上GTID的标识的,二进制日志当中,每一个事务相关的语句,记录下来的时候,在事件首部会把它相关联的GTID记录下来
GTID使得追踪和比较复制事务变得非常简单,而且能够从崩溃中快速恢复
尤其是InnoDB存储引擎,要想使用它的高可用功能的话, 必须借助于GTID来实现
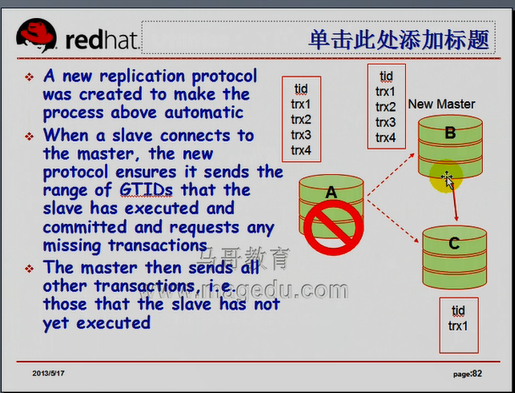
如下图,A是主,B是从,C也是从,为了实现高可用的时候,A节点挂掉的时候, 假如B提升为主,那么C将修改自己的主服务器为B,,,,,由于我们的复制是异步的,B有可能落后于A,C也有可能落后于A,,,B和C很难说谁获取数据更快点,(B可能获取的快点,但运行过程中,因为B可能繁忙什么的,事实上不一定比C快,,,,假设A上10个事务,B完成了1-9,C完成了8.9.10)(若把B提升为主,B得包括C的所有数据)(所以我们提升B为主的之前,必须要保证,C上有的,但B上没有的,都应该先复制到B上去;;然后让B成为主服务器,再让C成为B的从)
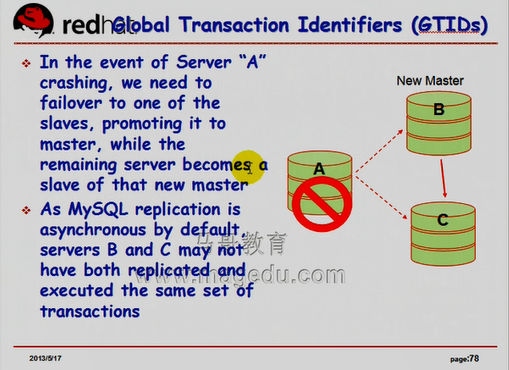
早期没有GTID的时候,B和C的谁执行的事务多少,怎么区别?
我们记录在二进制日志中的事件,每一个事件,都底属于哪个事务没有明确说明,所以主从复制的时候只能挨个一个一个进行复制,因此一旦A产生故障,想把B提升为主的,就比较麻烦,(因为B虽然比C快,但B不一定完全包含C已经生效的内容)(此时不得不把C同步到B,再把B提升为主的,问题是B怎么知道C中的哪些B中没有,B是追踪不到相关的事件的),,,,,,,,,,,,,所以GTID能派上用场了,B只需比较一下,通知C,已经完成哪些事务了,C看一看哪些事务自己有,而B中没有的,于是把这些事务提供给B,这一切结束之后,C再成为B的从..........有了GTID之后,由于每一个二进制日志都有其事务的相关信息,所以实现复制的时候,当使用 > chang master to 时,不再需要使用 master_log_file,master_log_pos 的功能了,,,因为双方可以通过协议协商一下,看一看已经执行了哪些事务了,你那边执行了哪些事务,我这边还没有,我就从那边开始往后复制,,,,,,,,所以有了GTID之后,我们可以完全自动的让服务器让主从两端自动的发现它应该从哪个文件哪个位置复制,从服务器再也不需要指定文件和位置了
有了GTID架构之后,可以使mysql复制快速从崩溃中恢复过来,一定程度上提高了高可用能力,,,,,,,,
MySQL5.6还引入了多线程复制 multi-thread-replication
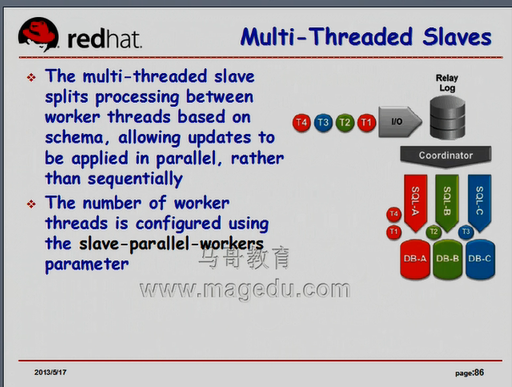
如下图主服务器有多个cpu,多个事务同时执行的时候,产生的二进制日志的速度,比直接记录进磁盘IO中的速度,比传递到从服务器的速度快,比从服务器在本地应用的速度快很多.
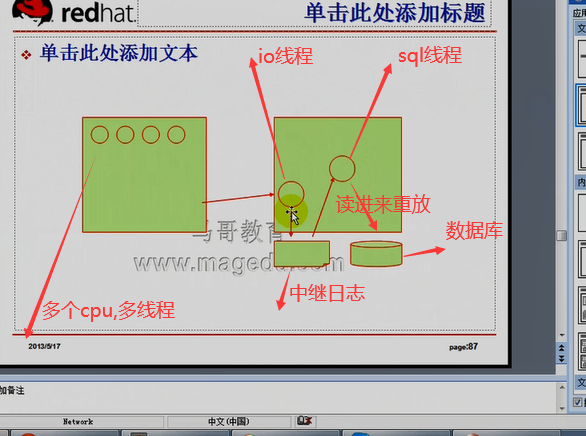
如下图从服务器可以启动多个SQL线程,并行的从中继日志中读数据,然后重放在本地,
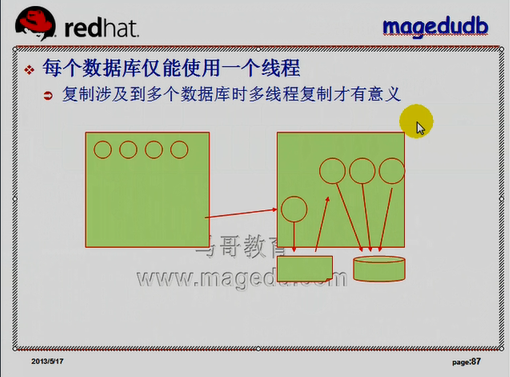
但是假如数据库magedudb里面有多张表,各表有关系,不能交叉着执行,,,,,,,,,
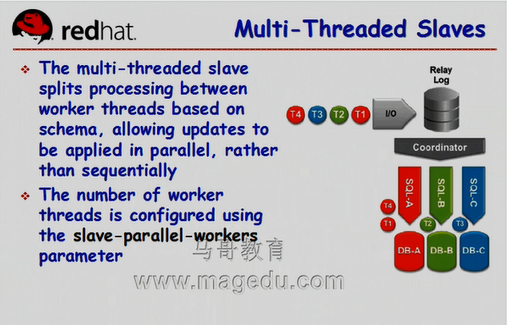
所以MySQL5.6的多线程复制指的是每一个数据库仅能使用一个线程,,,如果仅复制一个数据库,多线程是不起作用的
复制涉及到多个数据库时多线程复制才有意义,所以线程数与数据库数尽可能保持一致,,,,线程比数据库多的话,就会空闲了
slave-parallel-workers=2 从服务器并行的线程数(worker通常指的是线程)
#个数尽可能的等于或小于复制的数据库数,多于它是没有意义的
等于 0 表示禁用多线程功能
MySQL5.6为了能够让它的GTID,基于GTID的复制功能,快速复制功能能够有效的实现起来,MySQL提供了很多专用于复制管理的工具,它们通常都是python程序,依赖于python2.7及以上的版本,所以红帽5上,默认的python版本是2.4,不适用,可以升级python,工作量很大,,,,,建议在centos或红帽6以上的版本中使用,红帽6已接近稳定了,
如下图提供的工具,依赖于python 2.7 下载地址 https://launchpad.net/mysql-utilities 这是一个开放的云,也是遵循GPL协定的程序,但是并不属于mysql官方
Replicate
Check
Show
HA
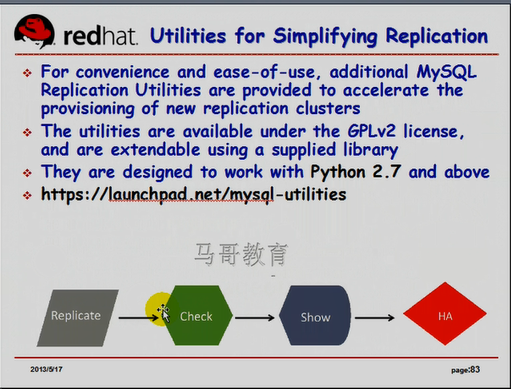
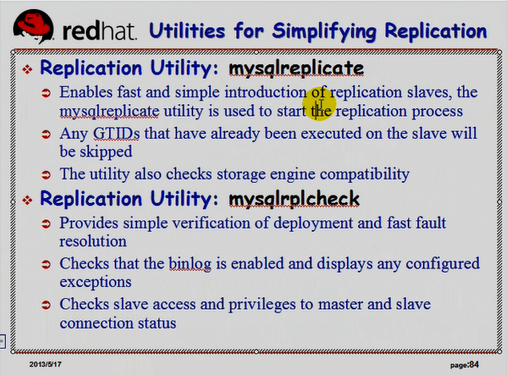
如下图MySQL官方提供的工具
mysqlreplicate 跟复制相关的工具,快速启动复制功能的工具,,它能够快速的启动mysql的从服务器的,能够帮助从服务器检查所有在本地已经执行了的事务,通过追踪GTID,它知道哪些事务已经完成了,,能快速跳过已经执行的事务,从尚未执行的事务开始执行
mysqlrplcheck mysql replication check,,mysql复制检查,,,,检查我们的复制环境是不是满足我们需求的工具,,,,,,,兼具复制(Replicate)和检查(Check)两种功能的工具 用于去简单的验证我们的布署,并实现快速故障解决(修复)等功能,,,,,,能够检查binlog是不是被启用了,显示相关的配置异常,,,,,,,,,,,
mysqlrplshow mysql replication show,主要是用来显示的,,,,,,,,,,,,,发现并显示我们的复制托普图的(复制是不是多级复制,谁是主,谁是从,有多少个从,,,能够绘制一个树状结构图出来),显示主服务器和从服务器的时候,会显示其主机名和端口号
mysqlfailover 故障转移工具,,,,,,, 能够快速的自动或者手动提升一个slave为master,只要我们给了它适当的指示,它能够快速的让一个slave从其它slave那里获取这个slave上不具备的事务,应用到本地以后,并将本地提升为主服务器
mysqlrpladmin mysql replication admin,这是一个管理工具, 调度管理工具,想手动让某一个主机下线,或者想手动让某一个slave上线,,,,,,,能够像配置keepalived一样,能够让它调度down掉一个节点,,,,比如让某一个slave调度down掉,或者手动的再让它启动起来,

手动配置mysql5.6,利用GTID实现复制功能,
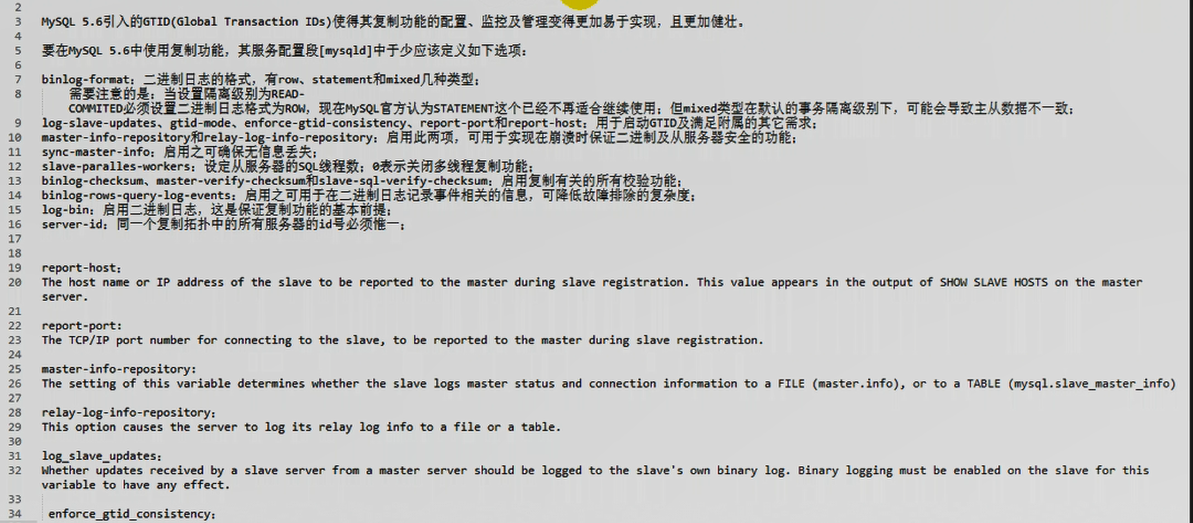
MySQL 5.6引入的 GTID ( Global Transaction IDS )使得其复制功能的配置、监控及管理变得更加易于实现,且更加健壮。
要在MySQL 5.6中使用复制功能,其服务配置段[mysqld]中于少应该定义如下选项:
binlog-format:二进制日志的格式,有statement、row和mixed几种类型;建议使用row
需要注意的是:当设置隔离级别为READ-COMMITED必须设置二进制日志格式为ROW,现在MySQL官方认为STATEMENT这个已经不再适合继续使用;但mixed类型在默认的事务隔离级别下,可能会导致主从数据不一致;
log-slave-updates、gtid-mode、enforce-gtid-consistency、report-port和report-host:用于启动GTID及满足附属的其它需求; #这几个指令必须得给
master-info-repository和relay-log-info-repository:启用此两项,可用于实现在崩溃时保证二进制及从服务器安全的功能;
sync-master-info:启用之后确保无信息丢失;同步master-info的,从服务器启动以后,从服务器应该把它的master-info(启动的相关信息,随时记录到master-info里面,,,, 任何一个事务提交之后,必须要把这个事务提交以后的那个已经读取的主服务器上的二进制日志事件的位置,对应的文件名称都要记录到master-info中去,,,,,下次启动时就从这个位置读取了)
slave-paralles-workers:设定从服务器的SQL线程数;0 表示关闭多线程复制功能;
binlog-checksum、master-verify-checksum和slave-sql-verify-checksum:启用复制有关的所有校验功能;
binlog-rows-query-log_events:启用之可用于在二进制日志记录事件相关的信息,可降低故障排除的复杂度;基于行的复制的时候,它能够在二进制日志中每记录一个事件的时候,同时记录二进制日志事件相关的额外的信息,,,,记录的数据量会变大的,,,,所以不是强制使用这一项的
log-bin:启用二进制日志,这是保证复制功能的基本前提;
server-id:同一个复制拓扑中的所有服务器的id号必须惟一;
report-host:
The host name or IP address of the slave to be reported to the master during slave registration. This value appears in the output of SHOW SLAVE HOSTS on the master server.
report-port:
The TCP/IP port number for connecting to the slave, to be reported to the master during slave registration.
master-info-repository:
The setting of this variable determines whether the slave logs master status and connection information to a FILE (master.info), or to a TABLE (mysql.slave_master_info)
relay-log-info-repository:
This option causes the server to log its relay log info to a file or a table.
log_slave_updates:
Whether updates received by a slave server from a master server should be logged to the slave's own binary log. Binary logging must be enabled on the slave for this variable to have any effect.
enforce_gtid_consistency:
下面这几项是强制的
log-slave-updates 表示从服务器上,从中继日志中读取事件在本地应用的时候,是否把这个事件的相关操作记录到本地的二进制日志(我们本来说过从不作为其它从的主,应该不启用二进制日志的),在GTID功能上,为了GTID复制的安全,应该启用这个功能(要想使这一项有意义,还得启用二进制日志),,,,,从服务器上可以不启用,但主服务器上和有可能变成主的从服务器上,这个指令要启用???????
gtid-mode 是否启用GTID的功能(模式)的,如果设置为No,表示不启用GTID了,
enforce_gtid_consistency 是否强制GGTID的一致性,GGTID的一致性指的是记录到二进制日志中,有些特殊的语句,能够修改数据库的语句,是不记录的,但是能够靠其它方式保证数据库的一致性功能,主要跟临时表的创建功能有关,马哥没展开讲
report-port 在GTID模式下,每一个从服务器在连入主服务器的时候,它必须要告诉主服务器,自己是谁,自己的主机名或ip地址,以及自己的端口号,这样在主服务器上使用 > show slave hosts,,,,可以看出来已经连到当前主服务器的所有从服务器
report-host
对于主服务器来讲 log-bin,server-id必须得有
我们的基于GTID的复制功能,它会给你的server生成一个UUID,
在第一个节点node1 192.168.0.46 上 主服务器
mysql> show slave hosts; #MySQL5.5上也是支持这个命令的,从服务器的 id 号,端口号,主服务器id MySQL5.6上应该显示的更详细
+-----------+------+------+-----------+
| Server_id | Host | Port | Master_id |
+-----------+------+------+-----------+
| 11 | | 3306 | 1 |
+-----------+------+------+-----------+
1 row in set (0.00 sec)
mysql>
binlog-checksum和master-verify-checksum能够启用复制有关的校验功能,保证复制过程中即便在服务器出现故障的前提下,依然能够尽可能读取到可用的数据的???????????
binlog-checksum 主服务器端在启动的时候,要不要检验binlog本身的检验码的,比如主服务器崩溃后,重新开机时的检验码与停机时校验码不一样,会拒绝读取的
master-verify-checksum
slave-sql-verify-checksum
一、简单主从模式配置步骤
1、配置主从节点的服务配置文件
1.1、配置master节点:
[mysqld]
binlog-format=ROW #二进制格式
log-bin=master-bin #二进制文件名
log-slave-updates=true #是否把从其它服务器读过来的数据记录到二进制日志,,,当然把从变成主,其它从要从这个服务器读数据过来的,此时应该记录到二进制,这样自己这个由从变成主时,才能复制数据到其它的从
gtid-mode=on #启用GTID功能,不启用,与mysql5.5功能就是一样的了
enforce-gtid-consistency=true
master-info-repository=TABLE #值也可以为FILE(即master.info) #slave主动连接到master,靠的是master.info文件(从服务器记录的连接信息,连的哪个从主服务器??????,以及相关的端口,从服务器所复制的主服务器的二进制日志文件的名称及事件位置等),MySQl5.6中,也可以记录到表中了,为了GTID安全性来讲,记录到表中更靠得住,,,,,,,,,让主服务器记录有哪几个从服务器,每个从服务器复制到哪儿了?????????
relay-log-info-repository=TABLE #值也可以为FILE(即slave.info) ,,,,,,,,,让slave自己记的(连的主服务器是谁,主服务器哪一个二进制日志文件,以及二进制日志文件的什么位置等等??????????)?????
sync-master-info=1
slave-parallel-workers=2 #主节点好像用不着,偶尔会用到,在实现故障转移的时候有用????,,,很多从服务器相关的配置在故障转移时才用得上的?????
binlog-checksum=CRC32
master-verify-checksum=1
slave-sql-verify-checksum=1
binlog-rows-query-log_events=1
server-id=1
report-port=3306
port=3306
datadir=/mydata/data
socket=/tmp/mysql.sock
report-host=master.magedu.com
1.2、配置slave节点:
[mysqld] #未定义二进制日志,未定义中继日志(当然可以定义一下,不定义也可以工作的,,因为只要执行 > change master to ,系统就知道它是个从服务器,而且启用默认配置,启用中继日志了)
binlog-format=ROW
log-slave-updates=true
gtid-mode=on
enforce-gtid-consistency=true
master-info-repository=TABLE
relay-log-info-repository=TABLE
sync-master-info=1
slave-parallel-workers=2 #主节点好像用不着
binlog-checksum=CRC32
master-verify-checksum=1
slave-sql-verify-checksum=1
binlog-rows-query-log_events=1
server-id=11
report-port=3306
port=3306
log-bin=mysql-bin.log
datadir=/mydata/data
socket=/tmp/mysql.sock
report-host=slave.magedu.com
2、创建复制用户
mysql> GRANT REPLICATION SLAVE ON *.* TO repluser@172.16.100.7 IDENTIFIED BY 'replpass';
说明:172.16.100.7是从节点服务器;如果想一次性授权更多的节点,可以自行根据需要修改;
3、为备节点提供初始数据集
锁定主表,备份主节点上的数据,将其还原至从节点;如果没有启用GTID,在备份时需要在master上使用show master status命令查看二进制日志文件名称及事件位置,以便后面启动slave节点时使用。
4、启动从节点的复制线程
如果启用了GTID功能,则使用如下命令: #MASTER_HOST省略了
mysql> CHANGE MASTER TO MASTER_HOST='master.magedu.com', MASTER_USER='repluser', MASTER_PASSWORD='replpass', MASTER_AUTO_POSITION=1; #直接使用MASTER_AUTO_POSITION,让它自动去识别位置的,不用使用MASTER_LOG_FILE和MASTER_LOG_POS了
没启用GTID,需要使用如下命令: #MASTER_HOST省略了
slave> CHANGE MASTER TO MASTER_HOST='172.16.100.6',
-> MASTER_USER='repluser',
-> MASTER_PASSWORD='replpass',
-> MASTER_LOG_FILE='master-bin.000003',
-> MASTER_LOG_POS=1174;
如果不使用mysqlrplcheck,mysqlrpladmin,这些工具的话,它就不依赖于python2.7了,所以mysql5.6可以装到红帽5.8上(当然也可以安装在红帽6上),
马哥使用的红帽6.4 32位的,红帽6.0系列当中,它们对网络服务的管理功能和5.0不一样,
红帽6 NetworkManager 很多场景不能用,比如不支持桥接的设备,在虚拟化中也用不成??????所以直接禁用NetworkManager,启用network
红帽5 network
我们克隆复制过来的红帽6的虚拟主机,默认eth0不启用,克隆过来的主机都启用eth1网卡(原来的网卡被命名为eth1了,如果想使用eth0,可以编辑 /etc/udev/rules.d/70-persistent-net.rule 里面对应mac地址的eth0 eth1????相关的位置改一改,并重启network服务,)(见 /node-admin/15888 )
我安装下 红帽6吧,安装过程不详述了
在第一个ha1 rhel6节点 192.168.0.60 上主服务器
[root@localhost ~]# uname -r # -r --kernel-release 内核发行版
2.6.32-754.el6.i686
[root@localhost ~]#
[root@localhost ~]# lsb_release # LSB Version 版本号
LSB Version: :base-4.0-ia32:base-4.0-noarch:core-4.0-ia32:core-4.0-noarch:graphics-4.0-ia32:graphics-4.0-noarch:printing-4.0-ia32:printing-4.0-noarch
[root@localhost ~]#
[root@localhost ~]# cat /etc/issue #红帽版本
Red Hat Enterprise Linux Server release 6.10 (Santiago)
Kernel \r on an \m
[root@localhost ~]# hostname master.magedu.com
[root@localhost ~]# vim /etc/sysconfig/network
NETWORKING=yes
HOSTNAME=master.magedu.com
[root@localhost ~]#
[root@localhost ~]# uname -n
master.magedu.com
[root@localhost ~]#
在第二个ha2 rhel6节点 192.168.0.61 上从服务器
[root@localhost ~]# uname -r
2.6.32-754.el6.i686
[root@localhost ~]# hostname slave.magedu.com
[root@localhost ~]#
[root@localhost ~]# vim /etc/sysconfig/network
NETWORKING=yes
HOSTNAME=slave.magedu.com
[root@localhost ~]# uname -n
slave.magedu.com
[root@localhost ~]#
主从节点时间要同步(任何集群,复制集群,高可用集群等集群,都要同步)
主机名要解析(很多服务可能反解地址到主机名的,如果没有dns服务,最好编辑本地的hosts文件,别让它查询dns,免得反解耽误大量时间)
在第一个ha1 rhel6节点 192.168.0.60 上主服务器
[root@localhost ~]# service ntpd status
ntpd 已停
[root@localhost ~]# service ntpd start
正在启动 ntpd: [确定]
[root@localhost ~]#
[root@localhost ~]# ntpq -p (这里有点问题 需要 到 /node-admin/15703 和 /node-admin/15897 看看处理下,第二个节点才能同步时间 )
No association ID's returned
[root@localhost ~]#
在第二个ha2 rhel6节点 192.168.0.61 上 从服务器
[root@slave ~]# ntpdate 192.168.0.60
20 Mar 01:09:19 ntpdate[2834]: adjust time server 192.168.0.60 offset 0.000001 sec
[root@slave ~]#
如果跳板机,循环的话,一下子各个主机全部下载了, 或者 febrik,也有同样类似的功能

https://downloads.mysql.com/archives/ mysql历史版本下载
https://downloads.mysql.com/archives/community/ mysql历史版本下载
在第一个ha1 rhel6节点 192.168.0.60 上主服务器
[root@master ~]# wget https://cdn.mysql.com/archives/mysql-5.6/mysql-5.6.10-linux-glibc2.5-i686.tar.gz
[root@master ~]# mkdir /mydata/data -pv
mkdir: 已创建目录 "/mydata"
mkdir: 已创建目录 "/mydata/data"
[root@master ~]#
我们在生产中,是需要使用LVM的,,,,这里我们就不使用了吧
[root@master ~]# useradd -r mysql #创建系统用户
[root@master ~]# chown -R mysql.mysql /mydata/data/
[root@master ~]# tar xf mysql-5.6.10-linux-glibc2.5-i686.tar.gz -C /usr/local
[root@master ~]#
在第二个ha2 rhel6节点 192.168.0.61 上从服务器
[root@slave ~]# wget https://cdn.mysql.com/archives/mysql-5.6/mysql-5.6.10-linux-glibc2.5-i686.tar.gz

[root@slave ~]# mkdir /mydata/data -pv
mkdir: 已创建目录 "/mydata"
mkdir: 已创建目录 "/mydata/data"
[root@slave ~]# useradd -r mysql
[root@slave ~]#
[root@slave ~]# chown -R mysql.mysql /mydata/data/
[root@slave ~]#
mysql5.6默认提供的配置文件中没有任何内容,
在第一个ha1 rhel6节点 192.168.0.60 上主服务器
[root@master ~]# cd /usr/local/
[root@master local]# ls
bin games lib mysql-5.6.10-linux-glibc2.5-i686 share
etc include libexec sbin src
[root@master local]# ln -sv mysql-5.6.10-linux-glibc2.5-i686 mysql
"mysql" -> "mysql-5.6.10-linux-glibc2.5-i686"
[root@master ~]# cd /usr/local/
[root@master local]# ls
bin games lib mysql-5.6.10-linux-glibc2.5-i686 share
etc include libexec sbin src
[root@master local]# ln -sv mysql-5.6.10-linux-glibc2.5-i686 mysql
"mysql" -> "mysql-5.6.10-linux-glibc2.5-i686"
[root@master local]# cd mysql
[root@master mysql]# ls
bin data include lib mysql-test scripts sql-bench
COPYING docs INSTALL-BINARY man README share support-files
[root@master mysql]# ll
总用量 76
drwxr-xr-x. 2 root root 4096 3月 20 09:41 bin
-rw-r--r--. 1 7161 wheel 17987 1月 23 2013 COPYING
drwxr-xr-x. 4 root root 4096 3月 20 09:41 data
drwxr-xr-x. 2 root root 4096 3月 20 09:41 docs
drwxr-xr-x. 3 root root 4096 3月 20 09:41 include
-rw-r--r--. 1 7161 wheel 7468 1月 23 2013 INSTALL-BINARY
drwxr-xr-x. 3 root root 4096 3月 20 09:41 lib
drwxr-xr-x. 4 root root 4096 3月 20 09:41 man
drwxr-xr-x. 10 root root 4096 3月 20 09:41 mysql-test
-rw-r--r--. 1 7161 wheel 2552 1月 23 2013 README
drwxr-xr-x. 2 root root 4096 3月 20 09:41 scripts
drwxr-xr-x. 28 root root 4096 3月 20 09:41 share
drwxr-xr-x. 4 root root 4096 3月 20 09:41 sql-bench
drwxr-xr-x. 3 root root 4096 3月 20 09:41 support-files
[root@master mysql]# pwd
/usr/local/mysql
[root@master mysql]#
[root@master mysql]# chown -R root.mysql ./* #改属主属组
[root@master mysql]# ll
总用量 76
drwxr-xr-x. 2 root mysql 4096 3月 20 09:41 bin
-rw-r--r--. 1 root mysql 17987 1月 23 2013 COPYING
drwxr-xr-x. 4 root mysql 4096 3月 20 09:41 data
drwxr-xr-x. 2 root mysql 4096 3月 20 09:41 docs
drwxr-xr-x. 3 root mysql 4096 3月 20 09:41 include
-rw-r--r--. 1 root mysql 7468 1月 23 2013 INSTALL-BINARY
drwxr-xr-x. 3 root mysql 4096 3月 20 09:41 lib
drwxr-xr-x. 4 root mysql 4096 3月 20 09:41 man
drwxr-xr-x. 10 root mysql 4096 3月 20 09:41 mysql-test
-rw-r--r--. 1 root mysql 2552 1月 23 2013 README
drwxr-xr-x. 2 root mysql 4096 3月 20 09:41 scripts
drwxr-xr-x. 28 root mysql 4096 3月 20 09:41 share
drwxr-xr-x. 4 root mysql 4096 3月 20 09:41 sql-bench
drwxr-xr-x. 3 root mysql 4096 3月 20 09:41 support-files
[root@master mysql]#
[root@master mysql]# scripts/mysql_install_db --user=mysql --datadir=/mydata/data/ #初始化

初始化完成后,在当前目录下生成配置文件 my.cnf ,直接编辑它,不用往/etc/ 复制了
[root@master mysql]# ls
bin docs lib mysql-test share
COPYING include man README sql-bench
data INSTALL-BINARY my.cnf scripts support-files
[root@master mysql]# cp support-files/mysql.server /etc/init.d/mysqld #复制服务脚本
[root@master mysql]# chkconfig --add mysqld #加到服务列表中去
[root@master mysql]# pwd
/usr/local/mysql
[root@master mysql]#
[root@master mysql]# vim my.cnf
....................
[mysqld]
datadir = /mydata/data #增加这行
innodb_file_per_table = ON #增加这行 # InnoDB 每表一个表文件 1 或者 ON
server-id =1 #增加这行
socket=/tmp/mysql.sock #增加这行 #套接字文件
log-bin = master-bin #增加这行 #二进制日志
....................
[root@master mysql]# service mysqld start #启动了
Starting MySQL. [确定]
[root@master mysql]#
[root@master mysql]# netstat -tunlp
Active Internet connections (only servers)
Proto Recv-Q Send-Q Local Address Foreign Address State PID/Program name
tcp 0 0 0.0.0.0:111 0.0.0.0:* LISTEN 1774/rpcbind
tcp 0 0 0.0.0.0:22 0.0.0.0:* LISTEN 2119/sshd
tcp 0 0 127.0.0.1:631 0.0.0.0:* LISTEN 1852/cupsd
tcp 0 0 127.0.0.1:25 0.0.0.0:* LISTEN 2198/master
tcp 0 0 0.0.0.0:53210 0.0.0.0:* LISTEN 1796/rpc.statd
tcp 0 0 :::3306 :::* LISTEN 3653/mysqld #3306端口
tcp 0 0 :::111 :::* LISTEN 1774/rpcbind
tcp 0 0 :::58037 :::* LISTEN 1796/rpc.statd
tcp 0 0 :::22 :::* LISTEN 2119/sshd
tcp 0 0 ::1:631 :::* LISTEN 1852/cupsd
tcp 0 0 ::1:25 :::* LISTEN 2198/master
udp 0 0 0.0.0.0:111 0.0.0.0:* 1774/rpcbind
udp 0 0 0.0.0.0:631 0.0.0.0:* 1852/cupsd
udp 0 0 192.168.0.60:123 0.0.0.0:* 2421/ntpd
udp 0 0 127.0.0.1:123 0.0.0.0:* 2421/ntpd
udp 0 0 0.0.0.0:123 0.0.0.0:* 2421/ntpd
udp 0 0 0.0.0.0:677 0.0.0.0:* 1774/rpcbind
udp 0 0 0.0.0.0:60983 0.0.0.0:* 1796/rpc.statd
udp 0 0 127.0.0.1:703 0.0.0.0:* 1796/rpc.statd
udp 0 0 :::43728 :::* 1796/rpc.statd
udp 0 0 :::111 :::* 1774/rpcbind
udp 0 0 fe80::20c:29ff:fe03:7488:123 :::* 2421/ntpd
udp 0 0 ::1:123 :::* 2421/ntpd
udp 0 0 :::123 :::* 2421/ntpd
udp 0 0 :::677 :::* 1774/rpcbind
[root@master mysql]#
[root@master mysql]# vim /etc/profile.d/mysql.sh
export PATH=$PATH:/usr/local/mysql/bin
[root@master mysql]# . /etc/profile.d/mysql.sh
[root@master mysql]# mysql #连上去了
Welcome to the MySQL monitor. Commands end with ; or \g.
Your MySQL connection id is 1
Server version: 5.6.10-log MySQL Community Server (GPL)
Copyright (c) 2000, 2013, Oracle and/or its affiliates. All rights reserved.
Oracle is a registered trademark of Oracle Corporation and/or its
affiliates. Other names may be trademarks of their respective
owners.
Type 'help;' or '\h' for help. Type '\c' to clear the current input statement.
mysql>\q
[root@master mysql]#
[root@master mysql]# ls /mydata/data/
auto.cnf ib_logfile1(InnoDB的事务日志) master.magedu.com.pid test
ibdata1 master-bin.000001 mysql
ib_logfile0(InnoDB的事务日志) master-bin.index performance_schema
[root@master mysql]#
InnoDB的事务日志组中至少两个文件,
[root@master mysql]# ls -lh /mydata/data/
总用量 109M
-rw-rw----. 1 mysql mysql 56 3月 20 09:59 auto.cnf
-rw-rw----. 1 mysql mysql 12M 3月 20 09:59 ibdata1
-rw-rw----. 1 mysql mysql 48M 3月 20 09:59 ib_logfile0 #这里是48M(mysql5.5是5M)
-rw-rw----. 1 mysql mysql 48M 3月 20 09:49 ib_logfile1
-rw-rw----. 1 mysql mysql 120 3月 20 09:59 master-bin.000001
-rw-rw----. 1 mysql mysql 20 3月 20 09:59 master-bin.index
-rw-rw----. 1 mysql mysql 5 3月 20 09:59 master.magedu.com.pid
drwx------. 2 mysql mysql 4.0K 3月 20 09:49 mysql
drwx------. 2 mysql mysql 4.0K 3月 20 09:49 performance_schema
drwx------. 2 mysql mysql 4.0K 3月 20 09:49 test
[root@master mysql]#
在第二个ha2 rhel6节点 192.168.0.61 上从服务器
[root@slave ~]# ls
anaconda-ks.cfg install.log.syslog mysql-5.6.10-linux-glibc2.5-i686.tar.gz
install.log iptables.20210319 test.txt
[root@slave ~]# tar xf mysql-5.6.10-linux-glibc2.5-i686.tar.gz -C /usr/local
[root@slave ~]# cd /usr/local/
[root@slave local]# ln -sv mysql-5.6.10-linux-glibc2.5-i686 mysql
"mysql" -> "mysql-5.6.10-linux-glibc2.5-i686"
[root@slave local]# cd mysql
[root@slave mysql]# ll
总用量 76
drwxr-xr-x. 2 root root 4096 3月 20 10:32 bin
-rw-r--r--. 1 7161 wheel 17987 1月 23 2013 COPYING
drwxr-xr-x. 4 root root 4096 3月 20 10:32 data
drwxr-xr-x. 2 root root 4096 3月 20 10:32 docs
drwxr-xr-x. 3 root root 4096 3月 20 10:32 include
-rw-r--r--. 1 7161 wheel 7468 1月 23 2013 INSTALL-BINARY
drwxr-xr-x. 3 root root 4096 3月 20 10:33 lib
drwxr-xr-x. 4 root root 4096 3月 20 10:33 man
drwxr-xr-x. 10 root root 4096 3月 20 10:33 mysql-test
-rw-r--r--. 1 7161 wheel 2552 1月 23 2013 README
drwxr-xr-x. 2 root root 4096 3月 20 10:32 scripts
drwxr-xr-x. 28 root root 4096 3月 20 10:32 share
drwxr-xr-x. 4 root root 4096 3月 20 10:32 sql-bench
drwxr-xr-x. 3 root root 4096 3月 20 10:33 support-files
[root@slave mysql]# ls
bin data include lib mysql-test scripts sql-bench
COPYING docs INSTALL-BINARY man README share support-files
[root@slave mysql]# chown -R root.mysql ./*
[root@slave mysql]# scripts/mysql_install_db --user=mysql --datadir=/mydata/data/
[root@slave mysql]# ls
bin docs lib mysql-test share
COPYING include man README sql-bench
data INSTALL-BINARY my.cnf(配置文件) scripts support-files
[root@slave mysql]# vim my.cnf
................................
[mysqld]
datadir = /mydata/data #增加的
log-bin = master-bin #增加的 #从服务器,可以不加吗??? 先把它启动起来再说
server-id = 11 #增加的 #与主服务器不一样
socket=/tmp/mysql.sock
................................
[root@slave mysql]# cp support-files/mysql.server /etc/init.d/mysqld
[root@slave mysql]# chkconfig --add mysqld
[root@slave mysql]# service mysqld start
Starting MySQL. [确定]
[root@slave mysql]#
[root@slave mysql]# netstat -tnlp
Active Internet connections (only servers)
Proto Recv-Q Send-Q Local Address Foreign Address State PID/Program name
tcp 0 0 0.0.0.0:111 0.0.0.0:* LISTEN 1754/rpcbind
tcp 0 0 0.0.0.0:41234 0.0.0.0:* LISTEN 1776/rpc.statd
tcp 0 0 0.0.0.0:22 0.0.0.0:* LISTEN 2099/sshd
tcp 0 0 127.0.0.1:631 0.0.0.0:* LISTEN 1833/cupsd
tcp 0 0 127.0.0.1:25 0.0.0.0:* LISTEN 2178/master
tcp 0 0 :::3306 :::* LISTEN 3133/mysqld #启动了
tcp 0 0 :::111 :::* LISTEN 1754/rpcbind
tcp 0 0 :::22 :::* LISTEN 2099/sshd
tcp 0 0 ::1:631 :::* LISTEN 1833/cupsd
tcp 0 0 ::1:25 :::* LISTEN 2178/master
tcp 0 0 :::46594 :::* LISTEN 1776/rpc.statd
[root@slave mysql]#
[root@slave mysql]# ls /mydata/data/
auto.cnf ib_logfile0 master-bin.000001 mysql slave.magedu.com.pid
ibdata1 ib_logfile1 master-bin.index performance_schema test
[root@slave mysql]#
在第一个ha1 rhel6节点 192.168.0.60 上主服务器
[root@master mysql]# pwd
/usr/local/mysql
[root@master mysql]# vim my.cnf #最终版本
...................................
[mysqld]
sql_mode=NO_ENGINE_SUBSTITUTION,STRICT_TRANS_TABLES #
datadir = /mydata/data
innodb_file_per_table = ON
server-id = 1
socket = /tmp/mysql.sock
log-bin = master-bin
binlog-format=ROW
log-slave-updates=true
gtid-mode=on
enforce-gtid-consistency=true
master-info-repository=TABLE
relay-log-info-repository=TABLE
sync-master-info=1
slave-parallel-workers=2
binlog-checksum=CRC32
master-verify-checksum=1
slave-sql-verify-checksum=1
binlog-rows-query-log_events=1
report-port=3306
port=3306
report-host=192.168.0.60
[root@master mysql]# service mysqld restart #重启
Shutting down MySQL.. [确定]
Starting MySQL. [确定]
[root@master mysql]#
[root@master mysql]# mysql
Welcome to the MySQL monitor. Commands end with ; or \g.
Your MySQL connection id is 1
Server version: 5.6.10-log MySQL Community Server (GPL)
Copyright (c) 2000, 2013, Oracle and/or its affiliates. All rights reserved.
Oracle is a registered trademark of Oracle Corporation and/or its
affiliates. Other names may be trademarks of their respective
owners.
Type 'help;' or '\h' for help. Type '\c' to clear the current input statement.
mysql> show global variables like '%gtid%';
+--------------------------+-------+
| Variable_name | Value |
+--------------------------+-------+
| enforce_gtid_consistency | ON | #为ON了
| gtid_executed | |
| gtid_mode | ON | #为ON了
| gtid_owned | |
| gtid_purged | |
+--------------------------+-------+
5 rows in set (0.01 sec)
mysql>
mysql> \q
Bye
[root@master mysql]#
在第二个ha2 rhel6节点 192.168.0.61 上从服务器
[root@slave mysql]# pwd
/usr/local/mysql
[root@slave mysql]#
[root@slave mysql]# vim my.cnf #最终版本 主从这个文件基本都一样 relay-log中继日志要定义一下吧???不忙定义
...................................
[mysqld]
sql_mode=NO_ENGINE_SUBSTITUTION,STRICT_TRANS_TABLES
datadir = /mydata/data
log-bin = master-bin #从服务器启不启动二进制日志无所谓,但是应该把它启动起来(因为万一主的挂了,要把从的提升为主的了(用到高可用功能),此时二进制日志就有用了)
server-id = 11
socket=/tmp/mysql.sock
binlog-format=ROW
log-slave-updates=true
gtid-mode=on
enforce-gtid-consistency=true
master-info-repository=TABLE
relay-log-info-repository=TABLE
sync-master-info=1
slave-parallel-workers=2
binlog-checksum=CRC32
master-verify-checksum=1
slave-sql-verify-checksum=1
binlog-rows-query-log_events=1
report-port=3306
port=3306
report-host=192.168.0.61
...................................
[root@slave mysql]# service mysqld restart #重启
Shutting down MySQL.. [确定]
Starting MySQL. [确定]
[root@slave mysql]#
在第一个ha1 rhel6节点 192.168.0.60 上主服务器
mysql> show master status; #好像比以前多了 Binlog_Do_DB Binlog_Ignore_DB Executed_Gtid_Set(执行了的Gtid集合,它现在指向到哪儿了)
+-------------------+----------+--------------+------------------+-------------------+
| File | Position | Binlog_Do_DB | Binlog_Ignore_DB | Executed_Gtid_Set |
+-------------------+----------+--------------+------------------+-------------------+
| master-bin.000002 | 151 | | | |
+-------------------+----------+--------------+------------------+-------------------+
1 row in set (0.00 sec)
mysql>
mysql> show global variables like '%uuid%'; #在gtid模式下,每个server有uuid,自动生成的随机码,主从服务器都有 (现在是没有主从之分的,它们的配置文件基本一样)
+---------------+--------------------------------------+
| Variable_name | Value |
+---------------+--------------------------------------+
| server_uuid | ebebffa4-891f-11eb-abb0-000c29037488 |
+---------------+--------------------------------------+
1 row in set (0.00 sec)
mysql>
在第二个ha2 rhel6节点 192.168.0.61 上从服务器
[root@slave mysql]# vim /etc/profile.d/mysql.sh
export PATH=$PATH:/usr/local/mysql/bin
[root@slave mysql]# . /etc/profile.d/mysql.sh
[root@slave mysql]# mysql
Welcome to the MySQL monitor. Commands end with ; or \g.
Your MySQL connection id is 1
Server version: 5.6.10-log MySQL Community Server (GPL)
Copyright (c) 2000, 2013, Oracle and/or its affiliates. All rights reserved.
Oracle is a registered trademark of Oracle Corporation and/or its
affiliates. Other names may be trademarks of their respective
owners.
Type 'help;' or '\h' for help. Type '\c' to clear the current input statement.
mysql> show global variables like '%uuid%'; #server_uuid是随机数
+---------------+--------------------------------------+
| Variable_name | Value |
+---------------+--------------------------------------+
| server_uuid | cd48f16f-8926-11eb-abdd-000c29b440a4 |
+---------------+--------------------------------------+
1 row in set (0.01 sec)
mysql>
uuid 补上事务id 就是gtid了
在第一个ha1 rhel6节点 192.168.0.60 上主服务器
mysql> grant replication slave on *.* to 'repluser'@'192.168.%.%' identified by 'replpass';
Query OK, 0 rows affected (0.00 sec)
mysql> flush privileges;
Query OK, 0 rows affected (0.00 sec)
mysql>
在第二个ha2 rhel6节点 192.168.0.61 上从服务器
mysql> change master to MASTER_HOST='192.168.0.60',MASTER_PORT=3306,MASTER_USER='repluser',MASTER_PASSWORD='replpass',MASTER_AUTO_POSITION=1; ## MASTER_PORT=3306可以不写,MASTER_AUTO_POSITION表示自动启用获得二进制日志文件及位置
Query OK, 0 rows affected, 2 warnings (0.09 sec) #2个warning,警告
mysql>
mysql> show warnings; #看看警告
+-------+------+----------------------------------------------------------------------------------------------------------------------------------------------------------------------------------------------------------------+
| Level | Code | Message |
+-------+------+----------------------------------------------------------------------------------------------------------------------------------------------------------------------------------------------------------------+
| Note | 1759 | Sending passwords in plain text without SSL/TLS is extremely insecure. |
| Note | 1760 | Storing MySQL user name or password information in the master.info repository is not secure and is therefore not recommended. Please see the MySQL Manual for more about this issue and possible alternatives. |
+-------+------+----------------------------------------------------------------------------------------------------------------------------------------------------------------------------------------------------------------+
2 rows in set (0.00 sec)
#大意是密码发送是明文的,不安全,保存mysql的用户名和密码到master.info文件不安全,因此不是推荐 的方式,请看mysql的官方文档找找解决办法
mysql>
mysql> show slave status\G
*************************** 1. row ***************************
Slave_IO_State:
Master_Host: 192.168.0.60
Master_User: repluser
Master_Port: 3306
Connect_Retry: 60
Master_Log_File:
Read_Master_Log_Pos: 4
Relay_Log_File: slave-relay-bin.000001
Relay_Log_Pos: 4
Relay_Master_Log_File:
Slave_IO_Running: No #未启动
Slave_SQL_Running: No #未启动
Replicate_Do_DB:
Replicate_Ignore_DB:
Replicate_Do_Table:
Replicate_Ignore_Table:
Replicate_Wild_Do_Table:
Replicate_Wild_Ignore_Table:
Last_Errno: 0
Last_Error:
Skip_Counter: 0
Exec_Master_Log_Pos: 0
Relay_Log_Space: 151
Until_Condition: None
Until_Log_File:
Until_Log_Pos: 0
Master_SSL_Allowed: No
Master_SSL_CA_File:
Master_SSL_CA_Path:
Master_SSL_Cert:
Master_SSL_Cipher:
Master_SSL_Key:
Seconds_Behind_Master: NULL
Master_SSL_Verify_Server_Cert: No
Last_IO_Errno: 0
Last_IO_Error:
Last_SQL_Errno: 0
Last_SQL_Error:
Replicate_Ignore_Server_Ids:
Master_Server_Id: 0
Master_UUID:
Master_Info_File: mysql.slave_master_info #这边已经记录了
SQL_Delay: 0
SQL_Remaining_Delay: NULL
Slave_SQL_Running_State:
Master_Retry_Count: 86400
Master_Bind:
Last_IO_Error_Timestamp:
Last_SQL_Error_Timestamp:
Master_SSL_Crl:
Master_SSL_Crlpath:
Retrieved_Gtid_Set:
Executed_Gtid_Set:
Auto_Position: 1
1 row in set (0.00 sec)
mysql>
mysql> start slave; #启动两个线程
Query OK, 0 rows affected, 1 warning (0.01 sec)
mysql>
mysql> show slave status\G
*************************** 1. row ***************************
Slave_IO_State: Waiting for master to send event
Master_Host: 192.168.0.60
Master_User: repluser
Master_Port: 3306
Connect_Retry: 60
Master_Log_File: master-bin.000002 #两个线程启动后,知道自动读它了
Read_Master_Log_Pos: 538 #两个线程启动后,知道自动读这个位置了
Relay_Log_File: slave-relay-bin.000003
Relay_Log_Pos: 750
Relay_Master_Log_File: master-bin.000002
Slave_IO_Running: Yes #启动了
Slave_SQL_Running: Yes #启动了
Replicate_Do_DB:
Replicate_Ignore_DB:
Replicate_Do_Table:
Replicate_Ignore_Table:
Replicate_Wild_Do_Table:
Replicate_Wild_Ignore_Table:
Last_Errno: 0
Last_Error:
Skip_Counter: 0
Exec_Master_Log_Pos: 538
Relay_Log_Space: 1118
Until_Condition: None
Until_Log_File:
Until_Log_Pos: 0
Master_SSL_Allowed: No
Master_SSL_CA_File:
Master_SSL_CA_Path:
Master_SSL_Cert:
Master_SSL_Cipher:
Master_SSL_Key:
Seconds_Behind_Master: 0
Master_SSL_Verify_Server_Cert: No
Last_IO_Errno: 0
Last_IO_Error:
Last_SQL_Errno: 0
Last_SQL_Error:
Replicate_Ignore_Server_Ids:
Master_Server_Id: 1
Master_UUID: ebebffa4-891f-11eb-abb0-000c29037488
Master_Info_File: mysql.slave_master_info
SQL_Delay: 0
SQL_Remaining_Delay: NULL
Slave_SQL_Running_State: Slave has read all relay log; waiting for the slave I/O thread to update it
Master_Retry_Count: 86400
Master_Bind:
Last_IO_Error_Timestamp:
Last_SQL_Error_Timestamp:
Master_SSL_Crl:
Master_SSL_Crlpath:
Retrieved_Gtid_Set: ebebffa4-891f-11eb-abb0-000c29037488:1-2
Executed_Gtid_Set: ebebffa4-891f-11eb-abb0-000c29037488:1-2
Auto_Position: 1
1 row in set (0.00 sec)
mysql>
在第一个ha1 rhel6节点 192.168.0.60 上主服务器
mysql> create database mydb;
Query OK, 1 row affected (0.00 sec)
mysql>
在第二个ha2 rhel6节点 192.168.0.61 上从服务器
mysql> show databases;
+--------------------+
| Database |
+--------------------+
| information_schema |
| mydb | #看到了mydb
| mysql |
| performance_schema |
| test |
+--------------------+
5 rows in set (0.00 sec)
mysql>
在第一个ha1 rhel6节点 192.168.0.60 上主服务器
mysql> show slave hosts;
#Host是从服务器那边定义的 report-host, Port是从服务器那边定义的 report-port Slave_UUID应该是从服务器那边的uuid Server_id是slave的server_id号 Master_id 是当前主的server_id号
mysql> show slave hosts;
+-----------+--------------+------+-----------+--------------------------------------+
| Server_id | Host | Port | Master_id | Slave_UUID |
+-----------+--------------+------+-----------+--------------------------------------+
| 11 | 192.168.0.61 | 3306 | 1 | cd48f16f-8926-11eb-abdd-000c29b440a4 |
+-----------+--------------+------+-----------+--------------------------------------+
1 row in set (0.00 sec)
mysql>
有多个数据库的话,可以启动多个复制线程的,(我们定义的是slave-parallel-workers=2个)
mysql>
mysql> show global status like '%gtid%';
Empty set (0.00 sec)
mysql> show global variables like '%gtid%';
+--------------------------+------------------------------------------+
| Variable_name | Value |
+--------------------------+------------------------------------------+
| enforce_gtid_consistency | ON |
| gtid_executed | ebebffa4-891f-11eb-abb0-000c29037488:1-3 | #有值了,uuid冒号后跟1事务id 2事务id 3事务id
| gtid_mode | ON |
| gtid_owned | |
| gtid_purged | |
+--------------------------+------------------------------------------+
5 rows in set (0.00 sec)
mysql>
mysql> show master status;
# Executed_Gtid_Set 表示已经执行过的事务的树,表示从第一个事务到第三个事务,,,从服务器也启用二进制日志了(感觉这里应该是主的二进制日志)????,所以????这里也有二进制日志及其位置,,,,所以以后从服务器连到主服务器上,它会自动的去找自己没有执行过的事务
+-------------------+----------+--------------+------------------+------------------------------------------+
| File | Position | Binlog_Do_DB | Binlog_Ignore_DB | Executed_Gtid_Set |
+-------------------+----------+--------------+------------------+------------------------------------------+
| master-bin.000002 | 680 | | | ebebffa4-891f-11eb-abb0-000c29037488:1-3 |
+-------------------+----------+--------------+------------------+------------------------------------------+
1 row in set (0.00 sec)
mysql>
在第二个ha2 rhel6节点 192.168.0.61 上从服务器
mysql> show master status;
#事务也是1-3, 从服务器使用 show master status 查看自己执行到什么位置了
+-------------------+----------+--------------+------------------+------------------------------------------+
| File | Position | Binlog_Do_DB | Binlog_Ignore_DB | Executed_Gtid_Set |
+-------------------+----------+--------------+------------------+------------------------------------------+
| master-bin.000003 | 191 | | | ebebffa4-891f-11eb-abb0-000c29037488:1-3 |
+-------------------+----------+--------------+------------------+------------------------------------------+
1 row in set (0.00 sec)
mysql>
在第一个ha1 rhel6节点 192.168.0.60 上主服务器
[root@master mysql]# cd /mydata/data/
[root@master data]#
[root@master data]# mysqlbinlog master-bin.000001 #好像现在内容不在这里
/*!50530 SET @@SESSION.PSEUDO_SLAVE_MODE=1*/;
/*!40019 SET @@session.max_insert_delayed_threads=0*/;
/*!50003 SET @OLD_COMPLETION_TYPE=@@COMPLETION_TYPE,COMPLETION_TYPE=0*/;
DELIMITER /*!*/;
# at 4
#210320 9:59:35 server id 1 end_log_pos 120 CRC32 0xc6ae69ec Start: binlog v 4, server v 5.6.10-log created 210320 9:59:35 at startup
ROLLBACK/*!*/;
BINLOG '
B1dVYA8BAAAAdAAAAHgAAAAAAAQANS42LjEwLWxvZwAAAAAAAAAAAAAAAAAAAAAAAAAAAAAAAAAA
AAAAAAAAAAAAAAAAAAAHV1VgEzgNAAgAEgAEBAQEEgAAXAAEGggAAAAICAgCAAAACgoKGRkAAexp
rsY=
'/*!*/;
# at 120
#210320 10:56:09 server id 1 end_log_pos 143 CRC32 0x843e8ddd Stop
DELIMITER ;
# End of log file
ROLLBACK /* added by mysqlbinlog */;
/*!50003 SET COMPLETION_TYPE=@OLD_COMPLETION_TYPE*/;
/*!50530 SET @@SESSION.PSEUDO_SLAVE_MODE=0*/;
[root@master data]#
[root@master data]# mysqlbinlog master-bin.000002
/*!50530 SET @@SESSION.PSEUDO_SLAVE_MODE=1*/;
/*!40019 SET @@session.max_insert_delayed_threads=0*/;
/*!50003 SET @OLD_COMPLETION_TYPE=@@COMPLETION_TYPE,COMPLETION_TYPE=0*/;
DELIMITER /*!*/;
# at 4
#210320 10:56:12 server id 1 end_log_pos 120 CRC32 0x4741e59d Start: binlog v 4, server v 5.6.10-log created 210320 10:56:12 at startup
# Warning: this binlog is either in use or was not closed properly.
ROLLBACK/*!*/;
BINLOG '
TGRVYA8BAAAAdAAAAHgAAAABAAQANS42LjEwLWxvZwAAAAAAAAAAAAAAAAAAAAAAAAAAAAAAAAAA
AAAAAAAAAAAAAAAAAABMZFVgEzgNAAgAEgAEBAQEEgAAXAAEGggAAAAICAgCAAAACgoKGRkAAZ3l
QUc=
'/*!*/;
# at 120
#210320 10:56:12 server id 1 end_log_pos 151 CRC32 0x247fb7d3 Previous-GTIDs
# [empty]
# at 151
#210320 13:26:34 server id 1 end_log_pos 199 CRC32 0x6f156fb5 GTID [commit=yes]
SET @@SESSION.GTID_NEXT= 'ebebffa4-891f-11eb-abb0-000c29037488:1'/*!*/;
# at 199
#210320 13:26:34 server id 1 end_log_pos 411 CRC32 0xbf54f31f Query thread_id=5 exec_time=0 error_code=0
SET TIMESTAMP=1616217994/*!*/;
SET @@session.pseudo_thread_id=5/*!*/;
SET @@session.foreign_key_checks=1, @@session.sql_auto_is_null=0, @@session.unique_ checks=1, @@session.autocommit=1/*!*/;
SET @@session.sql_mode=1075838976/*!*/;
SET @@session.auto_increment_increment=1, @@session.auto_increment_offset=1/*!*/;
/*!\C utf8 *//*!*/;
SET @@session.character_set_client=33,@@session.collation_connection=33,@@session.c ollation_server=8/*!*/;
SET @@session.lc_time_names=0/*!*/;
SET @@session.collation_database=DEFAULT/*!*/;
GRANT REPLICATION SLAVE ON *.* TO 'repluser'@'192.168.%.%' IDENTIFIED BY PASSWORD ' *D98280F03D0F78162EBDBB9C883FC01395DEA2BF'
/*!*/;
# at 411
#210320 13:26:56 server id 1 end_log_pos 459 CRC32 0x0a6ac480 GTID [commit=yes]
SET @@SESSION.GTID_NEXT= 'ebebffa4-891f-11eb-abb0-000c29037488:2'/*!*/;
# at 459
#210320 13:26:56 server id 1 end_log_pos 538 CRC32 0x09d3ceb6 Query thread_id=5 exec_time=0 error_code=0
SET TIMESTAMP=1616218016/*!*/;
flush privileges
/*!*/;
# at 538 #位置
#210320 13:42:15 server id 1 end_log_pos 586 CRC32 0xd77d4575 GTID [commit=yes] #时间 和 server id 和 end_log_pos 每个事件有 GTID????? ,,,commit=yes 就是已经提交过了
SET @@SESSION.GTID_NEXT= 'ebebffa4-891f-11eb-abb0-000c29037488:3'/*!*/; #这是第三个事务,跟事务号可能不一样,它只是gtid自己提供的编号,,,
# at 586
#210320 13:42:15 server id 1 end_log_pos 680 CRC32 0xe5d4c902 Query thread_id=5 exec_time=0 error_code=0
SET TIMESTAMP=1616218935/*!*/;
create database mydb
/*!*/;
DELIMITER ;
# End of log file
ROLLBACK /* added by mysqlbinlog */;
/*!50003 SET COMPLETION_TYPE=@OLD_COMPLETION_TYPE*/;
/*!50530 SET @@SESSION.PSEUDO_SLAVE_MODE=0*/;
[root@master data]# clear
[root@master data]#
[root@master data]# mysql
Welcome to the MySQL monitor. Commands end with ; or \g.
Your MySQL connection id is 9
Server version: 5.6.10-log MySQL Community Server (GPL)
Copyright (c) 2000, 2013, Oracle and/or its affiliates. All rights reserved.
Oracle is a registered trademark of Oracle Corporation and/or its
affiliates. Other names may be trademarks of their respective
owners.
Type 'help;' or '\h' for help. Type '\c' to clear the current input statement.
#每一个语句是自动提交的,每一个语句都是一个事务(会导致系统性能差,建议关掉)
mysql>
mysql> select @@auto_commit;
ERROR 1193 (HY000): Unknown system variable 'auto_commit'
mysql>
mysql> show global variables like '%commit%';
+--------------------------------+-------+
| Variable_name | Value |
+--------------------------------+-------+
| autocommit | ON |
| binlog_order_commits | ON |
| innodb_api_bk_commit_interval | 5 |
| innodb_commit_concurrency | 0 |
| innodb_flush_log_at_trx_commit | 1 |
+--------------------------------+-------+
5 rows in set (0.00 sec)
mysql>
mysql> select @@autocommit; #自动提交值为1,,,关掉的话,只有使用 commit 才能提交,,,这样的话,好几个语句gtid号才一样
+--------------+
| @@autocommit |
+--------------+
| 1 |
+--------------+
1 row in set (0.00 sec)
mysql>
mysql> use mydb;
Database changed
mysql> create table tb1 (id int);
Query OK, 0 rows affected (0.08 sec)
mysql>
[root@master data]# mysqlbinlog master-bin.000002
...................................
#210320 13:42:15 server id 1 end_log_pos 680 CRC32 0xe5d4c902 Query thread_id=5exec_time=0 error_code=0
SET TIMESTAMP=1616218935/*!*/;
create database mydb
/*!*/;
# at 680
#210320 14:30:43 server id 1 end_log_pos 728 CRC32 0x6cc00b73 GTID [commit=yes]
SET @@SESSION.GTID_NEXT= 'ebebffa4-891f-11eb-abb0-000c29037488:4'/*!*/; #看到了第4个事务了
# at 728
#210320 14:30:43 server id 1 end_log_pos 827 CRC32 0xbcd36c2c Query thread_id=9exec_time=0 error_code=0
use `mydb`/*!*/;
SET TIMESTAMP=1616221843/*!*/;
create table tb1 (id int)
/*!*/;
DELIMITER ;
# End of log file
ROLLBACK /* added by mysqlbinlog */;
/*!50003 SET COMPLETION_TYPE=@OLD_COMPLETION_TYPE*/;
/*!50530 SET @@SESSION.PSEUDO_SLAVE_MODE=0*/;
[root@master data]#
mysql> show master status; #执行的事务集到第4个了
+-------------------+----------+--------------+------------------+------------------------------------------+
| File | Position | Binlog_Do_DB | Binlog_Ignore_DB | Executed_Gtid_Set |
+-------------------+----------+--------------+------------------+------------------------------------------+
| master-bin.000002 | 827 | | | ebebffa4-891f-11eb-abb0-000c29037488:1-4 |
+-------------------+----------+--------------+------------------+------------------------------------------+
1 row in set (0.00 sec)
mysql>
此时,从服务器上也应该是1-4,如果没有的话,它会读取主服务器进行本地应用的,所以这就是根据gtid来追踪事务的,知道自己哪个事务没执行,它就会从那个事务的事务号开始向后执行自己尚未执行的事务集,所以在5.6的gtid的方式中,追踪执行的和未执行的事务的这种方式会方便很多
mysql5.6使用半同步复制,使用ssl复制跟以前5.5的方式没有区别,只需要install plugin ...........set...enabled就可以了
mysql5.6的数据库复制与5.5没有太大区别,除了引入了gtid的机制,基于gtid复制的时候,许多额外的工具,(mysqlrplcheck等等),可以快速实现启动一个从服务,检测主服务是不是比从服务落后等??????
