You are here
马哥 38_04 _Linux集群系列之十——高可用集群之heartbeat安装配置 有大用
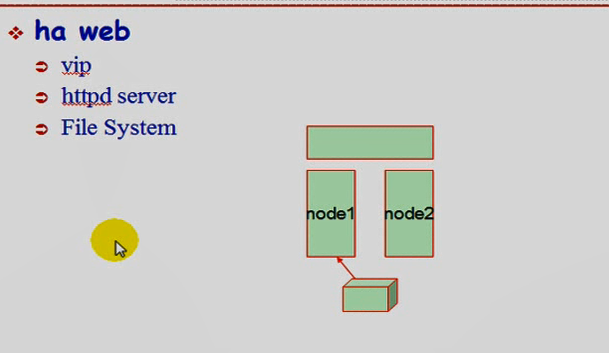
1)节点名称的解析 不建议使用dns,建议使用本地/etc/hosts文件
节点名称必须要与 # uname -n 保持一致
2)ssh互信通信,(为了管理方便,不提供密码,基于密钥,互相访问对访节点上的用户,通常情况下,只有管理员才有权限,)要在其它节点上启动或关闭节点,不能自己关闭或启动,当然第一次是自己启动的
3)各节点时间必须同步
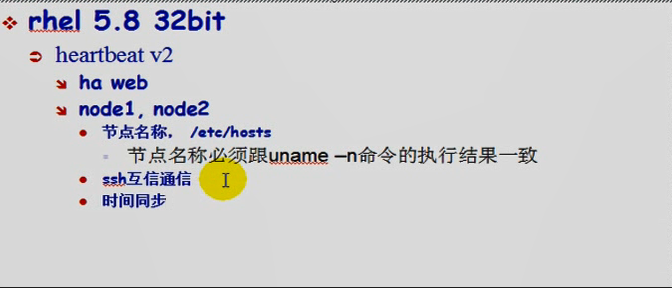

第一个节点: 192.168.0.45
第二个节点: 192.168.0.55
vip 192.168.0.50
一)先配第一个节点 192.168.0.45 (第二个节点 192.168.0.55 同样配置,网页这里就省了)
配了太多次,此次省略,然后 server network restart
[root@rs1 ~]# ifconfig
eth0 Link encap:Ethernet HWaddr 00:0C:29:3D:B0:3C
inet addr:192.168.0.45 Bcast:192.168.0.255 Mask:255.255.255.0
inet6 addr: fe80::20c:29ff:fe3d:b03c/64 Scope:Link
UP BROADCAST RUNNING MULTICAST MTU:1500 Metric:1
RX packets:178 errors:0 dropped:0 overruns:0 frame:0
TX packets:132 errors:0 dropped:0 overruns:0 carrier:0
collisions:0 txqueuelen:1000
RX bytes:20066 (19.5 KiB) TX bytes:17594 (17.1 KiB)
Interrupt:67 Base address:0x2000
lo Link encap:Local Loopback
inet addr:127.0.0.1 Mask:255.0.0.0
inet6 addr: ::1/128 Scope:Host
UP LOOPBACK RUNNING MTU:16436 Metric:1
RX packets:74 errors:0 dropped:0 overruns:0 frame:0
TX packets:74 errors:0 dropped:0 overruns:0 carrier:0
collisions:0 txqueuelen:0
RX bytes:5828 (5.6 KiB) TX bytes:5828 (5.6 KiB)
在 第一个节点192.168.0.45 ping 一下,互相通信没问题 (第二个节点192.168.0.55 上做的事网页上就省略掉了)
[root@rs1 ~]#
[root@rs1 ~]# ping 192.168.0.55
PING 192.168.0.55 (192.168.0.55) 56(84) bytes of data.
64 bytes from 192.168.0.55: icmp_seq=1 ttl=64 time=1.87 ms
64 bytes from 192.168.0.55: icmp_seq=2 ttl=64 time=0.194 ms
二)在 第一个节点192.168.0.45 配置hostname (第二个节点192.168.0.55 )
[root@rs1 ~]# hostname node1.magedu.com
[root@rs1 ~]# hostname
node1.magedu.com
[root@rs1 ~]# uname -n
node1.magedu.com
[root@rs1 ~]#
[root@rs1 ~]# vim /etc/sysconfig/network #永久保存 hostname
NETWORKING=yes
NETWORKING_IPV6=yes
#HOSTNAME=localhost.localdomain
#HOSTNAME=rs1.magedu.com
HOSTNAME=node1.magedu.com
三)配置双机互信
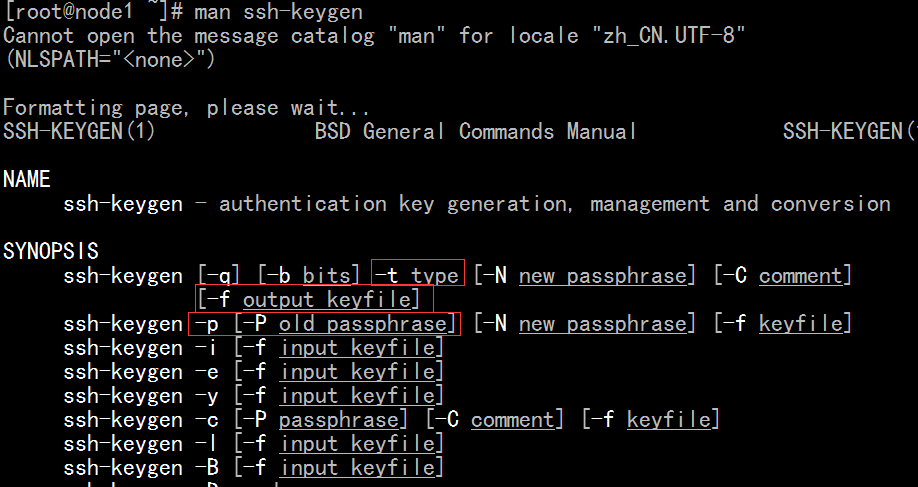
ssh-keygen
[root@node1 ~]# ssh-keygen -t rsa -f ~/.ssh/id_isa -P '' #这个命令中/.ssh/id_isa有错误,见下面同样的命令
Generating public/private rsa key pair.
Your identification has been saved in /root/.ssh/id_isa.
Your public key has been saved in /root/.ssh/id_isa.pub.
The key fingerprint is:
d1:b9:64:b9:fc:96:22:e4:27:3c:d2:7a:b7:11:57:b8 root@node1.magedu.com
[root@node1 ~]#
ssh-copy-id
[root@node1 ~]# ssh-copy-id -i .ssh/id_isa.pub root@192.168.0.55 (把公钥复制过去)(-i 表示 identity)
15
The authenticity of host '192.168.0.55 (192.168.0.55)' can't be established.
RSA key fingerprint is ae:fe:80:46:96:5b:2a:94:5e:8e:0c:ec:86:eb:e1:ee.
Are you sure you want to continue connecting (yes/no)? yes
Warning: Permanently added '192.168.0.55' (RSA) to the list of known hosts.
Nasty PTR record "192.168.0.55" is set up for 192.168.0.55, ignoring
root@192.168.0.55's password:
Now try logging into the machine, with "ssh 'root@192.168.0.55'", and check in:
.ssh/authorized_keys
to make sure we haven't added extra keys that you weren't expecting.
[root@node1 ~]#
[root@node1 ~]# ssh 192.168.0.55 'ifconfig' #可以通信,但是输密码,?为什么????为什么马哥不用输密码
#具体原因找到了 ,见 /node-admin/15685 最简单的解决办法是 改 .ssh/id_isa 为 .ssh/id_rsa
Nasty PTR record "192.168.0.55" is set up for 192.168.0.55, ignoring
root@192.168.0.55's password:
eth0 Link encap:Ethernet HWaddr 00:0C:29:CB:A5:7F
inet addr:192.168.0.55 Bcast:192.168.0.255 Mask:255.255.255.0
inet6 addr: fe80::20c:29ff:fecb:a57f/64 Scope:Link
UP BROADCAST RUNNING MULTICAST MTU:1500 Metric:1
RX packets:2235 errors:0 dropped:0 overruns:0 frame:0
TX packets:284 errors:0 dropped:0 overruns:0 carrier:0
collisions:0 txqueuelen:1000
RX bytes:182571 (178.2 KiB) TX bytes:39949 (39.0 KiB)
Interrupt:67 Base address:0x2000
lo Link encap:Local Loopback
inet addr:127.0.0.1 Mask:255.0.0.0
inet6 addr: ::1/128 Scope:Host
UP LOOPBACK RUNNING MTU:16436 Metric:1
RX packets:74 errors:0 dropped:0 overruns:0 frame:0
TX packets:74 errors:0 dropped:0 overruns:0 carrier:0
collisions:0 txqueuelen:0
RX bytes:5828 (5.6 KiB) TX bytes:5828 (5.6 KiB)
现在改 .ssh/id_isa 为 .ssh/id_rsa
[root@node1 ~]# ssh-keygen -t rsa -f .ssh/id_rsa -P '' (生成 ssh 密钥文件)
Generating public/private rsa key pair.
.ssh/id_rsa already exists.
Overwrite (y/n)? y
Your identification has been saved in .ssh/id_rsa.
Your public key has been saved in .ssh/id_rsa.pub.
The key fingerprint is:
c4:99:b5:2a:2d:74:d0:01:96:53:b7:7a:81:64:29:96 root@node1.magedu.com
[root@node1 ~]# ssh-copy-id -i .ssh/id_rsa.pub root@192.168.0.55 (把公钥复制过去)(-i 表示 identity)
15
root@192.168.0.55's password:
Now try logging into the machine, with "ssh 'root@192.168.0.55'", and check in:
.ssh/authorized_keys
to make sure we haven't added extra keys that you weren't expecting.
[root@node1 ~]#
[root@node1 ~]# ssh 192.168.0.55 'ifconfig' #此时不用再输密码了
eth0 Link encap:Ethernet HWaddr 00:0C:29:CB:A5:7F
inet addr:192.168.0.55 Bcast:192.168.0.255 Mask:255.255.255.0
inet6 addr: fe80::20c:29ff:fecb:a57f/64 Scope:Link
UP BROADCAST RUNNING MULTICAST MTU:1500 Metric:1
RX packets:19061 errors:0 dropped:0 overruns:0 frame:0
TX packets:6682 errors:0 dropped:0 overruns:0 carrier:0
collisions:0 txqueuelen:1000
RX bytes:1969739 (1.8 MiB) TX bytes:1216460 (1.1 MiB)
Interrupt:67 Base address:0x2000
lo Link encap:Local Loopback
inet addr:127.0.0.1 Mask:255.0.0.0
inet6 addr: ::1/128 Scope:Host
UP LOOPBACK RUNNING MTU:16436 Metric:1
RX packets:204 errors:0 dropped:0 overruns:0 frame:0
TX packets:204 errors:0 dropped:0 overruns:0 carrier:0
collisions:0 txqueuelen:0
RX bytes:25120 (24.5 KiB) TX bytes:25120 (24.5 KiB)
[root@node1 ~]#
四)配置主机名称解析
在 第一个节点192.168.0.45 (第二个节点 192.168.0.55 同理)
[root@node1 ~]# vim /etc/hosts
# Do not remove the following line, or various programs
# that require network functionality will fail.
127.0.0.1 localhost.localdomain localhost node1.magedu.com
::1 localhost6.localdomain6 localhost6
#192.168.0.75 www.a.org
#192.168.0.45 www.b.net
192.168.0.45 node1.magedu.com node1
192.168.0.55 node2.magedu.com node2
五)确保iptables 没有限定 (或者确定 iptables 没有拦截 694 相关的端口)
在 第一个节点192.168.0.45 (第二个节点 192.168.0.55 同理)
[root@node1 ~]# iptables -F
[root@node1 ~]# iptables -L -n -v
Chain INPUT (policy ACCEPT 8 packets, 514 bytes)
pkts bytes target prot opt in out source destination
Chain FORWARD (policy ACCEPT 0 packets, 0 bytes)
pkts bytes target prot opt in out source destination
Chain OUTPUT (policy ACCEPT 4450 packets, 600K bytes)
pkts bytes target prot opt in out source destination
Chain RH-Firewall-1-INPUT (0 references)
pkts bytes target prot opt in out source destination
[root@node1 ~]#
六)看两个节点时间是否同步
在 第一个节点192.168.0.45 (第二个节点 192.168.0.55 同理)
[root@node1 ~]# date
2020年 11月 25日 星期三 14:49:21 CST
[root@node1 ~]#
[root@node1 ~]# ntpdate 192.168.0.75
25 Nov 14:40:05 ntpdate[6846]: step time server 192.168.0.75 offset -1778.102739 sec
[root@node1 ~]#
[root@node1 ~]# service ntpd stop
关闭 ntpd: [确定]
[root@node1 ~]#
root@node1 ~]# chkconfig ntpd off #开机不启动,,,,将来使用时建议使用ntpd ,这种方式比较柔和???这个不太懂,不过因为刚开始时,因为时间差距大,所以要过好长时间才能同步到一致,所以第一次最好手动同步一下
[root@node1 ~]#
[root@node1 ~]# crontab -e
#*/5 * * * * /sbin/hwclock -s #每5分钟执行一次
*/5 * * * * ntpdate 192.168.0.75 #这种方式粗爆 #crontab的环境变量只有bin和sbin两个目录,有时也包启/usr/bin,/usr/sbin 所以要确保里面的命令能够正确执行,,,(实在没把握,使用绝对路径吧),这样的任务计划,每执行一次,都会给管理员发一封邮件,如果不想收邮件,那就 */5 * * * * /sbin/ntpdate 192.168.0.75 &> /dev/null
我们可以 # scp /var/spool/con/root node2:/var/spool/cron/ 直接复制到第二个节点
七)看两个节点创建快照
在 第一个节点192.168.0.45 (第二个节点 192.168.0.55 同理)
http://www.linux-ha.org/wiki/Heartbeat heartbeat官网

https://wiki.clusterlabs.org/wiki/Pacemaker pacemaker的
http://mirrors.sohu.com/centos/
红帽6.0以后内核已经整合corosync了,不提供安装包了

http://www.linux-ha.org/wiki/Downloads
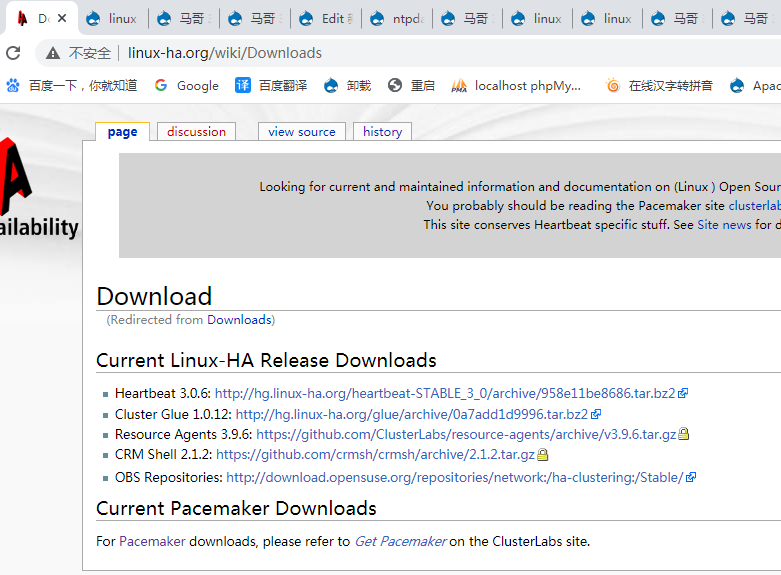
https://wiki.clusterlabs.org/wiki/Get_Pacemaker
https://fedoraproject.org/wiki/EPEL/zh-cn?rd=Epel fedora project 提供的许多程序包 谷歌或百度 "EPEL"

http://ftp.iij.ad.jp/pub/linux/Fedora/archive/epel/5/i386/

heartbeat - Heartbeat subsystem for High-Availability Linux 核心包 得装
heartbeat-devel - Heartbeat development package 开发包 不一定装
heartbeat-gui - Provides a gui interface to manage heartbeat clusters 图形接口管理hearbeat 集群 不一定装,可能其它得装的依赖于gui,所以gui也装下吧
heartbeat-ldirectord . Monitor daemon for maintaining high availability resources 管理LVS,为ipvs高可用提供规则自动生成及后端 real server 健康状态检查的组件 不一定装
heartbeat-pils - Provides a general plugin and interface loading library 装载库的通用的插件和接口 得装
heartbeat-stonith . Provides an interface to Shoot The other Node In The Head 专门用于爆头的接口 得装
八) 在节点上下载 heartbeat ,heartbeat-gui ,heartbeat-pils,heartbeat-stonith

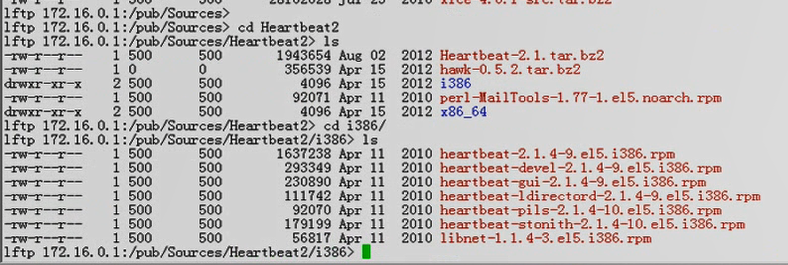
这四个软件包安装时依赖于 libnet, perl-MailTools


这里 perl-MailTools 依赖于 Date::Format 和 Date::Parse,马哥使用yum来安装

马哥使用 yum --nogpgcheck localinstall perl-MailTools-1.77-1. e15. noarch. rpm 来安装

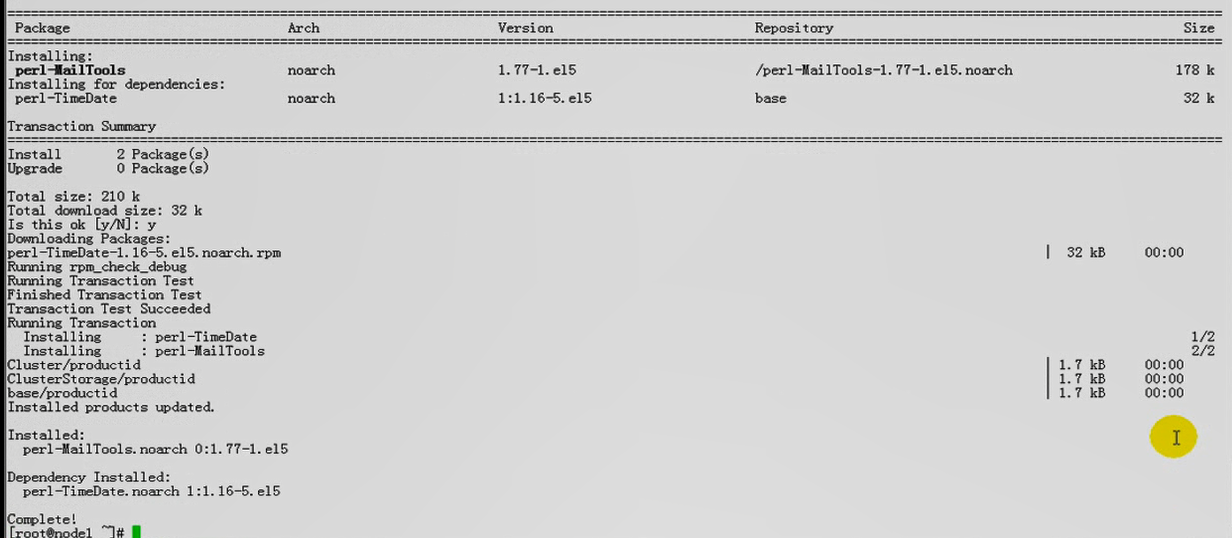
我通过 http://ftp.iij.ad.jp/pub/linux/Fedora/archive/epel/5/i386/ 这个网址 有大用 ,可以下载太多的软件
把 四个软件弄到本地(过程太简单,不演示了)
[root@node1 i386]# pwd
/root/i386
[root@node1 i386]# ls
heartbeat-2.1.4-11.el5.i386.rpm heartbeat-pils-2.1.4-11.el5.i386.rpm
heartbeat-gui-2.1.4-11.el5.i386.rpm heartbeat-stonith-2.1.4-11.el5.i386.rpm
[root@node1 i386]#
还是通过 http://ftp.iij.ad.jp/pub/linux/Fedora/archive/epel/5/i386/
下载 perl-MailTools-1.77-1.el5.noarch.rpm libnet-1.1.6-7.el5.i386.rpm
九)两个节点安装6件软件 (含两个依赖)
在 第一个节点192.168.0.45 (第二个节点 192.168.0.55 同理)
[root@node1 i386]# pwd
/root/i386
[root@node1 i386]# ls
heartbeat-2.1.4-11.el5.i386.rpm heartbeat-stonith-2.1.4-11.el5.i386.rpm
heartbeat-gui-2.1.4-11.el5.i386.rpm libnet-1.1.6-7.el5.i386.rpm
heartbeat-pils-2.1.4-11.el5.i386.rpm perl-MailTools-1.77-1.el5.noarch.rpm
[root@node1 i386]#
[root@node1 i386]# yum --nogpgcheck localinstall perl-MailTools-1.77-1.el5.noarch.rpm #因为rpm -ivh 会提示安装依赖 所以用yum --nogpgcheck localinstall 来安装 #由下图装好了
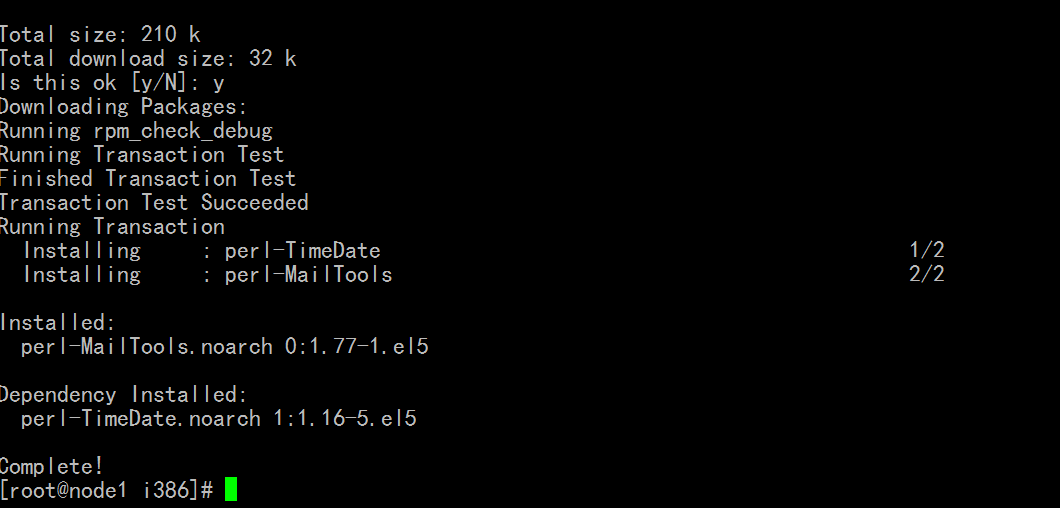
[root@node1 i386]# yum --nogpgcheck localinstall heartbeat-2.1.4-11.el5.i386.rpm heartbeat-stonith-2.1.4-11.el5.i386.rpm heartbeat-gui-2.1.4-11.el5.i386.rpm libnet-1.1.6-7.el5.i386.rpm heartbeat-pils-2.1.4-11.el5.i386.rpm #其它几个也用 yum --nogpgcheck localinstall 一并安装下吧 ;因为rpm -ivh 会提示安装依赖
九)看 heartbeat 安装后生成了哪些文件
在 第一个节点192.168.0.45 (第二个节点 192.168.0.55 同理)
[root@node2 ~]# rpm -ql heartbeat
/etc/ha.d #配置文件目录
/etc/ha.d/README.config
/etc/ha.d/harc
/etc/ha.d/rc.d #类似于/etc下的rc.d
/etc/ha.d/rc.d/ask_resources
/etc/ha.d/rc.d/hb_takeover
/etc/ha.d/rc.d/ip-request
/etc/ha.d/rc.d/ip-request-resp
/etc/ha.d/rc.d/status
/etc/ha.d/resource.d #里面都是资源代理脚本 自带的v1版本的资源代理(RA),,,,/etc/rc.d/init.d 下面的LSB的都可以用,都可以配置
/etc/ha.d/resource.d/AudibleAlarm
/etc/ha.d/resource.d/Delay
/etc/ha.d/resource.d/Filesystem
/etc/ha.d/resource.d/ICP
/etc/ha.d/resource.d/IPaddr #将VIP配置在某一个被称为活动节点的节点上去,而且能监控ip地址是否生效的
/etc/ha.d/resource.d/IPaddr2
/etc/ha.d/resource.d/IPsrcaddr
/etc/ha.d/resource.d/IPv6addr
/etc/ha.d/resource.d/LVM
/etc/ha.d/resource.d/LVSSyncDaemonSwap
/etc/ha.d/resource.d/LinuxSCSI
/etc/ha.d/resource.d/MailTo
/etc/ha.d/resource.d/OCF
/etc/ha.d/resource.d/Raid1
/etc/ha.d/resource.d/SendArp
/etc/ha.d/resource.d/ServeRAID
/etc/ha.d/resource.d/WAS
/etc/ha.d/resource.d/WinPopup
/etc/ha.d/resource.d/Xinetd
/etc/ha.d/resource.d/apache
/etc/ha.d/resource.d/db2
/etc/ha.d/resource.d/hto-mapfuncs
/etc/ha.d/resource.d/ids
/etc/ha.d/resource.d/portblock
....................
十)配置 heartbeat 的配置文件
在 第一个节点192.168.0.45 (第二个节点 192.168.0.55 同理)
配置文件三个:
1),密钥文件,600权限,authkeys
2),heartbeat服务的配置文件ha.cf,,,heartbeat的Messaging Layer配置文件
3),资源管理配置文件,,heartbeat 提供两个资源管理器,haresources(默认?)和crm
haresources的配置文件就叫 haresources
[root@node1 ~]# cd /etc/ha.d
[root@node1 ha.d]#
[root@node1 ha.d]# pwd
/etc/ha.d
[root@node1 ha.d]#
[root@node1 ha.d]# ls #没看到配置文件
harc rc.d README.config resource.d shellfuncs
[root@node1 ha.d]#
[root@node1 ha.d]# ls /usr/share/doc/heartbeat-2.1.4/ #样例配置文件
apphbd.cf faqntips.html haresources Requirements.html
authkeys faqntips.txt hb_report.html Requirements.txt
AUTHORS GettingStarted.html hb_report.txt rsync.html
ChangeLog GettingStarted.txt heartbeat_api.html rsync.txt
COPYING ha.cf heartbeat_api.txt startstop
COPYING.LGPL HardwareGuide.html logd.cf
DirectoryMap.txt HardwareGuide.txt README
[root@node1 ha.d]#
[root@node1 ha.d]# cp /usr/share/doc/heartbeat-2.1.4/{authkeys,ha.cf,haresources} /etc/ha.d #复制样例配置文件
[root@node1 ha.d]#
[root@node1 ha.d]# pwd
/etc/ha.d
[root@node1 ha.d]# ls #有三个配置文件了
authkeys ha.cf harc haresources rc.d README.config resource.d shellfuncs
[root@node1 ha.d]#
[root@node1 ha.d]# ls -la
总计 104
drwxr-xr-x 4 root root 4096 11-26 09:49 .
drwxr-xr-x 108 root root 12288 11-26 09:33 ..
-rw-r--r-- 1 root root 645 11-26 09:49 authkeys
-rw-r--r-- 1 root root 10539 11-26 09:49 ha.cf
-rwxr-xr-x 1 root root 745 2010-03-21 harc
-rw-r--r-- 1 root root 5905 11-26 09:49 haresources
drwxr-xr-x 2 root root 4096 11-25 17:05 rc.d
-rw-r--r-- 1 root root 692 2010-03-21 README.config
drwxr-xr-x 2 root root 4096 11-25 17:05 resource.d
-rw-r--r-- 1 root root 7862 2010-03-21 shellfuncs
[root@node1 ha.d]#
[root@node1 ha.d]# chmod 600 authkeys #改权限,为了安全
[root@node1 ha.d]#
[root@node2 ~]# dd if=/dev/random count=1 #成生一堆随机数 ( 可以用 # openssl rand -base64 )
R▒▒▒P ▒▒M▒▒d#▒▒}▒,▒^▒`▒▒,▒P▒▒▒v▒▒▒▒▒z▒k
=0+1 records in
0+1 records out
128 bytes (128 B) copied, 0.000163167 seconds, 784 kB/s
[root@node2 ~]#
[root@node2 ~]# dd if=/dev/random count=1 | md5sum #成生一堆随机数做md5编码 ,复制一下2e000b84542e11abd7a6d11e55736fba, 太长的话,其实会浪费系统性能资源的
0+1 records in
0+1 records out
128 bytes (128 B) copied, 8.8326e-05 seconds, 1.4 MB/s
2e000b84542e11abd7a6d11e55736fba -
[root@node2 ~]#
1)密钥文件 authkeys
[root@node1 ha.d]# vim authkeys
#auth 1 #使用第一种加密机制
#1 crc #循环冗余校验码 循环冗余检验(Cyclic Redundancy Check);这个不安全
#2 sha1 HI! #验证数据指纹的 一般用sha1 或 md5
#3 md5 Hello!
auth 1 #这里用1,下一行首部也用1,要对应,,,(用2的话,下一行首部也用2)
1 md5 2e000b84542e11abd7a6d11e55736fba
2)heartbeat服务的配置文件ha.cf,,,heartbeat的Messaging Layer配置文件
[root@node1 ha.d]# vim ha.cf #如果井号注释后面紧跟着单词文字,那么是可以直接去掉井号注释的
#对我们而言,只需改三项,两个node,及bcast(mcast,ucast)
#debugfile /var/log/ha-debug #调试文件
#logfile /var/log/ha-log #日志文件
#logfile /var/log/hearbeat.log
logfacility local0 #日志设施local0表示通过syslog来记录,那么上面的logfile 就不要开启了
#keepalive 2 #多少秒发一次心跳,默认单位是秒,也可以指定毫秒 1500ms means 1.5 seconds
keepalive 1
#deadtime 30 #死亡时间,当出现脑裂等之类的,多长时间看对方故障,认定对方死了;嫌长的话,可以改为5,,,10,,,秒,太短会误杀的吧
#warntime 10 #等 keepalive 1 ,,,等1秒钟看人家能不能发过来,不能马上挂,要多等一会儿,就是warntime
#initdead 120 #等第二个节点启动时要等多长时间,这些值不启用的话,其实默认就是这些值
#udpport 694 #heartbeat服务监听的udp端口
#baud 19200 #串行线缆的的发送速率
#serial /dev/ttyS0 # Linux #这几个都是串行设备
#serial /dev/cuaa0 # FreeBSD
#serial /dev/cuad0 # FreeBSD 6.x
#serial /dev/cua/a # Solaris
#bcast eth0 # Linux # bcast: broad cast 基于广播发送信息
bcast eth0 # Linux
#bcast eth1 eth2 # Linux
#bcast le0 # Solaris
#bcast le1 le2 # Solaris
#mcast eth0 225.0.0.1 694 1 0 # mcast: multi cast 基于多播(组播) 225.0.0.1是组播地址 694 是端口 1表示ttl值,只直接到达对方,如果经过路由器的话我们不允许的,因为我们两个节点在同一网段内 0是循环数,不用做任何循环,0跳,因为在同一个网段内,不用多出来一轮,否则这样子会导致在loopback上实现多播的,我们要禁止在loopback上实现多播 组播地址有哪些? 许多组播地址是预留的,不能随便使用
#ucast eth0 192.168.1.2 # ucast: Unique cast 基于单播 192.168.1.2 是对方的地址(如果单播的话,两个节点配置不一样) 一般两个节点才可以单播,节点多的话,单播很麻烦,只能一个一个单播,量太大了,如果一百个节点,那么每个信息报文都要发99次出去,会浪费大量时间和带宽
auto_failback on #原来故障节点又正常上线了,自动把资源转移回去
#stonith baytech /etc/ha.d/conf/stonith.baytech #定义stonith设备,我们没有设备,所以不用定义了
#下面演示了各种stonith的方式,怎么去连接对方主机的,怎么去stonith的等等,暂时马哥不讲,用到时再讲
#stonith_host * baytech 10.0.0.3 mylogin mysecretpassword
#stonith_host ken3 rps10 /dev/ttyS1 kathy 0
#stonith_host kathy rps10 /dev/ttyS1 ken3 0
#watchdog /dev/watchdog
#下面是配置几个节点,节点的名称
#node ken3
#node kathy
node node1.magedu.com #这里节点的名称一定要与 uname -n 保持一致
node node2.magedu.com
#ping 10.10.10.254 #万一另一个节点连不上,ping哪个节点 这叫 ping node
ping 192.168.0.1 #ping一下网关吧,可以认定网关是始终在线的
#ping_group group1 10.10.10.254 10.10.10.253 #万一另一个节点连不上,ping node 节点也连不上 就ping一个组里的节点,只要有一个ping通就可以,通常是与 ipfail 一起用的
#hbaping fc-card-name # hba ping 是为了光纤而使用的?没有光纤就不管它了 fc表示光纤?
#当集群中的一个节点宕机了,不能提供heartbeat集群服务了,我们停掉,还是尽可能恢复?我们是尽可能重启heartbeat的
#respawn userid /path/name/to/run
#respawn hacluster /usr/lib/heartbeat/ipfail #ipfail就是重启对应的节点
# deadping - dead time for ping nodes
#deadping 30 # ping node,如查ping不通的话,多长时间认定的确连不上ping node 了
#realtime off 打开调试之类的作用,意义不大
# api认证的
#apiauth ipfail uid=hacluster
#apiauth ccm uid=hacluster #ccm (cluster config manager 集群配置管理器)用不上,因为我们使用的是 haresources
#apiauth cms uid=hacluster #cms ( cluster manager service )用不上,因为我们使用的是 haresources
#apiauth ping gid=haclient uid=alanr,root
#apiauth default gid=haclient
#msgfmt classic/netstring #msgfmt ( message format )管理信息的格式
#下面两个表示可以把日志记录到其它主机上?
# use_logd yes/no
#conn_logd_time 60
#compression bz2 #集群事务信息发送的时候是不是压缩的,集群事务信息一共不到1k,再压一下,更小,没必要
#compression_threshold 2 # 大于2KB才压缩
3),资源管理配置文件,,heartbeat 提供两个资源管理器,haresources(默认?)和crm haresources的配置文件就叫 haresources
[root@node1 ha.d]# pwd
/etc/ha.d
[root@node1 ha.d]#
[root@node1 ha.d]# vim haresources
#每一行用来定义一个集群服务
#node1 10.0.0.170 Filesystem::/dev/sda1::/data1::ext2 #node1是主节点(活动节点)的名称,要跟#uname -n 保持一致,要与ha.cf的节点名称保持一致,10.0.0.170是vip(当然它是一个资源),,, Filesystem::/dev/sda1::/data1::ext2是文件系统,,也是一个资源,自动挂载哪一个设备到哪一个目录,并指定文件系统类型,Filesystem是一个资源代理,可以自动配置资源的,每个资源代理都是可以接受参数的,后面的参数用两个冒号隔开参数 资源间使用空格隔开 资源的参数使用双冒号隔开
#
# Regarding the node-names in this file:
#
# They must match the names of the nodes listed in ha.cf, which in turn
# must match the `uname -n` of some node in the cluster. So they aren't
# virtual in any sense of the word.
#
#just.linux-ha.org 135.9.216.110 135.9.215.111 135.9.216.112 httpd #有多个vip 135.9.216.110 135.9.215.111 135.9.216.112 ,httpd是服务,这里把服务说成是资源,位于/etc/rc.d/init.d 下面,,,集群服务启动的时候,会一直找 /etc/ha.d/resource.d/目录下找资源,找不到就到/etc/rc.d/init.d 下面找,/etc/rc.d/init.d 下面都是LSB格式的,都可以用作资源代理的,
#-------------------------------------------------------------------
#
# One service address, with the subnet, interface and bcast addr
# explicitly defined.
# If you wished to tell it that the broadcast address for this subnet
# was 135.9.8.210, then you would specify that this way:
# IPaddr::135.9.8.7/24/135.9.8.210 #资源代理 手动配置的 作为一个参数来使用的,所以只使用了一次双冒号.彼此间用斜线隔开,是作为一个参数传递给IPaddr的,135.9.8.210 是广播地址
If you wished to tell it that the interface to add the address to
# is eth0, then you would need to specify it this way:
# IPaddr::135.9.8.7/24/eth0 #IPaddr配置,后面135.9.8.7是vip,24是掩码,eth0表示配置在哪个网卡别名上
# And this way to specify both the broadcast address and the
# interface:
# IPaddr::135.9.8.7/24/eth0/135.9.8.210 #这个最后还可以跟上广播地址 ???
[root@node2 ~]# ls /etc/ha.d/resource.d/
apache hto-mapfuncs IPsrcaddr MailTo ServeRAID
AudibleAlarm ICP IPv6addr OCF WAS
db2 ids LinuxSCSI portblock WinPopup
Delay IPaddr LVM Raid1 Xinetd
Filesystem(资源代理) IPaddr2 LVSSyncDaemonSwap SendArp
[root@node2 ~]#
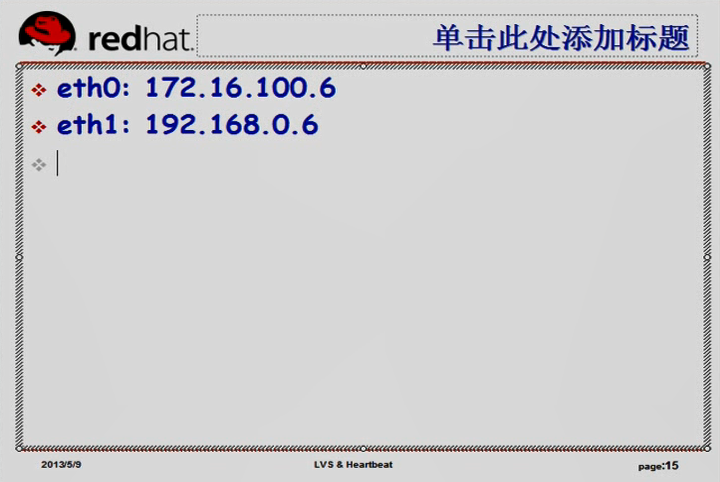
eth0: 172.16.100.6
eth1: 192.168.0.6
配置vip的时候,尽可能配置成,,,看vip与哪个网卡上的地址在同一网段,vip就配置在对应的网卡上的别名上 (比如 这里vip是 172.16.0.20,就配置在 eth0 (eth0:0) 上 ,,因为 172.16.0.20与172.16.100.6在同一个网段 )
[root@node1 ha.d]# pwd
/etc/ha.d
[root@node1 ha.d]# ls rc.d
ask_resources hb_takeover ip-request ip-request-resp status
[root@node1 ha.d]# ls resource.d/
apache Filesystem IPaddr(ifconfig命令来配置资源代理) LinuxSCSI OCF ServeRAID
AudibleAlarm hto-mapfuncs IPaddr2(ip addr命令来配置资源代理,建议使用它,功能更强大) LVM portblock WAS
db2 ICP IPsrcaddr LVSSyncDaemonSwap Raid1 WinPopup
Delay ids IPv6addr MailTo SendArp Xinetd
[root@node1 ha.d]#
[root@node1 ha.d]# ls /usr/lib/heartbeat #这个目录里面有很多与heatbeat相关的管理类命令和脚本
api_test crm_primitive.pyc hb_setsite ocf-shellfuncs
apphbd crm_primitive.pyo hb_setweight pengine
apphbtest crm_utils.py hb_standby pingd
atest crm_utils.pyc hb_takeover plugins
attrd crm_utils.pyo heartbeat quorumd
base64_md5_test cts ipctest quorumdtest
BasicSanityCheck dopd ipctransientclient ra-api-1.dtd
ccm drbd-peer-outdater ipctransientserver recoverymgrd
ccm_testclient findif(全称是 find ifconfig? 这个脚本去找vip,在同一网关的位置,配置在网卡别名上) ipfail req_resource
cib ha_config logtest ResourceManager
cibmon ha_logd lrmadmin send_arp
clmtest ha_logger lrmd stonithd
crm_commands.py ha_propagate lrmtest stonithdtest
crm_commands.pyc haresources2cib.py mach_down tengine
crm_commands.pyo haresources2cib.pyc mgmtd TestHeartbeatComm
crmd haresources2cib.pyo mgmtdtest transient-test.sh
crm.dtd hb_addnode mlock ttest
crm_primitive.py hb_delnode ocf-returncodes utillib.sh
[root@node1 ha.d]#
十二)装上 web服务
在 第一个节点192.168.0.45 (第二个节点 192.168.0.55 同理)

我的电脑 web服务已装好

http://192.168.0.45/index.html

[root@node1 ha.d]# locate index.html | xargs grep "RS1.magedu.com"
/www/a.org/index.html:RS1.magedu.com
我这里httpd是在 /www/a.org/index.html 下
[root@node1 ha.d]#
[root@node1 ha.d]# echo "<h1>node1.magedu.com</h1>" >> /www/a.org/index.html
[root@node1 ha.d]#
httpd 服务 (任何集群服务,这里即资源),注意一定要手动启动,不能让它自动启动
http://192.168.0.45/index.html

服务没问题,停掉 httpd
[root@node1 ha.d]# service httpd stop
停止 httpd: [确定]
[root@node1 ha.d]#
[root@node1 ha.d]# chkconfig httpd off #不能开机启动 不能开机自启动
[root@node1 ha.d]#
[root@node1 ha.d]# pwd
/etc/ha.d
[root@node1 ha.d]#
[root@node1 ha.d]# vim haresources
#一定要跟#uname -n 保持一致,但是它建议短格式的名称
#手动配置vip,只有一个网卡,可以不使用eth0,甚至可以不用加IPaddr的,广播地址不加了
#httpd服务资源 所有的 /etc/rc.d/init.d 下面的LSB的脚本一般都不接受参数,本身都自动启动的,就这是它跟OCF的区别
node1.magedu.com IPaddr::192.168.0.50/24/eth0 httpd
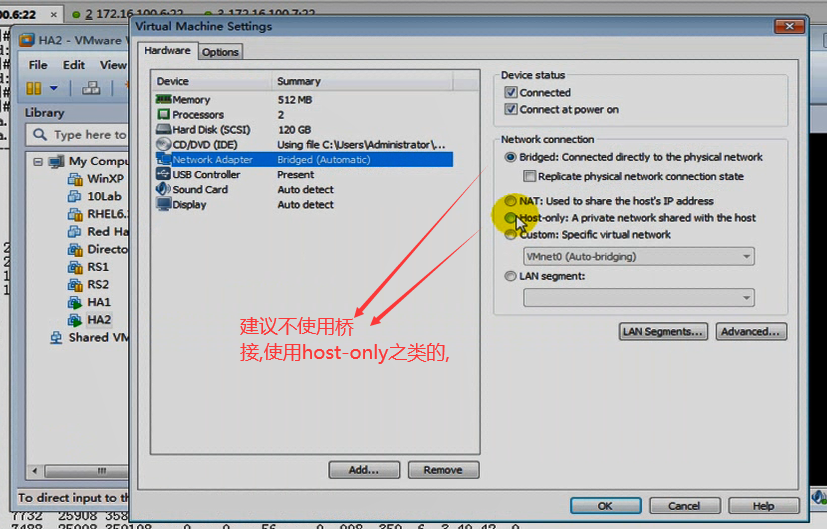
建议不使用桥接,使用host-only之类的,不然的话,每个人都互相发送心跳信息,因为启用了日志功能,所以发送大量相关的日志信息,使得硬盘狂转,
三个配置文件在两个节点( 192.168.20.45 192.168.0.55 )一模一样,都复制到另一个节点(192.168.0.55)吧
[root@node1 ha.d]# scp -p authkeys ha.cf haresources node2:/etc/ha.d #-p 保留它原来的属性,属主,时间等
The authenticity of host 'node2 (192.168.0.55)' can't be established.
RSA key fingerprint is ae:fe:80:46:96:5b:2a:94:5e:8e:0c:ec:86:eb:e1:ee.
Are you sure you want to continue connecting (yes/no)? yes
Warning: Permanently added 'node2' (RSA) to the list of known hosts.
authkeys 100% 691 0.7KB/s 00:00
ha.cf 100% 10KB 10.4KB/s 00:00
haresources 100% 5959 5.8KB/s 00:00
[root@node1 ha.d]#
[root@node1 ha.d]# service heartbeat start #启动第一个节点heartbeat集群服务
logd is already running
Starting High-Availability services:
2020/11/27_09:54:31 INFO: Resource is stopped
[确定]
[root@node1 ha.d]#
[root@node1 ha.d]# ssh node2 'service heartbeat start' #启动另一个节点的服务,一般必须要远程启动
Starting High-Availability services:
2020/11/26_03:51:38 INFO: Resource is stopped
[确定]
[root@node1 ha.d]#
[root@node1 ha.d]# tail -f /var/log/messages #看日志
Nov 27 09:19:39 node1 setroubleshoot: SELinux is preventing postdrop (logwatch_t) "write" to /var/spool/postfix/maildrop/3957113856B (var_spool_t). For complete SELinux messages. run sealert -l 6f03c3d5-2720-4d4d-96b7-b8af4571245d
Nov 27 09:19:39 node1 setroubleshoot: SELinux is preventing postdrop (logwatch_t) "setattr" to ./3957113856B (var_spool_t). For complete SELinux messages. run sealert -l 52ae3cf1-6504-46a2-9d15-0f05eef1d3d0
Nov 27 09:19:39 node1 setroubleshoot: SELinux is preventing postdrop (logwatch_t) "getattr" to /var/spool/postfix/public/pickup (var_spool_t). For complete SELinux messages. run sealert -l 2ab2c8b1-0c02-4226-8b7f-ba7b5bf58cd4
Nov 27 09:19:39 node1 setroubleshoot: SELinux is preventing postdrop (logwatch_t) "write" to pickup (var_spool_t). For complete SELinux messages. run sealert -l b0c30e75-bad6-421f-ad5a-a6346f66f75c
Nov 27 09:20:00 node1 rhsmd: In order for Subscription Manager to provide your system with updates, your system must be registered with the Customer Portal. Please enter your Red Hat login to ensure your system is up-to-date.
Nov 27 09:54:31 node1 heartbeat: [13869]: info: Version 2 support: false
Nov 27 09:54:31 node1 heartbeat: [13869]: WARN: Logging daemon is disabled --enabling logging daemon is recommended
Nov 27 09:54:31 node1 heartbeat: [13869]: info: **************************
Nov 27 09:54:31 node1 heartbeat: [13869]: info: Configuration validated. Starting heartbeat 2.1.4
Nov 27 09:54:31 node1 heartbeat: [13869]: info: heartbeat: already running [pid 4588].
在主节点 192.168.0.45 上
[root@node1 ha.d]# netstat -tnlp | grep 80 #我这边80没启动
tcp 0 0 0.0.0.0:32803 0.0.0.0:* LIST
[root@node1 ha.d]#
马哥 这边 80 启动了

[root@node1 ha.d]# ifconfig # 没看到 eth0:0
eth0 Link encap:Ethernet HWaddr 00:0C:29:3D:B0:3C
inet addr:192.168.0.45 Bcast:192.168.0.255 Mask:255.255.255.0
inet6 addr: fe80::20c:29ff:fe3d:b03c/64 Scope:Link
UP BROADCAST RUNNING MULTICAST MTU:1500 Metric:1
RX packets:14114 errors:0 dropped:0 overruns:0 frame:0
TX packets:16913 errors:0 dropped:0 overruns:0 carrier:0
collisions:0 txqueuelen:1000
RX bytes:2044054 (1.9 MiB) TX bytes:3333639 (3.1 MiB)
Interrupt:67 Base address:0x2000
lo Link encap:Local Loopback
inet addr:127.0.0.1 Mask:255.0.0.0
inet6 addr: ::1/128 Scope:Host
UP LOOPBACK RUNNING MTU:16436 Metric:1
RX packets:74 errors:0 dropped:0 overruns:0 frame:0
TX packets:74 errors:0 dropped:0 overruns:0 carrier:0
collisions:0 txqueuelen:0
RX bytes:5828 (5.6 KiB) TX bytes:5828 (5.6 KiB)
[root@node1 ha.d]#
马哥 这边看到了 eth0:0
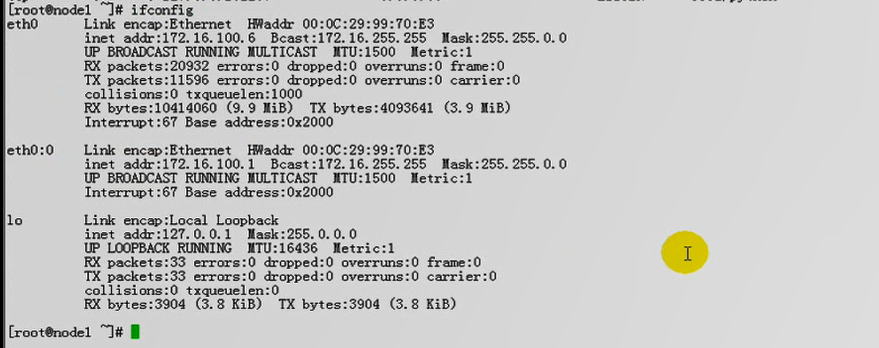
我是不是防火墙没有清空,清空掉防火墙就好了(192.168.0.45 192.168.0.55 两个节点都要清空)
#iptables -F
主机节点 (192.168.0.45) 上
[root@node1 ~]# netstat -tnlp | grep 80 # httpd 运行在这个主节点上
tcp 0 0 0.0.0.0:32803 0.0.0.0:* LISTEN -
tcp 0 0 :::80 :::* LISTEN 5220/httpd
[root@node1 ~]#
[root@node1 ~]# ifconfig #是vip地址
eth0 Link encap:Ethernet HWaddr 00:0C:29:3D:B0:3C
inet addr:192.168.0.45 Bcast:192.168.0.255 Mask:255.255.255.0
inet6 addr: fe80::20c:29ff:fe3d:b03c/64 Scope:Link
UP BROADCAST RUNNING MULTICAST MTU:1500 Metric:1
RX packets:22913 errors:0 dropped:0 overruns:0 frame:0
TX packets:11616 errors:0 dropped:0 overruns:0 carrier:0
collisions:0 txqueuelen:1000
RX bytes:3123863 (2.9 MiB) TX bytes:2277158 (2.1 MiB)
Interrupt:67 Base address:0x2000
eth0:0 Link encap:Ethernet HWaddr 00:0C:29:3D:B0:3C
inet addr:192.168.0.50 Bcast:192.168.0.255 Mask:255.255.255.0
UP BROADCAST RUNNING MULTICAST MTU:1500 Metric:1
Interrupt:67 Base address:0x2000
lo Link encap:Local Loopback
inet addr:127.0.0.1 Mask:255.0.0.0
inet6 addr: ::1/128 Scope:Host
UP LOOPBACK RUNNING MTU:16436 Metric:1
RX packets:74 errors:0 dropped:0 overruns:0 frame:0
TX packets:74 errors:0 dropped:0 overruns:0 carrier:0
collisions:0 txqueuelen:0
RX bytes:5828 (5.6 KiB) TX bytes:5828 (5.6 KiB)
[root@node1 ~]#
http://192.168.0.50/index.html #可以正常访问

让节点一 192.168.1.45 出现故障 ,看节点二 192.168.1.55 能不能取回资源
让 节点一 192.168.1.45 iptables 拒绝所有,会dead什么的,会有很长时间
heartbeat提供了测试脚本,可以直接实现资源转移的
[root@node1 ~]# cd /usr/lib/heartbeat
[root@node1 heartbeat]# ls
api_test crm_primitive.pyc hb_setsite ocf-shellfuncs
apphbd crm_primitive.pyo hb_setweight pengine
apphbtest crm_utils.py hb_standby( hb 就是 heartbeat 的略写,把自己转换成备节点,即对方成为主节点了) pingd
atest crm_utils.pyc hb_takeover plugins
attrd crm_utils.pyo heartbeat quorumd
base64_md5_test cts ipctest quorumdtest
BasicSanityCheck dopd ipctransientclient ra-api-1.dtd
ccm drbd-peer-outdater ipctransientserver recoverymgrd
ccm_testclient findif ipfail req_resource
cib ha_config logtest ResourceManager
cibmon ha_logd lrmadmin send_arp
clmtest ha_logger lrmd stonithd
crm_commands.py ha_propagate lrmtest stonithdtest
crm_commands.pyc haresources2cib.py mach_down tengine
crm_commands.pyo haresources2cib.pyc mgmtd TestHeartbeatComm
crmd haresources2cib.pyo mgmtdtest transient-test.sh
crm.dtd hb_addnode mlock ttest
crm_primitive.py hb_delnode ocf-returncodes utillib.sh
[root@node1 heartbeat]#
[root@node1 heartbeat]# pwd
/usr/lib/heartbeat
[root@node1 heartbeat]#
[root@node1 heartbeat]# ./hb_standby #自己弄成故障 转移节点资源
2020/11/27_12:29:09 Going standby [all].
[root@node1 heartbeat]#
[root@node1 heartbeat]# tail -f /var/log/messages #看日志
Nov 27 12:29:10 node1 avahi-daemon[5161]: Withdrawing address record for 192.168.0.50 on eth0.
Nov 27 12:29:10 node1 avahi-daemon[5161]: Leaving mDNS multicast group on interface eth0.IPv4 with address 192.168.0.50.
Nov 27 12:29:10 node1 IPaddr[6036]: INFO: Success
Nov 27 12:29:10 node1 heartbeat: [5957]: info: all HA resource release completed (standby).
Nov 27 12:29:10 node1 heartbeat: [4613]: info: Local standby process completed [all].
Nov 27 12:29:10 node1 avahi-daemon[5161]: Joining mDNS multicast group on interface eth0.IPv4 with address 192.168.0.45.
Nov 27 12:29:11 node1 heartbeat: [4613]: WARN: 1 lost packet(s) for [node2.magedu.com] [5141:5143]
Nov 27 12:29:11 node1 heartbeat: [4613]: info: remote resource transition completed.
Nov 27 12:29:11 node1 heartbeat: [4613]: info: No pkts missing from node2.magedu.com!
Nov 27 12:29:11 node1 heartbeat: [4613]: info: Other node completed standby takeover of all resources. (其它节点接管资源)
#在第二个节点上 192.168.0.55
[root@node2 ~]# ifconfig #看到了vip 192.168.0.50
eth0 Link encap:Ethernet HWaddr 00:0C:29:CB:A5:7F
inet addr:192.168.0.55 Bcast:192.168.0.255 Mask:255.255.255.0
inet6 addr: fe80::20c:29ff:fecb:a57f/64 Scope:Link
UP BROADCAST RUNNING MULTICAST MTU:1500 Metric:1
RX packets:26030 errors:0 dropped:0 overruns:0 frame:0
TX packets:12463 errors:0 dropped:0 overruns:0 carrier:0
collisions:0 txqueuelen:1000
RX bytes:3490451 (3.3 MiB) TX bytes:2458233 (2.3 MiB)
Interrupt:67 Base address:0x2000
eth0:0 Link encap:Ethernet HWaddr 00:0C:29:CB:A5:7F
inet addr:192.168.0.50 Bcast:192.168.0.255 Mask:255.255.255.0
UP BROADCAST RUNNING MULTICAST MTU:1500 Metric:1
Interrupt:67 Base address:0x2000
lo Link encap:Local Loopback
inet addr:127.0.0.1 Mask:255.0.0.0
inet6 addr: ::1/128 Scope:Host
UP LOOPBACK RUNNING MTU:16436 Metric:1
RX packets:74 errors:0 dropped:0 overruns:0 frame:0
TX packets:74 errors:0 dropped:0 overruns:0 carrier:0
collisions:0 txqueuelen:0
RX bytes:5828 (5.6 KiB) TX bytes:5828 (5.6 KiB)
[root@node2 ~]#
#在第二个节点上 192.168.0.55
[root@node2 ~]# netstat -tnlp | grep 80 #80端口也启动了
tcp 0 0 0.0.0.0:32803 0.0.0.0:* LISTEN -
tcp 0 0 :::80 :::* LISTEN 5510/httpd
[root@node2 ~]#
http://192.168.0.50/index.html #可看到第二个节点的资源

#在第二个节点上 192.168.0.55
[root@node2 ~]# /usr/lib/heartbeat/hb_standby # #自己弄成故障 转移节点资源
2020/11/26_06:31:53 Going standby [all].
[root@node2 ~]#
http://192.168.0.50/index.html # #可看到第一个节点的资源

再提供一个节点(192.168.0.75),让这个节点提供文件系统,让两个节点同时去挂载,看是否提供一模一样的网页页面
192.168.0.75节点提供NFS,让两个节点 192.168.0.45,192.168.0.55,都挂载,记住,关掉 两个节点 192.168.0.45,192.168.0.55的selinux(因为 selinux 可能会阻止挂载文件系统当作网页文件去访问的)
提供NFS的节点 192.168.0.75上
1)清空掉ipvsadm
[root@mail ~]# ipvsadm -C
[root@mail ~]# ipvsadm -L -n
IP Virtual Server version 1.2.1 (size=4096)
Prot LocalAddress:Port Scheduler Flags
-> RemoteAddress:Port Forward Weight ActiveConn InActConn
[root@mail ~]#
2)#创建 NFS共享文件夹 #输出去
[root@mail ~]# mkdir -p /web/htdocs #创建 NFS共享文件夹
[root@mail ~]#
[root@mail ~]# vim /etc/exports #输出去
/shared 192.168.1.0/24(rw,all_squash,anonuid=510,anongid=510)
#/var/ftp 192.168.1.0/24(ro)
/web/htdocs 192.168.0.0/24(ro)
提供NFS的节点 192.168.0.75上
[root@mail ~]# vim /web/htdocs/index.html
nfs server
3)启动NFS服务
[root@mail ~]# service nfs restart
关闭 NFS mountd: [确定]
关闭 NFS 守护进程: [确定]
关闭 NFS quotas: [确定]
关闭 NFS 服务: [确定]
启动 NFS 服务: [确定]
关掉 NFS 配额: [确定]
启动 NFS 守护进程: [确定]
启动 NFS mountd: [确定]
Stopping RPC idmapd: [确定]
正在启动 RPC idmapd: [确定]
[root@mail ~]#
以前做的关于arp_ignore,arp_announce 看看是不是 默认的 0
[root@mail ~]# cat /proc/sys/net/ipv4/conf/eth0/arp_ignore
0
[root@mail ~]# cat /proc/sys/net/ipv4/conf/eth0/arp_announce
0
[root@mail ~]# cat /proc/sys/net/ipv4/conf/all/arp_announce
0
[root@mail ~]# cat /proc/sys/net/ipv4/conf/all/arp_ignore
0
[root@mail ~]#
对两个高可用服务的节点都能ping 通
[root@mail ~]# ping 192.168.0.45
PING 192.168.0.45 (192.168.0.45) 56(84) bytes of data.
64 bytes from 192.168.0.45: icmp_seq=1 ttl=64 time=0.244 ms
64 bytes from 192.168.0.45: icmp_seq=2 ttl=64 time=0.244 ms
64 bytes from 192.168.0.45: icmp_seq=3 ttl=64 time=0.193 ms
--- 192.168.0.45 ping statistics ---
3 packets transmitted, 3 received, 0% packet loss, time 1999ms
rtt min/avg/max/mdev = 0.193/0.227/0.244/0.024 ms
[root@mail ~]# ping 192.168.0.55
PING 192.168.0.55 (192.168.0.55) 56(84) bytes of data.
64 bytes from 192.168.0.55: icmp_seq=1 ttl=64 time=0.159 ms
64 bytes from 192.168.0.55: icmp_seq=2 ttl=64 time=0.115 ms
64 bytes from 192.168.0.55: icmp_seq=3 ttl=64 time=0.218 ms
--- 192.168.0.55 ping statistics ---
3 packets transmitted, 3 received, 0% packet loss, time 2000ms
rtt min/avg/max/mdev = 0.115/0.164/0.218/0.042 ms
[root@mail ~]#
[root@mail ~]# showmount -e 192.168.0.75 #说明可以看到共享的目录
Export list for 192.168.0.75:
/shared 192.168.1.0/24
/web/htdocs 192.168.0.0/24
[root@mail ~]#
停掉两个节点的heartbeat服务,
在第一个节点 192.168.0.45的执行
[root@node1 heartbeat]# ssh node2 '/etc/init.d/heartbeat stop' #先停掉次节点
Stopping High-Availability services:
[确定]
[root@node1 heartbeat]#
[root@node1 heartbeat]# ifconfig
eth0 Link encap:Ethernet HWaddr 00:0C:29:3D:B0:3C
inet addr:192.168.0.45 Bcast:192.168.0.255 Mask:255.255.255.0
inet6 addr: fe80::20c:29ff:fe3d:b03c/64 Scope:Link
UP BROADCAST RUNNING MULTICAST MTU:1500 Metric:1
RX packets:43774 errors:0 dropped:0 overruns:0 frame:0
TX packets:23181 errors:0 dropped:0 overruns:0 carrier:0
collisions:0 txqueuelen:1000
RX bytes:6075428 (5.7 MiB) TX bytes:4556752 (4.3 MiB)
Interrupt:67 Base address:0x2000
eth0:0 Link encap:Ethernet HWaddr 00:0C:29:3D:B0:3C
inet addr:192.168.0.50 Bcast:192.168.0.255 Mask:255.255.255.0
UP BROADCAST RUNNING MULTICAST MTU:1500 Metric:1
Interrupt:67 Base address:0x2000
lo Link encap:Local Loopback
inet addr:127.0.0.1 Mask:255.0.0.0
inet6 addr: ::1/128 Scope:Host
UP LOOPBACK RUNNING MTU:16436 Metric:1
RX packets:74 errors:0 dropped:0 overruns:0 frame:0
TX packets:74 errors:0 dropped:0 overruns:0 carrier:0
collisions:0 txqueuelen:0
RX bytes:5828 (5.6 KiB) TX bytes:5828 (5.6 KiB)
[root@node1 heartbeat]#
[root@node1 heartbeat]# service heartbeat stop #再停自己主节点
Stopping High-Availability services:
[确定]
[root@node1 heartbeat]#
第一个节点 192.168.0.45
[root@node2 ~]# setenforce 0 #确保 selinux 未启用
[root@node2 ~]# getenforce
Permissive
[root@node2 ~]#
第二个节点 192.168.0.55
[root@node2 ~]# setenforce 0 #确保 selinux 未启用
[root@node2 ~]# getenforce
Permissive
[root@node2 ~]#
第一个节点 192.168.0.45
[root@node1 heartbeat]# mount 192.168.0.75:/web/htdocs /mnt #挂载一下
[root@node1 heartbeat]# ls /mnt
index.html
[root@node1 heartbeat]#
[root@node1 heartbeat]# umount /mnt #如果 # ls /mnt 看不到东西,可能是先挂载了,然后再在 192.168.0.75:/web/htdocs里面建文件的,我们可以 先卸载,再挂载 然后 ls /mnt 就可以看到 192.168.0.75:/web/htdocs 里面的index.html
[root@node1 heartbeat]# mount 192.168.0.75:/web/htdocs /mnt
[root@node1 heartbeat]# cat /mnt/index.html #没问题
nfs server
[root@node1 heartbeat]#
[root@node1 heartbeat]# umount /mnt #先卸载掉吧,我们只是手动测试挂载,真正使用高可用集群服务时是不能手动挂载的
[root@node1 heartbeat]#
在第一个节点 192.168.0.45
[root@node1 heartbeat]# cd /etc/ha.d
[root@node1 ha.d]# vim haresources
#资源配置顺序很关键
#先是vip,再是文件系统(Filesystem表示文件系统资源,192.168.0.75:/web/htdocs是远程设备, /www/a.org是挂载点 nfs 是文件系统) ,再是httpd服务
node1.magedu.com IPaddr::192.168.0.50/24/eth0 Filesystem::192.168.0.75:/web/htdocs::/www/a.org::nfs httpd
[root@node1 ha.d]# scp -p haresources node2:/etc/ha.d/ #把haresources复制到另一个节点 192.168.0.55 上
haresources 100% 6013 5.9KB/s 00:00
[root@node1 ha.d]#
在第一个节点 192.168.0.45
[root@node1 ha.d]# service heartbeat start #启动主节点 heartbeat 服务
Starting High-Availability services:
2020/11/27_14:03:44 INFO: Resource is stopped
[确定]
[root@node1 ha.d]# ssh node2 'service heartbeat start' #启动次节点 heartbeat 服务
Starting High-Availability services:
2020/11/26_07:59:22 INFO: Resource is stopped
[确定]
[root@node1 ha.d]#
[root@node1 ha.d]# tail -f /var/log/messages #看日志
Nov 27 14:04:28 node1 heartbeat: [7160]: info: remote resource transition completed.
Nov 27 14:04:28 node1 heartbeat: [7160]: info: node1.magedu.com wants to go standby [foreign]
Nov 27 14:04:29 node1 heartbeat: [7160]: info: standby: node2.magedu.com can take our foreign resources
Nov 27 14:04:29 node1 heartbeat: [7876]: info: give up foreign HA resources (standby).
Nov 27 14:04:29 node1 heartbeat: [7876]: info: foreign HA resource release completed (standby).
Nov 27 14:04:29 node1 heartbeat: [7160]: info: Local standby process completed [foreign].
Nov 27 14:04:29 node1 heartbeat: [7160]: WARN: 1 lost packet(s) for [node2.magedu.com] [12:14]
Nov 27 14:04:29 node1 heartbeat: [7160]: info: remote resource transition completed.
Nov 27 14:04:29 node1 heartbeat: [7160]: info: No pkts missing from node2.magedu.com!
Nov 27 14:04:29 node1 heartbeat: [7160]: info: Other node completed standby takeover of foreign resources.
[root@node1 ha.d]# netstat -tnlp | grep 80 #由下 80 端口启动了
tcp 0 0 0.0.0.0:32803 0.0.0.0:* LISTEN -
tcp 0 0 :::80 :::* LISTEN 7729/httpd
[root@node1 ha.d]#
[root@node1 ha.d]# ifconfig
eth0 Link encap:Ethernet HWaddr 00:0C:29:3D:B0:3C
inet addr:192.168.0.45 Bcast:192.168.0.255 Mask:255.255.255.0
inet6 addr: fe80::20c:29ff:fe3d:b03c/64 Scope:Link
UP BROADCAST RUNNING MULTICAST MTU:1500 Metric:1
RX packets:46784 errors:0 dropped:0 overruns:0 frame:0
TX packets:25591 errors:0 dropped:0 overruns:0 carrier:0
collisions:0 txqueuelen:1000
RX bytes:6493279 (6.1 MiB) TX bytes:4967323 (4.7 MiB)
Interrupt:67 Base address:0x2000
eth0:0 Link encap:Ethernet HWaddr 00:0C:29:3D:B0:3C
inet addr:192.168.0.50 Bcast:192.168.0.255 Mask:255.255.255.0
UP BROADCAST RUNNING MULTICAST MTU:1500 Metric:1
Interrupt:67 Base address:0x2000
lo Link encap:Local Loopback
inet addr:127.0.0.1 Mask:255.0.0.0
inet6 addr: ::1/128 Scope:Host
UP LOOPBACK RUNNING MTU:16436 Metric:1
RX packets:74 errors:0 dropped:0 overruns:0 frame:0
TX packets:74 errors:0 dropped:0 overruns:0 carrier:0
collisions:0 txqueuelen:0
RX bytes:5828 (5.6 KiB) TX bytes:5828 (5.6 KiB)
[root@node1 ha.d]#
访问vip 如下图 一切正常
http://192.168.0.50/index.html

在第一个节点 192.168.0.45
[root@node1 ha.d]# /usr/lib/heartbeat/hb_standby #让第一个节点挂掉
2020/11/27_14:14:00 Going standby [all].
[root@node1 ha.d]#
访问vip 如下图 照样一切正常
http://192.168.0.50/index.html

在第二节点上 可看到vip地址
[root@node2 ~]# ifconfig
eth0 Link encap:Ethernet HWaddr 00:0C:29:CB:A5:7F
inet addr:192.168.0.55 Bcast:192.168.0.255 Mask:255.255.255.0
inet6 addr: fe80::20c:29ff:fecb:a57f/64 Scope:Link
UP BROADCAST RUNNING MULTICAST MTU:1500 Metric:1
RX packets:45138 errors:0 dropped:0 overruns:0 frame:0
TX packets:23962 errors:0 dropped:0 overruns:0 carrier:0
collisions:0 txqueuelen:1000
RX bytes:6375243 (6.0 MiB) TX bytes:4725843 (4.5 MiB)
Interrupt:67 Base address:0x2000
eth0:0 Link encap:Ethernet HWaddr 00:0C:29:CB:A5:7F
inet addr:192.168.0.50 Bcast:192.168.0.255 Mask:255.255.255.0
UP BROADCAST RUNNING MULTICAST MTU:1500 Metric:1
Interrupt:67 Base address:0x2000
lo Link encap:Local Loopback
inet addr:127.0.0.1 Mask:255.0.0.0
inet6 addr: ::1/128 Scope:Host
UP LOOPBACK RUNNING MTU:16436 Metric:1
RX packets:74 errors:0 dropped:0 overruns:0 frame:0
TX packets:74 errors:0 dropped:0 overruns:0 carrier:0
collisions:0 txqueuelen:0
RX bytes:5828 (5.6 KiB) TX bytes:5828 (5.6 KiB)
[root@node2 ~]#
[root@mail ~]# netstat -tnlp | grep 80 # 80 端口在启用了
tcp 0 0 0.0.0.0:32803 0.0.0.0:* LISTEN -
tcp 0 0 :::80 :::* LISTEN 4669/httpd
[root@mail ~]#
[root@node2 ~]# mount
/dev/mapper/VolGroup00-LogVol00 on / type ext3 (rw)
proc on /proc type proc (rw)
sysfs on /sys type sysfs (rw)
devpts on /dev/pts type devpts (rw,gid=5,mode=620)
/dev/sda1 on /boot type ext3 (rw)
tmpfs on /dev/shm type tmpfs (rw)
/dev/mapper/myvg-mydata2 on /mydata2 type ext3 (rw)
none on /proc/sys/fs/binfmt_misc type binfmt_misc (rw)
sunrpc on /var/lib/nfs/rpc_pipefs type rpc_pipefs (rw)
nfsd on /proc/fs/nfsd type nfsd (rw)
192.168.0.75:/web/htdocs on /www/a.org type nfs (rw,addr=192.168.0.75) #可看到挂载nfs了
[root@node2 ~]#
